Detecting collisions within your game is a crucial element of both realism and functionality. In our level from the last tutorial you'll currently be able to walk through the trees and walk off the level itself which is neither useful nor realistic! Let's get that fixed with the use of Colliders.
Final Result Preview

Note: You'll come across the acronym "RMB" throughout this tut. I'm referring to clicking the "Right Mouse Button".
Step 1: Introducing Colliders
Detecting collisions within your game is a crucial element of both realism and functionality; currently walking around your level you'll be able to walk through the trees which isn't very realistic. Let's get that fixed with the use of Colliders.
Colliders are Components built in to Unity that provide collision detection using their various 'Bounding Boxes', the green lines shown surrounding the tree in the below image. The Mesh Collider however doesn't have any green lines surrounding in the image below it since it uses the Tree Mesh, outlined in blue.

When using Colliders the collision is handled for us, with the Collider calculating which part of the Bounding Box was intercepted first and controlling its reaction to the object(s) collided with. This data is stored and made available to us via several functions, allowing us to trigger more specific behaviour when objects enter, occupy and leave a bounding box should we need to. We'll explore some of these functions in this tutorial.
For now, however, let's use several colliders to simply prevent our player walking off the edge of the map.
Step 2: Using Colliders as Level Boundaries
Create an empty GameObject using the top menu, GameObject > Create Empty, and rename it 'Boundaries'. Make sure its Position within the Inspector is (0, 0, 0).
Duplicate it using either RMB > Duplicate or by Ctrl + D and rename it 'Bottom'. Drag 'Bottom' onto 'Boundaries' to make it a child of the Boundaries GameObject.
With 'Bottom' selected add a Box Collider Component using the top menu, Component > Physics > Box Collider, and within the Inspector set the Box Collider's Position and Centre values to those shown below:

Click the Y (Green) Axis of the Scene Gizmo within the top right hand corner of the Scene Window to transition the scene view into Top View, and zoom out so you can see your whole level as I have below:

Duplicate 'bottom' three times and rename them to 'Right', 'Left', and 'Top'. Select each one at a time and set their Box Collider Component's Position and Center values to those below.


You should now have surrounded your level on all 4 sides with Empty GameObjects, each with Box Colliders Components, similar to below. If you now run your game you'll find you can't fall off the map anymore.

Let's now put colliders to use in another situation...
Step 3: Stop Walking Through the Trees!
Currently, we can simply walk through the trees in our level which isn't too good. Here's what we're going to do...
We'll create a new Prefab with our chosen tree, apply and resize a Collider to fit the tree's trunk and then swap the tree we used within the terrains 'Place Trees' tool for the Prefab that has the Collider. Pretty straightforward right? Let's get started...
Within the Project Window select the Alder Tree within 'Terrain Assets / Trees Ambient-Occlusion /' and drag it into the scene; position it close to your First Person Controller so you can easily and quickly navigate to it.

With the tree selected within the Hierarchy add a Capsule Collider as a Component via the top menu, 'Component > Physics > Capsule Collider'.

The below dialog will appear, warning you that adding this component will break the connection to its original Prefab. That is, if you change the original Alder tree the changes won't be seen within this instance.
This isn't an issue for us so select 'Add' to confirm the adding of the Capsule Collider Component.

Click play and try and run through this particular tree and you'll find that you can't even get close to it because of the size of the capsulre colliders 'Bounding Box'.
With the tree selected, use the Inspector to adjust the colliders radius and centre point values so that it only occupies the trunk of the tree as shown below.
Don't forget to stop your game! Don't just pause it! Otherwise your changes will be undone when the game is stopped!
How nice of me to remind you :)

Run the game again and you should be able to walk right up to the tree but not through its trunk, perfect!
So, we now have a Tree that our user can't walk through -- however, we can still walk through all the other trees that were placed with the Terrain's Place Trees Tool. Let's replace those with the tree we've just added the Collider to. How will we do that? With the use of Prefabs.
Within the Project Window create a new folder and rename it 'Prefabs' and within it create a new Prefab and rename it 'tree-prefab'. Assign the tree with the Collider to the Prefab by selecting it within the Hierarchy and dragging it onto the Prefab. Finally, delete the tree from the Hierarchy.

We now have a tree with colliders all set up and ready to use; all that's left to do is select the Terrain in the Hierarchy and within the Inspector select the 'Place Trees' tool (which we used in the last tutorial) to place the trees over the terrain.

The current tree being placed over the map is the 'Alder' tree; select it and Click 'Edit Trees...' to bring up the Edit Tree Dialog Box. Click the circle to the right of the selected tree, in this case Alder, and select the tree-prefab from the Select GameObject dialog that appears.

All the trees will now be replaced with our tree that has the collider with it. To finish, select the terrain and at the bottom of the Inspector ensure 'Create Tree Collisions' is toggled on.

Now run the game again and you should collide with all of the trees that you've placed! If you have placed more than one type of tree, repeat the process for the other trees you have.
Step 4: Creating our Pickup Prefab
We're now going to begin developing a prefab for our pickup that will be scattered around the level for the player to collect. Download this Unity package to your Projects Asset folder and double click it to extract it.
The package will extract a Models folder complete with an .FBX model for our pickup, and add a new prefab 'pickup-prefab' within your Prefab folder.

Before the user collects the pickups however we must spawn them over the map. We could do this manually by dragging them from the Project Window onto the Terrain. However, it would be a little more interesting if they were to randomly spawn across the map at pre-determined spawn points... time to start scripting!
Step 5: A Quick Introduction to UnityScript
Unity provides several choices for programming in, JavaScript (UnityScript), C# and a form of Python - Boo. All three are equally fast and can interoperate. All three can make use of .NET libraries which support databases, regular expressions, XML, networking and so on. All three are also supported by MonoDevelop, we will however be using JavaScript (UnityScript).
At this stage previous programming experience would be helpful and will likely mean this section is a quick recap. For those of you new to programming I'd suggest checking out the Nettuts+ Javascript from Null series should you want to go beyond the basics with Unity. If there is enough interest I may publish a more in-depth tutorial for scripting in Unity, let me know in the comments...
For now, take a deep breath and let's dive straight in.
Variables
Variables are containers for information. They may be named anything you like but should be alphanumeric, begin with a lowercase letter, and be prefixed with the keyword 'var' as shown in the below example. For variable names of more than one word -- e.g. 'demo test' -- the camelBack / CamelCase Convention is used, resulting in 'demoTest'.
If you try to use a variable name already in use by Unity, like 'transform', you will get an error as variable names MUST be unique.
// basic variable declaration & assignment example
public var demo = 5;

// basic variable declaration example
public var demo;


function DemoFunction()
{
  // variable assignment within function
  demo = 5;
}
As demonstrated above, variables don't have to have a value assigned to them immediately upon declaration. They can be initialized or have a value assigned to them later on within a later part of the Script.
However, you should always define the data type of the information stored within the variable when it's declared so the compiler knows what data type it is dealing with and will be able to execute faster.
Some examples of common data types are:
// VARIABLE DATATYPE DECLARATION & ASSIGNMENT EXAMPLES

// String - list of characters within quotation marks
public var demo : String;
public var demo : String = "this is the variable 'playerSpeed' being assigned a String value";

// int - a whole number
public var demo : int;
public var demo : int = 100;

// Float - a decimal number
public var demo : float;
public var demo : float = 1.47;

// Boolean - true or false
public var demo : Boolean;
public var demo : Boolean = true;

// Array - a list of objects
public var demo : Array;
public var demo : Array = [];

// Vector3	- set of XYZ values
public var demo : Vector3;
public var demo : Vector3 = Vector3(1, 1, 1);
You can see some statistics on the performance brought via the use of Data Typing in this article on Performance Optimization.
So far all the above variables have been prefixed with the modifier 'public'. All 'public' variables will be available as parameters within the Inspector when the Script or GameObject the Script is attached to is selected and will also be available within other Scripts that have the Script attached as a component.
If you aren't going to change the value via the Inspector, or wish for it to not be available to other Scripts, then prefix it with the modifier 'private'.
// PUBLIC VARIABLES DECLARATION
public var demo : int;

// PRIVATE VARIABLES DECLARATION
private var demo : int;
If you wish to have a global variable you can use the 'static' modifier as shown below. This can be accessed from any other Script by using the Script's name followed by a dot and finally the variable name. This is called the 'dot syntax' and is demonstrated in the below script.
// GLOBAL (STATIC) VARIABLE DECLARATION
static var demo : int;

// USING DOT SYNTAX TO ACCESS STATIC VARIABLE
ScriptName.demo;
Functions
Functions define a series of instructions that can be called repeatedly within your script.
Like variables they must be alphanumeric but start with an Uppercase letter. If you try to use a function name already in use by Unity, like 'Update()', you will get an error as function SIGNATURES must be unique.
A function's SIGNATURE is made up of its name, its list of parameters, and its return type (if any). No two functions may have the same signature, although two functions may have the same name. Where two functions have the same name but different signatures this is called overloading, which we'll come to shortly.
Similarly to variable convention, functions of more than one word, like "demo function", use the CamelCase convention with a leading uppercase letter resulting in 'DemoFunction'. There are some cases where this is not the case, such as 'print(...)'.
To use or 'call' your function is it simply a matter of typing the function's name within your code followed by a pair of brackets '()'
// BASIC FUNCTION EXAMPLE
function DemoFunction()
{
  // instructions here
}

// CALLING BASIC FUNCTION
DemoFunction();
You can however have multiple functions with the same name but different parameters as demonstrated below ("overloading" the function). Functions can also have required and optional parameters as also demonstrated below:
// BASIC FUNCTION WITH PARAMATER
function DemoFunction(para:int)
{
  // instructions here
}

// CALLING BASIC FUNCTION WITH PARAMETER
DemoFunction(1);


// OVERLOADING 'DemoFunction' FUNCTION WITH MORE PARAMATERS
// NOTE THE SECOND PARAMETER IS OPTIONAL WITH A DEFAULT VALUE OF 0
function DemoFunction(para1:int, para2:String = "default parameter")
{
  // instructions here
}

// CALLING BASIC FUNCTION WITH DEFAULT PARAMETER
DemoFunction(1);


// CALLING BASIC FUNCTION WITH SPECIFIED PARAMETER
DemoFunction(1, "specified parameter");
Calling a function with parameters is simply a matter of entering the parameters within the brackets for the function to use, as shown above.
Event Function Execution Order
As a Script executes within Unity, there are several 'Event Functions' which are called in a specific order. You can use them control the behavior of your game. Let's have a look at the most popular ones, in order of execution, when starting within Unity:
Event Function: 'Awake()'
The 'Awake()' function is always called before any Start functions and also just after a prefab is instantiated.
Event Function: 'Start()'
The 'Start()' function is called before the first frame update only if the script instance is enabled.
Event Function: 'Update()'
The 'Update()' function is called every frame that the game is rendered, i.e. if your frame rate is 30fps (frames per second) then the function will be called 30 times per second. You should place most of your behavior code within this function, except anything which involves physics. It is worth noting that the Unity Player's frame rate can fluctuate at runtime, depending on the hardware it's running on and the computing required per frame. It is therefore crucial that your code within this function is as optimized as possible.
Event Function: 'LateUpdate()'
The 'LateUpdate()' function is called once per frame, after the 'Update()' function has finished. Any calculations that are performed in Update() will have completed when LateUpdate() begins.
Event Function: 'FixedUpdate()'
The 'FixedUpdate()' function is called within each physics step; it will keep in sync with Unity's physics engine. The code within this function should also be as optimized as possible.
Event Handler Function: 'OnApplicationQuit()'
The 'OnApplicationQuit' function is actually defined as an Event Handler; all Event Handlers begin with 'On'. It is called on all game objects when the application is quit. In the editor it is called when the user stops playmode. In the web player it is called when the web view is closed.
You can find more information about the Execution Order and the Update Order within the Unity Manual.
You'll begin to notice a lot of links to the Unity Manual, Unity Reference Manual and particularly the Unity Scripting Reference. These pages should be the first place you look should you wish to know more about a certain Component or a particular Function or Property. Learn to call them home.
Step 6: Our First Script - Spawning the Pickup
The time has finally come, it's time to create our first Script in Unity!
Creating the PickupController Script
Before writing any scripts, create a new Folder within the Project Window and rename it 'Scripts'.
Create a new Script by RMB on the Scripts folder and selecting 'Create > JavaScript', then use F2 to rename the script to 'PickupController'.

Double-click on the script to open it within Unity's default editor, which for those on PC is UniSciTe and for those on OSX is Unitron. We don't need the Update function which is added by default so go ahead and delete it. We're now ready to start scripting the spawning of our pickup.
Before we start, however, we need to choose the location where we would like our pickup to spawn; we'll do this using an Empty GameObject and retrieve the position of its Transform Component.
Adding the SpawnPoint
Use the top menu to add an Empty GameObject, GameObject > Create Empty, and within the Inspector set its position to (0, 0, 0) and rename it to 'PickupSpawnPoints'. This will be the parent object that will contain our spawnpoint(s) to help keep our Hierarchy organized.

When naming Scripts or GameObjects ensure you get the names EXACTLY as they are in the tutorial since they'll be used later on in our scripts and will otherwise return various errors.
Within the Hierarchy select the Player and then using the top menu add another Empty GameObject which will add an Empty GameObject to the scene at the position of the Player, rename it to 'spawnpoint' and drag it onto the PickupSpawnPoints GameObject to make PickupSpawnPoints the parent.

With the spawnpoint GameObject selected use the Transform Tools to move it in front of the player, as in the above screenshot, and ensure it is above the terrain.
To ensure our PickupController script can retrieve the GameObjects that are SpawnPoints we're going to use Tags...
Tagging the SpawnPoint
Tagging GameObjects is very similar to naming them, however there are a couple of extra useful functions available to us when using tags: GameObject.FindWithTag(...) and GameObject.FindGameObjectsWithTag(...).
Unity comes with several built-in Tags which you can find in the drop down Tag list at the top of the Inspector; you can also add your own which is what we're going to do now.
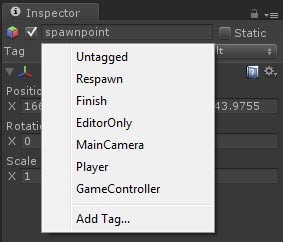
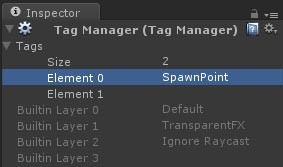
Access the Tag Manager by either selecting Add Tag at the bottom of the drop down Tag list or via the top menu, Edit > Project Settings > Tags.
To add a tag simply expand the Tags list, click in the next available element, and begin typing the name of the tag you'd like to add. Add 'SpawnPoint' into Element 0 as below.
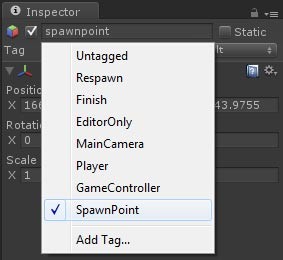
Now that we've added our 'SpawnPoint' Tag we have to go and apply it to our spawnpoint. Reselect the spawnpoint within the Hierarchy and apply the new 'SpawnPoint' tag from the drop down menu. Easy.
So, our spawnpoint is now all set up, time to start scripting!
Scripting our PickupController Script
Return to the PickupController Script and add the following code:
// the pickup prefab, assigned via the Inspector
public var pickupPrefab:GameObject;

// the spawnpoint that our pickup will be spawned at
private var spawnPoint:GameObject;


function Awake()
{
	// retrieve GameObject tagged as 'SpawnPoint' within the 'PickupSpawnPoints' GameObject which this script is a Component of
	spawnPoint = gameObject.FindWithTag("SpawnPoint");

	// spawn the pickup
	SpawnPickup();
}

function SpawnPickup()
{
	// retrieve the position and rotation of the pickup's spawn point
	var spawnedPickupPosition:Vector3 = spawnPoint.transform.position;
	var spawnedPickupRotation:Quaternion = spawnPoint.transform.rotation;

	// instantiate (create) the pickup prefab with the above position and rotation
	var spawnedPickup:GameObject = Instantiate(pickupPrefab, spawnedPickupPosition, spawnedPickupRotation);

	// set the spawned pickup as a child of the 'PickupSpawnPoints' gameobject that this script is a Component of
	spawnedPickup.transform.parent = spawnPoint.transform;
}
Have a glance over the comments and see if it makes sense. We have two variables: one public which can be assigned via the Inspector and one private which is assigned within the Awake function.
The Awake function, if you remember, is invoked when the script is being loaded; it retrieves our spawnpoint GameObject via its tag and assigns it to the spawnPoint variable of the script. SpawnPickup() is then called.
The SpawnPickup function retrieves the position and rotation of the spawnpoint and then Instantiates the pickupPrefab at the retrieved position and rotation.
The new clone of our pickupPrefab is returned by Instantiate(...) and stored as spawnedPickup and then made a child of the spawnPoint by assigning its parent property to the Transform Component of the spawnPoint. This isn't essential but is simply to keep our Hierarchy organized.
Although this script is complete and we've set up our spawnpoint, if you run the game right now nothing different will happen because we haven't attached the script as a Component to any of our GameObjects yet -- so it will never be executed.
Adding our PickupController Script as a Component
Adding a script as a Component of a GameObject is incredibly easy and can be done in either of two ways.
The first is to select the GameObject you wish to add the script as a Component of; this can be a GameObject within the Hierarchy OR a Prefab within the Project Window. You then simply click and drag the script you wish to add as a Component onto the Inspector and release and it will be added for you. Easy!
The second method is to simply drag the Script onto the name of the GameObject / Prefab you wish to add it to within either the Hierarchy or the Project Window. It's up to you which to use; I use both.
So we need to add our PickupController script as a Component of the PickupSpawnPoints GameObject -- do this using either of the above methods. The script should then appear within the Inspector when you select the PickupSpawnPoints GameObject as shown below:

If you now try running the game you'll get an error within the console in the bottom left corner of your screen, click it to view the error in more detail.

If you read the error it makes perfect sense: we haven't assigned our pickupPrefab variable, so when the script attempts to instantiate the variable there is nothing (null) to instantiate and so it throws an error.
To assign our pickup-prefab to the pickupPrefab variable using the Inspector there are two approaches. The first is via the Select GameObject Dialog Box available when you click the circle to the right of 'None (Game Object)' and the other is by simply dragging the Prefab onto the 'None (Game Object)' text.
Use one of the above methods to assign the pickup-prefab to the pickupPrefab variable of the PickupController Component of the PickupSpawnPoints GameObject.
If you now run the game the pickup will appear at the position of your spawnPoint -- you will, however, be able to walk straight through it!

Before being able to pick up the pickups let's make it a little more interesting and have multiple pickups spawning randomly at a range of spawnpoints... don't worry it's not as hard or as complex as it sounds!
Step 7: Spawning Multiple Pickups Randomly
Having only one pickup at one spawn point is rather plain and simple so let's alter our script to support an unlimited number of spawn points and spawn pickups at them randomly.
Adjusting our PickupController Script
Delete the variables currently defined at the top of your script and replace them with the below:
// the pickup prefab, assigned via the Inspector
public var pickupPrefab:GameObject;

// the number of pickups to have around the level at any one time
public var numberOfPickups:int = 2;

// the ARRAY of spawnpoints that our pickup will be spawned at
private var spawnPointList:GameObject[];

// array of which spawn points are currently available for spawning at
private var spawnIndexAvailableList:Array = [];

// variable to hold the total number of spawn points, saves having to recalculate
private var numberOfSpawnPoints:int;
So what changes have been made?
The first variable pickupPrefab has remained identical, but the private spawnPoint variable which was datatyped as GameObject has now become an Array of GameObjects so we can store multiple spawnpoints.
The spawnIndexAvailableList variable keeps track of which spawn points are available, i.e. don't have an pickup spawned at them, so multiple pickups aren't spawned in the same location.
Now delete and replace the current Awake() function with the one below:
function Awake()
{
	// retrieve GameObjects tagged as 'SpawnPoint' within the 'PickupSpawnPoints' GameObject which this script is a Component of
	spawnPointList = gameObject.FindGameObjectsWithTag("SpawnPoint");

	// retreive number of spawn points
	numberOfSpawnPoints = spawnPointList.length;

	// make sure number of pickups doesn't exceed number of spawn points
	if (numberOfPickups > numberOfSpawnPoints) numberOfPickups = numberOfSpawnPoints;

	// make all spawn points available by setting each index to true
	for (var i:int = 0; i < numberOfSpawnPoints; i++)
	{
		spawnIndexAvailableList[i] = true;
	}

	// spawn X amount of pickups according to numberOfPickups
	for (var j:int = 0; j < numberOfPickups; j++)
	{
		SpawnPickup();
	}
}
So this is a little more complex than before... let's take a look at what's going on.
The first change you'll notice is we're now using FindGameObjectsWithTag(...) which will retrieve ALL the GameObjects tagged as 'SpawnPoint', as opposed to FindWithTag(...) which will only return one.
The number of spawnpoints found is then saved as a variable to save having to recalculate it later in the script. To avoid any errors when spawning we check that the number of pickups we're going to spawn isn't greater than the number of spawn points.
We then set each element of the spawnIndexAvailableList to true as initially all the spawnpoints are available to be spawned at. Finally we spawn the pickups by calling SpawnPickup() within the for loop.
The last thing to do is to delete the current SpawnPickup function and replace it with the following:
function SpawnPickup()
{
	// generate a random integer to use as the index to select a spawn point from the list
	var randomSpawnIndex:int = Random.Range(0, numberOfSpawnPoints);

	// while the selected spawn index is unavailable regenerate another one
	while (!spawnIndexAvailableList[randomSpawnIndex])
	{
		randomSpawnIndex = Random.Range(0, numberOfSpawnPoints);
	}

	// retrieve the position and rotation of the pickups spawn point
	var spawnedPickupPosition:Vector3 = spawnPointList[randomSpawnIndex].transform.position;
	var spawnedPickupRotation:Quaternion = spawnPointList[randomSpawnIndex].transform.rotation;

	// instantiate (create) the pickup prefab with the above position and rotation
	var spawnedPickup:GameObject = Instantiate(pickupPrefab, spawnedPickupPosition, spawnedPickupRotation);

	// set the spawned pickup as a child of the 'PickupSpawnPoints' gameobject that this script is a Component of
	// this is so we can use SendMessageUpwards within scripts attached to the pickupPrefab to call functions within this script
	spawnedPickup.transform.parent = spawnPointList[randomSpawnIndex].transform;

	// set the name of the pickup as its index
	spawnedPickup.name = randomSpawnIndex.ToString();

	// make the spawn index unavailable to prevent another pickup being spawned in this position
	spawnIndexAvailableList[randomSpawnIndex] = false;
}
Again, this is quite different to before, so let's quickly run through what's now happening.
First we generate a random integer between 0 and numberOfSpawnPoints using Random.Range(...) which will be used to retrieve the spawnpoint at that index from the spawnPointList.
We then use a while loop to test whether that index is available and to keep regenerating a new index until one is available; this prevents more than one pickup being spawned in the same position.
Next we retrieve the position and rotation as we did in the previous version of this function, the only difference being that we're accessing the chosen spawnpoint's position and rotation via the Array rather than directly.
The instantiation of the object remains the same as before, as does the process of making the spawnedPickup a child of the spawnpoint (except for the reference via the Array of course).
We then set the name of the pickup as its index, using ToString() to convert the integer to a String value and finally set the generated index as unavailable by assigning false to that index of the Array.
Adding More Spawn Points
Now all that's left to do is to duplicate the spawnpoint within the Hierarchy (RMB > Duplicate or Ctrl + D) and position them around the level. Initially for testing I positioned four spawn points around the Player before duplicating more and positioning them further around the level.
I eventually added 25 spawn points around my scene and then used the Inspector to adjust the number of pickups within the PickupController to 15.

When you now run the game you should see more than one pickup spawned at different spawnpoints across the map, let's now pick them up!
Step 8: Collecting the Pickup Using Colliders
Now that we have pickups everywhere it's time to be able to actually pick them up... time for Colliders again!
Currently we simply pass through the pickups, but we need to be able to somehow detect the Player colliding with them. We can do this using a Box Collider.
Within the Project Window select the pickup-prefab and add a Box Collider using the top menu, Component > Physics > Box Collider. If you now run the game again you won't be able to pass through the pickups, instead colliding with them.

Let's now use Unity's built in functions to script additional behavior for when this collision is detected.
Creating the PlayerController Script
Within the Scripts folder create a new script and rename it to 'PlayerController'. This script will handle all the behaviors that result from a collision with any of the pickups.
Select the Player within the Hierarchy and add the PlayerController script as a Component by dragging it onto the Inspector, or use the other method if you prefer.

Open the PlayerController script, delete the Update() function, and add the following code:
// the PickupController component of the 'PickupSpawnPoints' GameObject
private var pickupController:PickupController;

function Awake()
{
	// retrieve the PickupSpawnPoints gameObject
	var pickupSpawnPoints:GameObject = gameObject.Find("PickupSpawnPoints");

	// and then retreive the PickupController Component of the above PickupSpawnPoints gameObject
	pickupController = pickupSpawnPoints.GetComponent("PickupController");
}

function OnControllerColliderHit (hit:ControllerColliderHit)
{
	if (hit.gameObject.tag == "Pickup")
	{
		// call the Collected(...) function of the PickupController Component (script) and
		// pass the pickup we hit as the parameter for the function
		pickupController.Collected(hit.gameObject);
	}
}
So what have we here?
The Awake() function retrieves the PickupSpawnPoints GameObject from the scene using GameObject.Find(...) and saves the returned GameObject into a variable.
The PickupController Component of the PickupSpawnPoints GameObject is then retrieved using GameObject.GetComponent(...) and assigned to the pickupController variable.
Why are we retrieving the PickupController Component? Let's take a look at the OnControllerColliderHit(...) function and try and understand what's going on...
The OnControllerColliderHit(...) function is triggered every frame our Player's CharacterController Collider collides with either a RigidBody or another Collider. Since our pickup has a BoxCollider the collision between that and the player is detected and triggers this function.
The function makes information about the collision available to us via its parameter of datatype ControllerColliderHit. We can use this to detect what the GameObject collided with is.
To detect whether we've collided with a pickup we use an if statement to test whether the GameObject collided with is tagged with 'Pickup'. Our pickup-prefab is currently un-tagged but we'll fix that shortly.
If the GameObject collided with is tagged as 'Pickup' then we call the Collected(...) function of the PickupController, passing the GameObject we collided with as the functions parameter.
There is also a problem with this however, the PickupController script doesn't yet have a Collected(...) function, so let's go and add one now before applying the tag to our pickup prefab.
Adding the Collected(...) function
Open the PickupController and add the following code to the bottom of the script:
function Collected(pickupCollected:GameObject)
{
	// retrieve name of the collected pickup and cast to int
	var index:int = parseInt(pickupCollected.name);

	// pickup has been destroyed so make the spawn index available again
	spawnIndexAvailableList[index] = true;

	// destroy the pickup
	Destroy(pickupCollected);

	// spawn a new pickup
	SpawnPickup();
}
So the Collected(...) function retrieves the name of the pickup that we've collected and then makes the spawnpoint it's positioned at available again. It then calls the Destroy(...) function to Destroy the pickup from the scene. Finally it then respawns a new pickup by calling the SpawnPickup() function.
So to quickly run through the flow of events so it's clear what's going on:
- The Player collides with the pickup which will be tagged as 'Pickup'.
- The PickupController's Collect(...) function is called and passed the pickup that has been collided with.
- The Pickup is destroyed and a new one is Instantiated by the call to SpawnPickup()
Lets now tag our pickup so this all starts working!
Tagging the Pickup
So, do you remember how we did this before with the SpawnPoint tag? It's exactly the same!
Select the pickup-prefab within the Project Window and at the top of the Inspector select 'Add Tag' from the Tag drop down list. Within the Tag Manager click within element 1 and type 'Pickup'. That's the Tag created.
Apply the tag by reselecting the pickup-prefab and selecting the 'Pickup' tag from the Tag drop down list.

If you now run the game again, when you collide with a pickup it'll disappear and then respawn. Let's now also introduce a random delay in between the player collecting the pickup and it respawning.
Step 9: Respawning After a Random Delay
This is a reasonably simple and quick addition to our script thanks to a built in function within Unity!
Open the PickupController script and add the following two variables to the top of the script:
// minimum and maximum spawn delay times
public var minimumSpawnDelayTime:int = 1;
public var maximumSpawnDelayTime:int = 5;
To create a delay in Unity we can use yield WaitForSeconds(...) which will delay the code following it by a number of seconds specified via the parameter. We can use a combination of this and Random.Range(...) to make our script wait for a random amount of time before respawning the next pickup.
Add the following line above the call to SpawnPickup() within the Collected(...) function:
// wait for a random amount of seconds between minimumSpawnDelayTime and maximumSpawnDelayTime
yield WaitForSeconds(Random.Range(minimumSpawnDelayTime, maximumSpawnDelayTime));
When you now run the game and collect a pickup there will be a random delay before the pickup is respawned, awesome!
Conclusion
So, you now have a basic knowledge of UnityScript and Colliders! Pretty good going for your second tutorial in Unity! It just goes to show how awesome and accessible this program really is!
In the next tutorial we'll introduce scoring with more complex gameplay with a variety of different pickups to collect, some hindering the player and some providing speed boosts etc. We'll also introduce a countdown Timer complete with a HUD displayed both the score and time remaining!
We'll also add a little animation to our pickups and introduce everyone's favorite: particles!

Comments