Unity is a multi-platform game development tool, designed from the start to ease creation, which just happens to contain the most powerful 3D engine this side of a million dollars. In this tutorial, we'll see how to get started with Unity, from downloading the software and getting introduced to the IDE, to creating our first project with our own custom terrain and skybox.
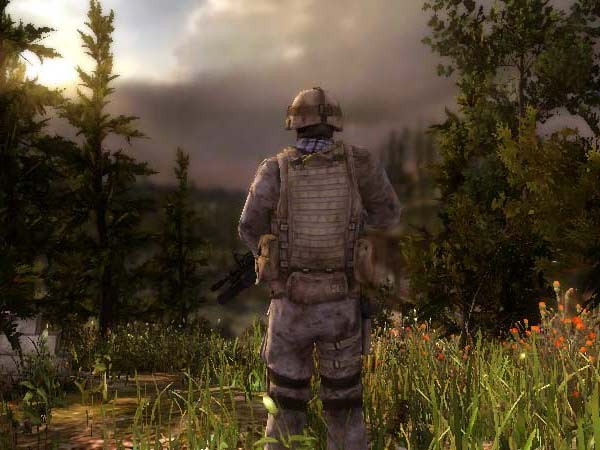
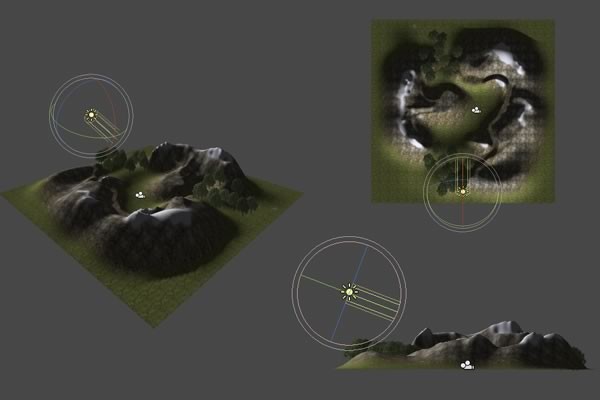
Final Result Preview

Click the image to load a demo of what you'll be creating, then use the mouse and WASD (or arrow keys) to move around the terrain.
Welcome To The World of Unity3D!
Unity lets you impress and inspire your players with everything from jaw-dropping visuals to ambient soundscapes and inject excitement into your developers with one click publishing to a range of platforms spanning across web, desktop, mobile and consoles.
For the latest major release, Unity 3.0, the entire rendering backend was completely rewritten bringing significant performance improvements alongside a ton of incredible post-processing effects and the integration of the world's best Lightmapper, Beast. PhysX, the awesome physics engine from NVIDIA, has also been fully integrated providing complex physics with minimum sweat on your part.
MonoDevelop, the programming environment for Unity -- yes there is still programming I'm afraid -- provides full auto-completion as well as a fully-fledged debugger allowing you to pause your game and dive in to inspect your logic and variables. Unity supports Javascript, C# and Boo (Python) as programming languages and can interoperate between all three within a single project allowing developers to utilise all the open source libraries available no matter what language they're actually developing in.
You'll quickly realise that a lot of work within Unity is to do with your Assets, i.e your models, textures, audio, and so on. As well as there being several reasonable sources for assets across the web, Unity 3.1 has introduced the Asset Store, a built in one stop shop of both free and paid for Assets/Extensions, some of which we'll put into use later in this tutorial.
Asset management within Unity is so simple: if you make an external change to your Aaset in Maya or Photoshop, for example, just click Save and Unity reimports the asset! You can also find starter kits and premade game assets over on ActiveDen for as little as $4!!
Hopefully the above has whet your appetite for this incredible application but you're sat there waiting for me to hit you with the massive price tag to put you off right? Wrong! The 'indie' version of unity is actually FREE!! Yes, that's not a typo, not a 30 day trial, just FREE!! So what are you waiting for, head over to the Unity3D download page and start downloading Unity now!!
(There is of course a more feature packed 'Pro' version which isn't free; however for this tutorial series the FREE / 'indie' edition is all you need.)
Introduction to the Unity IDE
Unity by default will install with an awesome demo project titled 'Bootcamp' which we'll now take a look at whilst also exploring our way around the Unity interface.
Editor's Note: Since this tutorial was written, Bootcamp was replaced as the default project by AngryBoots. You can still download Bootcamp from the Asset Store.
Once you've downloaded and installed Unity, go ahead and launch it, and if the 'Bootcamp' project doesn't load at startup then select 'File -> Open Project' and browse to the newly installed 'Bootcamp Demo' folder. For Windows users this should be installed somewhere similiar to 'C:\Users\Public\Documents\Unity Projects' and for those on OSX it should be somewhere similiar to 'Macintosh HD/Users/Shared/Unity'. If its been installed elsewhere a quick search for 'Bootcamp Demo' should otherwise locate it for you.
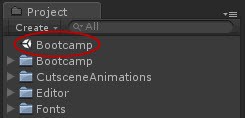
Once the project is imported, which can take some time for complex projects, open the 'bootcamp' scene within the Project window, seen below.
You're hopefully now looking at the same as below, so welcome to Unity and the Bootcamp Demo!
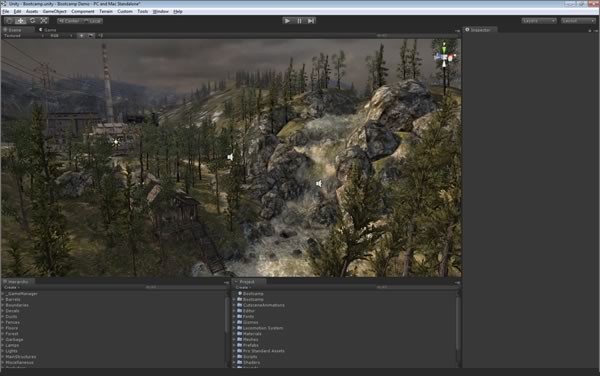
The first thing you're likely going to want to do is click the big shiny Play button located in the centre of the toolbar at the top of the screen. To get this urge out of your system go ahead and give it a click to play the game and run around in awe at the stunning graphics demonstrated in this project.
By pressing your ESC key you can potentially make the scene even more stunning by increasing the quality levels should they not be on full by default. Once you're done walking around making 'ooo' and 'awww' sounds click the Play button again to stop playing the game.
So, Unity's interface consists of movable/dock-able windows or views which can be rearranged to suit your particular work-flow. You just experienced everyones favourite, the 'Game View', where you can play and debug your games. You can have as many or as few windows/views as you like and there are several built in layouts, the above being the default 'wide' layout, as well as the ability to create your own.
Lets now dive in and take a closer look at each of these windows and some of their features. I strongly encourage you to keep switching between the tutorial and Unity whilst reading and explore each window to help you become familiar with them quicker. Don't worry about noting down short-cuts either; there's a Cheat Sheet at the end of this section ready and waiting to become your new bedtime reading.
The Toolbar
Not quite a window as such, but a very important part of Unity's interface nonetheless. The 'Toolbar' spreads across the top of the IDE and features several key tools for manipulating the 'Scene' and 'Game' windows as well as the layout of the interface. It also holds the very important 'Play' button.
The Toolbar - Transform Tools

The first component within the the Toolbar, located in the top left corner, holds the four 'Transform Tools' which you must now burn deep into your memory.
From left to right these are:
The Hand Tool (Keyboard Shortcut: Q)
By default the Hand Tool will allow you to Click and Drag to pan around the scene. Holding Shift will increase the panning speed; using combinations of Alt, Ctrl, LMB, MMB and RMB will allow you to pan, rotate and zoom around your scene. Don't fret, we'll explain these in a little more detail shortly.
The Translate Tool (Keyboard Shortcut: W)
The Translate Tool provides the ability to select GameObjects -- more on these later -- within your scene (or hierarchy) and then use the arrow-ended axis handles to move that object around the scene by clicking and dragging each axis handle. You can also move the selected GameObjects freely over all three axes by clicking and dragging the small square where the axis handles meet.
The Rotate Tool (Keyboard Shortcut: E)
The Rotate Tool provides axis handles that loop around and surround the selected GameObject which when click and dragged allow you to rotate it around either its centre or pivot point.
The Scale Tool (Keyboard Shortcut: R)
Very similar to the Translate Tool the Scale Tool provides the block ended axis handles which when Click and Dragged allow you to scale the selected GameObject on that particular axis. To scale all 3 axis simultaneously simply click and drag the grey cube where all 3 axis handles meet.
The Toolbar - Transform Gizmo
The next component within the Toolbar, highlighted below, is the 'Transform Gizmo', which determines whether the selected object is rotated or scaled relative to its centre point or to its pivot point, and whether local or global rotation is used when scaling and rotating the selected GameObject.

The Toolbar - Control Buttons
The component within the centre of the Toolbar controls the preview of your game within the Game window. Pressing the 'Play' button will play your game, clicking the 'Pause' button will unsurprisingly pause your game and the third button along allows you to step through the game when it's paused.

The Toolbar - Layers & Layout
The 'Layers' drop down menu located to the right hand side of the screen within the Toolbar allows you to toggle the visibility of particular layers on and off, and the 'Layout' drop down menu provides options regarding the Layout of the windows or views on screen. If you create a custom layout and are particularly fond of it you can use this menu to save your layout so you don't have to create it everytime you restart Unity.

So that's pretty much it for the Toolbar, pretty straight forward so far right?
Scene View
The Scene view is where you'll spend a lot of your time building and editing the components of your games within Unity. A fully rendered 3D 'preview' of the currently open scene is displayed inside the window where you can add, edit and remove GameObjects using its Orthographic and Perspective views.
For those coming from a Flash background you can liken this to the stage. All objects within this window are considered active GameObjects and are listed within the Hierarchy, which we'll look at shortly.
Navigating Scene View
There are several methods for navigating the Scene view, with some more suited to particular tasks than others. I suggest learning them all so you can navigate quickly and efficiently around your scene whatever you're doing.
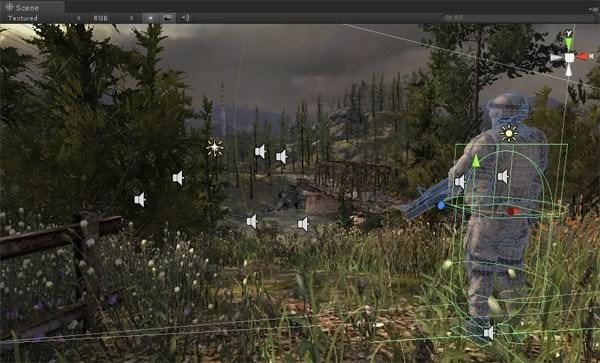
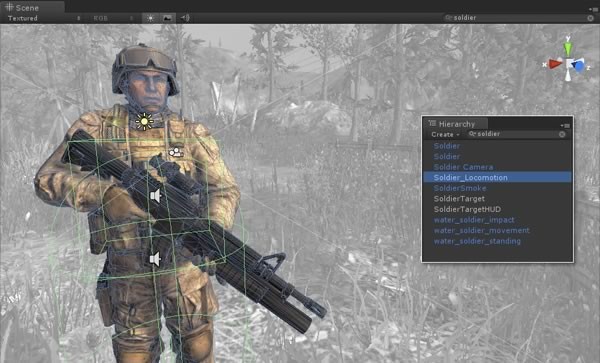
One of the most useful features is the ability to focus on any GameObject simply by selecting it in the Hierarchy and pressing the F Key. You can alternatively also double-click within the Hierarchy for the Scene view to focus on the selected GameObject. Try both these methods for focusing on the "Soldier_Locomotion", similar to above.
You can also use the Search Bar to search for specific GameObjects which can be useful and far quicker when you have a full scene. Simply type the name of the GameObject into the Scene or Hierarchy Search Bar, found in the top right corner of the window, and all of your scene will be greyed out except for the GameObject(s) with the searched name as shown below.
The Hierarchy will also return all those GameObjects containing the search string. Have a go searching for 'soldier' within both Scene and Hierarchy views and you should get something similiar to the below.
For those who are familiar with WASD you'll like this one. Hold RMB (Right-Mouse-Button) and use WASD and the mouse to fly through the scene. For those scratching their heads at WASD - W is Forward, A is Left, S is Backwards and D is Right. If you wish to fly faster, hold Shift.
There are quite a few keyboard and mouse combos for navigating the Scene view within Unity. The below are for a three-button mouse and can be used when any Transform tool is selected. These are crucial for a fast work-flow, so practice them in your sleep.
To rotate around current pivot point within the scene: Alt + LMB
To rotate around on the spot within the scene: Ctrl + RMB
To pan around the scene: Ctrl + Alt + LMB / Alt + MMB
To zoom in / out of the scene: Alt + RMB / Mouse Wheel
With all the above, hold Shift (if you can) to speed them up. If you're using a one- or two-button mouse I'd recommend checking the Unity Scene Navigation Documentation. I'd also recommend getting a proper mouse.
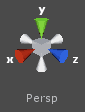
Unity's Scene view also features a 'Gizmo' in the top right hand corner which shows the current viewing angle and allows quick navigation to TOP (Y) / SIDE (X) / FRONT (Z) and PERSPECTIVE views.
Spend a few minutes navigating around the scene using these methods; the quicker your fingers learn them the better.
Translating / Rotating and Scaling Game Objects within Scene View
When building your games you'll likely place lots of different objects within your scene. To do this it's easiest to use the Transform Tools in the Toolbar to translate, rotate, and scale individual GameObjects using the appearing axis handles, shown below.
You can also type values directly into the Transform Component shown in the Inspector, shown above.
Scene View Control Bar
The control bar along the top of the Scene view provides various view modes such as Textured, Wireframe and Textured Wireframe. It also provides toggles for 'in-game' Lighting, Audio and Elements such as Skyboxes within Scene view. The above image for example has Lighting and Elements toggled on and Audio toggled off.
So that's it for Scene view, let's now take a look at the Hierarchy.
Hierarchy
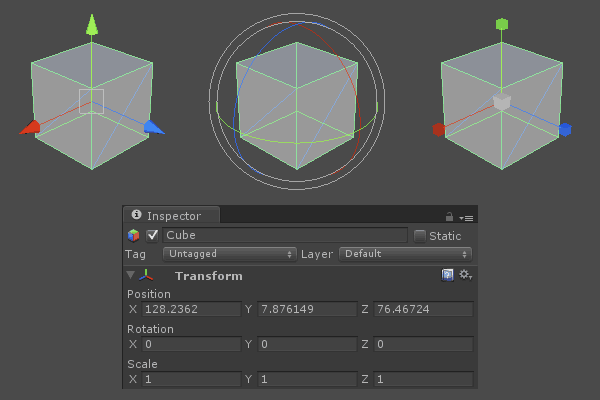
The Hierarchy window provides a list of all the GameObjects within Scene view, i.e. every object in your current scene. When a GameObject is selected within the Hierarchy it's also selected within Scene view and vice versa. You can add new GameObjects to the Hierarchy via the 'Create' menu shown below.
Objects that have children, i.e. are a parent object, have a grey triangle to the left of their name which toggles the display of their children. You can rename a GameObject by selecting it within the Hierarchy and pressing F2 or using the Inspector discussed below.
Those shown in blue text within the Hierarchy are Prefabs which will be explained shortly, the rest are simply GameObjects which I'll also explain a bit more about shortly.
Inspector
The Inspector displays information about the selected GameObject including all of its attached components and their adjustable properties. Properties can be assigned or modified by dragging and dropping GameObjects or Prefabs from the Hierarchy or Project views or by simply typing values, checking boxes, etc.
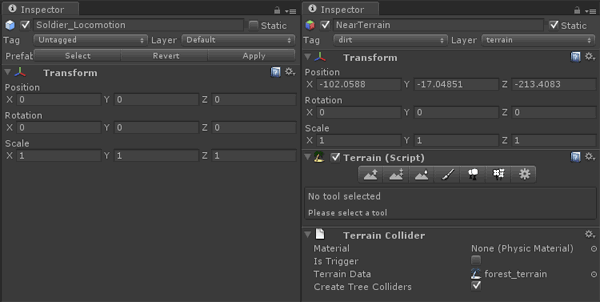
The very top of the Inspector displays the GameObject's name and, to the left, whether it's enabled. On the far right you can define whether the GameObject is static or not, for lighting purposes. Beneath the GameObject's name is its tag, if you have assigned one, and the layer it is part of, if you've assigned one.
A GameObject's Components are listed below and are collapsible via the triangle left of their name. The checkbox directly left of the name defines whether the Component is enabled or not, which comes in very useful when debugging. To the right of the name is a link to the Components Reference as well as a menu for resetting/removing the Component. You can also right-click a Component's name to remove it.
Project Window
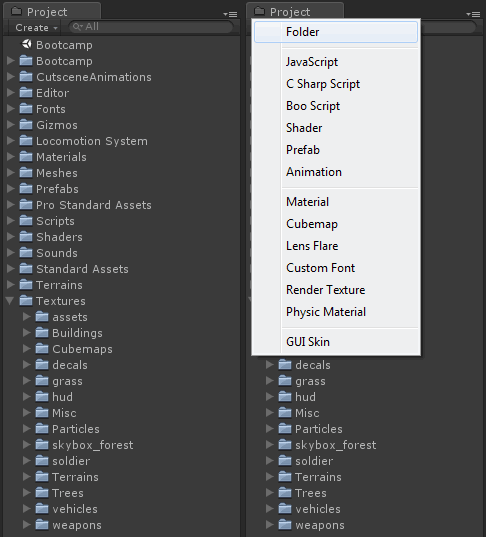
Every Unity project has an 'Assets' directory for all the models, textures, scripts, prefabs etc used or made available to the project. You can navigate and explore this directory within Unity's Project window as well as creating new sub-directories and Assets (i.e. scripts) within it by right-clicking or selecting 'Create' as shown below. Assets can also be searched for by using the Search field located in the top-right corner of the window. If you're coming from Flash you can liken this to the Library where you keep all your project's assets.
To add assets such as models and textures to your project, from the top menu select Assets -> Import New Asset, or simply drag them from your OS's file system to the Project View and the asset is immediately available for use within your project. If assets are altered -- e.g. you edit a texture in Photoshop -- when you save and return to Unity it will automatically update the asset for you. Awesome? Yes!
You should NEVER move project assets around using your OS's file system since this will break any meta-data associated with the asset, i.e. textures & materials applied to a model, scripts applied to a GameObject. You must ALWAYS use the Project View to organize your assets.
If you wish to locate an asset in Unity within your file system for any reason, like to edit in Photoshop, you can right-click and select 'Show In Explorer'.
Game View
The Game view is likely to become your favourite part of the Unity interface as it's where you play and test your game as if it's actually been published.
When you run your game, using the Play button within the Toolbar discussed earlier, you'll notice that changes within the Game View are reflected within both Scene View, Hierarchy and the Inspector and that it's still all editable. This gives you the great advantage of being able to edit and tweak your game to get the best result whilst its running!! However, as soon as you stop running the game all changes will be lost.
Lets repeat that:
ALL changes made whilst the game is STILL running WILL BE LOST once the game stops running.
We all fall victim to this; learn quickly or risk going bald fast.

Game View Control Bar
The control bar at the top of the Game view allows you to force an aspect ratio on your game within the Game view, toggle Gizmos, toggle Stats and toggle whether the Game view goes fullscreen when you click Play.
Cheat Sheet
In order to work as efficiently as possible within Unity you seriously need to commit all the keyboard short-cuts to memory. To help you learn them quicker I've devised a Unity Cheat Sheet that includes all the short-cuts detailed above, all on one page - Unity Cheatsheet Download.
So that was a pretty quick fly-through of the main and most popular windows / views within the Unity IDE. There are so many other windows that we could go through but you must surely be itching to get started! Let's just explain a few bits of Unity jargon and then we'll hit the ground running.
GameObjects, Components & Prefabs
You may have noticed these three terms in the above sections. GameObjects, Components & Prefabs are key concepts to building games within Unity and it's essential you understand what they are and how you can use them.
GameObjects
Every object within your game is a GameObject. They are containers that contain Components to determine their behaviour and appearance. Every GameObject has a Transform Component by default which determines its location, scale and rotation within the game, and more can be added, edited and removed using the Inspector. Within the Hierarchy, GameObjects are white.
Components
Components determine the behaviour and appearance of GameObjects they are attached to and are the real workings of any game within Unity. Scripts that you develop can be attached to GameObjects in exactly the same way as Components because that's what they are: Components. They're Components that YOU developed. To add Components to the selected GameObject, use the Component menu.
Prefabs
For those who have worked with Flash, Prefabs are very similar to the concept of MovieClips within the Library. If you've never worked with Adobe Flash or don't understand the concept of MovieClips then ignore that last sentence.
Prefabs are re-usable GameObjects stored within the Project window alongside all your other Assets. You can create as many instances of a Prefab within your game as required and any alterations to the original will be reflected within every instance you've created. This is called Inheritance. You can also override an instance's default values allowing them to look more unique, rather than like clones of the original Prefab.
When you first create a new Prefab using the Project Window 'Create -> Prefab' it is just an empty container with no GameObject and therefore can't be added to the Hierarchy or Scene. To create a usable Prefab you must select a GameObject within the Hierarchy and drag and drop it onto the newly created Prefab. Once done, the original GameObject is now an instance of the Prefab and you can add as many instances of the Prefab to your game as you wish. Within the Hierarchy, Prefabs are blue.
A good scenario to help you get to grips with this concept is to imagine you're creating a racing car game with four players. You want each player to have the same car yet them be different colours. The solution? Prefabs. You'd create a GameObject which will be your car and add Components that provided the behaviour of a car. This GameObject would then be converted to a Prefab and four instances created within your scene. You'd then edit each instance to apply a different colour. Easy, right?
Okay, enough theory; let's get started...
Your First Project
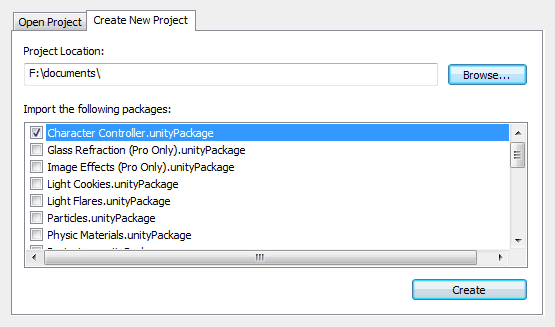
Now that you've explored the Bootcamp demo and worked your way around Unity's interface it's time to create your first project! From the top menu select File -> New Project.
First, select the directory where you wish to save your project and then ensure that both the Character Controller and Skyboxes packages are checked for import into the project. Finally, select Create.
Once Unity has opened your new project you should first save your scene. A Unity Project can have as many scenes as you wish and scenes can be loaded and unloaded at runtime. Scenes can be as complex or as simple as you wish and can feature whole game levels or just tiny sections or even menus.
As your project grows it's important to keep it organised, so first create a new folder within the Project window and rename it Scenes using F2. Then select File -> Save Scene or Ctrl / Command + S and save the scene within the Scenes folder as 'game'.
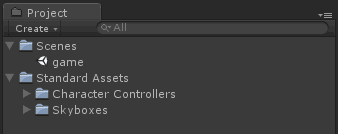
You may have noticed another folder within the Project window called 'Standard Assets'. Twirl it open and you'll find the packages imported when we created the project which contain Prefabs, Scripts and Shaders which we'll put into use whilst making our first scene.
Step 1: Developing Terrain
Unity's Terrain Editor features a host of options so the creation of sweeping landscapes and mountainous terrain becomes quick and easy.
Create a new folder and rename it 'Terrain' and from the top menu select Terrain -> Create Terrain. Within the Project window rename the terrain 'New Terrain' to 'Terrain' and drag it into the Terrain folder to keep the project neatly organised.
We now need to set the resolution of our terrain using the top menu, 'Terrain -> Set Resolution'.
You must remember to do this BEFORE you develop the topology of the terrain as altering it later will cause your terrain to be reset. Match your settings with those below and then read on to find out what they actually mean.

So, the first three should be pretty obvious and are the width, height and length of the terrain (in metres). If you try to build terrain above this height it will simply level out.
The HeightMap Resolution is the resolution of the texture that Unity stores to represent the Terrain. This must be a power of two plus one, like 513 or 1025, due to the way in which it is stored. The Detail Resolution determines how precisely you can place details such as plants, rocks etc onto the terrain. The lower this number the better the performance.
The Control Texture Resolution is the resolution of the textures painted onto the terrain and therefore controls the detail of those textures. For performance we'll keep this value at 512. The Base Texture Resolution is the resolution of the composite texture rendered in place of the splat map at certain distances (billboarding) to improve performance.
If you can't see your terrain once you've created it use one of the techniques mentioned earlier to Focus on it. You may have noticed with the terrain selected the Inspector window now provides several options for editing the terrain. Lets now take a look at them.
The Raise / Lower Tool (Keyboard Shortcut: Shift + Q)
To build up and develop your terrain select the Raise / Lower Tool circled below and click and drag across the terrain to start developing it. You can select from a range of brushes, brush sizes, opacity (softness) whilst raising your terrain. If you wish to lower the terrain simply hold the Shift key whilst you click and drag.
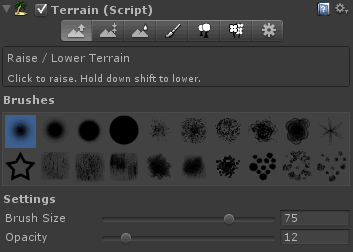
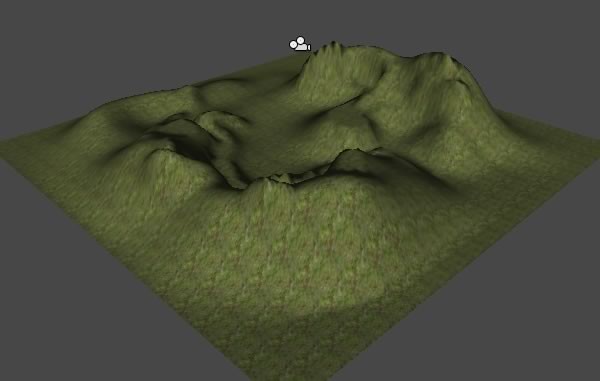
Have a play around with different brushes and opacaties to generate some mountainous terrain like the one below, don't worry if it's not exactly the same though, feel free to use your artistic license and go wild.
Just keep in mind you don't want to make the terrain too steep since your player will then struggle to navigate it, unless you're purposefully making a section of your terrain that's inaccessible to the player.
I started with a large brush with a soft opacity to generate some smooth hill areas before then reducing the brush size and increasing the opacity to steepen particular areas.
The Paint Height Tool (Keyboard Shortcut: Shift + W)
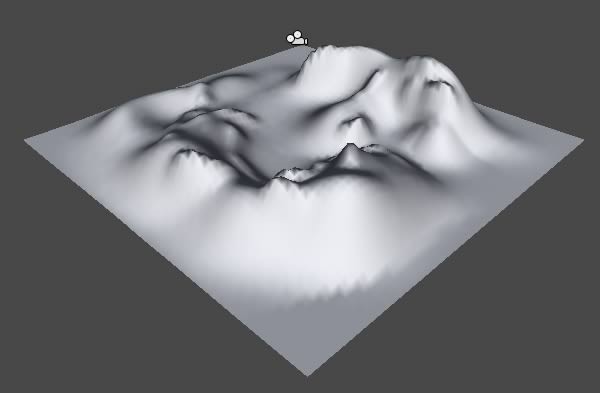
Now select the Paint Height Tool, one along to the right from the 'Raise / Lower' tool. This is identical to the previous tool except for you specify the max height at which you can raise the terrain to, which if exceeded causes the terrain to flatten out. You can also Shift + Click to set the height to the that of the terrain where your mouse is currently located.
You can see where I used this tool to cut paths into and through the 'Mountains' above. Use it to similar effect or to create a plateau somewhere on your terrain. I also then used the Raise / Lower Tool to create more prominent peaks for the mountains.
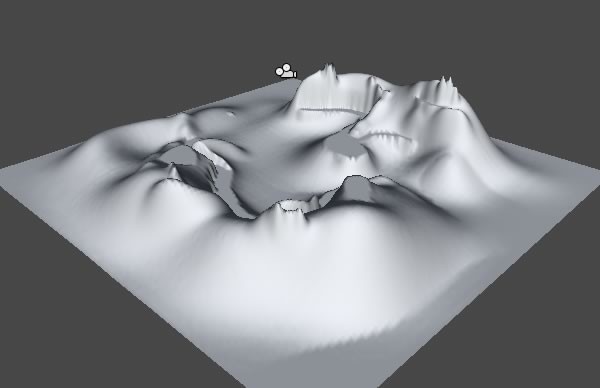
The Smooth Height Tool (Keyboard Shortcut: Shift + E)
Next select the Smooth Height Tool, next one along from the 'Paint Height' tool. This smoothens your terrain making much smoother surfaces for characters / vehicles to navigate on. Use the Smooth Height tool on your terrain to smoothen out any jagged areas, if you find areas later on that you can't access when playing your game you can always come back and use this tool to smoothen those areas a little more.

So now you should hopefully have a lovely topology for your terrain, it looks a little bland though...
Step 2: Texturing Terrain
Now we've developed the topology for our terrain lets search for some textures and details to liven it up. To quickly find some Assets we're going to use the Asset Store, a feature recently introduced within Unity 3.1.
To launch the Asset Store select 'Window -> Asset Store' from the top menu. To use the Asset Store you must have an account so quickly sign up (it's free) and enable your account by clicking the link in the email they send you. Once your account is activated click the 'Open Asset Store' link found on this page page to open the Asset store to the FREE Terrain Assets package from Unity.
Click 'Download' to begin downloading the package (~35mb).
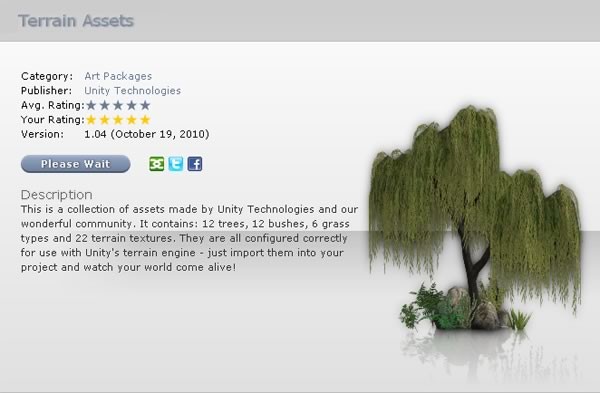
When the download is complete Unity will list the contents of the package, as shown below, allowing you to select only the Assets that you wish to import. Simply click 'Import' so we have it all available to us.
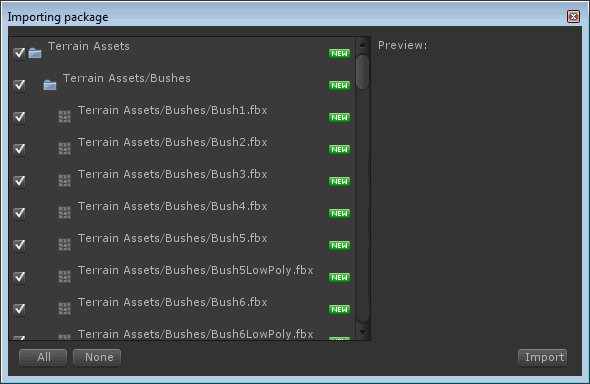
Within your Project window you'll now notice a new folder, 'Terrain Assets', featuring quite a few textures and models for us to use, awesome! Let's get painting!
The Paint Texture Tool (Keyboard Shortcut: Shift + R)
Reselect your terrain and select the Paint Texture Tool, next tool along, and beneath the brushes on the right select Edit Textures -> Add Texture. Click the small circle next to 'None (Texture 2D)' to browse and search the available textures. For now select 'Forest Floor' and click 'Apply'
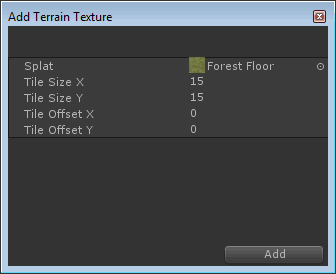
Whoa! There's green moss and dirt everywhere! What just happened?!
As this is the first texture applied to this terrain the entire terrain is textured since this is the base layer texture for the terrain. You can now overlay more textures by adding them and painting them over the terrain with the mouse using various brush sizes and opacities. If you wish to change a texture you can do so simply by double clicking it. To delete a texture simply select it and click Edit Textures -> Remove Texture. The texture thats currently selected will be the one that is painted.
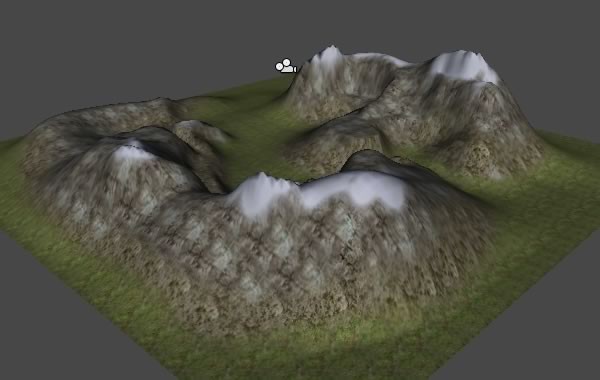
Go ahead and add as many textures as you wish, experimenting with different brush and opacity settings to make your scene appear however you'd like. I used the following textures, applying the Forest Floor as the base texture, followed by the Cliff (Grassy), then Cliff (Layered Rock) and then finally Snow for the peaks of the mountains.
So, our terrain is now looking pretty good but it could do with some more detail...
Step 3: Detailing Terrain
Unity has a two built-in tools for adding details to a terrain; let's now take a look at them.
The Place Trees Tool (Keyboard Shortcut: Shift + T)
The Place Trees Tool, the next tool along from the Paint Tool, unsurprisingly is to do with the placement of trees, who would have guessed! The tool works very similarly to the 'Paint Texture' tool, instead of selecting a texture, you select a model of a Tree using the 'Edit Trees' menu and then paint it onto the terrain.
You'll notice there are quite a few more settings this time such as 'Tree Density' which controls the percentage of trees within the brush area and 'Tree Height / Width Variation' which will make your trees look a little less identical by randomizing the width / height of the trees you place.
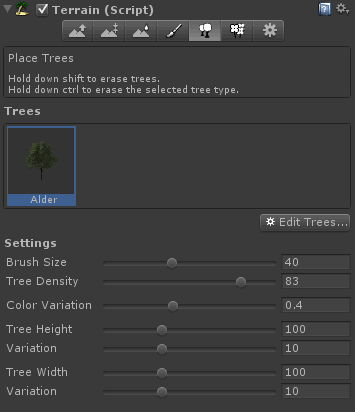
There is also an option for mass placing of trees within the top menu, Terrain -> Mass Place Trees, where you can specify a number and Unity will place that many trees over your terrain, choosing randomly from those you have added within the Place Trees Tool.
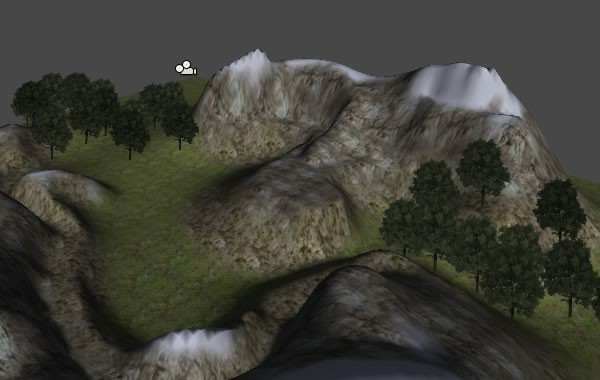
I used the Alder Tree within my map and painted it on with a medium brush size and high density. I only clicked once at either end of my level to produce the above.
The Place Plants Tool (Keyboard Shortcut: Shift + Y)
You can also place smaller details using the Place Plants Tool in an identical way to the Place Trees Tool.
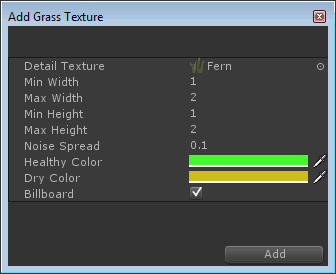
I used the Add Grass Texture and selected the Fern and painted it around the centre of my map using quite a small brush size with minimal strokes to produce the following.
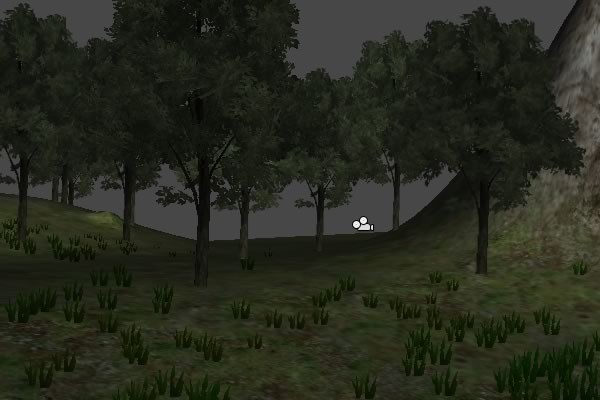
When doing this however beware that when painting from a distance the detail WON'T appear and a lot of detail WILL effect performance. If it doesn't appear to be painting, zoom in further.
The very last button within the Terrain Component within the Inspector allows you to control factors such as how far from the camera detail is drawn from and at what distance billboarding (the process of replacing meshes with images) occurs. You can also determine the speed of the wind within the scene, and how much the grass will bend in the wind. You can set how much the trees bend in the wind when you add or edit a tree using the Place Trees Tool.
Hopefully your terrain is now looking pretty good with some trees and detail so lets add a player so we can explore what we've just made.
Step 4: The First Person Controller Prefab
Within your Project window, twirl open Standard Assets and then Character Controllers. Drag the First Person Controller into your Scene view where you would like to begin playing from, ensuring it is placed above the terrain using the Transform tool. Within the Toolbar click the Play button.
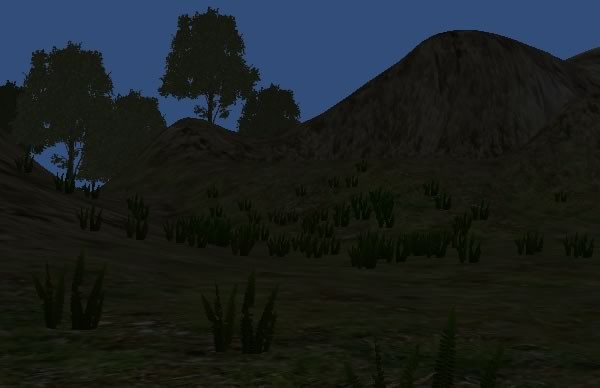
You should hopefully be able to now run around your terrain but depending on whether you had the in-game lighting enabled within your Scene view it may now look a little darker than expected, as shown below.
If you look at the very bottom of the screen you'll also notice a warning message. Stop the game by clicking the 'Play' button again and then click the error message to bring up the console.
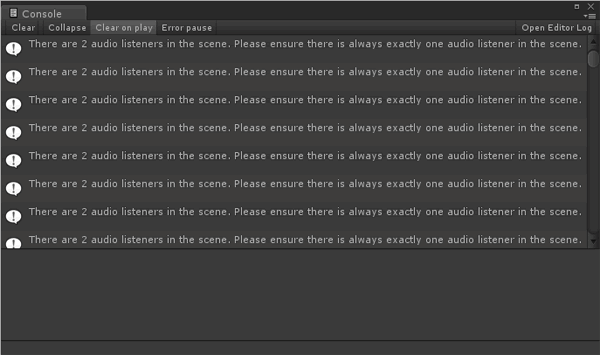
So what is this warning message? The warning is because we have '2 audio listeners in the scene'. Wait a minute, we didn't add any audio listeners did we? Actually, there was already one and we just involuntarily added another, so let's take a closer look at what's actually within our scene.
Step 5: Did We Add Another Audio Listener?
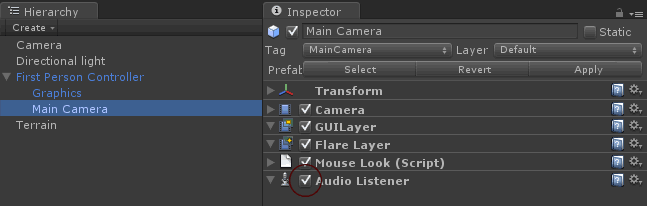
Within the Hierarchy select the Camera and then take a look within the Inspector. Notice anything?
Look at its components... one of them just happens to be an Audio Listener!
The Audio listener receives input from and Audio Source in the scene and plays it back to the user and therefore it makes sense to be attached the Camera. You'll notice it has no properties at all, it just had to be added to work and the Camera has one attached by default.
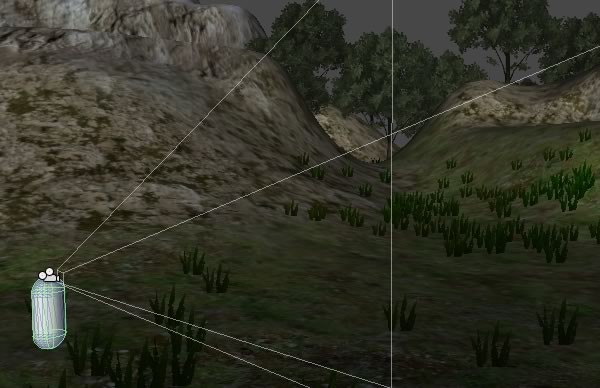
So our warning is that we have two Audio Listeners within the scene -- where is the other, what have we added to the scene? Lets have a closer look at the First Person Controller (FPC).
At first glance selecting the FPC and looking within the Inspector it doesn't appear to have an Audio Listener; however, since it's a GameObject it can have children, so take a look.
Surely enough it has two children, 'Graphics' and 'Camera'. The 'Graphics' is simply a Mesh however 'Camera' is a Camera with, you guessed it, an Audio Listener. This camera within the FPC is the actual camera our game is being rendered through so we don't want to start deleting components from it.
The other Camera in the scene however isn't being used at all so lets just delete it. Click Play again and you should no longer have any error messages.
Lets now brighten up our scene a little.
Step 6: Lighting the Scene
There are three different types of Lighting within Unity: Point, Spot and Directional.
To light our map we'll use a Directional light so go ahead and add one to the scene from the top menu by selecting GameObject -> Create Other -> Directional Light.
You may notice a difference as soon as the light is added depending on its direction but reposition it using the Transform and Rotation tools to light your scene properly. It may help to use the Orthographic views, particularly TOP to position and SIDE to rotate as shown above.
Hopefully now when you play the scene is lit a bit better than before.
Step 7: Adding a Lens-Flare
Lets now add a flare effect to our Directional light!
Import the 'Light Flares' package using the top menu Assets -> Import Package. The package is located within the Unity installation directory.
Within Windows this is something like 'C:\Program Files (x86)\Unity\Editor\Standard Packages', and using OSX it's something like '/Applications/Unity/Standard Packages'.
Once you've located the directory select the Light Flares package, and when the Importing Package dialog appears within Unity click Import to import all the available flares into our project.
To apply the flare select the directional light and observe it has a 'Flare' property within the Light Component.
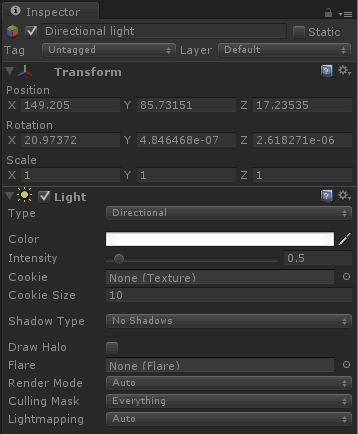
Browse within the Project window to 'Standard Assets/Light Flares' and, with the directional light still selected, drag and drop the Sun Flare onto the Flare property within the Inspector.
This is an alternative and sometimes quicker method for assigning a property than selecting it from the list that will appear when you click the circle next to the property.

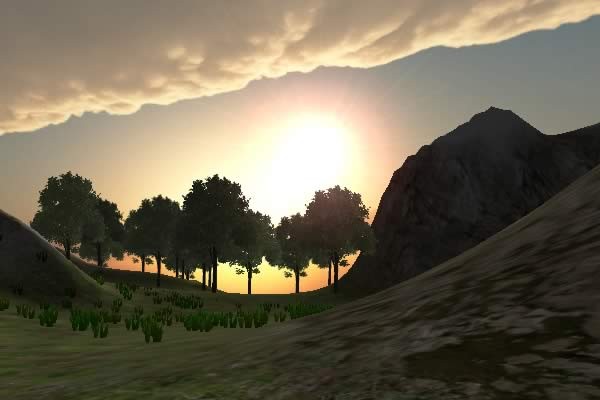
Click 'Play' and now when you look in the direction of the light the lens flare should appear.
Step 8: Adding a Skybox
Hopefully your level looks pretty good now except for when you look into the very dull blue horizon. Lets go ahead and fix that with a Skybox (a series of six images, mapped onto a Cube) to make the map look larger than it is without a large amount of unnecessary processing.
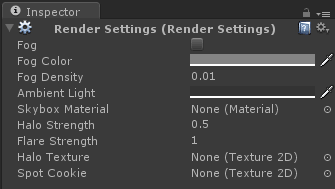
To apply a Skybox open the Render Settings from the top menu by selecting Edit -> Render Settings. Here you are able to edit several settings such as fog, ambient light and the Skybox Material.
The Standard Assets package we imported when we created our project features several Skyboxes so assign one by dragging it onto the Skybox Material. Click 'Play' and enjoy the hopefully more inspiring view.
If you have chosen a skybox with a sun present you may have to alter the position of your directional light so that the flare roughly aligns with the Skybox's sun.
If you wish to change the skybox, simply drag a different skybox onto the Skybox Material property to overwrite the currently assigned skybox.
Your map should look pretty good now considering you first opened Unity only a couple of hours ago!
Step 9: Publishing Your Game
So you can go and show off your game to your mum let's publish it so we can play it outside of the Unity IDE.
From the top menu select File -> Build Settings.
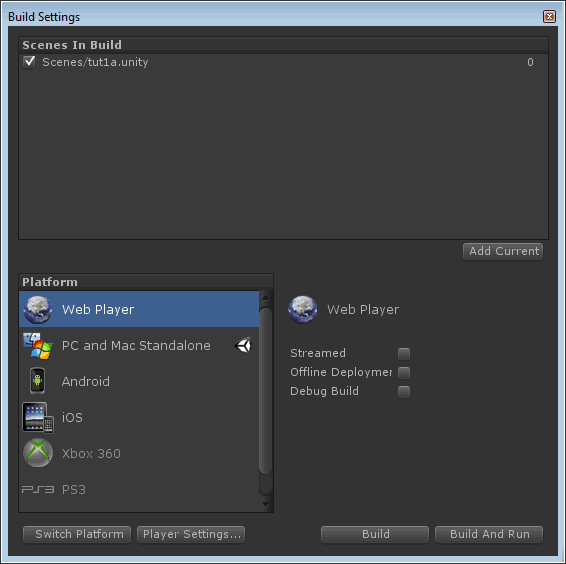
Select Add Current to add the current scene to the build and select Web Player from the Platform list to publish to the web.
Finally, select Build And Run and select a folder for the build files to be exported to. Unity will now export your build files and soon open your browser with your game in all its glory. Go forth and share!
Conclusion
I hope you've enjoyed this introduction to Unity and can see the potential it has, even though we've barely scratched the surface.
In future tutorials we'll introduce UnityScript, Collision Detection for trees and level boundaries and light mapping. We'll also create some pickups for our player to collect against a timer with UnityScript.

Comments