In the tutorial, we will learn how to create a dynamic, bubbling photo displayer using the FLiNT particle engine and flash.
This application will randomly select images from an array and place them into floating bubbles. We will also add an interactive background to the image with FLiNT particle physics.
Final Result Preview
Let's take a look at the final result we will be working towards:
Step 1: Setting up the IDE
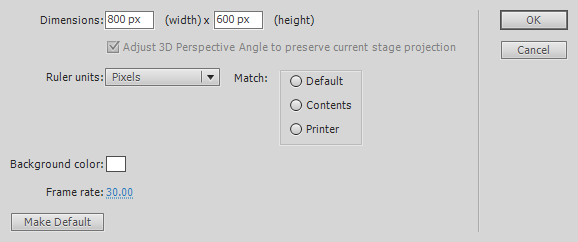
Let's begin.Open up your favorite version of Adobe Flash (needs to work with AS3). I will be using Flash CS5 in this tutorial, but you won't need to. Create a new AS3 Document and make sure the settings are as below:
Step 2: Getting FLiNT
Now let's set up the FLiNT engine. If you haven't already, download it from github.com. Then unzip the contents into the root directory of your project.
If you want to get caught up on FLiNT usage, I'd recommend you check Create a Sparkling Bomb Mouse Cursor with FLiNT Particles out. It's great for people who are just starting off with the engine.
Step 3: Document Class
Now go into Flash's properties panel. Set Document Class to "Main". Open up your favorite actionscript editor. Create a new class file in the directory that your FLA is in. Set its name to "Main". Here is all you should have at the moment:
package
{

	public class Main
	{

		public function Main()
		{

		}

	}

}
Step 4: Imports
Add the following import statements to your code underneath the package {This will import the necessary .as files into your program for its use.
	import flash.display.MovieClip;
	import flash.events.Event;
	import flash.events.MouseEvent;
	import flash.geom.Point;
	import org.flintparticles.common.actions.Age;
	import org.flintparticles.common.actions.ScaleImage;
	import org.flintparticles.common.counters.Blast;
	import org.flintparticles.common.counters.Steady;
	import org.flintparticles.common.displayObjects.RadialDot;
	import org.flintparticles.common.emitters.Emitter;
	import org.flintparticles.common.initializers.ImageClass;
	import org.flintparticles.common.initializers.Initializer;
	import org.flintparticles.common.initializers.ScaleImageInit;
	import org.flintparticles.common.particles.Particle;
	import org.flintparticles.threeD.initializers.RotateVelocity;
	import org.flintparticles.twoD.actions.DeathZone;
	import org.flintparticles.twoD.actions.Explosion;
	import org.flintparticles.twoD.actions.MouseAntiGravity;
	import org.flintparticles.twoD.actions.Move;
	import org.flintparticles.twoD.actions.RotateToDirection;
	import org.flintparticles.twoD.emitters.Emitter2D;
	import org.flintparticles.twoD.initializers.Position;
	import org.flintparticles.twoD.initializers.Velocity;
	import org.flintparticles.twoD.renderers.DisplayObjectRenderer;
	import org.flintparticles.twoD.zones.DiscSectorZone;
	import org.flintparticles.twoD.zones.DiscZone;
	import org.flintparticles.twoD.zones.LineZone;
	import org.flintparticles.twoD.zones.PointZone;
	import org.flintparticles.twoD.zones.RectangleZone;
Whew! I know that's a ton of files, we can thank FLiNT for their wonderful organization on this one :)
Step 5: Drawing the Background
Now let's open up the Flash IDE. It is up to you to create a 800x600 gradient box as your background. The main purpose of this tutorial isn't to learn any new flash drawing skills, but I can show you what I drew in my own application. This background is also included in the source of the tutorial.

Step 6: Our Images
Now we can select the images that we want our application to display. The good part about the design of the application is that it can work with as many images as you want, as long as you mention them in the application's array... But we can get to that later.
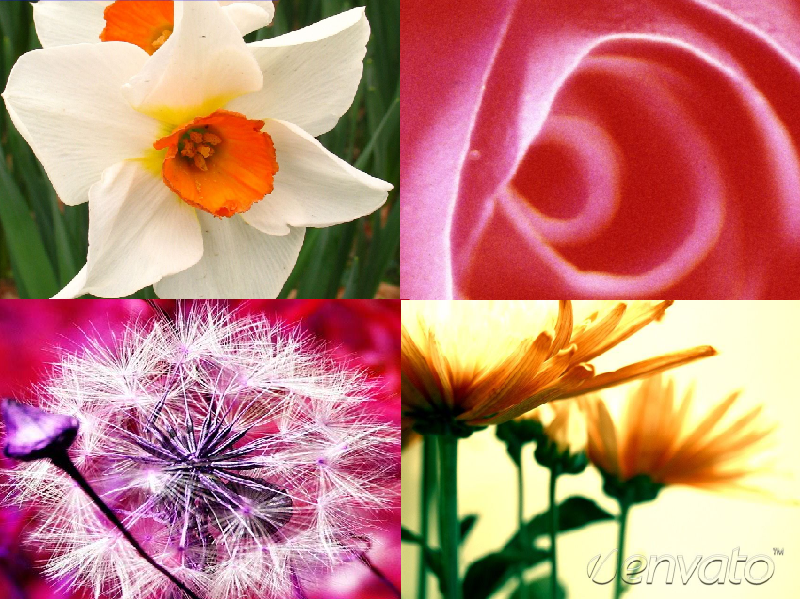
For now, let's just select four images from the internet. Here are the four images that I have selected:
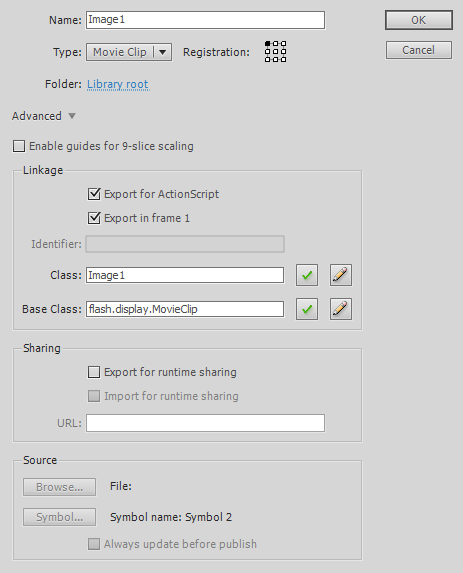
Now drag each one onto the stage. Push F8 to create a MovieClip. Here are the settings that you should choose for each MovieClip. Now just replace the "1" with the number of the image in each case.
Once you've chosen a number of images that satisfies you, move ahead to the next step :)
Step 7: Our Image Array
Now let's create a list of all of our images inside our Main class. Add the highlighted line of code to your class
package
{
	import flash.display.MovieClip;
	import flash.events.Event;
	import flash.events.MouseEvent;
	import flash.geom.Point;
	import org.flintparticles.common.actions.Age;
	import org.flintparticles.common.actions.ScaleImage;
	import org.flintparticles.common.counters.Blast;
	import org.flintparticles.common.counters.Steady;
	import org.flintparticles.common.displayObjects.RadialDot;
	import org.flintparticles.common.emitters.Emitter;
	import org.flintparticles.common.initializers.ImageClass;
	import org.flintparticles.common.initializers.Initializer;
	import org.flintparticles.common.initializers.ScaleImageInit;
	import org.flintparticles.common.particles.Particle;
	import org.flintparticles.threeD.initializers.RotateVelocity;
	import org.flintparticles.twoD.actions.DeathZone;
	import org.flintparticles.twoD.actions.Explosion;
	import org.flintparticles.twoD.actions.MouseAntiGravity;
	import org.flintparticles.twoD.actions.Move;
	import org.flintparticles.twoD.actions.RotateToDirection;
	import org.flintparticles.twoD.emitters.Emitter2D;
	import org.flintparticles.twoD.initializers.Position;
	import org.flintparticles.twoD.initializers.Velocity;
	import org.flintparticles.twoD.renderers.DisplayObjectRenderer;
	import org.flintparticles.twoD.zones.DiscSectorZone;
	import org.flintparticles.twoD.zones.DiscZone;
	import org.flintparticles.twoD.zones.LineZone;
	import org.flintparticles.twoD.zones.PointZone;
	import org.flintparticles.twoD.zones.RectangleZone;

	public class Main
	{
		private var imageList:Array = [Image1, Image2, Image3,  Image4]

		public function Main()
		{

		}

	}

}
Step 8: Our Bubble Mask
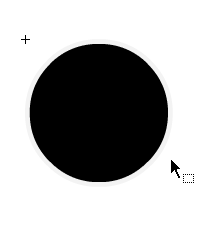
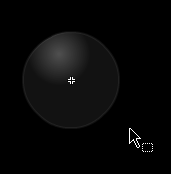
Let's make an object that will mask the image selected by our program. This will just be a black circle which is the shape we want our images to take. If you want, you can do something more creative like a star... It all works.
Draw the circle, select it, and push F8 to create a new MovieClip. Make sure to set the registration point to the top right corner. Also set the class name to MaskMC. Now delete the object from the stage. Here is a screenshot of what the object can look like:
Step 9: Countdown Variable
Place this variable above the constructor. This variable will be used as a countdown timer to check when to make a new bubble:
private var countDown:int = 30
Step 10: ENTER_FRAME Event Listener
Now let's add an ENTER_FRAME event listener and a function for it to call. Add the following code to your constructor.
addEventListener(Event.ENTER_FRAME, enterFrame)
Now we can create this function for our event listener to link to:
private function enterFrame(e:Event):void {
	//Create bubbles
{
Step 11: Countdown Loops
Now that we've set our event listener up, we can modify our function to have to do something every time the counter reaches zero. Modify your function to look like this:
	//30 times in a second:
	private function enterFrame(e:Event):void {
		//Subtract one from the countDown
		countDown--

		//If the countdown is at 0
		if (countDown == 0) {
		//Make a new bubble

		//Restart countdown at 30
		countDown = 30
		}
	}
Now we can just insert the right bubble making code into the function and we'll be all set!
Step 12: enterFrame() Part 1
Let's do the next part of our enterFrame() function. In this step, we shall be creating the bubble MovieClip. Add the following into your function:
//Creates a new movieclip which will be our bubble
var myNewBubble:MovieClip = new MovieClip()

//Adds the mask to the bubble
myNewBubble.addChild(new MaskMC())

//Picks a random MovieClip from the array of images.
//[Math.floor(Math.random() * imageList.length)] is just choosing the number of
//the image, based on the number of items in the list
var myImageInBubble:MovieClip = new imageList[Math.floor(Math.random() * imageList.length)]()

//Adds the image to the bubble
myNewBubble.addChild(myImageInBubble)

//Masks the image to the mask .getChildAt(0) is the first
//object added to a MovieClip
myImageInBubble.mask = myNewBubble.getChildAt(0)
This is how your function should look now:
private function enterFrame(e:Event):void
{
	countDown--
	if (countDown <= 0) {

		var myNewBubble:MovieClip = new MovieClip()
		myNewBubble.addChild(new MaskMC())
		var myImageInBubble:MovieClip = new imageList[Math.floor(Math.random() * imageList.length)]()
		myNewBubble.addChild(myImageInBubble)
		myImageInBubble.mask = myNewBubble.getChildAt(0)

	}
}
Step 13: enterFrame() Part 2
And now we can add the finishing touches to our enterFrame() function. Here are the things to add underneath what we did earlier:
//Places the bubble at the bottom of the screen
myNewBubble.y = 800
//Moves the bubble randomly on the X axis
myNewBubble.x = Math.random() * stage.width

//Adds an event listener to the bubble
myNewBubble.addEventListener(Event.ENTER_FRAME, bubbleFrameEnter)
addChild(myNewBubble)
Here is a snapshot of what your enterframe function should be looking like:
private function enterFrame(e:Event):void {
	countDown--
	if (countDown <= 0) {

		var myNewBubble:MovieClip = new MovieClip()
		myNewBubble.addChild(new MaskMC())
		var myImageInBubble:MovieClip = new imageList[Math.floor(Math.random() * imageList.length)]()
		myNewBubble.addChild(myImageInBubble)
		myImageInBubble.mask = myNewBubble.getChildAt(0)

		myNewBubble.y = 800
		myNewBubble.x = Math.random() * stage.width

		myNewBubble.addEventListener(Event.ENTER_FRAME, bubbleFrameEnter)
		addChild(myNewBubble)


		countDown = 30


	}
}
Step 14: Bubble's ENTER_FRAME Handler
If you remember from our last step, we added another enterframe event listener to our new bubble. Add this function to your main class so that the bubbles move:
private function bubbleFrameEnter(e:Event):void {
	//Move the target of our function up slowly
	e.target.y -= 7

	//If the bubble's Y is lower than zero
	if (e.target.y < 0) {
		//Pop and remove bubble
	}
}
You may find that this reduces your SWF's performance. If so, try adding each bubbles to an array when it's created, and moving each bubble in the array up by 7 pixels in the enterFrame() function.
Step 15: Killing Bubbles
We have yet to make our bubbles pop with the FLiNT engine, but we can at least remove them and save some memory. Here is what we can add to our bubble's ENTER_FRAME handler to delete our objects from the stage and remove the event listener attached to them.
//Find the parent of our bubble (target)
//and tell it to remove our target
e.target.parent.removeChild(e.target)

//Remove our target's (the bubble's) event
//listener, so it doesn't do anything anymore
e.target.removeEventListener(Event.ENTER_FRAME, bubbleFrameEnter)
Here is what your bubbleFrameEnter function should look like:
private function bubbleFrameEnter(e:Event):void
{
	e.target.y -= 7
	if (e.target.y < 0) {

		//FLiNT explosion FX here
		//_______________________

		e.target.parent.removeChild(e.target)
		e.target.removeEventListener(Event.ENTER_FRAME, bubbleFrameEnter)

	}
}
If you're using an array, you'll need to remove the bubble from the array here.
Congratulations on finishing Part One of our application! Now we need to add some FLiNT effects to our program to make it more realistic and fun to watch!
Step 16: Background Bubble Design
Now let's add some background bubble effects to our scene. To do this we need to design a MovieClip to use with FLiNT. Make sure the following settings are set in your new MovieClip:

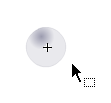
Draw a bubble that you would like to use. Note that this is different from the photo bubbles we've been dealing with. I have chosen the following image below (zoomed 8 times). The size doesn't matter as long as it is small enough to multiply a few times and still look good.
Step 17: Renderer and Emitter
We can now get started with the FLiNT engine. To begin, we need to create our Emitter and Renderer. Add the following code above the constructor of your document class.
//Creates a new DisplayObjectRenderer
private var myRenderer:DisplayObjectRenderer = new DisplayObjectRenderer();

//Creates a 2D FLiNT emitter for standard 2D effects
private var myEmitter:Emitter2D = new Emitter2D()
From the emitter, we can attach all of the correct properties to the bubbles to make them behave like we want them to. The renderer will be drawing the bubbles onto the stage.
Step 18: Emitter Customization
Now that we have created our emitter, we can go ahead and attach all of the actions and properties we want to it to make it behave just how we want it to. To do this, add the following code anywhere inside your constructor.
//Tells the emitter to create 10 bubbles every second
myEmitter.counter = new Steady( 10 );

//Tells the emitter to use the bubble_mc MovieClip as our particle
myEmitter.addInitializer(new ImageClass(bubble_mc));

//Tells the emitter to create bubbles within a certain
//line span. Bubble locations range from (0,700) to (830,700),
//spanning from one side of the bottom of the screen to the other
myEmitter.addInitializer(new Position(new LineZone(new Point(0,700),new Point(830,700))))

//Sets the velocity of the particles to X:0, Y: -65,
//making them go in a straight direction up.
myEmitter.addInitializer( new Velocity( new PointZone( new Point( 0, -65 ) ) ) );

//Tells the emitter to randomly scale images from .75x to 5x
myEmitter.addInitializer( new ScaleImageInit( 0.75, 5 ) );

//Tells the particles to start moving
myEmitter.addAction( new Move() );

//Draws a rectangle from the top left corner (-40,-40),
//to the bottom right corner (850,750). This will be the
//safe zone for bubbles. Any bubbles exitting these bounds
//are destroyed
myEmitter.addAction( new DeathZone( new RectangleZone(-40,-40,850,750), true ) );

//Tells bubbles to move away from the mouse, specifying
//the force of the movement (10), the renderer connected
//to the emitter (myRenderer), and the epislon of the gravity (1)
myEmitter.addAction(new MouseAntiGravity(10,myRenderer,1))

//Fires up all of the stuff we just specified :)
myEmitter.start()
Nice job on making some awesome particle effects with FLiNT. Oh wait... you can't see them... Looks like we'll have to cover that in the next step :)
Step 19: Displaying Our Masterpiece
And now *drumroll* comes the final puzzle piece in this puzzle. (erm) I mean tutorial. Now all we have to do is render our particle effects with our emitter. To do this, add the following code to the bottom of our constructor:
//Connect the particle emitter to the renderer
myRenderer.addEmitter( myEmitter );

//Add the renderer to the stage.
addChild( myRenderer );
Step 20: Bubble Explosions
In Step 15 we left a blank spot in our code for explosions when our image bubbles left the stage. Now it is time to add some FLiNT effects to the mix to make it look like the bubbles are really popping.
Let's begin by drawing our explosion particle. Go into the Flash IDE and create a new darker, smaller bubble and (Select + F8) it. Now set the class name to "bubble_mc2".
Modify your bubbleFrameEnter() function to look like the below. Check out the comments for an in-depth explanation of what we are doing:
private function bubbleFrameEnter(e:Event):void
{
	//Old movement stuff
	e.target.y -= 7

	//Check when the bubble reaches the top
	if (e.target.y < 0) {

		//Create a new particle emitter for the explosion
		var newE:Emitter2D = new Emitter2D();

		//Add the emitter to the renderer
		myRenderer.addEmitter(newE);

		//This time we want to use a "blast"
		//counter. Blast(20) tells the emitter to
		//create 20 pieces in the explosion
		newE.counter = new Blast(20);

		//Give the emitter our particle MovieClip
		newE.addInitializer(new ImageClass(bubble_mc2));

		//Set the position of the created particles to be a
		//"DiscZone". This is basically a circular area
		//where particles can be created.
		//DiscZone(centerPoint:Pointer,innerRadius,outerRadius)
		//We are setting the center point to be approximately
		//the center of the bubble and both radius's shall be
		//set to "50"
		newE.addInitializer(new Position(new DiscZone(new Point(e.target.x + 75, e.target.y + 75),50,50)));

		//Creates a new explosion
		//(power:Number, x:Number, y:Number, expansionRate:Number, depth:Number, epsilon:Number)
		//The explosion has a power of 5, starts at the center of our DisZone,
		//has a expansionRate of 2000, depth of 20, and an epislon of 1
		newE.addAction(new Explosion(5, e.target.x + 75 , e.target.y + 75, 2000,20, 1));

		//Tells the emitter to start moving the particles
		newE.addAction(new Move());

		//Sets the death zone of particles outside of the screen
		newE.addAction(new DeathZone(new RectangleZone(-30, -30, 820, 620), true));

		//Starts the emitter
		newE.start();

		e.target.parent.removeChild(e.target)
		e.target.removeEventListener(Event.ENTER_FRAME, bubbleFrameEnter)

	}
}
Conclusion
Congratulations on using FLiNT to make a dynamic image displayer. Now that you've created this, you can start using the techniques showed in this tutorial for your own personal projects to create something truly unique with FLiNT.
Thanks for reading, and I hope the tutorial was useful for you :)

Comments