Source control is the way to go for software development, and using a repository hosting service allows you to manage your code even further.
Besides the multiple benefits of Bitbucket that we've already mentioned, you can also set up webhooks to automate processes and create all sorts of alerts and interactions based on actions executed in your repository. In this article we're going to take a look at what webhooks are and how you can use them, and we'll go through an example of implementing code deployment via webhooks.
What's a Webhook?
When you perform certain actions in a Git repository, you have the ability to invoke a given script. This is called a hook, and there are several types of hooks in Git. You can, for instance, execute a script just before committing changes to the repository, or before pushing to the remote repository.
These examples are for a local repository. However, when using a repository hosting service such as Bitbucket, you have the ability to execute webhooks. These are very similar to a Git hook, but instead of executing a script, you send an HTTP request to a given URL, with the payload varying based on the type of webhook.
Improving Your Workflow
Although it's not hard, deploying your code to a production server can be very time-consuming and a real pest. However, it's a necessary step in any modern application development. In a local repository you could create a script that builds your code every time you commit something or merge to your master branch, and when working with Bitbucket this should be no different. To emulate this, we will take advantage of the Bitbucket POST hook.
Setting Up the POST Hook
The first step to set up the POST hook for a given repository is to have the repository in place. For this tutorial I'm going to use a modified version of Bootstrap's Jumbotron example. You can grab the repository from Bitbucket or simply fork it in your account. This example is the same as Bootstrap's Jumbotron, but using RequireJS and managing dependencies via npm and Bower.
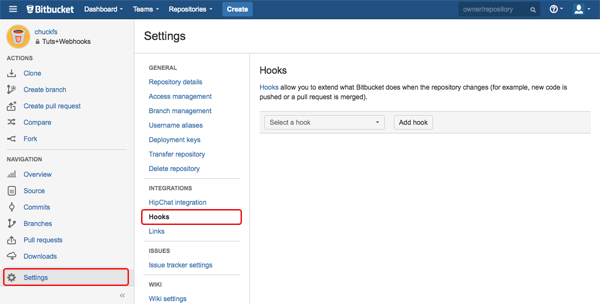
Once you have the repository in place, it's time to set up the POST hook. Go to the repository overview, navigate to Settings, and go to the Hooks section. For the hook type select POST, and enter the URL to send the HTTP request to once the repository is pushed. This is all you need to do on the Bitbucket side to automate your deployment process via webhooks.
Handle the Hook Request
Once you have configured the POST hook for your repository, the next thing you need to do is catch the request and in this case clone and build the repository in the public HTML path. For this we are going to use NodeJS with ExpressJS. Let's create the script that will handle the cloning, installing, building and moving of the application. It's a bash script that we can execute from our NodeJS server.
#/bin/bash

git clone $1

cd tuts-webhooks

npm install

bower install

node_modules/requirejs/bin/r.js -o build.js
rm build/build.txt

rm -rf /usr/share/nginx/www/tuts-webhooks.bitslice.net/html/*
mv build/* /usr/share/nginx/www/tuts-webhooks.bitslice.net/html/.
cd ../
rm -rf tuts-webhooks
This script takes care of all the steps necessary to get the application code, as well as building, optimizing and moving the result to the server public location. The $1 refers to the script's first argument, which, in this case, is the repository URL. Note however that the paths are set to the paths in my server, and yours will likely be different, so update them in order for the script to work correctly.
With this script in place, we can run it manually with the repository URL and get a production version of our website. However we don't want to execute it manually, and this is where NodeJS and the Bitbucket POST request will shine. Let's create a server that will respond to the POST hook request and execute the previous script.
Package.json
The describer for the server that will handle the POST hook requests is as follows.
{
    "name"              : "WebHooksTutsPlus",
    "description"       : "Server application used to catch requests send from the Tuts Bitbucket Webhooks repository.",
    "version"           : "1.0.0",
    "private"           : true,
    "dependencies"      : {
        "body-parser"   : "~1.0.x",
        "express"       : "4.x.x"
    }
}
The only dependencies for this simple server are Express and body-parser for handling the JSON requests payload.
NodeJS Server
Now for the actual NodeJS server, the code goes as follows.
var bodyParser  = require( 'body-parser' ),
    express     = require( 'express' ),
    app         = express();

var site		= require( './routers/site' );

app.use( bodyParser.json() );
app.use( bodyParser.urlencoded() );

app.get( '/', function ( req, res, next ) {
    res.send( 'Hooks listener running' );
});
app.use( '/site', site );

app.listen( 9090 );
This is a very simple web server that listens on the localhost's 9090 port. At line 10 we have a method that listens on the server base URL and responds with a text message just to verify that the server is running. Now for the script that actually handles the POST hook, add the following script and place it inside the _routers_ folder.
var express = require( 'express' ),
    router  = express.Router();

router.post( '/', function ( req, res, next ) {
    var payload         = JSON.parse( req.param( 'payload' ) ),
        repo            = payload.canon_url + payload.repository.absolute_url,
        exec            = require( 'child_process' ).exec;

	exec( './site.sh ' + repo + ' site', function ( error, stdout, stderr ) {});

    res.json({ message : 'Site updated' });
});

module.exports  = router;
This router listens for POST requests to the 'site' URL. It just builds the repository URL from the request payload and executes our previously created script with the repository URL. For simplicity we are not handling the output of the NodeJS exec method or checking for errors in the script execution.
That's it! Now after each push to your repository, your site will automatically build, optimize and deploy the code. Just remember to give it a couple of minutes to install all the dependencies and compile the code.
Security Considerations
OK, that's great: our site updates automatically when we push changes to the repository. But right now we are not validating any information when performing the update process. One of the most basic checks that we can and should perform is the origin of the request, and Bitbucket gives us the IPs that the POST hook may come from. With this information we can now modify our server to only attempt to update the website when the request is coming from this origin. Add the following code at the top of our router method.
if ( req.ip != '131.103.20.165' && req.ip != '131.103.20.166' ) {
    res.json({ message : 'Untrusted origin' });
    return;
}
Note that if Bitbucket updated its outgoing IPs we would need to update this section. Another thing to take into account is that, at least in my case, I'm using nginx as a reverse proxy, so right now the req.ip call will return 127.0.0.1 and won't work. To fix this, we need to tell our server to trust the proxy and use the original IP. Simple enough: we just need to add the following code above the first app.use() call in our server.js.
app.enable( 'trust proxy' );
And that's it, now our req.ip will give the original IP address, and we can check against Bitbucket's outgoing addresses.
Special Considerations
This example uses a NodeJS server to handle the request, and the server listens on the localhost's port 9090. Therefore, in order for this to work I'm using nginx as a reverse proxy to pass the remote request to the NodeJS server. Setting up nginx as a reverse proxy is outside the scope of this tutorial, but it is important to mention and to use an equivalent configuration when following along. Also remember to perform the npm install command before starting the server for the first time.
Conclusion
Throughout this series we have seen some really cool possibilities and ways to take advantage of Bitbucket's capabilities. And we have just scratched the surface of webhooks. There are lots of different triggers and information provided by each hook (read what other information is passed in a Bitbucket POST hook), so you could, for example, set it up to get alerts when someone forks your repository. Or on the more advanced end of the spectrum, you can create a mobile application to get push notifications when certain actions are performed.
Leave any comments, questions and any other feedback in the comments section below.

Comments