In this series, you've been learning how to create a WordPress theme form static HTML.
Up to this point, you have:
- prepared your markup for WordPress
- converted your HTML to PHP and split your file into template files
- edited the stylesheet and uploaded your theme to WordPress
- added a loop to your index file
- added meta tags, the
wp_headhook and the site title and description to your header file - added a navigation menu
- added widget areas to the header and sidebar.
In this tutorial, you'll finish off the footer.php file by adding the following areas to it:
- widget areas
- a colophon
- the
wp_footerhook.
When you've done this. you will have a fully functioning theme. Then, in the remaining parts of the series, I'll show you how to make your theme even better by adding extra template files and featured images functionality.
What You'll Need
- your code editor of choice
- a browser for testing your work
- a WordPress installation, either local or remote
- If you're working locally, you'll need MAMP, WAMP or LAMP to enable WordPress to run.
- If you're working remotely, you'll need FTP access to your site plus an administrator account in your WordPress installation.
1. Registering Widget Areas for the Footer
Registering widget areas for your footer is very similar to registering them for the header and sidebar which we did in the previous article in this series.
The different is that, in this article, we're going to register four widget area rather than just one. This means that the theme can have four widgetized areas displayed side-by-side in what's traditionally called a "fat footer."
Start by opening your functions.php file. Find the wptutsplus_widgets_init() function and add the following code inside it, below the code for the three sidebars you've already registered:
// First footer widget area, located in the footer. Empty by default.
register_sidebar(
	array(
		'name' => __( 'First Footer Widget Area', 'compass' ),
		'id' => 'first-footer-widget-area',
		'description' => __( 'The first footer widget area', 'compass' ),
		'before_widget' => '<div class="widget-container %2$s" id="%1$s">',
                'after_widget' => '</div>',
		'before_title' => '<h3 class="widget-title">',
                'after_title' => '</h3>'
	)
);

// Second Footer Widget Area, located in the footer. Empty by default.
register_sidebar(
	array(
		'name' => 'Second Footer Widget Area',
		'id' => 'second-footer-widget-area',
		'description' => 'The second footer widget area',
		'before_widget' => '<div class="widget-container %2$s" id="%1$s">',
                'after_widget' => '</div>',
		'before_title' => '<h3 class="widget-title">',
                'after_title' => '</h3>',
	)
);

// Third Footer Widget Area, located in the footer. Empty by default.
register_sidebar(
	array(
		'name' => 'Third Footer Widget Area',
		'id' => 'third-footer-widget-area',
		'description' => 'The third footer widget area',
		'before_widget' => '<div class="widget-container %2$s" id="%1$s">',
                'after_widget' => '</div>',
		'before_title' => '<h3 class="widget-title">',
                'after_title' => '</h3>',
	)
);

// Fourth Footer Widget Area, located in the footer. Empty by default.
register_sidebar(
	array(
		'name' => 'Fourth Footer Widget Area',
		'id' => 'fourth-footer-widget-area',
		'description' => 'The fourth footer widget area',
		'before_widget' => '<div class="widget-container %2$s" id="%1$s">',
                'after_widget' => '</div>',
		'before_title' => '<h3 class="widget-title">',
                'after_title' => '</h3>',
	)
);
This registers four new widget areas, each of which has a unique ID and description.
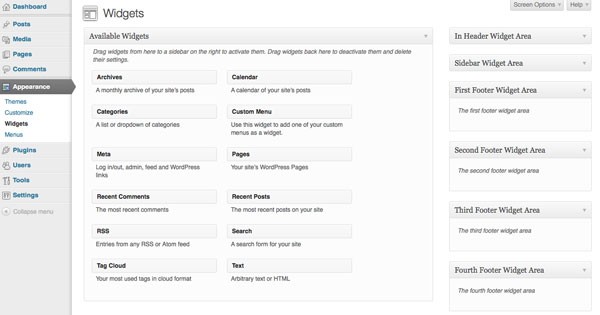
If you open the "Widgets" admin screen now, you'll see the four empty widget areas ready for you to populate:

But you still need to add the widget areas to your footer.php file to make them work properly.
2. Adding Widget Areas to the Footer File
Open your theme's footer.php file and find this code:
<aside class="fatfooter" role="complementary">
  <div class="first quarter left widget-area">
    <div class="widget-container">
      <h3 class="widget-title">First footer widget area</h3>
      A widget area in the footer - use plugins and widgets to populate this.
    </div><!-- .widget-container -->
  </div><!-- .first .widget-area -->
  <div class="second quarter widget-area">
    <div class="widget-container">
      <h3 class="widget-title">Second footer widget area</h3>
      A widget area in the footer - use plugins and widgets to populate this.
      </div><!-- .widget-container -->
    </div><!-- .second .widget-area -->
  <div class="third quarter widget-area">
    <div class="widget-container">
      <h3 class="widget-title">Third footer widget area</h3>
      A widget area in the footer - use plugins and widgets to populate this.
    </div><!-- .widget-container -->
  </div><!-- .third .widget-area -->
  <div class="fourth quarter right widget-area">
    <div class="widget-container">
      <h3 class="widget-title">Fourth footer widget area</h3>
        A widget area in the footer - use plugins and widgets to populate this.
    </div><!-- .widget-container -->
  </div><!-- .fourth .widget-area -->
</aside><!-- #fatfooter -->
Replace it with the code below:
<aside class="fatfooter" role="complementary">
  <div class="first quarter left widget-area"></div><!-- .first .widget-area -->
  <div class="second quarter widget-area"></div><!-- .second .widget-area -->
  <div class="third quarter widget-area"></div><!-- .third .widget-area -->
  <div class="fourth quarter right widget-area"></div><!-- .fourth .widget-area -->
</aside>
<!-- #fatfooter -->
Now save your footer template.
You can now add widgets to your widget areas via the "Widgets" admin screen. I won't cover this here as we've already reviewed you how to do that in the previous tutorial.
3. Adding a Colophon to Your Footer
A colophon is a note at the bottom of the page with small print. It may include copyright information, or company details if your site is for a company, or other similar information. For many WordPress-based sites, many of them include a link that reads "Proudly Powered by WordPress."
In my colophon, I'm going to add a copyright notice with the date - I'll use the bloginfo() function to retrieve information about the site.
In your footer.php file, immediately after the closing </footer> tag, add the following code:
</pre>
<section class="colophon" role="contentinfo">
  <small class="copyright half left">
    © 2013
  </small><!-- .copyright -->
  <small class="credits half right">
     Proudly powered by <a href="http://wordpress.org/">WordPress</a>.
  </small><!-- .credits -->
</section><!--.colophon-->
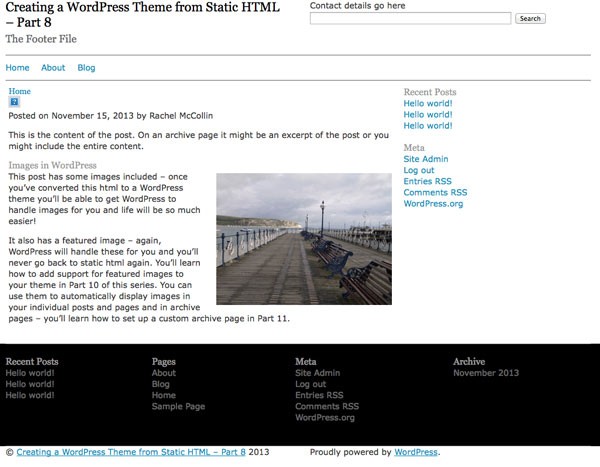
Now if you save your footer file and visit your site, you will see the colophon displayed (as well as the footer widgets):

4. Adding the wp_footer Hook
The final step is to add the wp_footer hook. You may remember that in Part 5 of this series you added the wp_head hook to the header.php file. Both of these hooks are used by plugins and both are essential for any site using your theme to work.
In your footer.php template, before the closing </body> tag, add the following line:
<?php wp_footer(); ?>
Finally, save your file.
Summary
The footer template, as well as all of the other template files you've created, is now complete. You have a fully functioning theme which you can use to power your sites.
In the next tutorial, I'll show you how to make your theme even better by adding a template file just for static pages, so that you can display content differently on those to the way it's displayed on posts or archive pages.
Resources
- The Widgets API
- The wp_get_theme() function
- The wp_footer hook


Comments