In the first part of this series, we explored the basics of the Sprite Kit framework and implemented the game's start screen. In this tutorial, we will implement the game's main classes.
Swift is an object-oriented language and we will take advantage of this
by separating all of the game's entities into their own classes. We'll start by implementing the Invader class.
1. Implementing the Invader Class
Step 1: Create the Invader Class
Select New > File... from Xcode's File menu, choose Cocoa Touch Class from the iOS > Source section, and click Next. Name the class Invader and make sure it inherits from SKSpriteNode. Make sure that Language is set to Swift. Enter the following code into Invader.swift.
import UIKit
import SpriteKit

class Invader: SKSpriteNode {

    var invaderRow = 0
    var invaderColumn = 0

    init() {
        let texture = SKTexture(imageNamed: "invader1")
        super.init(texture: texture, color: SKColor.clearColor(), size: texture.size())
        self.name = "invader"
    }

    required init?(coder aDecoder: NSCoder) {
        super.init(coder: aDecoder)
    }


    func fireBullet(scene: SKScene){

    }

}
The Invader class is a subclass of the SKSpriteNode class. It has two properties, invaderRow and invaderColumn. The invaders are aligned in a grid just like in the original Space Invaders game. The two properties give us an easy way to keep track of which row and column the invader is in.
In the init method, we initialize an SKTexture instance. The init(imageNamed:) method takes an image as a parameter. We then invoke the initializer of the superclass, passing in the texture, SKColor.clearColor for the color parameter, and for the size parameter we pass in the texture's size. Finally, we set the name to "invader" so we can identify it later.
The init method is a designated initializer, which means that we need to delegate initialization up to a designated initializer of the Invader's superclass. That's why we invoke the init(texture:color:size:) method.
You may be wondering why the required init(coder:) method is there as well. The SKSpriteNode conforms to the NSCoding protocol. The init(coder:) method is marked as required, which means that every subclass needs to override this method.
We will implement the fireBullet method later in this tutorial.
Step 2: Add Invaders to the Scene
In this step, we will add the invaders to the GameScene. Open GameScene.swift and delete everything inside the didMoveToView(_:) method as well as everything within the touchesBegan(_:withEvent:) method. The contents of GameScene.swift should now look like this.
import SpriteKit

class GameScene: SKScene {
    override func didMoveToView(view: SKView) {

    }

    override func touchesBegan(touches: Set<NSObject>, withEvent event: UIEvent) {
        /* Called when a touch begins */

    }

    override func update(currentTime: CFTimeInterval) {
        /* Called before each frame is rendered */
    }
}
We will have one global variable in our project, invaderNum. This variable is used to keep track of the current level of the game. By declaring it as a global variable, we have access to invaderNum across scenes. To declare the variable as a global variable, we declare it outside the GameScene class.
import SpriteKit

var invaderNum = 1
class GameScene: SKScene {
...
Next, add the following properties to the GameScene class.
class GameScene: SKScene {
    let rowsOfInvaders = 4
    var invaderSpeed = 2
    let leftBounds = CGFloat(30)
    var rightBounds = CGFloat(0)
    var invadersWhoCanFire:[Invader] = []

    override func didMoveToView(view: SKView) {

    }
The rowsOfInvaders property is how many rows of invaders the game will have and the invaderSpeed property is how fast the invaders will move. The leftBounds and rightBounds properties are used to create a margin on the left and right side of the screen, restricting the invaders' movement in the left and right directions. And finally, the invadersWhoCanFire property is an array that's used to keep track of which invaders can fire a bullet.
Add the setupInvaders method below the update(currentTime:) method in the GameScene class.
func setupInvaders(){
    var invaderRow = 0;
    var invaderColumn = 0;
    let numberOfInvaders = invaderNum * 2 + 1
    for var i = 1; i <= rowsOfInvaders; i++ {
        invaderRow = i
        for var j = 1; j <= numberOfInvaders; j++ {
            invaderColumn = j
            let tempInvader:Invader = Invader()
            let invaderHalfWidth:CGFloat = tempInvader.size.width/2
            let xPositionStart:CGFloat = size.width/2 - invaderHalfWidth - (CGFloat(invaderNum) * tempInvader.size.width) + CGFloat(10)
            tempInvader.position = CGPoint(x:xPositionStart + ((tempInvader.size.width+CGFloat(10))*(CGFloat(j-1))), y:CGFloat(self.size.height - CGFloat(i) * 46))
            tempInvader.invaderRow = invaderRow
            tempInvader.invaderColumn = invaderColumn
            addChild(tempInvader)
               if(i == rowsOfInvaders){
                    invadersWhoCanFire.append(tempInvader)
                }
            }
        }
    }
We have the invaderRow and invaderColumn variables that will be used to set the properties of the same name on the invader. Next, we use a double for loop to lay out the invaders on the screen. There is a lot of numeric type conversion going on, because swift does not implicitly convert numbers to the appropriate type. We must do so ourselves.
We first instantiate a new Invader, tempInvader, and then declare a constant invaderHalfWidth that is half the size of tempInvader.
Next, we calculate the xPositionStart so that the invaders will always be aligned in the middle of the scene. We get half of the scene's width and subtract half of the invader's width since the default registration point is the center (0.5, 0.5) of the sprite. We then must subtract the width of the invader times however much invaderNum is equal to, and add 10 to that value, since there are 10 points of space between the invaders. This may be a little hard to comprehend at first, so take your time to understand it.
We then set the invader's position property, which is a GGPoint. We use a bit more math to make sure each invader has 10 points of space between them and that each row has 46 points of space between them.
We assign the invaderRow and invaderColumn properties, and add the tempInvader to the scene with the addChild(_:) method. If this is the last row of invaders, we put the tempInvader into the invadersWhoCanFire array.
The setupInvaders method is invoked in the didMoveToView(_:) method. In this method, we also set the backgroundColor property to SKColor.blackColor.
 override func didMoveToView(view: SKView) {
    backgroundColor = SKColor.blackColor()
    setupInvaders()
}
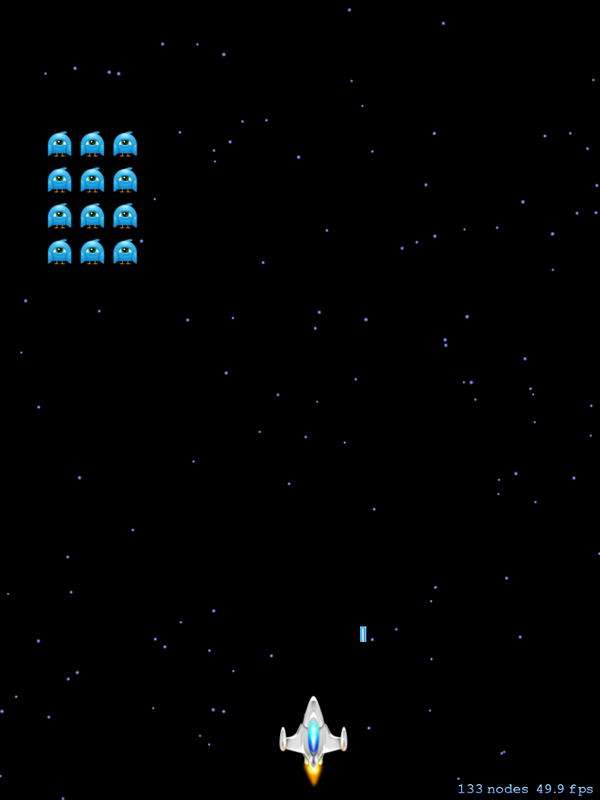
If you test the application, you should see 4 rows of 3 invaders. If you set invaderNum to 2, you should see 4 rows of 5 invaders aligned in the middle of the scene.
2. Implementing the Player Class
Step 1: Create the Player Class
Create a new Cocoa Touch Class named Player that is a subclass of SKSpriteNode. Add the following implementation to Player.swift.
import UIKit
import SpriteKit


class Player: SKSpriteNode {


    init() {
        let texture = SKTexture(imageNamed: "player1")
        super.init(texture: texture, color: SKColor.clearColor(), size: texture.size())
        animate()
    }

    required init?(coder aDecoder: NSCoder) {
        super.init(coder: aDecoder)
    }

    private func animate(){
        var playerTextures:[SKTexture] = []
        for i in 1...2 {
            playerTextures.append(SKTexture(imageNamed: "player\(i)"))
        }
        let playerAnimation = SKAction.repeatActionForever( SKAction.animateWithTextures(playerTextures, timePerFrame: 0.1))
        self.runAction(playerAnimation)
    }


    func die (){

    }

    func kill(){

    }

    func respawn(){

    }

    func fireBullet(scene: SKScene){

    }
}
The init method should look familiar. The only difference is that we are using a different image for the initial setup. There are two images named player1 and player2 in the images folder, one has the thruster engaged and the other has the thruster off. We will constantly switch between these two images, creating the illusion of a thruster firing on and off. This is what the animate method does.
In the animate method, we have an array playerTextures that will hold the textures for the animation. We add the SKTexture objects to this array by using a for-in loop and a closed range using the closed range operator. We use string interpolation to get the correct image and initialize an SKTexture instance.
We declare a constant, playerAnimation, which invokes the repeatActionForever method of the SKAction class. In that action, we invoke animateWithTextures(_:timePerFrame:). The animateWithTextures(_:timePerFrame:) method takes as parameters an array of textures and the amount of time that each texture is shown. Lastly, we invoke runAction(_:) and pass in the playerAnimation.
The other methods will be implemented later in this tutorial.
Step 2: Adding the Player to the Scene
Declare a constant property named player to the GameScene class.
class GameScene: SKScene {
    ...
    var invadersWhoCanFire:[Invader] = [Invader]()
    let player:Player = Player()
Next, add the setupPlayer method below the setupInvaders method.
func setupPlayer(){
    player.position = CGPoint(x:CGRectGetMidX(self.frame), y:player.size.height/2 + 10)
    addChild(player)
}
You should be familiar with the implementation of the setupPlayer method. We set the player's position and add it to the scene. However, we are using a new function, CGRectGetMidX(_:), which returns the center of a rectangle along the x-axis. Here we use the scene's frame.
You can now invoke the setupPlayer method in the didMoveToView(_:) method.
 override func didMoveToView(view: SKView) {
    backgroundColor = SKColor.blackColor()
    setupInvaders()
    setupPlayer()
}
If you test the application, you should see the player added to the bottom of the screen with the thrusters engaged and firing.
3. Implementing the Bullet Classes
Step 1: Create the Bullet class
Create a new Cocoa Touch Class named Bullet that is a subclass of the SKSpriteNode class.
import UIKit
import SpriteKit

class Bullet: SKSpriteNode {


    init(imageName: String, bulletSound: String?) {
        let texture = SKTexture(imageNamed: imageName)
        super.init(texture: texture, color: SKColor.clearColor(), size: texture.size())
        if(bulletSound != nil){
            runAction(SKAction.playSoundFileNamed(bulletSound!, waitForCompletion: false))
        }
    }


    required init?(coder aDecoder: NSCoder) {
        super.init(coder: aDecoder)
    }
}
The init method takes two parameters, imageName and bulletSound. The second parameter is optional. The player will play a laser sound each time a bullet is fired. I do not have the invaders doing that in this game, although you certainly could. That's also the reason why the bullet sound is an optional parameter. You could even use a different sound for each one.
The first part should be familiar, although we are now creating the texture with whatever image was passed in as the first argument. This will allow you to use different images for the player and invaders' bullets if you wanted to.
If bulletSound isn't nil, we run an SKAction method playSoundFileNamed(_:waitForCompletion:). This method takes as parameters a String, which is the name of the sound file including the extension, and a Bool, waitForCompletion. The waitForCompletion parameter isn't important to us. If it were set to true, then the action would last for however long the sound file is.
Step 2: Create the InvaderBullet Class
Create a new Cocoa Touch Class named InvaderBullet that is a subclass of the Bullet class.
import UIKit
import SpriteKit
class InvaderBullet: Bullet {

    override init(imageName: String, bulletSound:String?){
        super.init(imageName: imageName, bulletSound: bulletSound)
    }

    required init?(coder aDecoder: NSCoder) {
        super.init(coder: aDecoder)

    }

  }
The implementation of the InvaderBullet class might not make much sense, because we only call the init(imageName:bulletSound:) method of the superclass in the init(imageName:bulletSound:) initializer. It will, however, make much more sense why it is set up this way when we add code for collision detection.
Step 3: Create the PlayerBullet Class
Create a new Cocoa Touch Class named PlayerBullet that is also a subclass of the Bullet class. As you can see, the implementation of the PlayerBullet class is identical to that of the InvaderBullet class.
import UIKit
import SpriteKit

class PlayerBullet: Bullet {


    override init(imageName: String, bulletSound:String?){
        super.init(imageName: imageName, bulletSound: bulletSound)
    }
    required init?(coder aDecoder: NSCoder) {
        super.init(coder: aDecoder)
    }

}
Conclusion
In this tutorial, we created and implemented some of the key classes of the game. We added a grid of invaders to the scene and the spaceship the player will be controlling. We will continue to work with these classes in the next part of this series in which we implement the gameplay.

Comments