In this tutorial series, you'll learn how to create a Teeter inspired game. The objective of the game is to balance a ball and avoid the obstacles to get to the goal. Read on!
Where We Left Off
In the first tutorial in this series, the Teeter-like Game concept was explained and the interface created. In this tutorial, a basic physics implementation will be created, the game interaction will be coded, and the project will be exported for release.
Step 29: Add Physics
Set the physics properties for each graphic. The static elements can't be moved. Check also that we use the radius property in the player and holes, this declares the physics shape as a circle and not a square, improving the collisions.
	-- Add Physics to GFX

	physics.addBody(left, 'static')
	physics.addBody(right, 'static')
	physics.addBody(top, 'static')
	physics.addBody(bottom, 'static')

	physics.addBody(b1, 'static')
	physics.addBody(b2, 'static')
	physics.addBody(b3, 'static')
	physics.addBody(b4, 'static')

	physics.addBody(h1, 'static', {radius = 15})
	physics.addBody(h2, 'static', {radius = 15})
	physics.addBody(h3, 'static', {radius = 15})
	physics.addBody(h4, 'static', {radius = 15})
	physics.addBody(h5, 'static', {radius = 15})

	physics.addBody(player, {radius = 14})
	physics.addBody(goal, 'static', {radius = 15})
Step 30: Set Holes as Sensors
Since we don't need an actual physics response when the collision occurs, we set the holes as sensors.
	-- Set Holes as Sensors

	h1.isSensor = true
	h2.isSensor = true
	h3.isSensor = true
	h4.isSensor = true
	h5.isSensor = true

	--gameListeners('add')
end
Step 31: Code Review
Here is the full code written in this tutorial alongside with comments to help you identify each part:
-- Teeter like Game
-- Developed by Carlos Yanez

-- Hide Status Bar

display.setStatusBar(display.HiddenStatusBar)

-- Physics

local physics = require('physics')
physics.start()
physics.setGravity(0, 0)

-- Graphics

-- [Background]

local bg = display.newImage('bg.png')

-- [Title View]

local titleBg
local playBtn
local creditsBtn
local titleView

-- [Credits]

local creditsView

-- [Player]

local player

-- [Bars Table]

local bars = {}

-- [Holes Table]

local holes = {}

-- [Goal]

local goal

-- Sounds

local bell = audio.loadSound('bell.caf')
local buzz = audio.loadSound('buzz.caf')

-- Functions

local Main = {}
local startButtonListeners = {}
local showCredits = {}
local hideCredits = {}
local showGameView = {}
local gameListeners = {}
local movePlayer = {}
local onCollision = {}
local alert = {}
local dragPaddle = {}

-- Main Function

function Main()
	titleBg = display.newImage('titleBg.png')
	playBtn = display.newImage('playBtn.png', display.contentCenterX - 35.5, display.contentCenterY + 10)
	creditsBtn = display.newImage('creditsBtn.png', display.contentCenterX - 50.5, display.contentCenterY + 65)
	titleView = display.newGroup(titleBg, playBtn, creditsBtn)

	startButtonListeners('add')
end

function startButtonListeners(action)
	if(action == 'add') then
		playBtn:addEventListener('tap', showGameView)
		creditsBtn:addEventListener('tap', showCredits)
	else
		playBtn:removeEventListener('tap', showGameView)
		creditsBtn:removeEventListener('tap', showCredits)
	end
end

function showCredits:tap(e)
	playBtn.isVisible = false
	creditsBtn.isVisible = false
	creditsView = display.newImage('credits.png', 0, display.contentHeight+40)
	transition.to(creditsView, {time = 300, y = display.contentHeight-20, onComplete = function() creditsView:addEventListener('tap', hideCredits) end})
end

function hideCredits:tap(e)
	playBtn.isVisible = true
	creditsBtn.isVisible = true
	transition.to(creditsView, {time = 300, y = display.contentHeight+creditsView.height, onComplete = function() creditsView:removeEventListener('tap', hideCredits) display.remove(creditsView) creditsView = nil end})
end

function showGameView:tap(e)
	transition.to(titleView, {time = 300, x = -titleView.height, onComplete = function() startButtonListeners('rmv') display.remove(titleView) titleView = nil end})

	-- [Add GFX]

	-- Goal

	goal = display.newImage('goal.png')
	goal.x = 439
	goal.y = 31
	goal.name = 'g'

	-- Walls

	local left = display.newLine(-1, 0, -1, display.contentHeight)
	local right = display.newLine(display.contentWidth+1, 0, display.contentWidth+1, display.contentHeight)
	local top = display.newLine(0, -3, display.contentWidth, -3)
	local bottom = display.newLine(0, display.contentHeight, display.contentWidth, display.contentHeight)

	-- Bars

	local b1 = display.newImage('bar.png', 92, 67)
	local b2 = display.newImage('bar.png', 192, -2)
	local b3 = display.newImage('bar.png', 287, 67)
	local b4 = display.newImage('bar.png', 387, -2)

	-- Holes

	local h1 = display.newImage('hole.png', 62, 76)
	local h2 = display.newImage('hole.png', 124, 284)
	local h3 = display.newImage('hole.png', 223, 224)
	local h4 = display.newImage('hole.png', 356, 114)
	local h5 = display.newImage('hole.png', 380, 256)

	h1.name = 'h'
	h2.name = 'h'
	h3.name = 'h'
	h4.name = 'h'
	h5.name = 'h'

	-- Player

	player = display.newImage('player.png')
	player.x = 49
	player.y = 288
	player:setReferencePoint(display.CenterReferencePoint)

	-- Add Physics to GFX

	physics.addBody(left, 'static')
	physics.addBody(right, 'static')
	physics.addBody(top, 'static')
	physics.addBody(bottom, 'static')

	physics.addBody(b1, 'static')
	physics.addBody(b2, 'static')
	physics.addBody(b3, 'static')
	physics.addBody(b4, 'static')

	physics.addBody(h1, 'static', {radius = 15})
	physics.addBody(h2, 'static', {radius = 15})
	physics.addBody(h3, 'static', {radius = 15})
	physics.addBody(h4, 'static', {radius = 15})
	physics.addBody(h5, 'static', {radius = 15})

	physics.addBody(player, {radius = 14})
	physics.addBody(goal, 'static', {radius = 15})

	-- Set Holes as Sensors

	h1.isSensor = true
	h2.isSensor = true
	h3.isSensor = true
	h4.isSensor = true
	h5.isSensor = true

	gameListeners('add')
end
Step 32: Game Listeners
This code adds the Accelerometer and Collision listeners. It passes a parameter to remove them too.
function gameListeners(action)
	if(action == 'add') then
		Runtime:addEventListener('accelerometer', movePlayer)
		player:addEventListener('collision', onCollision)
		player:addEventListener('touch', dragPaddle)
	else
		Runtime:removeEventListener('accelerometer', movePlayer)
		player:removeEventListener('collision', onCollision)
		player:removeEventListener('touch', dragPaddle)
	end
end
Step 33: Move the Player
The Accelerometer values are captured by this function and then passed to the X and Y property of the ball.
function movePlayer:accelerometer(e)
	player.x = player.x + (e.yGravity*-15)
	player.y = player.y + (e.xGravity*-15)
end
Step 34: Collisions
When the ball collides with an object, its name is compared to the ones given to the holes and goal. Then the corresponding alert is called.
function onCollision(e)
	if(e.other.name == 'h') then
		alert()
	elseif(e.other.name == 'g') then
		alert('win')
	end
end
Step 35: Alert
The alert will remove the game listeners, play a sound, and display the correct message.
function alert(action)
	local alert

	gameListeners('rmv')

	if(action == 'win') then
		alert = display.newImage('complete.png')
		alert.x = display.contentCenterX
		alert.y = display.contentCenterY
		transition.from(alert, {time = 300, xScale = 0.3, yScale = 0.3})
		audio.play(bell)
	else
		alert = display.newImage('gameOver.png')
		alert.x = display.contentCenterX
		alert.y = display.contentCenterY
		transition.from(alert, {time = 300, xScale = 0.3, yScale = 0.3})
		audio.play(buzz)
	end
end
Step 36: Simulator Movement
I've optionally added this code to move the ball by dragging it in the simulator.
function dragPaddle(e)
	if(e.phase == 'began') then
		lastY = e.y - player.y
		lastX = e.x - player.x
	elseif(e.phase == 'moved') then
		player.y = e.y - lastY
		player.x = e.x- lastX
	end
end
Step 37: Call Main Function
In order to initially start the game, the Main function needs to be called. With the above code in place, we'll do that here:
Main()
Step 38: Loading Screen
The Default.png file is an image that will be displayed right when you start the application while the iOS loads the basic data to show the Main Screen. Add this image to your project source folder, it will be automatically added by the Corona compiler.
Step 39: Icon
Using the graphics you created before you can now create a nice and good looking icon. The icon size for the non-retina iPhone icon is 57x57px, but the retina version is 114x114px and the iTunes store requires a 512x512px version. I suggest creating the 512x512 version first and then scaling down for the other sizes.
Also, the icons It don't need to have the rounded corners or the transparent glare, iTunes and the iPhone will do that for you.
Step 40: Testing in the Simulator
It's time to do the final test. Open the Corona Simulator, browse to your project folder, and then click open. If everything works as expected, you are ready for the final step!
Step 41: Build
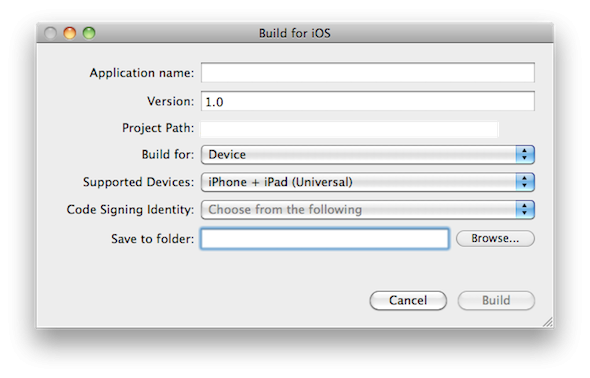
In the Corona Simulator go to File > Build and select your target device. Fill the required data and click build. Wait a few seconds and your app will be ready for device testing and/or submission for distribution!
Conclusion
Experiment with the final result and try to make your custom version of the game!
I hope you liked this tutorial series and find it helpful. Thank you for reading!

Comments