Welcome to the final tutorial in our Rapid Roll game series! In this tutorial, we'll handle the player movement, collisions, and the steps to build the final app.
Where We Left Off. . .
Please be sure to check part 1 and part 2 of the series to fully understand this tutorial.
Step 1: Player Movement
The player is pushed down by the moveSpeed variable.
function update(e)
    -- Player Movement
    player.y = player.y + moveSpeed
Step 2: Blocks Movement
The moveSpeed variable affects the blocks too, in the opposite direction.
for i = 1, blocks.numChildren do
    -- Blocks Movement
    blocks[i].y = blocks[i].y - moveSpeed
end
Step 3: Update Score
The game score raises every frame, this code changes the textfield.
	-- Score

	score = score + 1
	scoreTF.text = score
Step 4: Lose Lives
If the player reaches the top of the stage, a life is removed.
	-- Lose Lives

	if(player.y > display.contentHeight or player.y < -5) then
		player.x = blocks[blocks.numChildren - 1].x
		player.y = blocks[blocks.numChildren - 1].y - player.height
		lives = lives - 1
		livesTF.text = 'x' .. lives
	end
Step 5: Check for Game Over
When the player is out of lives, the alert function is called. This function will stop the game and reveal the final score.
	-- Check for Game Over

	if(lives < 0) then
		showAlert()
	end
Step 6: Levels
You can add as many levels as you want, this is an example of how you can add a level.
When the score reached 500, the gravity increases by 1, this will make the game move faster and harder to land on the platforms.
	-- Levels

	if(score > 500 and score < 502) then
		moveSpeed = 3
	end
end
Step 7: Grab Lives
The life graphic will be removed and the lives counter will increase when the player hits a live sprite.
function collisionHandler(e)
	-- Grab Lives

	if(e.other.name == 'live') then
		display.remove(e.other)
		e.other = nil
		lives = lives + 1
		livesTF.text = 'x' .. lives
	end
Step 8: Hit Bad Block
If the player hits a bad block, a life will be removed from the lives counter and textfield.
	-- Bad Blocks

	if(e.other.name == 'bad') then
		lives = lives - 1
		livesTF.text = 'x' .. lives
	end
end
Step 9: Show Alert
This function will stop the game and reveal the final score.
function showAlert()
	gameListeners('rmv')
	local alert = display.newImage('alertBg.png', 70, 190)

	alertScore = display.newText(scoreTF.text .. '!', 134, 240, native.systemFontBold, 30)
	livesTF.text = ''

	transition.from(alert, {time = 200, xScale = 0.8})
end
Step 10: Call Main Function
In order to initially start the game, the Main function needs to be called. With the above code in place, we'll do that here:
Main()
Step 11: Loading Screen
The Default.png file is an image that will be displayed right when you start the application while the iOS loads the basic data to show the Main Screen. Add this image to your project source folder, it will be automatically added by the Corona compliler.
Step 12: Icon
Using the graphics you created before you can now create a nice and good looking icon. The icon size for the non-retina iPhone icon is 57x57px, but the retina version is 114x114px and the iTunes store requires a 512x512px version. I suggest creating the 512x512 version first and then scaling down for the other sizes.
It doesn't need to have the rounded corners or the transparent glare, iTunes and the iPhone will do that for you.
Step 13: Testing in Simulator
It's time to do the final test. Open the Corona Simulator, browse to your project folder, and then click open. If everything works as expected, you are ready for the final step!
Step 14: Build
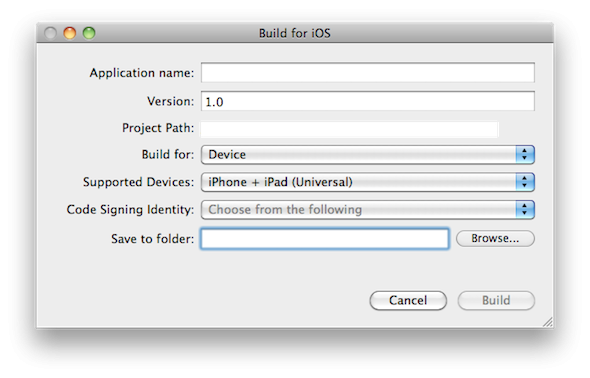
In the Corona Simulator go to File > Build and select your target device. Fill the required data and click build. Wait a few seconds and your app will be ready for device testing and/or submission for distribution!
Conclusion
Experiment with the final result and try to make your custom version of the game!
I hope you liked this tutorial series and find it helpful. Thank you for reading!

Comments