The Corona SDK makes game development for the iPhone, iPad, and Android easy. Corona uses the Lua programming language to create cross-platform apps. In this tutorial, we will explore how to create a memory match game with the Corona SDK.
Brief Overview
The Corona SDK allows developers to build cross-platform mobile applications quickly and easily while using very few lines of code. Today’s tutorial will teach you how to create a simple memory match game from scratch. We will start by creating the graphics for the game, setting up optional properties, and finally coding the game.

Gameplay
Although a memory match game is familiar to a lot of people, we want to start by defining the gameplay and the rules of our memory match game. The player will try to find matching pairs by tapping on the buttons. When the player taps on the second button, we will check if the buttons match and notify the player of the result. If the buttons match, the buttons will be removed from play.
Creating the Graphics
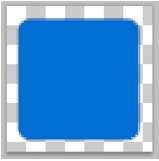
Using Photoshop, we are going to create the buttons for the memory match game. We will create 6 buttons that contain different designs.
With Photoshop open, create a New document that is 60px by 60px. After creating the document follow these steps:
- Select the Rounded Rectangle Tool
- Set Fixed Size to 56px by 56px
- Set your Foreground color to #1874cd
- Set the radius to 5px
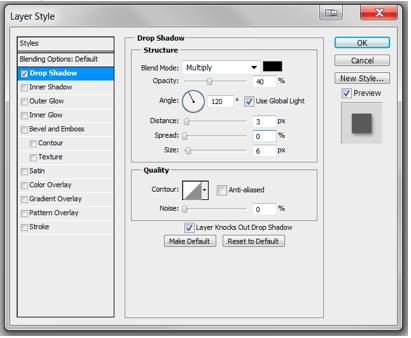
Next, let’s add some style to the button to make the game more appealing. Add the following layer styles to your buttons: Set Drop Shadow.
Then Add the following Gradient Overlay:
Color Stop 1: #1874cd
Color Stop 2: #145798

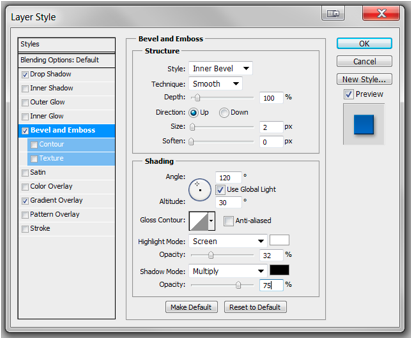
Then we need to add a "Bevel Emboss" effect.
Next, we add the icons to set up matching pairs. For the icons, I grabbed a free web icon pack from another tutorial on psd.tutsplus.com. Place 6 icons on new layers within your Photoshop file.

Now that we have the buttons setup, export the graphics as PNG images and label the images 1 – 6.
Setting Up the Lua Config
We are going to start by creating a file named config.lua. This file will set the size and the scaling properties of our application. For the memory match game, we will set the size of the app to be 320x480 and we will set the scale to zoomStretch. The zoomStretch property will scale the content to the size of the screen.
Create a new file named config.lua and save the following code inside config.lua.
application =
{
        content =
        {
        	width = 320,
                height = 480,
                scale = "zoomStretch",
        },
}
Set the Build Settings
Next, we are going to set up a build.settings file. The build file sets up optional properties that will be used to control your app. For our app, we only want the user to play in portrait mode or an upside down portrait mode.
Create a new file called build.settings and copy the following code to build.settings:
settings =
{
	orientation =
	{
		default = "portrait",
		content = "portrait",
		supported =
			{
				"portrait", "portraitUpsideDown",
			},
	},
}
Coding the Game
With our graphics created, we can start creating the memory match game. Let’s get started by opening your preferred Lua editor and create a new document called main.lua.
Hide the Status Bar
Our first step is to hide the status bar.
display.setStatusBar(display.HiddenStatusBar);
Variables
We will also set up some variables to be used throughout our program. The first two lines will return the width and height of the screen. The variable totalButtons will help us keep track of the total number of on screen buttons and the variables secondSelect and checkForMatch will set up when the app should check for matches. Finally, we will start the button grid slightly off screen for an even layout.
_W = display.contentWidth; -- Returns Screen Width
_H = display.contentHeight; -- Returns Screen Height

local totalButtons = 0 –Track total on screen buttons

local secondSelect = 0 – Track if first or second button select
local checkForMatch = false –Let the app know when to check for matches

x = -20 --Set starting point for button grid
Create the Button Tables
After we have set up some of our variables, we are going to set up the button tables.
--Declare button, buttonCover, and buttonImages table
local button = {}
local buttonCover = {}
local buttonImages = {1,1, 2,2, 3,3, 4,4, 5,5, 6,6}

--Declare and prime a last button selected variable
local lastButton = display.newImage("1.png");
lastButton.myName = 1;
Background
--Set up simple off-white background
local myRectangle = display.newRect(0, 0, _W, _H)
myRectangle:setFillColor(235, 235, 235)
Notifications
--Notify player if match is found or not
local matchText = display.newText(" ", 0, 0, native.systemFont, 26)
matchText:setReferencePoint(display.CenterReferencePoint)
matchText:setTextColor(0, 0, 0)
matchText.x = _W/2
Playing the Game
The game function is where the main gameplay will occur. The game function starts by the player flipping over the first button. When the player taps a second button, the game function runs a check to compare the two buttons. If the buttons do not match, then both buttons are flipped back over. If the buttons do match, then both buttons are removed from the screen.
--Set up game function
function game(object, event)
	if(event.phase == "began") then
		if(checkForMatch == false and secondSelect == 0) then
			--Flip over first button
			buttonCover[object.number].isVisible = false;
			lastButton = object
			checkForMatch = true
		elseif(checkForMatch == true) then
			if(secondSelect == 0) then
				--Flip over second button
				buttonCover[object.number].isVisible = false;
				secondSelect = 1;
				--If buttons do not match, flip buttons back over
				if(lastButton.myName ~= object.myName) then
					matchText.text = "Match Not Found!";
					timer.performWithDelay(1250, function()
						matchText.text = " ";
						checkForMatch = false;
						secondSelect = 0;
						buttonCover[lastButton.number].isVisible = true;
						buttonCover[object.number].isVisible = true;
					end, 1)
				--If buttons DO match, remove buttons
				elseif(lastButton.myName == object.myName) then
					matchText.text = "Match Found!";
					timer.performWithDelay(1250, function()
						matchText.text = " ";
						checkForMatch = false;
						secondSelect = 0;
						lastButton:removeSelf();
						object:removeSelf();
						buttonCover[lastButton.number]:removeSelf();
						buttonCover[object.number]:removeSelf();
					end, 1)
				end
			end
		end
	end
end
Laying Out the Buttons
Finally, we are going to lay the buttons out in a 3x4 grid. Each button that is created will be added to the button table, placed on the screen, and have an event listener attached. The event listener will allow the player to tap the button to flip it over.
Each button will also have a cover button. The cover button will hide the button image and will be removed when the button is tapped.
--Place buttons on screen
for count = 1,3 do
	x = x + 90
	y = 20

	for insideCount = 1,4 do
		y = y + 90

		--Assign each image a random location on grid
		temp = math.random(1,#buttonImages)
		button[count] = display.newImage(buttonImages[temp] .. ".png");
		--Position the button
		button[count].x = x;
		button[count].y = y;

		--Give each a button a name
		button[count].myName = buttonImages[temp]
		button[count].number = totalButtons

		--Remove button from buttonImages table
		table.remove(buttonImages, temp)

--Set a cover to hide the button image
		buttonCover[totalButtons] = display.newImage("button.png");
		buttonCover[totalButtons].x = x; buttonCover[totalButtons].y = y;
		totalButtons = totalButtons + 1

		--Attach listener event to each button
		button[count].touch = game
		button[count]:addEventListener( "touch", button[count] )
	end
end
Conclusion
Try building your own memory game by adding a scoring system, more buttons, and different graphics. The best way to learn about Corona is to jump right into it. Thank you for reading!

Comments