Many of you might be aware that we recently launched a helpful web service, called Nettuts+ Prefixr. Thankfully, the tool has come a long way since the initial launch, as I've squashed countless bugs, and added some neat new features. I'd like to give you a quick rundown on the current state of the tool, as well as how to use it.
Wait - What is Prefixr?
Prefixr takes all of those pesky CSS3 prefixes that we must type over and over, and does away with them! If you create your stylesheets using the official syntax, you may then, at deployment, run your clean stylesheet through Prefixr, and it'll instantly update your stylesheet to include every required prefix.
This way, you don't have to deal with remembering whether or not a particular CSS3 property requires a -ms prefix or not. That knowledge is built into Prefixr.
Let's review a quick example. Below, I have some scattered CSS that is badly in need of updating. Notice that, in some places, we've only declared a -moz prefix; in other areas, we've used the official syntax, etc.
.box {
   opacity: .5;
}

.container {
   box-shadow: 20px;
   -moz-transition: box-shadow 2s;
   -webkit-border-radius: 4px;
   animation: slide 1s alternate;
   background: linear-gradient(top, #e3e3e3 10%, white);
}

@-webkit-keyframes "slide" {
   0% { left: 0; }
   100% { left: 50px; }
}
Copy the code above, and paste it into Prefixr. In return, you'll receive:
.box {
   -ms-filter: "progid:DXImageTransform.Microsoft.Alpha(Opacity=50)";
   filter: alpha(opacity=50);
   opacity: .5;
}

.container {
   -webkit-box-shadow: 20px;
   -moz-box-shadow: 20px;
   box-shadow: 20px;

   -webkit-transition: box-shadow 2s;
   -moz-transition: box-shadow 2s;
   -o-transition: box-shadow 2s;
   -ms-transition: box-shadow 2s;
   transition: box-shadow 2s;

   -webkit-border-radius: 4px;
   -moz-border-radius: 4px;
   border-radius: 4px;

   -webkit-animation: slide 1s alternate;
   -moz-animation: slide 1s alternate;
   -ms-animation: slide 1s alternate;
   animation: slide 1s alternate;

   background-image: -webkit-gradient(linear, left top, left bottom, color-stop(10%, #e3e3e3), to(white));
   background: -webkit-linear-gradient(top, #e3e3e3 10%, white);
   background: -moz-linear-gradient(top, #e3e3e3 10%, white);
   background: -o-linear-gradient(top, #e3e3e3 10%, white);
   background: -ms-linear-gradient(top, #e3e3e3 10%, white);
   background: linear-gradient(top, #e3e3e3 10%, white);
}

@keyframes "slide" {
 0% {
    left: 0;
 }
 100% {
    left: 50px;
 }

}

@-moz-keyframes "slide" {
 0% {
    left: 0;
 }
 100% {
    left: 50px;
 }

}

@-webkit-keyframes "slide" {
 0% {
    left: 0;
 }
 100% {
    left: 50px;
 }

}

@-ms-keyframes "slide" {
 0% {
    left: 0;
 }
 100% {
    left: 50px;
 }

}
Wow - that's a lot of duplicate styling. But, unfortunately, it's necessary at this point in time. If you want your web applications to be as consistent as possible from browser to browser, you need to use these various prefixes. However, as you can imagine, this can quickly bloat your code. That's why Prefixr is so helpful!
Create your stylesheets using the official syntax, and then run it through Prefixr when you deploy, or when you need a conversion.
I Don't Want to Copy and Paste into Prefixr
No worries! I don't either. Visiting Prefixr.com is only one way to update your stylesheets. I much prefer to use it within my favorite code editor. Thanks to various users, there are a handful of plugins and scripts available for the most popular editors. For example, as a Sublime Text user, I personally use Will Bond's "Sublime Prefixr" plugin, which works wonderfully.
Now, I never to have to manually visit Prefixr and copy and paste my stylesheet. I simply select the bit of CSS that I wish to optimize, and type ctrl+alt+x on Windows and Linux, or cmd+ctrl+x on OSX.
Editors List
Refer below for the current list of supported editors.
TextMate Commands
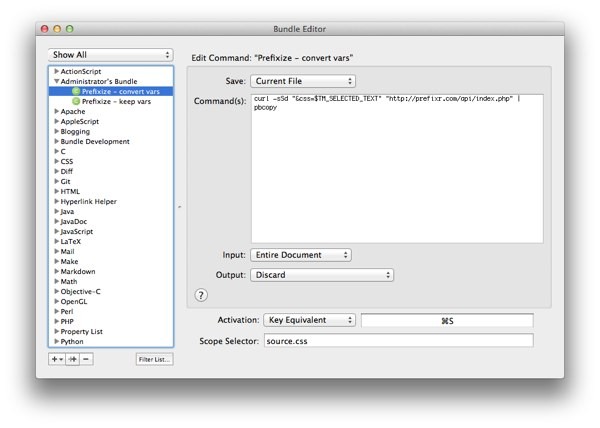
There are countless TextMate users out there; let's create a command that will run a selection through Prefixr, and place the result in the clipboard. Within TextMate, browse to the Bundle Editor, and create a new command.

Paste the following into the "Command" textarea. This will take the selected text, run it through Prefixr, and copy the response to your clipboard. Next, assign an activation key, and you're all set! This is helpful if you'd prefer to store the Prefixed results in a separate stylesheet.
curl -sSd "css=$TM_SELECTED_TEXT" "http://prefixr.com/api/index.php" | pbcopy
Or, if you'd prefer the result to be compressed, modify the command, like so:
curl -sSd "css=$TM_SELECTED_TEXT&compress_option=true" "http://prefixr.com/api/index.php" | pbcopy
Now, if your stylesheet displays:
.box {
	border-radius: 5px;
}
Select the stylesheet, type the activation key that you assigned, and the following should now be stored in your clipboard (assuming you use the compress option).
.box{-webkit-border-radius:5px;-moz-border-radius:5px;border-radius:5px;}
Can I Use Variables?
Prefixr isn't the same type of preprocessor as Less, Stylus, or Sass. I love those - Sass and Stylus particularly. Prefixr is instead for the folks who dislike the idea of using them. That said, variables do come in handy, so if you'd like to use them in Prefixr, it will automatically update your stylesheets. For example:
@variables {
  site_width: 960px;
}

.container {
   width: var(site_width);
}
Run it through Prefixr, and we get:
.container {
   width: 960px;
}
It's important to note that this is entirely an optional feature. If you feel that variables complicate CSS, then don't use this feature!
Requests?
Nettuts+ Prefixr is under active development, so if you notice a bug or would like a new feature to be implemented, either leave a comment below, or click on the "Feedback" button at Prefixr.com.


Comments