In the first part of this series I gave a quick overview of the popular CSS preprocessors LESS and SASS. I also shared a few of the frameworks in which they are used.
I plan on taking a deeper dive into LESS and talking about the parts of the language I use most often. I also plan on showing you how to get started using it with CodeKit.
Let's dig in!
What I Use and Why
I personally use LESS for most WordPress projects. I spend a lot of time working with Standard and it uses Bootstrap as its framework of choice.
Since Bootstrap uses LESS for compiling its CSS, I have learned how to use its .less files to make modifications. I know of other web designers and developers who prefer to use Foundation. Since Foundation uses SASS, they have learned to use that instead.
I am personally starting to work on another web project that uses SASS, and it has been relatively easy to pick things up due to my experience with LESS.
A Look at LESS
Variables
Variables are pretty self-explanatory. You can create a variable somewhere in your .less file and then reference it in other places in that file, or other files. I tend to use it for colors, fonts, padding, and margins.
Here's an example:
// Variables
@red: #ff0000;
@green: #00ff00;
@blue: #0000ff;

// Styling

// Links
a { color: @blue; }
a:visited { color: @blue; }
That will then compile to this:
a { color: #0000ff; }
a:visited { color: #0000ff; }
If you wanted to change the color of both link stylings, then you just need to change the variable:
@blue
from
#0000ff
to
#0000a4
You change in one spot, recompile, and you have changed all instances of that variable throughout the file.
Another great way to use these variables as well would be to use more semantic naming like:
@primaryColor
and
@secondaryColor
You can then use those variables throughout your code. When your designer comes up with those colors, you can just change them once, recompile, then you're done!
Nesting
Nesting is used just like you would nest logic in an if/else block in your PHP or JavaScript: You set your higher level selector like .post, then place the other selectors inside of it. It will eliminate the need to repeatedly type out .post in front of your other selectors like so:
// Post
.post {
	padding: 20px;
	.post-header {
		margin: 20px 0;
	}
}
That will then compile to this:
.post { padding: 20px; }
.post .post-header { margin: 20px 0; }
You can also use & to concatenate selectors as well. An example could be if you wanted to target specific widgets in your sidebar. Let's say you wanted to style the background color of Recent Posts and Recent Comments widgets differently. You can do the following in LESS:
.widget {
	padding: 20px;
	&.widget_recent_entries {
		background-color: white;
	}
	&.widget_recent_comments {
		background-color: black;
	}
}
That would compile into this:
.widget { padding: 20px; }
.widget.widget_recent_entries { background-color: white; }
.widget.widget_recent_comments { background-color: black; }
You can also use this for pseudo classes like :hover, :active, :visited, :before, and :after.
// Links
a {
	color: blue;
	&:hover {
		color: red;
	}
	&:visited {
		color: red;
	}
}
That would compile to this:
a { color: blue; }
a:hover { color: red; }
a:visited { color: red; }
Mixins
Mixins are basically a number of style attributes that you want to group together. A great example of this is for attributes that are different between browsers like border radius.
Instead of having to remember each one, you can call your mixin and it will provide each attribute for you. Here's an example:
// Mixin
.border-radius {
	border-radius: 4px;
	-moz-border-radius: 4px;
	-webkit-border-radius: 4px;
}
// Widget
.widget {
	.border-radius;
}
That will compile to the following:
.widget {
	border-radius: 4px;
	-moz-border-radius: 4px;
	-webkit-border-radius: 4px;
}
What if you wanted to use border radius multiple times in your .less file but wanted different amounts for each? That's when you would use a Parametric Mixin.
This simply means that you can reuse a mixin and pass it an argument to use. Here's an example:
// Mixin
.border-radius (@radius: 4px) {
	border-radius: @radius;
	-moz-border-radius: @radius;
	-webkit-border-radius: @radius;
}

// Widget
.widget {
	.border-radius();
}

// Post
.post {
	.border-radius(8px);
}
That would compile to this:
.widget {
	border-radius: 4px;
	-moz-border-radius: 4px;
	-webkit-border-radius: 4px;
}
.post {
	border-radius: 8px;
	-moz-border-radius: 8px;
	-webkit-border-radius: 8px;
}
Putting It All Together
Here's an example of using variables, nesting, and mixins all at the same time:
// Variables
@widget-recent-posts-border-radius: 4px;
@widget-recent-posts-background-color: white;
@widget-recent-posts-link-color: @blue;

@widget-recent-comments-border-radius: 8px;
@widget-recent-comments-background-color: black;
@widget-recent-comments-link-color: @red;

// Colors
@blue: #0000ff;
@red: #ff0000;

// Mixins
.border-radius (@radius: 4px) {
	border-radius: @radius;
	-moz-border-radius: @radius;
	-webkit-border-radius: @radius;
}

// Widgets
.widget {
	&.widget_recent_entries {
		background-color: @widget-recent-posts-background-color;
		.border-radius(@widget-recent-posts-border-radius);
		ul li a {
			color: @widget-recent-posts-link-color;
		}
	&.widget_recent_comments {
		background-color: @widget-recent-comments-background-color;
		.border-radius(@widget-recent-comments-border-radius);
		ul li a {
			color: @widget-recent-comments-link-color;
		}
	}
}
Which would all compile into this:
.widget.wiget_recent_entries {
	background-color: white;
	border-radius: 4px;
	-moz-border-radius: 4px;
	-webkit-border-radius: 4px;
}
.widget.widget_recent_entries ul li a { color: #0000ff; }
.widget.wiget_recent_comments {
	background-color: black;
	border-radius: 8px;
	-moz-border-radius: 8px;
	-webkit-border-radius: 8px;
}
.widget.widget_recent_entries ul li a { color: #ff0000; }
Using CodeKit
Importing a Project
It's extremely easy to setup your CodeKit Project. You can simply drag and drop your folder into CodeKit, or you can click the plus button in the bottom left and then select a folder from the file browser.
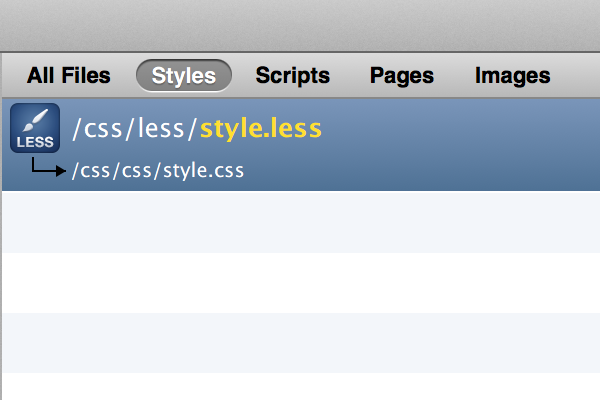
Once you do that, CodeKit will automatically scan all the files in that folder and then group them into the following categories:
- Styles
- Scripts
- Pages
- Images
Configuring the Project
So you have now imported your project files. Next we are going to set the output path of your .less files. I would suggest to have a css folder and a less folder inside of it. You will want to make sure to have all of your files in that less folder to point to your style.less file.
You will want to switch over to the Styles view. We will want to have the style.less file be compiled into your theme's root folder as style.css. To do this, you will want to right-click on the style.less file, and select "Set output path…". This will bring up a File Browser.
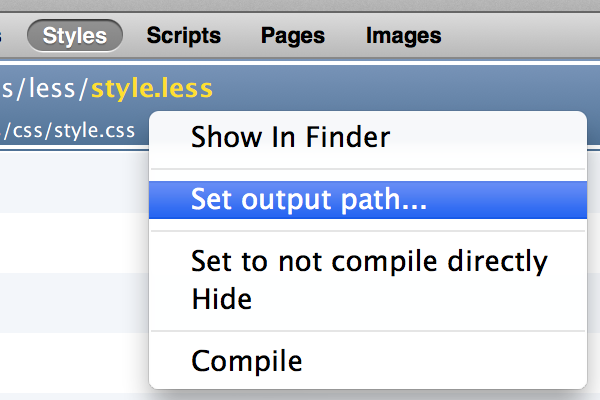
Next, you will want to click in the Output filename and extension text input. Once you do that it may auto populate style.css for you. If it doesn't, then you will want to enter in style.css. Lastly you will click on Select to save.
We are almost there! Next we will need to select a compilation setting. You will see the compilation settings screen reveal itself when you click on a .less file. We have three available output styles:
- Regular
- Minified
- Compressed (YUI)
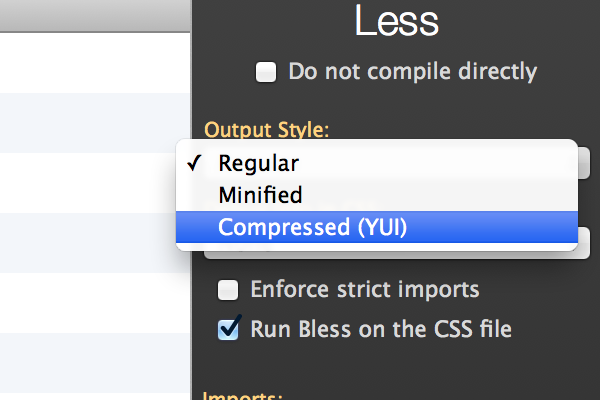
Select one of the above and click on "Compile". You should get a notification that your style.less file has compiled.
If all of your syntax is correct, your compile will be successful. If there are any errors, it will flip you over to the Log view and give you the line number and explanation of the error.
If everything compiles correctly, you should be able to open up your style.css file and see the output. As you edit your .less files and save them, CodeKit will automatically recompile your files.
Note: Make sure that you don't make any changes to the style.css file, because as soon as you recompile your .less files, your changes will be overridden.
Conclusion
We have now gone through a deeper dive into LESS and broken down a few of the popular features. I have explained a few reasons why I personally choose to use LESS in my WordPress projects and how to use CodeKit to compile all of my files.
In the next post, I will go into greater detail around how to structure your '.less' files and connect them all together.

Comments