In this tutorial you will learn how to generate custom sized images for you to use in your WordPress theme. Why use custom image sizes? So you won't have to edit every image you upload to the Media Library. This way every image uploaded will get all the custom defined image sizes generated automatically. It can be inserted into the post or page using the Media Gallery or from the loop. Continue reading to find out how.
Step 1 Defining Custom Image Sizes
For your theme to support custom image sizes you have to edit the functions.php file found in your themes folder. Open your theme's functions.php and check if you have a line that looks like this:
add_action( 'after_setup_theme', 'function_name' );
This hook is called during a theme's initialization. It is generally used to perform basic setup, registration, and initialization actions for a theme, where "function_name" is the name of the function to be called.
If you found a line like that, then also find the method with the same name as the 2nd parameter from that add_action method.
If you can't find a line that looks like that you should add it, and also create a method names as the 2nd parameter:
add_action( 'after_setup_theme', 'setup' );
function setup() {
	// ...
}
Now to enable post thumbnails for your theme add the following lines in the method defined above:
function setup() {
	// ...

	add_theme_support( 'post-thumbnails' ); // This feature enables post-thumbnail support for a theme
	// To enable only for posts:
	//add_theme_support( 'post-thumbnails', array( 'post' ) );
	// To enable only for posts and custom post types:
	//add_theme_support( 'post-thumbnails', array( 'post', 'movie' ) );

	// Register a new image size.
	// This means that WordPress will create a copy of the post image with the specified dimensions
	// when you upload a new image. Register as many as needed.
	// Adding custom image sizes (name, width, height, crop)
	add_image_size( 'featured-image', 620, 200, true );

	// ...
}
Step 2 Displaying Images With Custom Sizes
Insert Custom Sized Image Into Post Using Media Gallery
To insert an image inside a post or page from the media gallery insert the following filter into the functions.php file:
add_filter( 'image_size_names_choose', 'custom_image_sizes_choose' );
function custom_image_sizes_choose( $sizes ) {
	$custom_sizes = array(
		'featured-image' => 'Featured Image'
	);
	return array_merge( $sizes, $custom_sizes );
}
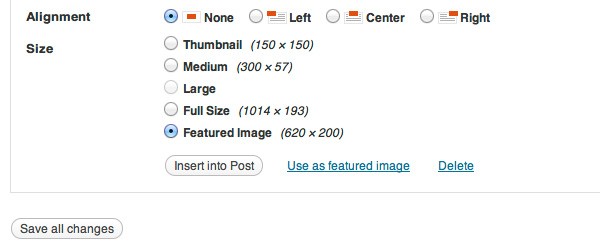
What this code does, is it merges your custom image sizes with the one defined within WordPress so the result will be the image below.

Insert Custom Sized Image Inside the Loop
To display for example the image that was named "featured-image", inside the loop you have to add these lines:
<?php
if ( has_post_thumbnail()):
	the_post_thumbnail( 'featured-image', array( 'class' => 'featured-image' ) );
endif;
?>
This will check if the post/page has any image attached and will output an <img> tag showing the image at the desired size.
Step 3 Resizing Existing Images
For this task there is a plugin to help out, Regenerate Thumbnails. It can regenerate all, a batch, or individual images. If changing image sizes and regenerating them, the images with the previous dimensions will not be deleted.
Example
Let's say you would like to make use of this feature within your theme. From the /wp-content/themes/name-of-the-theme folder open functions.php with your favorite text editor. If your theme doesn't have an after_setup_theme action defined, you must add one. The code for the custom image sizes will be added into that defined method.
Note: these are reserved image size names: thumb, thumbnail, medium, large, post-thumbnail. Adding a custom image size with a reserved name will override its predefined values.
add_action( 'after_setup_theme', 'setup' );
function setup() {
	// ...

	add_theme_support( 'post-thumbnails' ); // This feature enables post-thumbnail support for a theme
	add_image_size( 'header', 600, 200, true ); // header image
	add_image_size( 'custom-size1', 400, 200 ); // 400 pixel wide and 200 pixel tall, resized proportionally
	add_image_size( 'custom-size2', 400, 200, true ); // 400 pixel wide and 200 pixel tall, cropped

	// ...
}
Editing the content.php or content-single.php or content-page.php files, you can show the image with the appropriate size for the post header putting it below or under the post title.
<h1><?php the_title(); ?></h1>
<?php
if ( has_post_thumbnail()):
	the_post_thumbnail( 'header' );
endif;
the_content();
?>
To make the other two custom sizes choosable from the Media Gallery add the following filter:
add_filter( 'image_size_names_choose', 'custom_image_sizes_choose' );
function custom_image_sizes_choose( $sizes ) {
	$custom_sizes = array(
		'custom-size1' => 'My custom size 1',
		'custom-size2' => 'My custom size 2'
	);
	return array_merge( $sizes, $custom_sizes );
}
A real life example of how this works and how it can be used: gurde.com
References
Next
How to generate a gallery with custom image sizes and add some JavaScript to zoom the images and switch between them (mouse and keyboard).


Comments