While WordPress does a good job at handling basic security, its login is still only as secure as your username and password — just like the login on pretty much every web site out there.
The jury is still out on what the login method of the future will be but at the moment the best candidate seems to be two-factor authentication: combining a username and password based login with an additional, time limited one-time token generated and verified by a third party.
Luckily for us, WordPress provides filters that make it possible to hook into its authentication flow to extend it in plugins and themes. So, in this tutorial, I will show you how to do just that by creating a plugin to add two-factor authentication to WordPress using AlterEgo, the two-factor authentication service by MailChimp.
AlterEgo is not the only solution for two-factor authentication but it is an interesting one, mainly because of the possibility to log in using your phone without typing in a passcode. Here's how AlterEgo is described on its web site:
AlterEgo adds an extra layer of security to your web app to thwart phishing attacks and breaches caused by insecure passwords.
It generates temporary auth codes only accessible on users' mobile devices and makes them required for entry. Even if passwords are compromised, AlterEgo blocks account access unless the user has the temporary auth code.
What You'll Need
To complete this tutorial, you'll need a working WordPress installation running on a PHP setup with the cURL extensions enabled (we will use cURL to send requests to the AlterEgo API).
When testing the plugin, if you want to be able to set up the authentication, your WordPress server needs to be using SSL: When a user enables AlterEgo for their user account, a user-specific authentication token is sent to your server as a HTTP parameter. To make sure this parameter is transmitted securely, AlterEgo requires a secure connection.
As AlterEgo doesn't have a separate test mode, this security requirement that makes a lot of sense in production mode is applied also during plugin development...
In this tutorial, I will guide you through the parts of the plugin code relevant for understanding the changes to the authentication flow; however, to get a full picture of the plugin and to try it yourself, you can download the full source code from GitHub using the link on the right.
How the Authentication Flow Will Work
In this tutorial, we will create a new screen for entering an AlterEgo passcode.
The screen will be shown for all users who have enabled AlterEgo in their user accounts, right after the user has completed the standard WordPress login.
To make this happen, we will hook into the WordPress authentication flow, using one of the two authentication filters WordPress exposes to us developers: authenticate and wp_authenticate_user. The filters are similar to each other in functionality, the difference being that authenticate is called before WordPress completes any of its own authentication and wp_authenticate_user fires only after the basic authentication has been completed.
For this plugin, I decided to go with authenticate as it gives us a little more flexibility in altering the login flow.
We'll get into the details of how to do this in a while. But first, we need to create the plugin and add a few admin screens needed for enabling the authentication.
Create Required WordPress Settings
All of the code in this tutorial will be placed in a WordPress plugin called "AlterEgo Two-Factor Authenticator". Creating WordPress plugins has been well documented in many tutorials already (here's a good one from Tuts+) so I won't go through the basic housekeeping again in this tutorial. You can refer to the source code for full details.
Let's jump straight into admin screen modifications:
- First we'll add a new settings field to the General Settings page for entering the AlterEgo API key.
- Then, we'll retrieve an API key from AlterEgo and save it using the settings field we just created.
- Finally, we'll add an option for your users to enable AlterEgo authentication for their accounts. This will be done on the users' Profile pages.
Let's get started!
Step 1: Add A Settings Field For Storing the AlterEgo API Key
First, it is important to remember that every WordPress site running this plugin is considered its own application and thus needs to have its own API key. So, we'll need to store the API key in a settings field rather than hardcode it in the plugin's code.
As we only need one settings field, it makes the most sense to do it by extending an existing settings page rather than creating a settings page of its own for the plugin.
Inside the plugin class, add the following functions to create a new settings field to the General Settings page.
/**
* Adds a General Settings field for storing the AlterEgo API key.
*/
function register_admin_settings() {
add_settings_field(
'alterego_api_key',
'AlterEgo API key',
array( $this, 'alterego_api_key_setting_callback' ),
'general'
);
register_setting( 'general', 'alterego_api_key' );
}
/**
* Callback function for rendering the API key settings field.
*/
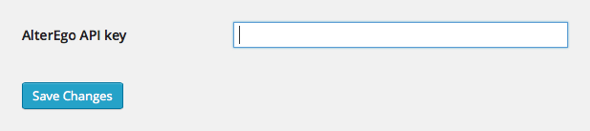
function alterego_api_key_setting_callback() {
echo '<input name="alterego_api_key" type="text" class="regular-text" value="' . get_option( 'alterego_api_key' ) . '"/>';
}
The WordPress Settings API will handle storing the setting so what's left for us is registering it (lines 5-11) and defining how the settings field is rendered, using the callback function (lines 17-19) defined on line 8:
array( $this, 'alterego_api_key_setting_callback' )
Our AlterEgo authentication plugin is created in an object-oriented way as a PHP class, so every time we pass a callback function to WordPress hooks, we need to pass both the object ($this) and the function to call.
Before the setting appears on the General Settings page, the function, register_admin_settings, needs to be called. To make this happen, let's create a constructor for the plugin class, and inside it, a WordPress action hook. Like this:
/**
 * Sets up the plugin by hooking it to the right WordPress
 * actions and filters.
 */
public function __construct() {
    add_action( 'admin_init', array( $this, 'register_admin_settings' ) );
}
That's it. The settings field is ready:
Step 2: Create AlterEgo Account and Register an Application
Now, we have created the settings item for storing the AlterEgo API key in WordPress settings. Next, to test the application, we need to get one.
To get an API key, first go to AlterEgo and create an account.

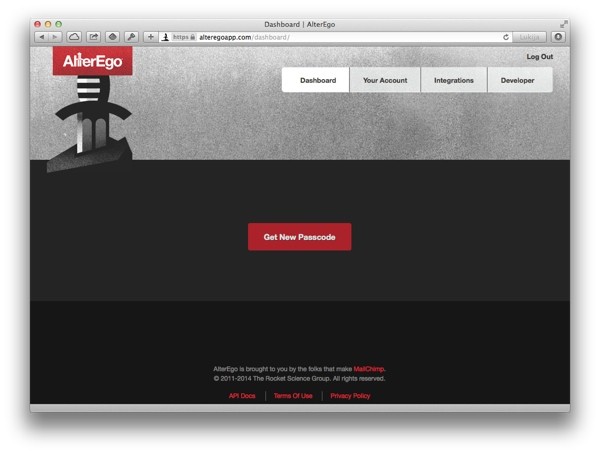
After creating your AlterEgo account and logging in, you will see a dashboard that looks like this. Click on Developer on the top right.
On the Developer page, you'll find a list of applications (now empty), and a button for registering a new application.
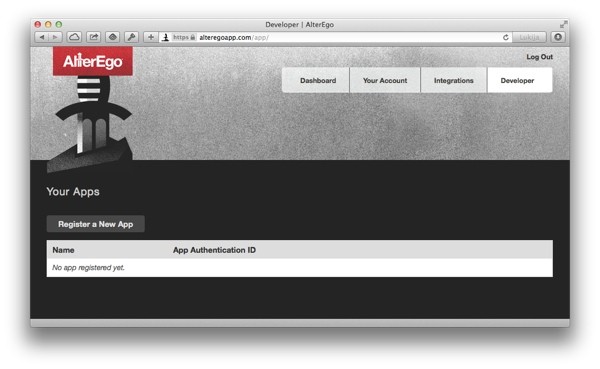
Click on Register a New App to create a new application for your WordPress site:
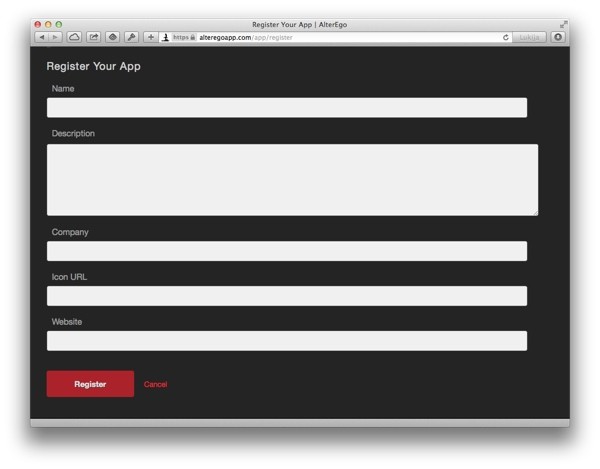
Every field in the form except Icon URL is required.
Side Note: Requirements for the WordPress Site
The Website field is needed for enabling AlterEgo for a user's WordPress login: AlterEgo will only redirect your users to a URL that is a sub page of the address specified here. While AlterEgo will let you enter any valid address (it does check that the web site exists), it's good to look at the requirements for that URL already at this point.
So, we are faced with two requirements that, depending on your WordPress setup, might give you some additional work: First, at this step, AlterEgo needs to have access to your server so that it can check its validity. Second, the server needs to be using HTTPS.
So, if your WordPress installation isn't already using SSL and accessible from the internet, you'll need to edit the configuration before you can continue with enabling AlterEgo authentication. How to do this is mostly outside the scope of this tutorial, but I'll share a quick overview of my solution:
- I use MAMP to create a self-signed certificate and to run my local server in HTTPS mode, using that certificate.
- I make the server available to the internet using the dynamic DNS service from No-IP.
Of course, this is not the only way to set up the server, but it does work — and doesn't take all that long to setup.
Step 3: Use the API Key
When you have configured your server, fill in the information on AlterEgo's "Register Your App" screen and click Register. If all goes well, the data will be accepted and you will be redirected back to the list of applications.
Now, with your newly created application included, the list will look like this:
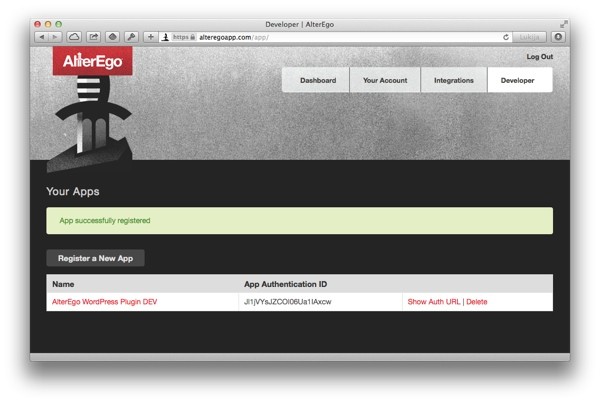
Copy the App Authorization ID value and save it in the WordPress settings as AlterEgo API key.
Enabling AlterEgo on a User Account
Now that we have enabled AlterEgo on a general level, the next thing to add is the settings field users can use to enable AlterEgo authentication for their user accounts.
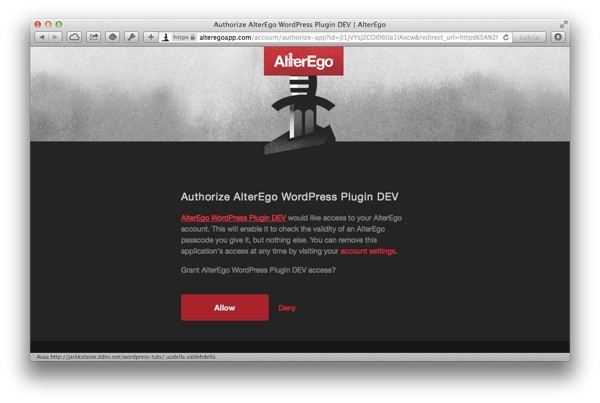
This is done by redirecting the user to a page on AlterEgo to authorize the web site to use her AlterEgo account. Once the user has accepted the request, she is redirected back to your WordPress site where our plugin will then capture and store the returned authorization key for future use.
This is a user specific task so the natural place for the setting is on the user's profile page.
Step 1: Create the Settings Field
The Profile page doesn't support the WordPress Settings API we used to create the API key settings field. Instead, we'll use the action hook, show_user_profile to call our function register_profile_page_field to render the settings field.
In this case, as the settings field is actually simply a link to AlterEgo, this approach seems very natural, actually.
This line goes to the plugin's constructor:
add_action( 'show_user_profile', array( $this, 'register_profile_page_field' ) );
And here's the function that will render the settings field, followed by some explanation:
/**
 * Renders the profile page option for enabling AlterEgo authentication for
 * the currently logged in user.
 *
 * @param User $user	Current user's WordPress user object
 */
function register_profile_page_field( $user ) {
?>
    <table class="form-table">
    <tr>
        <th>
            <label for="alterego_enabled"><?php _e( 'AlterEgo Authentication', 'alterego_login' ); ?></label>
        </th>
        <td>
            <?php if ( $this->get_user_auth_key( $user, $username ) ) :	?>
                <p>
                    <?php _e( 'AlterEgo two-factor authentication <strong>enabled</strong>.', 'alterego_login' ); ?>
                    <a href="<?php echo home_url( 'index.php?alterego_setup=3' ); ?>"><?php _e( 'Disable', 'alterego_login' ); ?></a>
                </p>
            <?php else : ?>
                <p>
                    <a href="<?php echo home_url( 'index.php?alterego_setup=1' ); ?>">
                        <?php _e( 'Enable AlterEgo two-factor authentication', 'alterego_login' ); ?>
                    </a>
                </p>
            <?php endif; ?>
        </td>
    </tr>
    </table>
<?php
}
Most of this code is simply HTML for rendering the AlterEgo settings field on the user profile page.
Worth noticing however is how on line 15 we call a function named get_user_auth_key. This is a simple helper function for retrieving the user's AlterEgo authentication key from the user's meta data.
Later, when we make API requests to AlterEgo, the authentication key is used as a parameter to identify the user. In this case, we're using it simply to check whether the user has connected her WordPress account to AlterEgo or not so that we can show a different link (Enable / Disable AlterEgo) depending on the user's status.
The settings field looks like this (when the user hasn't enabled the AlterEgo authentication):

Step 2: Start the AlterEgo Setup Flow
To enable AlterEgo, the user clicks on the link that says "Enable AlterEgo two-factor authentication". Continuing with the code snippet from above (line 23), take a look at the URL for this link:
<a href="<?php echo home_url( 'index.php?alterego_setup=1' ); ?>
It would be possible to redirect the user straight to AlterEgo, but that would make it possible for a hacker to skip the basic WordPress authentication and go straight to AlterEgo. It wouldn't actually be a terrible scenario but it's still better to close that door.
We will do that by passing a one-time token along with the AlterEgo request. This way, when the user is redirected back to your site, we can check that the user is who he or she claims to be.
So, instead of redirecting the user straight to AlterEgo, the flow starts with a redirect to the same WordPress site, using a new query parameter alterego_setup=1 to mark this a special request that should be handled by the AlterEgo plugin.
To do this, we will first register the parameter alterego_setup as a new query variable and then create a function to hook to the WordPress action parse_requests to grab the request before WordPress handles it.
First, registering the query parameter:
/**
 * Adds new query variables to WordPress so that we can catch AlterEgo
 * authentication requests in "sniff_alterego_requests".
 *
 * @param Array $vars	Current query variables
 *
 * @return The $vars array with our added variables.
 */
public function add_query_vars( $vars ){
    $vars[] = 'alterego_login';
    $vars[] = 'alterego_key';
    $vars[] = 'alterego_sig';
    $vars[] = 'alterego_setup';
    $vars[] = 'alterego_notice';

    return $vars;
}
As you noticed, the function adds new variables to the list of variables passed to it and then returns the list. alterego_setup, the variable we are interested in at this point is one of them — the others are related to the login flow: submitting the AlterEgo passcode in the login screen is done in this same way.
To add these query variables, we need to make WordPress call this new function. To do that, add a new filter hook to the plugin class's constructor:
add_filter( 'query_vars', array( $this, 'add_query_vars' ), 0 );
Adding the query variable doesn't do much on its own. We also need a function for going through the request and catching requests with that use our custom query variables. We'll call this function sniff_alterego_requests and add it as an action (again in the constructor):
add_action( 'parse_request', array($this, 'sniff_alterego_requests'), 0);
Here's the AlterEgo setup related code from that function:
/**
 * Listens to HTTP requests, captures the AlterEgo specific requests and
 * passes them to the correct handlers.
 */
public function sniff_alterego_requests() {
    global $wp;

    // Enabling / disabling AlterEgo authentication ("alterego_setup")

    if ( isset( $wp->query_vars['alterego_setup'] ) ) {
        if ( is_user_logged_in() ) {
            $user = wp_get_current_user();
            switch ( $wp->query_vars['alterego_setup'] ) {
                // Step 1: start enabling process
                case 1:
                    $this->redirect_to_alterego( $user );
                    exit;

                // Step 2: verify and save data from AlterEgo
                case 2:
                    $this->alter_ego_auth_callback( $user );
                    exit;

                // Disable AlterEgo
                case 3:
                    $this->disable_alter_ego_auth( $user );
                    wp_redirect( admin_url( 'profile.php?updated=1' ) );
                    exit;

                default:
                    break;
            }
        } else {
            // User not logged in, cannot enable / disable AlterEgo
            wp_redirect( home_url() );
        }
    }
}
First, you'll notice that just like the name of the function suggests, we are "sniffing" WordPress's query variables to see if one of our own variables is passed in the request. In this case, alterego_setup.
When the code finds the variable, it digs deeper and diverts the WordPress flow by calling one of the plugin's request handler functions.
As the user just clicked on the "Enable AlterEgo authentication" link on her Profile page, the value for alterego_setup will be 1, and so the process begins.
Step 3: Create a Temporary Token and Redirect the User to AlterEgo
To handle the first step in the AlterEgo authorization flow, the sniffer method calls the function redirect_to_alterego, which adds a temporary token and then redirects the user to AlterEgo:
/**
 * Starts the process of setting up the AlterEgo authentication for current user:
 * redirects the user to AlterEgo to allow our application to use his/her
 * AlterEgo account.
 */
function redirect_to_alterego( $user ) {
    $app_id = get_option( 'alterego_api_key' );

    // Create temporary token and store it in user data
    $token = $this->generate_random_token();
    $this->set_temp_signature( $user, $token, 'auth-token' );

    // The token is also included in the redirect url to check when user gets back from AlterEgo
    $redirect_url = urlencode( home_url( 'index.php?alterego_setup=2&token=' . $token, 'https' ) );

    $url = 'https://alteregoapp.com/account/authorize-app?id=' . $app_id . '&redirect_url=' . $redirect_url;
    wp_redirect( $url );
    exit;
}
On lines 10 and 11, the function creates a temporary key and stores it in the user's profile.
Together with this temporary key, it also stores a time stamp that will be checked in the next step to make sure too much time hasn't passed in between steps. This way, if someone gains access to the temporary signature and tries to use it to call the URL later, the request will no longer be accepted.
To create the signature, we use two helper functions: generate_random_token creates a signature and set_temp_signature stores it in the user's profile.
Once the signature is in place, the function uses it to create a redirect URL (line 14) to which AlterEgo will send the user once the authorization is done. Notice how this URL includes two parameters:
-
alterego_setup=2: When the function sniff_alterego_requests catches this parameter, it will redirect the flow to the right handler. -
token=$token: After the user returns from AlterEgo, this token will be compared to the one saved in the user's meta data.
Finally, on lines 16-18, the function combines it all into a URL and redirects the user to AlterEgo:
After clicking on Allow, the user gets redirected back to the URL specified in $redirect_url. It's time to continue to the next step in the authorization process.
Step 3: Receive the Authenticate Token From AlterEgo
When the user is redirected back to WordPress, our query variable sniffing function catches the request and notices that it's time for the second step in the AlterEgo authentication flow and calls the function alter_ego_auth_callback:
/**
 * Receives and stores (if all is OK) the authorization token sent by AlterEgo
 * after the user has accepted the request.
 */
function alter_ego_auth_callback( $user ) {
    $token = $_POST['token'];
    $key = $_POST['key'];

    if ( $this->verify_temp_signature( $user, $token, 'auth-token' ) ) {
        update_user_meta( $user->ID, $this->alterego_auth_meta_field_name, $key );
        $this->delete_temp_signature( $user, 'auth-token' );

        wp_safe_redirect( admin_url( 'profile.php?updated=1' ) );
        exit;
    } else {
        wp_die( __( 'Invalid security token', 'alterego_login' ) );
    }
}
The function is pretty straightforward, but let's go through it briefly:
First, on line 9, the function checks the validity of the one-time token.
Then, if all is OK, it continues by saving the AlterEgo authorization key to the user's meta data, deleting the temporary signature and finally redirecting the user back to the Profile page.
On that page, AlterEgo is now enabled:

With this step completed, we can now move on to the actual AlterEgo login.
Creating the AlterEgo Login Screen
Now, with the backend ready, let's get started with the actual AlterEgo login.
As you recall from the introduction, we will interrupt the basic WordPress login flow to ask for an AlterEgo passcode right after the user name and password have been checked.
To add this step, we will use the WordPress filter authenticate which is called right at the moment when a user has submitted the login form and WordPress is getting started with the authentication.
Step 1: Replace the Default Authentication
Create a new function and add it as a a filter (this goes in the constructor):
add_filter( 'authenticate', array( $this, 'authenticate' ), 10, 3 );
Then the function itself. First, here's the code, and then we'll go through it line by line.
/**
 * Authentication implementation with AlterEgo support.
 *
 * This method gets called through the "authenticate" filter hook.
 *
 * If the user has enabled AlterEgo, the login is handled here with an
 * added AlterEgo step. Otherwise, the process is passed to the
 * regular WordPress authentication.
 */
function authenticate( $user = '', $username = '', $password = '' ) {
    if ( $this->get_user_auth_key( $user, $username ) ) {
        // Verify that the user's AlterEgo key is still valid and in use
        $ping = $this->alterego_api_call( get_user_by( 'login', $username ), '/check/ping.json' );
        if ( $ping != 'PONG!') {
            $this->disable_alter_ego_auth( get_user_by( 'login', $username ) );
            return $user;
        }

        // Do the basic authentication manually
        $user = wp_authenticate_username_password( $user, $username, $password );
        if ( is_wp_error( $user ) ) {
            return $user;
        }

        // Create a temporary signature (valid for 5 minutes), store it in user
        // meta data and pass as a parameter in the login form. This signature
        // will be checked at the end of the authentication process to make sure the user
        // has passed the regular authentication and is allowed to do the AlterEgo
        // authentication.
        $signature = $this->generate_random_token();
        $this->set_temp_signature( $user, $signature, 'login' );

        $this->render_alterego_login_page( $user );
        exit;
    } else {
        // The user is not using AlterEgo, let WordPress handle the login
        return $user;
    }
}
On line 11, you'll notice the same check we used on the settings page. This line checks whether the user has enabled AlterEgo or not. In the else branch, on lines 39-42, you'll notice that if the user hasn't enabled AlterEgo, the filter just returns the user data without making any changes to it. In that case, WordPress takes over and finishes the login in its normal way.
Lines 12-17 are an additional check to see that the user hasn't disabled the AlterEgo authorization on the AlterEgo side. We'll soon at making API calls soon. At this point, it's enough to know that this method returns PONG if everything is OK. If the API method returns something else, the ping call fails and (on line 16) the function disables AlterEgo for this user and lets WordPress handle the login.
As we are using the authenticate filter, no authentication has been completed at this point yet. So, our first task (on line 20) is to call WordPress to do the basic authentication.
Now, the regular WordPress login would just set the auth cookie and redirect the user to the WordPress admin Dashboard. We're not done yet: it's time to show the AlterEgo login screen.
On lines 30-31, using the signature function described earlier, the function creates a security token that will be included in the post variables when the user submits her AlterEgo passcode. This way, when checking the AlterEgo passcode, the plugin can also make sure that the user has completed the regular username and password login as well.
Finally, on line 33, it's time to render the login screen for entering the AlterEgo passcode. To do this, the plugin calls the function render_alterego_login_page. Notice that on the next line, we need to interrupt the execution as otherwise WordPress would try to continue with a regular login — which would result in a number of error messages and weird behavior...
Step 2: Create the AlterEgo Login Screen
The function render_alterego_login_page initializes a number of variables needed for rendering the page and then includes the template file login_page.php.
/**
 * Renders the AlterEgo login page with all required user information.
 *
 * @uses login_page.php
 */
function render_alterego_login_page( $user, $error = null ) {
    if ( !($user instanceof WP_User) ) {
        return;
    }

    $alterego_login_url = home_url( 'index.php?alterego_login=1' );
    $signature_meta = get_user_meta( $user->ID, $this->alterego_sig_meta_field_name, true );

    $signature = '';
    if ( is_array( $signature_meta ) ) {
        $signature = $signature_meta['signature'];
    }

    // Forward WordPress's cookie related parameters
    $redirect_to = $_POST['redirect_to'];
    $remember_me = $_POST['remember_me'];

    $error_message = $error;

    require( 'login_page.php' );
}
The login page was built by copying and editing the standard WordPress login template and is a rather straightforward HTML form. For details, take a look at the attached source file.
The most interesting part is the form itself and the variables defined above:
-
$alterego_login_urlis used as the form action. We'll look at this in the next section. -
login: The user name of the person going through the login process. -
alterego_sig: The one time token is used for checking that no one can submit the AlterEgo code without going through the WordPress login first. -
redirect_to: Familiar from the default WordPress login, this parameter is used to define which page the user will land on after the login is finished. -
remember_me: Another WordPress login variable, used for defining the duration of the auth cookie.
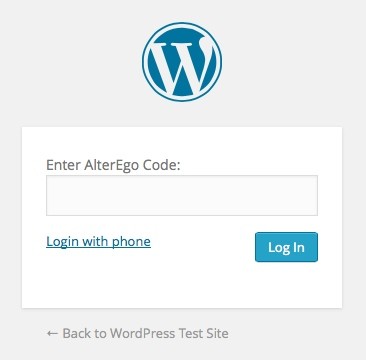
<form name="loginform" id="loginform" method="post" action="<?php echo esc_url( $alterego_login_url ) ?>">
    <input type="hidden" name="login" value="<?php echo $user->user_login; ?>"/>
    <input type="hidden" name="alterego_sig" value="<?php echo $signature; ?>"/>
    <input type="hidden" name="redirect_to" value="<?php echo $redirect_to; ?>"/>
    <input type="hidden" name="remember_me" value="<?php echo $remember_me; ?>"/>

    <label for="alterego_key"><?php _e('Enter AlterEgo Code:', 'alterego_login') ?><br />
    <input type="password" name="alterego_key" class="input" /></label>

    <input type="submit" name="wp-submit" id="wp-submit" class="button button-primary button-large" value="<?php esc_attr_e('Log In'); ?>" />

    <a href="#" id="send-challenge">Login with phone</a>
</form>
The form looks like this:
When the user submits the form by clicking on Log In, the flow continues to YOURSITE/index.php?alterego_login=1. As you remember from earlier, alterego_login is one of the custom query variables we added for sniffing requests (in add_query_vars).
Which leads us to our next step.
Step 3: Verify AlterEgo Passcode
When the user submits her AlterEgo code, the request (like every request) goes through the function sniff_alterego_requests. So, to interrupt the default flow, let's extend it with a handler for the query variable alterego_login:
// AlterEgo login requests ("alterego_login")

if ( isset( $wp->query_vars['alterego_login'] ) ) {
    $password = $wp->query_vars['alterego_key'];
    $signature = $wp->query_vars['alterego_sig'];

    $username = $_POST['login'];
    $user = get_user_by( 'login', $username );

    $this->do_alterego_authentication( $user, $username, $password, $signature );
    exit;
}
This addition collects the data (password, signature, user name) and passes them to the AlterEgo authentication function do_alterego_authentication which will do the actual authentication.
Here's the function, followed by some explanation:
/**
 * Checks the AlterEgo passcode entered by user to finish the login.
 *
 * Called by sniff_alterego_requests when it finds an AlterEgo login request.
 */
function do_alterego_authentication( $user, $username, $password, $signature ) {
    if ( !$this->verify_temp_signature( $user, $signature ) ) {
        // Bad or missing signature. Start over.
        wp_redirect( home_url( 'wp-login.php' ) );
        exit;
    }

    if ( $password == null || trim( $password ) == '' ) {
        $this->render_alterego_login_page( $user, __( 'AlterEgo code cannot be empty', 'alterego_login' ) );
        exit;
    }

    // Parameters OK, do the login.
    $response = $this->alterego_api_call( $user, 'check/password.json', array( 'pass' => $password ) );
    if ( $response == true ) {
        // AlterEgo code OK, finish login
        $this->delete_temp_signature( $user, 'login' );

        $remember_me = ( $_POST['remember_me'] == 'forever' ) ? true : false;
        wp_set_auth_cookie( $user->ID, $remember_me );

        // If redirect was set in parameters, use that one. Otherwise go to Dashboard.
        $redirect_to = ( isset( $_POST['redirect_to'] ) ) ? $_POST['redirect_to'] : admin_url();
        wp_safe_redirect( $redirect_to );
    } else {
        $this->render_alterego_login_page( $user, __( 'Invalid AlterEgo code', 'alterego_login' ) );
    }
}
After some parameter validation, the actual AlterEgo login begins with an AlterEgo API call to the API method check/password.json on line 19. We'll explore the function alterego_api_call in more detail in a just a second, but let's go through the rest of the function first to get an overall view.
If AlterEgo accepts the passcode, the function continues with the login by setting WordPress's authentication cookie, auth_cookie on line 25 and then redirecting the user to either the Dashboard or to the URL specified in the redirect_to attribute.
If the user has entered the wrong code, however, the AlterEgo login screen is rendered again, along with an error message.
That's it. Now, let's look into the function that we used to make the API call:
/**
 * Makes a call to the AlterEgo API using cURL.
 *
 * @param User $user 		The WordPress user object making the call
 * @param string $method	The API method to call
 * @param Array $params		The parameters to be sent to the API
 *
 * @return the API call response as parsed from JSON
 */
function alterego_api_call( $user, $method, $params = array() ) {
    // 'key' is used in every API call, so it's easiest to add it here
    $params['key'] = $this->get_user_auth_key( $user );
    $url = $this->api_endpoint . $method . '?key=' . $this->get_user_auth_key( $user );

    $params_as_json = json_encode( $params );

    $ch = curl_init();
    if ( $ch ) {
        curl_setopt_array(
            $ch, array(
                CURLOPT_URL => $url,
                CURLOPT_RETURNTRANSFER => true,
                CURLOPT_CUSTOMREQUEST => "POST",
                CURLOPT_POSTFIELDS => $params_as_json,
                CURLOPT_HTTPHEADER => array(
                    'Content-Type: application/json',
                    'Content-Length: ' . strlen( $params_as_json )
                )
            )
        );

        $output = curl_exec( $ch );

        if ( $output) {
            $json_data = json_decode( $output, true );
        }

        curl_close( $ch );
    }

    return $json_data;
}
On line 13, the function builds the URL to which it will send the API request. The URL is constructed using the following building blocks:
-
API Endpoint (
$api_endpoint): This is the URL of the API, stored in its own variable for clarity and to make it easier to update. -
The API Method (
$method): The API method to call. In the login code above,check/password.json. - The User's AlterEgo Authentication Key: The AlterEgo documentation talks about API key, but the parameter, which is passed as a GET parameter in the API URL is actually the user's authentication key.
Next, the function makes a basic HTTPS call to the API with the parameters encoded into a JSON string. The response is also returned in JSON format.
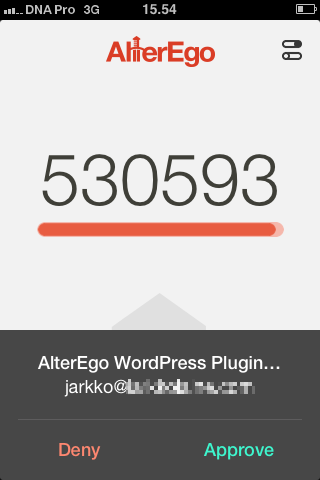
Now, with everything put together, give it a go. After your WordPress login, the site asks you for your AlterEgo login and when you enter one (using your AlterEgo smartphone app), you are logged in and redirected to your WordPress admin dashboard.
The login works now, but we still there is more to add: logging in using your phone, without having to type the code.
Alternative Login Method: Login With Phone
Earlier, when we looked at the AlterEgo login screen, you may have noticed a small HTML link that said "Login with Phone". Now, it's time to add the functionality behind it.
When a user clicks on that link, an Ajax request will be sent to your WordPress site which will in turn tell AlterEgo to push a login request to the user's smartphone:
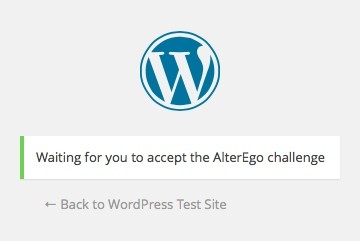
After sending the request, the site polls AlterEgo to see if the user has approved this request (in AlterEgo documentation, this is called a challenge). Finally, when the user has accepted the challenge, the login is completed and the user gets redirected to the WordPress dashboard.
Step 1: Create the AJAX Functions
Now, let's put the pieces together. First, the API call. This goes inside the plugin:
/**
 * Pushes a new AlterEgo challenge to the user's mobile phone.
 */
function ajax_send_challenge() {
    $signature = $_POST['sig'];
    $username = $_POST['login'];
    $user = get_user_by( 'login', $username );

    // Verify the signature passed with the AJAX request
    if ( $this->verify_temp_signature( $user, $signature ) ) {
        $challenge_id = $this->alterego_api_call( $user, 'challenge/new.json' );
        echo $challenge_id;
    } else {
        echo '-1';
    }

    die();
}
The code is pretty straightforward and uses many of the elements we have already covered: it checks the authentication signature and if the signature is valid, sends a new AlterEgo API call, challenge/new.json. Then it returns the ID of the challenge, received as a response to the API call.
For checking the challenge, we need a second function:
/**
 * Polls AlterEgo to see if authentication challenge has been accepted.
 */
function ajax_check_challenge() {
    $signature = $_POST['sig'];
    $challenge_id = $_POST['id'];
    $remember_me = $_POST['remember_me'];

    $username = $_POST['login'];
    $user = get_user_by( 'login', $username );

    if ( $this->verify_temp_signature( $user, $signature ) ) {
        $response = $this->alterego_api_call( $user, 'challenge/check.json', array( 'id' => $challenge_id ) );

        if ( $response == 1 ) {
            // AlterEgo challenge OK, finish login
            $this->delete_temp_signature( $user, 'login' );

            $remember_me = ($remember_me == 'forever') ? true : false;
            wp_set_auth_cookie( $user->ID, $remember_me );
        }

        echo $response;
    } else {
        echo '-1';
    }

    die();
}
Again, before proceeding with the API call, we check that the temporary signature is valid. Then, if all is OK, on line 13, the function makes an API call, challenge/check.json, to check if the user has clicked on Approve on his or her phone. If the check is successful and the user has accepted the challenge, it's OK to complete the login by setting the auth cookie.
Notice that the API call uses the challenge ID received in ajax_send_challenge.
To make these function available through an AJAX calls, we need to define them in our plugin's constructor. As these AJAX functions are needed only outside the admin area, we'll use the wp_ajax_nopriv_ prefix for our actions.
add_action( 'wp_ajax_nopriv_send_challenge', array($this, 'ajax_send_challenge'));
add_action( 'wp_ajax_nopriv_check_challenge', array($this, 'ajax_check_challenge
Step 2: Use JavaScript to Handle the Flow
Now, we have the building blocks. The last piece is the JavaScript code that will call the functions and put it all together.
That can be found at the bottom of the view file login_form.php:
<script type="text/javascript" >
    var ajaxurl = "<?php echo admin_url( 'admin-ajax.php' ); ?>";
    var redirectUrl = "<?php echo $redirect_to; ?>";

    /**
     * Does an AJAX call to check if challenge has been accepted.
     * If not yet, tries again in 3 seconds.
     */
    function checkChallenge(id) {
        var data = {
            'action': 'check_challenge',
            'id': id,
            'login': '<?php echo $user->user_login; ?>',
            'sig': '<?php echo $signature; ?>',
            'remember_me': '<?php echo $remember_me; ?>'
        };
        jQuery.post(ajaxurl, data, function(res) {
            if (res == true) {
                jQuery("#waiting-notice").hide();
                jQuery("#login-ok-notice").show();

                window.location.replace( redirectUrl );
            } else {
                setTimeout(function() { checkChallenge(id); }, 3000);
            }
        });
    }

    jQuery(document).ready(function($) {
        jQuery("#send-challenge").click(function() {
            jQuery("#loginform").hide();
            jQuery("#login_error").hide();
            jQuery("#sending-notice").show();

            var data = {
                'action': 'send_challenge',
                'login': '<?php echo $user->user_login; ?>',
                'sig': '<?php echo $signature; ?>'
            };

            $.post(ajaxurl, data, function(response) {
                jQuery("#sending-notice").hide();
                jQuery("#waiting-notice").show();

                // After 3 seconds, check if challenge has been accepted
                setTimeout( function() { checkChallenge(response); }, 3000 );
            });
        })
    });
</script>
On lines 2 and 3, the code passes some variables from WordPress to JavaScript: the URL for sending the AJAX requests and the redirect URL to which the user should be sent once the login is finished.
Lines 9-27 is a function for checking the challenge. It simply calls the AJAX function ajax_check_challenge that we created earlier (which in turn calls AlterEgo). Then, if all is OK, it redirects the user to the redirect URL set on line 2. If the challenge hasn't been accepted yet, we use setTimeOut to create a timer that will poll the challenge again in three seconds.
Line 30 onward is where we put it all to use. When a user clicks on the link with ID send-challenge, the jQuery function does some UI modifications by hiding the form and showing a simple status screen:
Then, on line 41, it sends an AJAX request to push the challenge to the user's phone. If the request went through OK, it sets a timer to start with the polling, as described above.
A good idea for improvement might be to add a counter and stop polling after some time (when deciding how much time, you need to take into account the time it takes to go and retrieve the phone). I left it out as I noticed while reverse engineering MailChimp's own code that MailChimp doesn't have a timeout functionality either. Maybe the risk of someone polling for too long isn't all that big after all.
Conclusion
That's it. Now you have seen how to add an AlterEgo authentication step into the WordPress login flow, including the fun method of authenticating with a challenge sent to the user's phone.
Wether you'll be using AlterEgo in your next project or not, I hope this tutorial has given an idea about extending the WordPress login flow and using an API through WordPress.

Comments