Facebook launched the social plugins for developers in 2010. You all know at least one of them, the "like" button that you see on lots of blog posts across the net (like this one, pardon the pun!). Today we are focusing on the Comments Box system. Adding Facebook comments allows the user to comment on your blog using his Facebook account. There is no need for him to enter his name and email address or even register an account on your site.
The Benefits of Adding Comments via Facebook
I won't push too hard on whether or not you actually need this feature on your own blog. Every site has their own set of priorities and best practices. But, for the sake of argument, let's look at the pros of adding Facebook comments to your WordPress site.
Here is a list of features:
- Facebook notification for likes/replies to comments
- Comments can be posted to the Facebook wall with one click
- Replies to the comment on the wall will be shown on your site as well
- User authentication through Facebook or services like Yahoo!, AOL & Hotmail
- Grammar filter (adds punctuation, trims extra whitespace, fix common grammar mistakes etc.)
- Less trolling, more discussion
How does it work?
If a user opens a post with Facebook Comments on the page, the script checks if the user is logged into Facebook. This happens in an iframe, so no data is actually transferred to your server. The only information the script needs from your website is an Facebook App ID and the Full URL of the post. With the App ID Facebook checks if the user is allowed to moderate comments or change settings for the Comments Box. The URL is used to locate the comments on the Facebook servers. If the user is not logged into Facebook, he can login directly from the Comments Box.

Now let's add the Comments Box to your theme.
Create a Facebook App
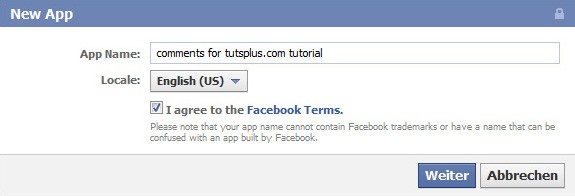
To add a Facebook Comments Box you will need to create a Facebook App first. Go to https://developers.facebook.com/apps/ and create a new app. Enter a name and define the locale for the app. The name is not crucial, because it won't show up on the website. Just make sure you can identify the app later, if you have several websites with Facebook comments enabled.
Now you can see an overview of your application. You are able to change the name, locale and other information. Since the application will not be published to the App Directory you don't need to fill out the other fields. Important is the App ID which you can find on top of the page. We will need the ID later when adding the code to the theme.
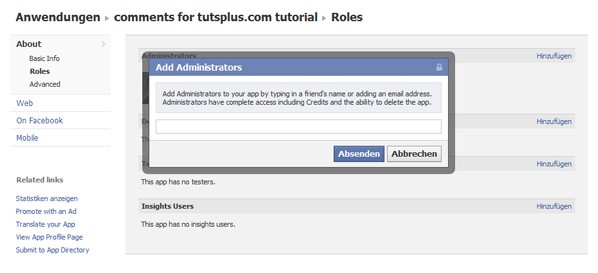
The person who created the App is Administrator and therefore able to moderate comments by default. To add another Administrator click on Roles on the left site. You need to be friends with the person you want to assign the admin role.
It is also necessary to configure the Site URL and Domain. Click on Web in the left navigation pane and enter the full URL to your blog as Site URL. The domain name is the base URL. For example: If your blog is hosted at http://somecooldomainname.tld/mike/my-blog, the whole thing would be the Site-URL and somecooldomainname.tld is the domain itself.
Add the code to your theme
Adding the comments only takes 4 lines of code.
Adding the App ID
You need to add the Facebook App ID to your header.php file within the <head> tag. And you need to replace 'YOUR APP ID' with the ID from your newly created Application.
<meta property='fb:app_id' content='YOUR APP ID' />
Here is an example of the <head>.
<head>
	<meta charset="<?php bloginfo( 'charset' ); ?>" />
	<meta property='fb:app_id' content='YOUR APP ID' />
	<title><?php wp_title( '|', true, 'right' ); bloginfo( 'name' ); ?></title>
	<link rel="pingback" href="<?php bloginfo( 'pingback_url' ); ?>" />
</head>
As you can see, the App ID has been added directly after the charset in the head section.
Creating the Comments Box
Let's see the code first.
<div id="fb-root"></div>
<script src="http://connect.facebook.net/en_US/all.js#xfbml=1"></script>
<fb:comments href="<?php the_permalink(); ?>" width="880"></fb:comments>
The JavaScript call in the second line has a locale reference (en_US) in it. If you want your Comments Box to appear in a different language, you can change the URL. For example http://connect.facebook.net/de_DE/all.js is for the German interface. I also found fr_FR and es_ES for France and Spanish to be working. If you want to see if a different language is supported, just open the link http://connect.facebook.net/de_DE/all.js in a new window and change the locale in the URL. You will receive an error if the locale is not supported.
The tag fb:comments in the third line tells the Comments Box to only show the comments for the defined URL. Using the WordPress function the_permalink() allows us to dynamically assign the correct URL for every post. If you use a fixed URL you would see the same comments on every post/page. Just for the fun of it, try using "http://localhost" as URL. You will receive an error from Facebook that the page is not accessible, but it will still work. And as you can see, there are comments from other developers who used the same URL for testing.
You also need to modify the option width (in px) to suit your theme. This option defines the width of the whole Comments Box. There is another option called num_posts. With it you can define how many comments are displayed by default. If there are more comments then defined in num_posts, it will display a link to show more.
Placing the Comments Box
It is easiest to modify the comments.php. Of course this is different in every theme, so simply follow the basic rules.
Only show the comments if:
- The post/page is not password protected or the correct password has been entered
- Comments are allowed in the post/page
I modified the comments.php file from the default theme "Twenty Ten" as example:
<div id="comments">
	<?php if ( post_password_required() ) : ?>
		<p class="nopassword"><?php _e( 'This post is password protected. Enter the password to view any comments.', 'twentyten' ); ?></p>
		</div>
		<?php return; ?>
	<?php endif; ?>

	<?php if ( comments_open() ) : ?>
		<div id="fbcomments"><div id="fb-root"></div><script src="http://connect.facebook.net/de_DE/all.js#xfbml=1"></script><fb:comments href="<?php the_permalink(); ?>" width="880"></fb:comments></div>
	<?php endif; ?>

	<?php if ( ! comments_open() ) : ?>
		<p><?php _e( 'Comments are closed.', 'twentyten' ); ?></p>
	<?php endif; ?>
</div>
As you can see, we are only showing the Comments Box if there is no password protection or the post is public (line 9). If the comments are closed an appropriate message is shown.
Let's have a look
This is the default theme with Facebook Comments enabled.
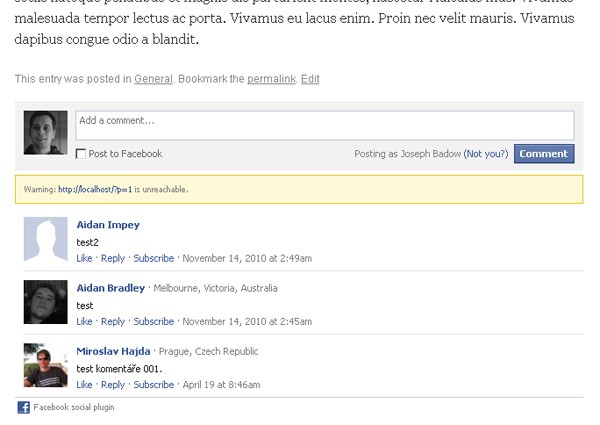
You can see an error message above the first comment. It appeared because I was calling the Comments Box from my local web server via http://localhost/wordpress/?p=1 and Facebook can't connect to it. So, how does it look online? This is the view for an admin.
If you compare the screenshot with the one above you will see additional options. Even though I was recognized as "me" when I opened the page from my local server, Facebook could not reach the site itself. Now as it is online and Facebook can actually reach the page, I can access the admin options to moderate comments and change settings. The comments can be moderated either on every post page or all comments at once over here http://developers.facebook.com/tools/comments.
In the settings page you can define if comments are visible to everyone right away or if you want to check them first. You can also create a blacklist for bad words, allow login through external provider (see below) and enable a simple spelling correction.
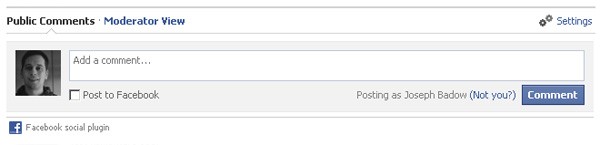
If a non-admin user looks at the comments he will see the following:

If you decide to post the comment to your wall, it will be displayed like this:

There has to be an open Facebook session in order to authenticate the user. If the user is not logged in, he can either login to Facebook or use a different service (Yahoo!, AOL or Hotmail) to authenticate himself.
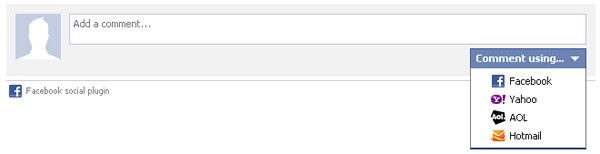
As I said, allowing third-party services for authentication is optional and can be disabled in the settings.
Display the number of comments
The comment count will be displayed on top of the Comments Box where you can also change in which order the comments should appear. The comment count can also be displayed using this iframe.
<iframe src="http://www.facebook.com/plugins/comments.php?href=<?php the_permalink(); ?>&permalink=1" scrolling="no" frameborder="0" style="border:none; overflow:hidden; width:130px; height:16px;" allowTransparency="true"></iframe>

It will give you the classic Facebook speech bubble and the text $n comments, it all comes in Facebook blue.
If you want to modify the style of the comment count, try using the <span> method:
<fb:comments-count href=<?php the_permalink(); ?>></fb:comments-count> comentarios
This is supposed to result in a <span> with the number of comments. For example $n comentarios. However, so far I was not able to display the comment count this way.
Thanks for reading and feel free to ask questions in the comments.
- More information on Facebook Social Plugins: http://developers.facebook.com/docs/plugins/
- Separate Page to moderate comments http://developers.facebook.com/tools/comments

Comments