Everyone these days tries to rank their site's content higher in Google Search results. There are marketing firms earning a good deal of revenue in relation to the most notorious digital term these days, "SEO". In this post I will be explaining the different aspects of "On Page SEO", how to deal with it in WordPress using one of the best free plugins: WordPress SEO by Yoast.
This is a series of tutorials, in the first one we will be configuring and understanding different sections of the WordPress SEO Plugin. Future tutorials in this series will be about different aspects of SEO, how to utilize your site's Tags & Categories, the concept of rel='canonical', a practical example of an SEO optimized post, and finally some discussion about what else you need to do after having this plugin configured.

Our Goals
This tutorial will help you in optimizing your WordPress sites with the most popular aspects of On Page SEO. Today our goal is to configure this WordPress SEO plugin and to understand the meaning of each step.
Search engine optimization (SEO) is the process of affecting the visibility of a website or a web page in a search engine's "natural" or un-paid ("organic") search results. In general, the earlier (or higher ranked on the search results page), and more frequently a site appears in the search results list, the more visitors it will receive from the search engine's users.
Dashboard
First of all head over to your WordPress admin panel and install the plugin named WordPress SEO by Yoast (Go to Plugins > Add New > Search for WordPress SEO By Yoast > Install it > Then activate it). After activating the plugin, if you observe the left side menu, you will find a new panel introduced with the name SEO, just like the one in the image below.

When you click it you will be inside the Dashboard of the WordPress SEO plugin. Here you can take a tour or restore the default settings of this plugin in future. More over you will find Tracking and Security check boxes.
Tracking
It allows the author of the plugin to track issues with the plugin if there are any, in future. If you are concerned about your privacy you should keep it unchecked.
Security
This option, if checked, will disallow your Editors and Authors from redirecting a post to another URL, which is one of the capabilities of the plugin. Checking this will also forbid them from no-indexing your posts. If you don't trust your Editors and Authors, this option should be checked.
Webmaster Tools
These tools allow you to easily verify your site's ownership by using the meta code provided by Google and Bing Webmaster tools. This option can also help you in verifying your site for Alexa (if you have their premium subscription). You can see I have filled in the Google Webmaster's meta code.
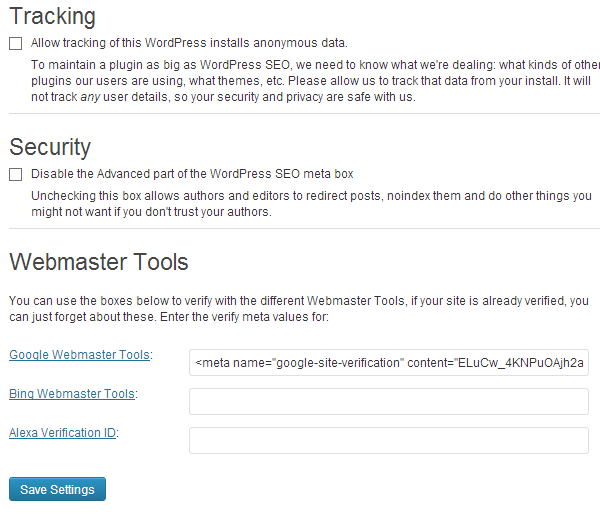
After you are done with these configurations you can press the button saying "Save Settings".
Titles & Metas
Then comes the Titles and Metas panel, this panel helps you in configuring the title, site wide metas, and cleaning up the head. Let's see what the options are here and how to deal with them:
Force Rewrite Titles
This option means that the WordPress SEO plugin needs to change the title tag of your installed theme, so that it can modify it as per your settings. This option should normally be ticked.
Site Wide Meta Settings
No-index subpages of archives: It should be checked as it helps your homepage to retain its importance, your Homepage is one of the most important parts of your blog.
Use meta keywords tag: I prefer to check it, as the Search Engines like Yahoo and Bing are known to give some importance to these meta keywords. These are the keywords around which your article is based.
Add noodp meta robots tag sitewide and Add noydir meta robots tag sitewide are used if your site is present in DMOZ or Yahoo Directory, sometimes Google prefers the description of your site from these directories, enabling these tags can help you remove this kind of error.
Clean Up the <head>
There is a theory that Google prefers a clean head. Most of the SEO Analysts suggest to keep your site's head portion clean, the top most links which the Google bot reads get more importance. I don't prefer hiding these links, as in RSD, WLW Manifest Links and shortlinks of your WordPress posts are helpful in a way like if you use Microsoft Live Editor to Publish your posts then hiding these links is not preferred. If you plan to clean up the head of your blog anyway, I would recommend you check the first three options and leave the RSS links option unchecked. Why? Because RSS links are read by certain plugins and can get you more subscribers. Some people say these RSS links are valuable assets for your blog. Enough said!

Done with Title and Metas? Press "Save Settings"
Homepage Settings
Click the Home tab inside the plugin and you will land on the page where all the settings of your Homepage can be found. These settings are kind of 'set and forget' settings. You can see the character limits in the image below, fill according to your domain name and niche.
Title: 70 Characters, can be Domain Name with Slogan. e.g. TheBookShop.com - Buy Books at Cheapest Rates
Description: 160 characters in which you will use your focused keyword once. e.g. If your site is for a book shop, you can include the term Buy Books here.
Meta keywords: Don't spam this box, just put 5 to 6 keywords here, and you should put long tail keywords here, e.g. Download Books at Cheap Rates, Cheap priced Books Downloads etc.
After that, go to your profile page from the top right corner of the Admin Bar, fill in the Google+ URL of your profile and select your name from the users list at the Home Tab of the WordPress SEO plugin, so that your thumbnail is displayed with the exact domain name in Google's Search. It is due to the rel="author" attribute that WordPress SEO adds this to the header with your profile link. This helps you get a good deal of exposure and more clicks. Make a Google+ page for your blog and add the URL in the box at the end, so that rel="publisher" can be added. These two rel attributes are important for your On Page SEO, and help your site rank better.

After all these settings you need to click "Save Settings".
Post Types
Then click the Post Types tab where you will generically configure the On Page SEO elements for Posts, Pages and Media files.
Posts SEO
The Help tab provides the details about these generic tags we are using here, but I recommend you do it the way it is done in the image below. Why? After experimenting for about three to five years, I have found these settings best. Of course, we are not going to no-index the posts, but if you tick the Meta Robots No-index then search engines won't index your posts. Either you check the date snippet or not, if your theme supports the date tag then Google will include it in its search results. I find the date factor very important in On Page SEO, though you can find contrary suggestions about this factor from a lot of people.

-
%%title%%Replaced with the title of the post/page. -
%%focuskw%%Replaced with the post's focus keyword. -
%%tag%%Replaced with the current tag/tags. -
%%category%%Replaced with the post categories (comma-separated). -
%%excerpt%%Replaced with the post/page excerpt (or auto-generated if it does not exist).
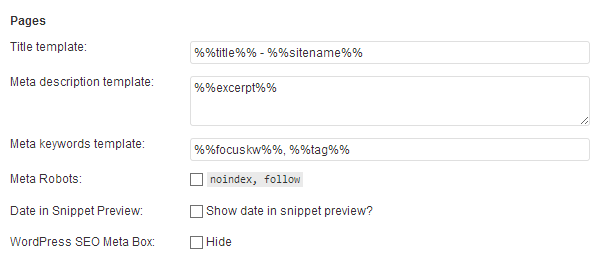
Pages SEO
Set the pages' parameters as mentioned in the following image:
-
%%sitename%%The site's name
Media SEO
If you want to index media files separately then you can uncheck the checked box against Meta Robots, and set it like the below image:

Taxonomies
The WordPress SEO plugin allows you to configure the On Page SEO parameters for taxonomies like Categories, Tags, Formats and any Custom Taxonomies, if you have them.
Categories VS Tags
Normally Categories are used to categorize the content into organized form, and tags are used to put more aliases for a single post. Right now our focus is towards the configuration of WordPress SEO by Yoast, so we will skip this discussion, but you will read some details about this in next tutorial of the series.
What to Do?
I don't index both of them so that Search Engines should give most importance to my main article's titles instead of Tags or their Categories. Here are the settings, if you see I have checked Meta Robots Nofollow so that the Google bot never indexes them.

Formats
Same goes for formats, I have checked no-index for them, you can index them if you want.

Author Archives
It is a matter of your choice, you can index them if you want or else no-index them, Joost de Valk the developer of this plugin has explained it below the options very well.

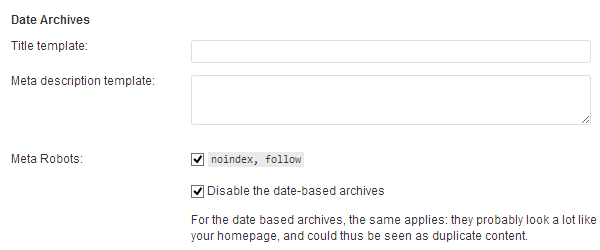
Date Archives
I recommend you no-index as shown below, you should disable them to save yourself from a Content Duplication penalty.
Other Special Pages
Search and 404 pages can have the following template settings:

That's All for Now...
In the next tutorial we will configure the Social part, XML Sitemaps, Permalinks, Internal links, RSS, and will look into the robots.txt file. Do you have any questions regarding this tutorial? Let us know.

Comments