Node.js has an under-appreciated module in its standard library that is surprisingly useful. The Readline module does what it says on the box: it reads a line of input from the terminal. This can be used to ask the user a question or two, or to create a prompt at the bottom of the screen. In this tutorial, I intend to show off the capability of Readline and make a real-time CLI chatroom backed by Socket.io. The client will not only send simple messages, but have commands for emotes with /me, private messages with /msg, and allow for nicknames to be changed with /nick.
A Little About Readline
This is probably the simplest usage of Readline:
var readline = require('readline');

var rl = readline.createInterface(process.stdin, process.stdout);

rl.question("What is your name? ", function(answer) {
	console.log("Hello, " + answer );
	rl.close();
});
We include the module, create the Readline interface with the standard input and output streams, then ask the user a one-off question. This is the first usage of Readline: asking questions. If you need to confirm something with a user, perhaps in the form of the ever-popular, "Do you want to do this? (y/n)", which pervade CLI tools, readline.question() is the way to do it.
The other functionality that Readline provides is the prompt, which can be customized from its default ">" character and temporarily paused to prevent input. For our Readline chat client, this will be our primary interface. There will be a single occurrence of readline.question() to ask the user for a nickname, but everything else will be readline.prompt().
Managing Your Dependencies
Let's start with the boring part: dependencies. This project will make use of socket.io, the socket.io-client package and ansi-color. Your packages.json file should look something like this:
{
    "name": "ReadlineChatExample",
	"version": "1.0.0",
	"description": "CLI chat with readline and socket.io",
	"author": "Matt Harzewski",
	"dependencies": {
		"socket.io": "latest",
		"socket.io-client": "latest",
		"ansi-color": "latest"
	},
	"private": true
}
Run npm install and you should be good to go.
The Server
For this tutorial, we'll be using an incredibly simple Socket.io server. It doesn't get any more basic than this:
var socketio = require('socket.io');

// Listen on port 3636
var io = socketio.listen(3636);

io.sockets.on('connection', function (socket) {

    // Broadcast a user's message to everyone else in the room
	socket.on('send', function (data) {
		io.sockets.emit('message', data);
    });

});
All it does is take an incoming message from one client and pass it on to everyone else. The server would probably be more robust for a larger-scale application, but for this simple example, it should be sufficient.
This should be saved in the project directory as server.js.
The Client: Includes & Setup
Before we get to the fun part, we need to include our dependencies, define some variables, and start the Readline interface and socket connection.
var readline = require('readline'),
socketio = require('socket.io-client'),
util = require('util'),
color = require("ansi-color").set;


var nick;
var socket = socketio.connect('localhost', { port: 3636 });
var rl = readline.createInterface(process.stdin, process.stdout);
The code is pretty much self explanatory at this point. We've got our nickname variable, the socket connection (through the socket.io-client package) and our Readline interface.
Socket.io will connect to localhost over port 3636 in this example, of course this would be changed to your own server's domain and port, if you were making a production chat app. (There's not much point in chatting with yourself!)
The Client: Asking for the User's Name
Now for our first usage of Readline! We want to ask the user for their choice of nickname, which will identify them in the chatroom. For this, we will use Readline's question() method.
// Set the username
rl.question("Please enter a nickname: ", function(name) {
    nick = name;
	var msg = nick + " has joined the chat";
	socket.emit('send', { type: 'notice', message: msg });
	rl.prompt(true);
});
We set the nick variable from before, to the value collected from the user, send a message to the server (which will be relayed to the other clients) that our user has joined the chat, then switch the Readline interface back to prompt mode. The true value passed to prompt() ensures that the prompt character is properly displayed. (Otherwise the cursor may move to the zero position on the line and the ">" won't be shown.)
Unfortunately, Readline has a frustrating issue with the prompt() method. It doesn't play nice with console.log(), which will output text onto the same line as the prompt character, leaving stray ">" characters everywhere and other weirdness. To remedy this, we will not be using console.log anywhere in this application, save for one place. Instead, output should be passed to this function:
function console_out(msg) {
    process.stdout.clearLine();
	process.stdout.cursorTo(0);
	console.log(msg);
	rl.prompt(true);
}
This slightly hacky solution ensures that the current line in the console is empty, and that the cursor is in the zero position before printing the output. Then it explicitly calls for the prompt to be output again, afterwards.
So for the remainder of this tutorial, you will see console_out() instead of console.log().
The Client: Handling Input
There are two types of input that a user may enter: chat and commands. We know that commands are preceded by a slash, so it's easy to distinguish between the two.
Readline has several event handlers, but the most important one is undoubtedly line. Whenever a newline character is detected in the input stream (from the return or enter key), this event fires. So we need to hook into line for our input handler.
rl.on('line', function (line) {
    if (line[0] == "/" && line.length > 1) {
		var cmd = line.match(/[a-z]+\b/)[0];
		var arg = line.substr(cmd.length+2, line.length);
		chat_command(cmd, arg);

	} else {
		// send chat message
		socket.emit('send', { type: 'chat', message: line, nick: nick });
		rl.prompt(true);
	}
});
If the first character of the input line is a slash, we know it's a command, which will require more processing. Otherwise, we just send a regular chat message and reset the prompt. Note the difference between the data sent over the socket here and for the join message in the previous step. It's using a different type, so the receiving client knows how to format the message and we pass the nick variable as well.
The command name (cmd) and the text that follows (arg) are isolated with a little regex and substring magic, then we pass them to a function that processes the command.
function chat_command(cmd, arg) {
    switch (cmd) {

		case 'nick':
			var notice = nick + " changed their name to " + arg;
			nick = arg;
			socket.emit('send', { type: 'notice', message: notice });
			break;

		case 'msg':
			var to = arg.match(/[a-z]+\b/)[0];
			var message = arg.substr(to.length, arg.length);
			socket.emit('send', { type: 'tell', message: message, to: to, from: nick });
			break;

		case 'me':
			var emote = nick + " " + arg;
			socket.emit('send', { type: 'emote', message: emote });
			break;

		default:
			console_out("That is not a valid command.");

	}
}
If the user types /nick gollum, the nick variable is reset to be gollum, where it might have been smeagol before and a notice is pushed to the server.
If the user types /msg bilbo Where is the precious?, the same regex is used to separate the recipient and the message, then an object with the type of tell is pushed to the server. This will be displayed a bit differently than a normal message and should not be visible to other users. Admittedly, our overly simple server will blindly push the message out to everyone, but the client will ignore tells that aren't addressed to the correct nickname. A more robust server could be more discrete.
The emote command is used in the form of /me is eating second breakfast. The nickname is prepended to the emote in a way that should be familiar to anyone who has used IRC or played a multiplayer roleplaying game, then it's pushed to the server.
The Client: Handling Incoming Messages
Now the client needs a way to receive messages. All we need to do is hook into the Socket.io client's message event and format the data appropriately for output.
socket.on('message', function (data) {
    var leader;
	if (data.type == 'chat' && data.nick != nick) {
		leader = color("<"+data.nick+"> ", "green");
		console_out(leader + data.message);
	}
	else if (data.type == "notice") {
		console_out(color(data.message, 'cyan'));
	}
	else if (data.type == "tell" && data.to == nick) {
		leader = color("["+data.from+"->"+data.to+"]", "red");
		console_out(leader + data.message);
	}
	else if (data.type == "emote") {
		console_out(color(data.message, "cyan"));
	}
});
Messages with a type of chat that weren't sent by the client using our nickname are displayed with the nickname and chat text. The user can already see what they typed into the Readline, so there's no point in outputting it again. Here I'm using the ansi-color package to colorize the output a little. It's not strictly necessary, but it makes the chat easier to follow.
Messages with a type of notice or emote are printed as-is, though colored cyan.
If the message is a tell and the nickname is equal to this client's current name, the output takes the form of [Somebody->You] Hi!. Of course, this isn't terribly private. If you wanted to see everybody's messages, all you would have to do is take out the && data.to == nick part. Ideally, the server should know which client to push the message to and not send it to clients that don't need it. But that adds needless complexity which is beyond the scope of this tutorial.
Fire It Up!
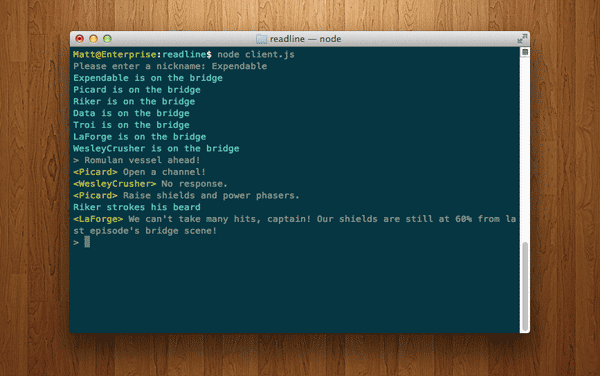
Now let's see if it all works. To test it out, launch the server by running node server.js and then open a couple new terminal windows. In the new windows, run node client.js and enter a nickname. You should then be able to chat between them, assuming all goes well.
Hopefully this tutorial has shown you how easy it is to get started with the Readline module. You may want to try adding more functionality to the chat application, for more practice. And lastly, checkout the Readline documentation for the full API.

Comments