This tutorial will take a look at porting a Flash/Flex game to the Corona SDK. Specifically, we will be porting from ActionScript to Lua, with the end goal of playing formerly Flash-only games on the iPhone. In addition to demonstrating language and API differences, this tutorial series will also account for hardware restrictions such as screen size and lack of physical buttons on the iPhone.
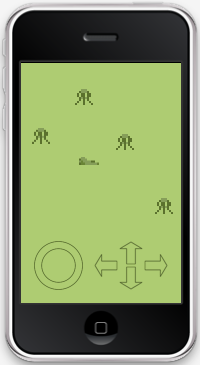
Adding Enemies
Now we will begin working with our enemy: "de/pixelate/flixelprimer/Alien.as". As always, syntax gets converted first.
When you are done with that, add the module decleration and wrap all of the functions inside of Alien().
module(..., package.seeall)

--[Embed(source="../../../../assets/png/Alien.png")] private var ImgAlien:Class

function Alien(x, y) --:void
	super(x, y, ImgAlien)
	velocity.x = -200

	function update() --:void
		velocity.y = Math.cos(x / 50) * 50
		super.update()
	end

end
The alien works very similar to our bullet. It creates an image, sets its x and y
coordinates, and gives it a velocity. So, we will approach it the same way. The top two lines inside of the function can be replaced with almost the same code as we used for the bullet. This time we will be using an image though.
module(..., package.seeall)

function Alien(x, y) --:void
	local Alien = display.newImage("Alien.png")

	Alien.x = x
	Alien.y = y

	function update() --:void
		...
	end

end
Now that we have the image loaded and set, let's make it move to the left. Again, we will create something like our bullet's update() code. Leave the old lines inside update() commented.
module(..., package.seeall)

function Alien(x, y) --:void
	...

	function update() --:void
		if Alien then
			if (Alien.x > 0 - Alien.contentWidth) then
				Alien.x = Alien.x - 2
			end
		end

		... commented code...
	end

	Runtime:addEventListener( "enterFrame", update )

end
Now let's make a kill() function, and make Alien return an Alien.
module(..., package.seeall)

function Alien(x, y) --:void
	...

	function update() --:void
		...
	end

	function Alien:kill()
		Alien.parent:remove( Alien )
		Alien = nil
	end

	Runtime:addEventListener( "enterFrame", update )

	return Alien
end
Now we can kill() our alien if it's x is off the screen to the left. We can also add a new() function as a convenience.
module(..., package.seeall)

function Alien(x, y) --:void
	local Alien = display.newImage("Alien.png")

	Alien.x = x
	Alien.y = y

	function update() --:void
		if Alien then
			if (Alien.x > 0 - Alien.contentWidth) then
				Alien.x = Alien.x - 2
			else
				Alien:kill()
			end
		end
	end

	function Alien:kill()
		Alien.parent:remove( Alien )
		Alien = nil
	end

	Runtime:addEventListener( "enterFrame", update )

	return Alien
end

function new(x, y)
	return Alien(x, y)
end
Using Timers To Control Aliens
Creaing the alien was pretty easy. Now we need to start adding them to the game through PlayState.
First, import the module into PlayState.lua.
module(..., package.seeall)

local Ship    = require("Ship")
local Bullet  = require("Bullet")
local Alien   = require("Alien")
local Buttons = require("Buttons")
Now we need to set up a timer. The original code had a variable _spawnInterval that was used to set _spawnTimer. Every time _spawnTimer reached 0, it would be reset to the value of _spawnInterval._spawnInterval would then be decreased by .1, resulting in aliens getting spawned faster.
To start, uncomment the _spawnInterval and _spawnTimer property declerations in create().
function create() --:void
	-- variable declarations
	PlayState._inGame = true
	PlayState._background = nil
	PlayState._ship = nil
	--PlayState._aliens = nil
	PlayState._bullets = nil
	--PlayState._scoreText = nil
	--PlayState._gameOverText = nil
	PlayState._spawnTimer = nil
	PlayState._spawnInterval = nil
	--PlayState.SoundExplosionShip = nil
	--PlayState.SoundExplosionAlien = nil
	PlayState.SoundBullet = nil

	...
end
Now in the variable assignments, set _spawnTimer to 0 and _spawnInterval to 2.5. Also add a call to resetSpawnTimer(). We'll create this function in a second.
function create() --:void
	...

	-- variable assignments
	PlayState._background = display.newRect(0, 0, display.contentWidth, display.contentHeight)
	PlayState._background:setFillColor(171, 204, 125)

	PlayState._ship = Ship.new()

	PlayState._shoot = false

	PlayState._bullets = display.newGroup()

	PlayState.SoundBullet = media.newEventSound( "Bullet.caf" )

	PlayState._spawnTimer = 0
	PlayState._spawnInterval = 2.5
	resetSpawnTimer()

end
Now find the commented function resetSpawnTimer(). It will look something like this.
function resetSpawnTimer() --:void
	_spawnTimer = _spawnInterval
	_spawnInterval = _spawnInterval*0.95
	if(_spawnInterval < 0.1) then
		_spawnInterval = 0.1
	end
end
Amazingly enough, that is exactly what we need. We just need to make the variables properties of PlayState. That way the function will know what _spawnInterval and _spawnTimer we are talking about.
function resetSpawnTimer() --:void
	PlayState._spawnTimer = PlayState._spawnInterval
	PlayState._spawnInterval = PlayState._spawnInterval*0.95
	if(PlayState._spawnInterval < 0.1) then
		PlayState._spawnInterval = 0.1
	end
end
Now we need to add some code to update(). In the original code, the game created aliens even if the game was over and the ship was dead. In order to do the same thing, let's put our alien handling code outside of where we check if the game is over.
function update()
	PlayState._spawnTimer = PlayState._spawnTimer - (30/1000)

	if(PlayState._spawnTimer < 0) then
		spawnAlien()
		resetSpawnTimer()
	end

	if PlayState._inGame then
		...
	end
end
This code works just like the source code. It subtracts 1 frame's worth of time from _spawnTimer. It then checks if _spawnTimer is less than zero. If it is, it resets the timer and spawns a new alien.
Another Display Group
Before we can spawn any aliens, we need a display group to add them to. Just like _bullets, uncomment the _aliens decleration and assign them to a new display group.
function create() --:void
	-- variable declarations
	PlayState._inGame = true
	PlayState._background = nil
	PlayState._ship = nil
	PlayState._aliens = nil
	PlayState._bullets = nil
	--PlayState._scoreText = nil
	--PlayState._gameOverText = nil
	PlayState._spawnTimer = nil
	PlayState._spawnInterval = 2.5
	--PlayState.SoundExplosionShip = nil
	--PlayState.SoundExplosionAlien = nil
	PlayState.SoundBullet = nil

	-- variable assignments
	PlayState._background = display.newRect(0, 0, display.contentWidth, display.contentHeight)
	PlayState._background:setFillColor(171, 204, 125)

	PlayState._ship = Ship.new()

	PlayState._shoot = false

	PlayState._aliens  = display.newGroup()
	PlayState._bullets = display.newGroup()

	PlayState.SoundBullet = media.newEventSound( "Bullet.caf" )

	PlayState._spawnTimer = 0
	PlayState._spawnInterval = 2.5
	resetSpawnTimer()

	...
end
Now find your spawnAlien() function and uncomment it. It should look something like this:
function spawnAlien() --:void
	local x  = FlxG.width
	local y = Math.random() * (FlxG.height - 100) + 50
	_aliens.add(new Alien(x, y))
end
This code creates an alien just to the right of the screen and at a random height. Then it adds the new alien to the display group. We can do the same thing with this code:
function spawnAlien() --:void
	local x = display.contentWidth
	local y = math.random() * (display.contentHeight - 240) + 50
	PlayState._aliens:insert(Alien.new(x, y))
end
Recreating Original Cosine Wave Based Motion For Aliens
If we run the code now, it works almost like the original. The aliens appear at random heights, and they slowly appear more frequently. When they get outside the screen, they call kill() on themselves. Now we just need to get them to move the way they did in the original code. In the original game, aliens followed the path of a cosine wave that was generated based on their x location. We have this code commented out in the aliens update() funciton. This code took some playing with. Because we don't have velocity to work with, it is hard to use the original code. This is the time in porting where you will just have to play with the numbers. I found this code worked closest to the original:
function update() --:void
	if Alien then
		if (Alien.x > 0 - Alien.contentWidth) then
			Alien.x = Alien.x - 2
			Alien.y = Alien.y + math.cos(Alien.x / 10) * 2
		else
			Alien:kill()
		end
	end
end
Handling Collisions
Now that we have all of our game objects working like the originals, we need to check for collisions between the bullets and aliens, and the aliens and ship. In the original code, collisions were checked in the update() function. If a collision occured, the two objects were passed to the functions overlapAlienBullet() and overlapAlienShip(). Let's create those functions first. If we uncomment overlapAlienBullet(), we have code that looks like this:
function overlapAlienBullet(alien, bullet) --:void
	local emitter = createEmitter()
	emitter.at(alien)
	alien.kill()
	bullet.kill()
	FlxG.play(SoundExplosionAlien)
	FlxG.score = FlxG.score + 1
	_scoreText.text = FlxG.score.toString()
end
This code creates a particle emitter, kills both of the objects, plays a sound effect, and updates the score. Recreating the flixel particle system is beyond the scope of this tutorial, and we have yet to implement a score system. For now, let's just comment out those lines and kill the objects.
function overlapAlienBullet(alien, bullet) --:void
	alien:kill()
	bullet:kill()
	--FlxG.play(SoundExplosionAlien)
	--FlxG.score = FlxG.score + 1
	--_scoreText.text = FlxG.score.toString()
end
Do the same for overlapAlienShip():
function overlapAlienShip(alien, ship) --:void
	ship:kill()
	alien:kill()
	--FlxG.play(SoundExplosionShip)

	--_gameOverText = new FlxText(0, FlxG.height / 2, FlxG.width, "GAME OVER\nPRESS ENTER TO PLAY AGAIN")
	--_gameOverText.setFormat(null, 16, 0xFF597137, "center")
	--add(_gameOverText)
end
Now let's create the sound effect for use in those functions. Uncomment the sound variable declarations in create().
function create() --:void
	-- variable declarations
	PlayState._inGame = true
	PlayState._background = nil
	PlayState._ship = nil
	PlayState._aliens = nil
	PlayState._bullets = nil
	--PlayState._scoreText = nil
	--PlayState._gameOverText = nil
	PlayState._spawnTimer = nil
	PlayState._spawnInterval = 2.5
	PlayState.SoundExplosionShip = nil
	PlayState.SoundExplosionAlien = nil
	PlayState.SoundBullet = nil

	...
end
Now assign them to their sounds:
function create() --:void
	...

	-- variable assignments
	PlayState._background = display.newRect(0, 0, display.contentWidth, display.contentHeight)
	PlayState._background:setFillColor(171, 204, 125)

	PlayState._ship = Ship.new()

	PlayState._shoot = false

	PlayState._aliens  = display.newGroup()
	PlayState._bullets = display.newGroup()

	PlayState.SoundBullet = media.newEventSound( "Bullet.caf" )
	PlayState.SoundExplosionShip = media.newEventSound( "ExplosionShip.caf" )
	PlayState.SoundExplosionAlien = media.newEventSound( "ExplosionAlien.caf" )

	PlayState._spawnTimer = 0
	PlayState._spawnInterval = 2.5
	resetSpawnTimer()
end
Playing the sounds is as easy as one line per function().
function overlapAlienBullet(alien, bullet) --:void
	alien:kill()
	bullet:kill()
	media.playEventSound( PlayState.SoundExplosionAlien )

	--FlxG.score = FlxG.score + 1
	--_scoreText.text = FlxG.score.toString()
end

function overlapAlienShip(alien, ship) --:void
	ship:kill()
	alien:kill()
	media.playEventSound( PlayState.SoundExplosionShip )

	--_gameOverText = new FlxText(0, FlxG.height / 2, FlxG.width, "GAME OVER\nPRESS ENTER TO PLAY AGAIN")
	--_gameOverText.setFormat(null, 16, 0xFF597137, "center")
	--add(_gameOverText)
end
Roll Our Own Collision Code
Now that we have our overlap functions in place, we need to check for collisions every frame. In Corona, we don't have an easy way to check for overlapping display objects. We will have to do the checks manually. This is a pretty easy concept, but becomes pretty messy in implementation. Let's think about this for a second. What defines an overlap? Your first instinct may be to check if an object is inside of another. This would work, but in this case an overlap may just be parts of the objects. An object need not be completely inside of another to overlap. What does this look like in code? All we need to do is check if the maximum x value of an oject is greater than the minumum x
value of the other object. Then we check if the same object's minimum x value is less than the other objects maximum x value. This will return true for every overlap. Next we perform the same checks on the objects' y values. If we loop through all of the objects in the display groups that we created earlier, we should have a working collision system.
Let's try this with the bullets and aliens. We need to perform these checks only in-game. So put this code inside of the proper part of the update() function:
function update() --:void
	...

	if PlayState._inGame then
		if PlayState._shoot == true and PlayState._ship then
			local p = PlayState._ship:getBulletSpawnPosition()
			spawnBullet(p)
		end

		if PlayState._bullets.numChildren > 0 and PlayState._aliens.numChildren > 0 then
			for b=1, PlayState._bullets.numChildren do
				local bulletXMax = PlayState._bullets[b].contentBounds.xMax
				local bulletXMin = PlayState._bullets[b].contentBounds.xMin
				local bulletYMax = PlayState._bullets[b].contentBounds.yMax
				local bulletYMin = PlayState._bullets[b].contentBounds.yMin
				for a=1, PlayState._aliens.numChildren do
					if (PlayState._aliens[a].contentBounds.xMin <= bulletXMax) then
						if (PlayState._aliens[a].contentBounds.xMax >= bulletXMin) then
						   if (PlayState._aliens[a].contentBounds.yMin <= bulletYMax) then
								if (PlayState._aliens[a].contentBounds.yMax >= bulletYMin) then
									overlapAlienBullet(PlayState._aliens[a], PlayState._bullets[b])
								end
							end
						end
					end
				end
			end
		end
	end
end
Like I said, this code looks a little messy, but it works. So what does this do? First, it checks if a bullet or an alien even exist. This code can become really memory intensive, so we have to check everything. We don't want to waste time if we don't even have both kinds of objects. Once that code passes, we start a for loop. This loop sets a variable ("b" named after "bullets") to 1 and runs the rest of the code for every bullet in _bullets. The next four lines of code create a local copy of the min and max values of the bullet. Like I said before, we need to save memory here. We don't need to be calculating the bullets x and y values over and over if they aren't changing. The next line starts yet another for loop. This one repeats for all of the aliens in _aliens. The code inside of the second for loop just performs the checks we were talking about earlier. Is the bullet's max x value greater than the alien's min x value? I cannot stress memory enough here, that
is why we are checking each condition in a separate if statement. If one of those tests fail, we can just drop out of the loop. There is no need to continue checking if there is no collision. Finally, in the very center, if all of those checks pass, we call our overlapAlienBullet() function with the colliding bullet and alien.
Whew. That was a lot of code. Now we just need to do the same for the ship.
function update() --:void
	...

	if PlayState._inGame then
		if PlayState._shoot == true and PlayState._ship then
			local p = PlayState._ship:getBulletSpawnPosition()
			spawnBullet(p)
		end

		...

		if PlayState._aliens.numChildren > 0 then
			local shipXMax = PlayState._ship.contentBounds.xMax
			local shipXMin = PlayState._ship.contentBounds.xMin
			local shipYMax = PlayState._ship.contentBounds.yMax
			local shipYMin = PlayState._ship.contentBounds.yMin
			for a=1, PlayState._aliens.numChildren do
				if (PlayState._aliens[a].contentBounds.xMin <= shipXMax) then
					if (PlayState._aliens[a].contentBounds.xMax >= shipXMin) then
						if (PlayState._aliens[a].contentBounds.yMin <= shipYMax) then
							if (PlayState._aliens[a].contentBounds.yMax >= shipYMin) then
								overlapAlienShip(PlayState._aliens[a], PlayState._ship)
							end
						end
					end
				end
			end
		end
	end
end
This code is identical to the bullet and alien code. The only difference is we only have one ship. We know there is a ship, otherwise PlayState._inGame would be false. We don't need to loop through a display group of ships because we only have one.
Before we can test this code, we need to make the game end in overlapAlienShip(). Change _inGame to false.
function overlapAlienShip(alien, ship) --:void
	ship:kill()
	alien:kill()
	media.playEventSound( PlayState.SoundExplosionShip )

	PlayState._inGame = false

	--_gameOverText = new FlxText(0, FlxG.height / 2, FlxG.width, "GAME OVER\nPRESS ENTER TO PLAY AGAIN")
	--_gameOverText.setFormat(null, 16, 0xFF597137, "center")
	--add(_gameOverText)
end
Running the code now shows that our hard work has paid off. We now have a fully working port of the original game. We do still need to recreate the score system, and we need to be able to restart the game, but the hard porting is finished.
Implementing A Score System
Let's start with the score system. This is as simple as creating a text label, and updating it when the score changes. Uncomment the _scoreText line and add a new _score property in the create() declarations.
function create() --:void
		-- variable declarations
		PlayState._inGame = true
		PlayState._background = nil
		PlayState._ship = nil
		PlayState._aliens = nil
		PlayState._bullets = nil
		PlayState._score = nil
		PlayState._scoreText = nil
		--PlayState._gameOverText = nil
		PlayState._spawnTimer = nil
		PlayState._spawnInterval = 2.5
		PlayState.SoundExplosionShip = nil
		PlayState.SoundExplosionAlien = nil
		PlayState.SoundBullet = nil

		...
end
Now we need to assign them some values. _score can just be set to 0. _scoreText needs to be assigned a new text object located at the top-left of the screen.
function create() --:void
		...

		-- variable assignments
		PlayState._background = display.newRect(0, 0, display.contentWidth, display.contentHeight)
		PlayState._background:setFillColor(171, 204, 125)

		PlayState._ship = Ship.new()

		PlayState._shoot = false

		PlayState._aliens  = display.newGroup()
		PlayState._bullets = display.newGroup()

		PlayState._score = 0
		PlayState._scoreText = display.newText( "0", 10, 8, nil, 32 )
		PlayState._scoreText:setTextColor(89, 113, 55)

		PlayState.SoundBullet = media.newEventSound( "Bullet.caf" )
		PlayState.SoundExplosionShip = media.newEventSound( "ExplosionShip.caf" )
		PlayState.SoundExplosionAlien = media.newEventSound( "ExplosionAlien.caf" )

		PlayState._spawnTimer = 0
		PlayState._spawnInterval = 2.5
		resetSpawnTimer()
end
The newText API is simple: display.newText("text to display", x position, y position, font, size). "PlayState._scoreText:setTextColor(89, 113, 55)" just sets the fill color to the same green color as the bullets. All we need now is to update the score in overlapAlienBullet():
function overlapAlienBullet(alien, bullet) --:void
	alien:kill()
	bullet:kill()
	media.playEventSound( PlayState.SoundExplosionAlien )

	PlayState._score = PlayState._score + 1
	PlayState._scoreText.text = PlayState._score
end
This simply adds 1 to the _score property when an alien is killed by a bullet. Then it changes the text property of _scoreText to the value of the score.
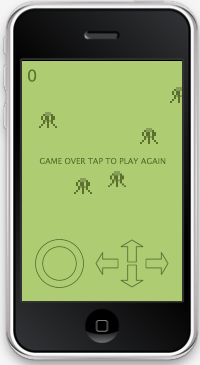
Game Over
Before we wrap up this game, we need some way of resetting it. That way, the user can start over when they die. We will need to do this in two steps. First, we have to stop everything that the user can control as soon as the ship dies. Then, we have to reset everything else when the user taps to start a new game.
Let's turn off all of the buttons in the overlapAlienShip() function. Also, let's remove the ship property. We can do this by setting all of the values to nil.
function overlapAlienShip(alien, ship) --:void
	ship:kill()
	alien:kill()
	media.playEventSound( PlayState.SoundExplosionShip )

	PlayState._inGame = false
	PlayState._ship = nil
	PlayState._upButton.onPress = nil
	PlayState._upButton.onRelease = nil
	PlayState._downButton.onPress = nil
	PlayState._downButton.onRelease = nil
	PlayState._leftButton.onPress = nil
	PlayState._leftButton.onRelease = nil
	PlayState._rightButton.onPress = nil
	PlayState._rightButton.onRelease = nil
	PlayState._shootButton.onPress = nil
	PlayState._shootButton.onRelease = nil

	--_gameOverText = new FlxText(0, FlxG.height / 2, FlxG.width, "GAME OVER\nPRESS ENTER TO PLAY AGAIN")
	--_gameOverText.setFormat(null, 16, 0xFF597137, "center")
	--add(_gameOverText)
end
This code just assigns all of the onPress and onRelease values to nil. The buttons will still
display, but they won't call any code when pressed.
Game Over Message
We see now that the original overlapAlienShip() function displayed a text label to tell the user that the game was over. We will do the same thing. First uncomment our _gameOverText property in the create() function.
function create() --:void
		-- variable declarations
		PlayState._inGame = true
		PlayState._background = nil
		PlayState._ship = nil
		PlayState._aliens = nil
		PlayState._bullets = nil
		PlayState._score = nil
		PlayState._scoreText = nil
		PlayState._gameOverText = nil
		PlayState._spawnTimer = nil
		PlayState._spawnInterval = 2.5
		PlayState.SoundExplosionShip = nil
		PlayState.SoundExplosionAlien = nil
		PlayState.SoundBullet = nil

		...
end
Back in overlapAlienShip(), we need to replace the commented code with these lines.
function overlapAlienShip(alien, ship) --:void
	ship:kill()
	alien:kill()
	media.playEventSound( PlayState.SoundExplosionShip )

	PlayState._inGame = false
	PlayState._ship = nil
	PlayState._upButton.onPress = nil
	PlayState._upButton.onRelease = nil
	PlayState._downButton.onPress = nil
	PlayState._downButton.onRelease = nil
	PlayState._leftButton.onPress = nil
	PlayState._leftButton.onRelease = nil
	PlayState._rightButton.onPress = nil
	PlayState._rightButton.onRelease = nil
	PlayState._shootButton.onPress = nil
	PlayState._shootButton.onRelease = nil

	PlayState._gameOverText = display.newText( "GAME OVER TAP TO PLAY AGAIN", 35, display.contentHeight/2 - 50, nil, 16 )
	PlayState._gameOverText:setTextColor(89, 113, 55)
end
This is the same code we used to create and fill the score text. The position is changed to center the text on the screen, and the text says "TAP TO PLAY AGAIN" instead of "PRESS ENTER TO PLAY AGAIN".
Add A Tap Listener
Since we are going to be tapping to restart the game, we need to add a new event listener. We can do this the same way we added the enterFrame listener, but this time the event we are listening for is "tap". Also we need to add a function for the listener to call. At the bottom of overlapAlienShip() add this event listener:
function overlapAlienShip(alien, ship) --:void
	ship:kill()
	alien:kill()
	media.playEventSound( PlayState.SoundExplosionShip )

	PlayState._inGame = false
	PlayState._ship = nil
	PlayState._upButton.onPress = nil
	PlayState._upButton.onRelease = nil
	PlayState._downButton.onPress = nil
	PlayState._downButton.onRelease = nil
	PlayState._leftButton.onPress = nil
	PlayState._leftButton.onRelease = nil
	PlayState._rightButton.onPress = nil
	PlayState._rightButton.onRelease = nil
	PlayState._shootButton.onPress = nil
	PlayState._shootButton.onRelease = nil

	PlayState._gameOverText = display.newText( "GAME OVER TAP TO PLAY AGAIN", 35, display.contentHeight/2 - 50, nil, 16 )
	PlayState._gameOverText:setTextColor(89, 113, 55)

	Runtime:addEventListener( "tap", tap )
end
This code checks for a tap anywhere on the screen. When a "tap" occurs, it calls the function tap(). Let's make an empty tap() funciton for it to call. Put it just above create().
...
function tap( event )
	-- we just need this as a placeholder for now
end

function create()
	...
end
Cleaning Everything Up
Let's make a remove() function to handle cleaning up all of the game objects. Put this function above our new tap() function.
...
function remove()
	--
end

function tap( event )
	-- we just need this as a placeholder for now
end

function create()
	...
end
Removing Display Objects And Groups
To start with, we should kill all of the remaining aliens and bullets. To do this, we can simply loop through the respective display groups. This is the proper way to remove objects in Corona:
function remove()
	for i=PlayState._bullets.numChildren, 1, -1 do
		PlayState._bullets[i]:kill()
	end
	for i=PlayState._aliens.numChildren,  1, -1 do
		PlayState._aliens[i]:kill()
	end
	PlayState._bullets:removeSelf()
	PlayState._bullets = nil
	PlayState._aliens:removeSelf()
	PlayState._aliens = nil
end
These loops work a special way. Each loop starts with "i" set to the last object in the display groups. Then the loop kills that object and subtracts 1 from "i". The loop repeats until "i" is equal to 1. The reason we are subtracting from "i" is that every time we kill an object it removes itself from the display group. This means that there is one less object in the display group. If we were to add 1 to "i", we would end up calling kill() on objects that don't exist anymore. To fix this, we count backwards everytime we remove an object.
After all of the objects are removed from the groups, we remove the groups. We also set the properties that held the groups to nil. Now they can be used again.
Nil-ing Out Variables For The Garbage Collector
Let's set all of the used variables to nil. This way the garbage collector can free up the memory. This will also make sure that all of the variables are reset before we start a new game. Remove all of the buttons first:
function remove()
	for i=PlayState._bullets.numChildren, 1, -1 do
		PlayState._bullets[i]:kill()
	end
	for i=PlayState._aliens.numChildren,  1, -1 do
		PlayState._aliens[i]:kill()
	end
	PlayState._bullets:removeSelf()
	PlayState._bullets = nil
	PlayState._aliens:removeSelf()
	PlayState._aliens = nil

	PlayState._upButton:removeSelf()
	PlayState._upButton = nil
	PlayState._downButton:removeSelf()
	PlayState._downButton = nil
	PlayState._leftButton:removeSelf()
	PlayState._leftButton = nil
	PlayState._rightButton:removeSelf()
	PlayState._rightButton = nil
	PlayState._shootButton:removeSelf()
	PlayState._shootButton = nil
end
We need to first remove them from the display and then set them to nil. Let's take care of our sounds now.
function remove()
	for i=PlayState._bullets.numChildren, 1, -1 do
		PlayState._bullets[i]:kill()
	end
	for i=PlayState._aliens.numChildren,  1, -1 do
		PlayState._aliens[i]:kill()
	end
	PlayState._bullets:removeSelf()
	PlayState._bullets = nil
	PlayState._aliens:removeSelf()
	PlayState._aliens = nil

	PlayState._upButton:removeSelf()
	PlayState._upButton = nil
	PlayState._downButton:removeSelf()
	PlayState._downButton = nil
	PlayState._leftButton:removeSelf()
	PlayState._leftButton = nil
	PlayState._rightButton:removeSelf()
	PlayState._rightButton = nil
	PlayState._shootButton:removeSelf()
	PlayState._shootButton = nil

	PlayState.SoundExplosionShip = nil
	PlayState.SoundExplosionAlien = nil
	PlayState.SoundBullet = nil
end
Now our text objects:
function remove()
	...

	PlayState._scoreText:removeSelf()
	PlayState._scoreText = nil
	PlayState._gameOverText:removeSelf()
	PlayState._gameOverText = nil
end
Removing Event Listeners
To finish cleaning up, we need to remove our event listeners. After that, we can finally reset PlayState to an empty array:
function remove()
	...

	Runtime:removeEventListener( "enterFrame", update )
	Runtime:removeEventListener( "tap", tap )
	PlayState = nil
	PlayState = {}
end
Restarting Game
Restarting the game is as simple as calling remove() and then create() in our tap() function.
function tap( event )
	remove()
	create()
end
Final Tweaks
We are almost done. We just need to put a few finishing touches on. Start by removing all of the commented lines from old source code. This will clean our files up a ton.
Enabling Multitouch
Another quick tweak we can make is to enable multitouch. You won't notice the change on the simulator, but it is nice to be able to press multiple buttons at a time on the actual device. This is a one line adjustment. We only need it to happen once, so let's add it to the main.lua file.
local PlayState = require("PlayState")

function Main()
	system.activate( "multitouch" )
	display.setStatusBar( display.HiddenStatusBar )

	PlayState.PlayState()
end

Main()
Modifying The UI Library To Fit Our Needs
I was also having some trouble with the ui.lua module. The buttons don't count pulling your finger off the device a release, unless the last place touched was the button. This doesn't always work properly for this particular game, and sometimes the ship will seem to be moving on its own because the release function doesn't get called. This was a simple fix. I removed the check to see if the button was being pressed when the users finger was released. This just meant commenting out the if and end statements on lines 91 and 98.
...

if "ended" == phase then
	-- Only consider this a "click" if the user lifts their finger inside button's stageBounds
	--if isWithinBounds then
		if onEvent then
			buttonEvent.phase = "release"
			result = onEvent( buttonEvent )
		elseif onRelease then
			result = onRelease( event )
		end
	--end
end

...
These changes are included in the ui.lua file included with this tutorial.
Conclusion
We are finished. We now have a fully working replica of the original flash game. We have a ship that moves and fires, aliens, and a score system. The game manages memory of all objects, and has the ability to reset and start over. Other than the particle system, this game is an identical port. Now that you have completed this tutorial, you should have sufficient knowledge to port almost any flash/actionscript game to the iPhone.
Exercises And Extra Features
A lot of developers like to add functionality or change the gameplay a bit when porting a game to a mobile device. I would like to challenge you to improve/modify this game to make it more like a real app. You could change the control scheme to any of the types we talked about in lesson 2. You could create a menu with settings or multiple levels. You can add different types of enemies. You can add a local or online high score system. The possibilities are endless. Fortunately, Corona makes development really fast, and really smooth. I hope you enjoyed this tutorial and, more importantly, learned a lot. Leave a comment below to tell us how things went.

Comments