Website loading speed matters a lot for every blog/website, especially for people with shared hosting – which is the cheapest available hosting service. Here are a few .htaccess and header.php tricks to increase your website loading speed by 50-70%
Web performance is getting more and more attention from web developers and is one of the hottest topics in web development. First and foremost, loading speed is more than a feature. Speed is the most important feature. If your website or blog is slow, people won't use it.
What speed means to internet giants:
- For Google – 500 milliseconds of extra load time caused 20% fewer searches
- For Yahoo – 400 milliseconds of extra load time caused a 5-9% increase in the number of people who clicked "back" before the page even loaded
- For Amazon – 100 milliseconds of extra load time resulted in a 1% drop in sales
Google, in their ongoing effort to make the web faster, blogged that "we've decided to take site speed into account in our search rankings."
So a slower website will even decrease your search engine ranking too.
Thus loading speed matters a lot. CDN (Content Delivery System) are pretty good for this purpose, but up to a limited extent, and good CDN providers are a little costly.
The good news is that some of the most important speed optimizations can be easily done with simple .htaccess tricks. These can make any website load faster by compressing content and enabling browser caching, and follow the Best Practices for Speeding Up Your Web Site from Yahoo!'s Exceptional Performance team and doesn't cost a cent.
Step 1 Gzip File Compression
Compression reduces response times by reducing the size of the HTTP response.
It's worthwhile to gzip your HTML documents, scripts and stylesheets. In fact, it's worthwhile to compress any text response including XML and JSON.
Image and PDF files should not be gzipped because they are already compressed. Trying to gzip them not only wastes CPU but can potentially increase file sizes.
File compression also saves some amount of your bandwidth.
With .htaccess
-
For Apache Servers
mod_pagespeedis an Apache module developed by Google and its command directive can be used just like other modules.Currently only GoDaddy and DreamHost support the
mod_pagespeedmodule, so if you host with them just copy and paste the following code to your .htaccess file:<IfModule pagespeed_module> ModPagespeed on # using commands,filters etc </IfModule>
Many of you may be hosting with other hosting providers which do not support the
mod_pagespeedmodule.You can use the
mod_deflatemodule (Apache 1.3x usedmod_gzipbut since Apache 2xmod_deflateis used)<ifModule mod_deflate.c> AddOutputFilterByType DEFLATE text/html text/plain text/xml application/xml application/xhtml+xml text/css text/javascript application/javascript application/x-javascript </ifModule>
-
For Nginx Servers
If you host on a Nginx webserver copy the following to your .htaccess to enable gzip compression.
			server {
				gzip on;
				gzip_types text/html text/css application/x-javascript text/plain text/xml image/x-icon;
			}
With header.php
If your server doesn't support mod_deflate or mod_gzip you can use this PHP script for gzip compression which works on both Apache and Nginx
Just copy this into your theme's header.php
<?php
if ( substr_count( $_SERVER['HTTP_ACCEPT_ENCODING'], 'gzip' ) ) {
	ob_start( "ob_gzhandler" );
}
else {
	ob_start();
}
?>
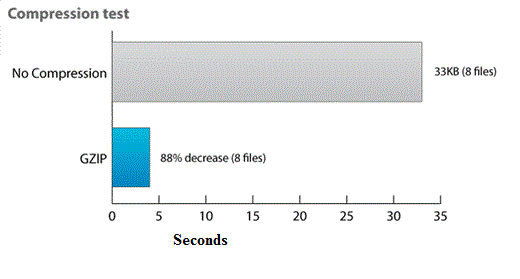
Below is the bar graph depicting my website's loading speed without and with gzip compression.
Step 2 Disable ETags
ETags (Entity Tags) are a mechanism that web servers and browsers use to determine if the component in the browser's cache matches the original server. Etags are added to provide a mechanism for validating entities that is more flexible than the date of last modification. An ETag is a string that uniquely identifies a specific version of a component. The limitations of this format is that the string is quoted. The origin server specifies the component's ETag using the ETag response header.
To disable ETags, paste this into your .htaccess file
Header unset ETag
FileETag None
Step 3 Use Browser Caching
With browser caching, we're explicitly instructing browsers to hang onto particular files for a specified period of time. When the file is needed again, the browser is to pull from its local cache instead of requesting it from the server again.
Running a website without caching in place makes as much sense as driving to the store for a glass of water every time you're thirsty. Not only is it impractical and short-sighted, it takes more work!
Browser caching is really useful to get returning users; i.e. it may build loyal permanent visitors to you and also saves a lot of your bandwidth.
A first-time visitor to your page will make several HTTP requests to download all your site's files, but by using the Expires and Cache-Control headers you make those files cacheable. This avoids unnecessary HTTP requests on subsequent page views.
-
For Apache Servers
Apache enables through the
mod_expiresandmod_headersmodules.The
mod_expiresmodule controls the setting of the Expires HTTP header and the max-age directive of the Cache-Control HTTP header in server responses. To modify Cache-Control directives other than max-age, you can use themod_headersmodule.The
mod_headersmodule provides directives to control and modify HTTP request and response headers. Headers can be merged, replaced or removed.Add these rules to .htaccess for setting Expires headers:
			# BEGIN Expire headers
			<ifModule mod_expires.c>
				ExpiresActive On
				ExpiresDefault "access plus 5 seconds"
				ExpiresByType image/x-icon "access plus 2592000 seconds"
				ExpiresByType image/jpeg "access plus 2592000 seconds"
				ExpiresByType image/png "access plus 2592000 seconds"
				ExpiresByType image/gif "access plus 2592000 seconds"
				ExpiresByType application/x-shockwave-flash "access plus 2592000 seconds"
				ExpiresByType text/css "access plus 604800 seconds"
				ExpiresByType text/javascript "access plus 216000 seconds"
				ExpiresByType application/javascript "access plus 216000 seconds"
				ExpiresByType application/x-javascript "access plus 216000 seconds"
				ExpiresByType text/html "access plus 600 seconds"
				ExpiresByType application/xhtml+xml "access plus 600 seconds"
			</ifModule>
			# END Expire headers
.htaccess rules for setting up Cache-control header:
			# BEGIN Cache-Control Headers
			<ifModule mod_headers.c>
				<filesMatch "\.(ico|jpe?g|png|gif|swf)$">
					Header set Cache-Control "public"
				</filesMatch>
				<filesMatch "\.(css)$">
					Header set Cache-Control "public"
				</filesMatch>
				<filesMatch "\.(js)$">
					Header set Cache-Control "private"
				</filesMatch>
				<filesMatch "\.(x?html?|php)$">
					Header set Cache-Control "private, must-revalidate"
				</filesMatch>
			</ifModule>
			# END Cache-Control Headers
Note:
- There is no need to set the
max-agedirective with the Cache-Control header since it is already set by themod_expiresmodule. -
must-revalidatemeans that once a response becomes stale it has to be revalidated; it doesn't mean that it has to be checked every time.
- There is no need to set the
-
For NGINX Servers
The corresponding .htaccess settings in Nginx would look something like this:
(The example below would tell your visitor's browsers to hang onto HTML, CSS, Javascript, images and favicon for an hour)
			location ~* \.(jpg|png|gif|jpeg|css|js)$ {
				expires 1h;
			}
Step 4 Reduce MySQL Database Size
Since WordPress 2.6, WordPress autosave posts while writing which remain even after the post is saved as revision in the MySQL Database. Bigger database also sends the site load time higher. I suggest removing revision feature.
Paste the following to wp-config.php to disable revisions:
define('WP_POST_REVISIONS', false );
If you decide to keep the revision feature on you may also choose to keep the revisions on the database for a fixed number of days, e.g. 10 days.
More...
- Adding the expires header does not affect the loading time of the website for a first visit, but you'd be surprised how much the page load is reduced for the next page view / visit from a returning visitor.

-
Track how your site is doing on: display loading number of queries and time.
Just paste the following code after the copyright text in your theme's footer.php:
<?php echo get_num_queries(); ?> queries in <?php timer_stop(1); ?> seconds.
Do you know or use some other method(s) to optimize the loading time of your blog/website? Don't forget to share them by commenting.

Comments