When you have a lot of clients with WordPress-powered websites, or a lot of WordPress projects that you work on, it might get messy to deal with all those updates and maintenance. Logging in to each website with different usernames and passwords, then moderating comments, updating plugins and themes, maybe occasionally (or periodically) making database and file backups... Even if it doesn't wear you out, it's still a lot of work that could take a part of your valuable time.
Using a centralized solution to manage multiple WordPress websites is a nice idea. And in this three-part series, that's exactly what we're going to go through: Learn about the WordPress managers one by one.
But first, I want to tell you about my workflow.
How I Manage My Websites as a Freelancer
I live in Turkey and I provide for myself by making websites powered by WordPress, writing WordPress-related articles and tutorials, and occasionally creating WordPress-related projects (in Turkish). So I can safely claim that I make my living by implementing, developing and writing about WordPress.
With my projects and my clients, I think I have about 30 WordPress-based websites. My main concerns are backups and updates of them: I need to have backups created automatically every day, and I need to update the plugins and WordPress cores.
The tool I'm currently using to manage these websites is InfiniteWP. I also use Jetpack Manage to check out some of my own websites' statistics and occasionally write posts. And in the past, I used CMS Commander, which was a nice tool but I wouldn't have used it if I hadn't won a yearly subscription from a giveaway.
Anyway, enough about my workflow. Let's start getting to know these tools, and let's start off with the one that Automattic owns: Jetpack Manage.
Jetpack Manage: Perfect Free Tool for Small Errands

Powered by Automattic, the company founded by Matt Mullenweg (co-founder of WordPress) and the company behind WordPress.com, Jetpack Manage is a WordPress manager that's way simpler than its competitors, yet has the most potential among all.
Installing and Using Jetpack Manage

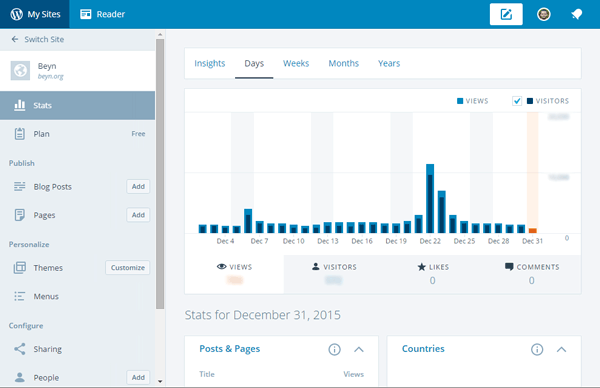
Jetpack Manage is installed out of the box with every new WordPress.com blog. And to install Jetpack Manage on self-hosted WordPress websites, all you have to do is create a WordPress.com account, install the Jetpack plugin on your website (and activate the Jetpack Manage module in it), and connect to WordPress.com with your credentials.
After enabling it and visiting WordPress.com, you can access a stripped-down version of your admin panel. It doesn't have any plugin settings or theme customization panels, but you can manage your posts, pages, categories, tags, plugins, users, statistics, and some of the Jetpack modules. You'll notice that you can access these data almost instantly, thanks to the new foundation of WordPress.com, powered by JavaScript, and called Calypso.
One of the coolest features of Jetpack Manage is the ability to install the desktop client of Calypso (which works like a wrapper for the WordPress.com admin panel) and manage your websites.
Again, this is a simpler tool than its competitors, but it has a lot of potential because it's the first tool that utilizes the new WordPress REST API, and it will continue to grow over the course of 2016.
InfiniteWP: The Tool of My Choice to Use in My Workflow

As I said earlier, InfiniteWP is the tool of my choice to use in my workflow. I can't say it's the best one, but it's the one that I'm most accustomed to. It's a free tool that you install on your own server, and then connect your websites to the software.
Its free version already offers great features, but you can extend it by installing paid addons like scheduled backups to the cloud, Google Analytics & Webmaster Tools integrations, uptime monitoring, and security plugins like iThemes Security and Sucuri.
The addons are a bit expensive if you buy them separately, but the Addons Suite has a more reasonable yearly price (currently $400 for the first year and $200 for the yearly renewals). After all, you can connect an infinite amount of WordPress websites.
Installing and Using InfiniteWP
To install InfiniteWP, there are a few options available: Install it on your own, install it automatically via your cPanel, install it as a WordPress plugin, or pay the InfiniteWP staff to have them install it. I installed it on my own and it was as easy as installing WordPress, so there's nothing to worry about.
If you're going to install it manually as well, check out this guide on infinitewp.com. If you're better off installing via cPanel, head over to this page to enter your cPanel credentials. And if you want to install InfiniteWP inside a WordPress installation, read this page to do so.
After installing the main software, you need to install the InfiniteWP Client plugin on your WordPress websites and connect them to your InfiniteWP panel. After that, you're all set. Enjoy!
Wrapping Up for Today
The Envato Market also offers a variety of interface elements that you can explore if this topic interests you. They aren't exactly WordPress managers, but they still give you an idea as to what can be done with the WordPress interface.
All the tools I talked about (and will talk about in the second and the third parts) have some great features and a few shortcomings. I'm currently using InfiniteWP, but that doesn't mean I think that it's the best tool. The choice will be yours to make, if you ever decide to use a WordPress manager.
This is it for today. In the next part, I'll be talking about CMS Commander, MainWP, and ManageWP, and little guides on how to install and use them. See you there!
By the way, for anything else unrelated to this article, you can get in touch with me at @BarisUnver_EN (English) and @BarisUnver (Turkish) on Twitter.


Comments