Moving a WordPress site can be quite daunting the first time you do it. It involves more than just copying some files from one place to another. But once you know what you need to move and what tools you need to move it, the process is quite straightforward as long as you follow all of the steps correctly.
In this tutorial I'll show you how to move your WordPress site from one place to another. Examples of when you might want to do this include:
- when uploading a local development version of a site to the live server
- when moving servers or hosting providers
If you're moving hosting providers, you may find that your new provider will make the move for you, so if you're unsure about what you're doing, check with them first.
Also if you're unsure, you might want to follow my tutorial on using plugins to move WordPress. For a simple installation this could do the job for you, and may be a lot easier.
But if your site has multiple theme or plugin or site settings configured, and you don't want to do it all again on the new site, you'll need to move the database manually. To find out how, read on!
What You'll Need
To follow this tutorial, you'll need:
- An installation of WordPress with themes and plugins running on it plus some content—posts, pages, media, or whatever happens to be on your site!
- A second location which you want to move your site to.
- An FTP client, a code editor, and access to phpMyAdmin.
What You'll Be Moving
It's worth knowing what you're going to be moving before you start:
- WordPress itself: you don't actually move this, but reinstall it in the new location instead.
- The contents of your wp-content directory, i.e. themes, plugins and uploads.
- Your database.
Before You Start
Before you start, turn off 'pretty permalinks' in your old site. Go to Settings > Permalinks, select the Default option, and click Save changes.
Making a Copy of Your Old Site
Start by making a copy of your site's files and database. You can either use your preferred backup plugin, or use FTP to download files and phpMyAdmin to copy your database. Here I'll show you how to do this using phpMyAdmin.
Copying Files
First, make a local copy of your wp-content directory. This contains all of your theme and plugin files and uploads.
When you come to upload this to your new site, you can choose not to upload the theme and plugin files but reinstall them in the new site instead, using the administration screens. Or you can just upload the copy you've taken from your old site—both will work.
Copying the Database
Open phpMyAdmin for your site. This will either be provided by your hosting provider or if you're working with a local site, it's part of MAMP.
Find the database for the site you want to move and click on the Export tab. Click Go, and a sql file with your database will be downloaded to your machine.
Note: If you have more than one database on your hosting account or server, you can find out which one applies to this site by checking the site's wp-config.php file.
Editing the Database
Before you can import your database tables to the new site, you'll need to make some edits to the sql file you just downloaded. I always make a copy of this file before I start, and prefix copy- to its name so I know it's the backup.
Open the sql file in your preferred code editor and replace all instances of the old domain name for the site with the new domain name.
So for example:
- If you're uploading a local site with the URL
http://localhost/example, you would change it tohttp://AnExampleSiteDomain.com. - If you're moving a site from one remote location to another, you replace
http://AnOldSiteExample.comwithhttp://ANewSiteExample.com. - If you're moving between hosts or servers but the domain name is staying the same, you don't need to make any changes.
Using the "replace" command in your code editor will speed this up—there could be thousands of instances. Save your sql file.
Note: An alternative way of doing this is by using the Search and Replace script by InterConnectIT, which automates this process.
Creating the New Site
Next you need to install WordPress in the new location. Do this as you normally would.
Adding Files
Before you import your database, it's a good idea to install plugins and themes, as any tables that have been created by these in the database won't work without them installed.
Either reinstall any themes and plugins in your new site or upload them from your local copy, using your FTP client. Copy them to the wp_content folder, with the same structure as in your old site. You might need to remove any new folders WordPress has created in the uploads folder so that they don't clash with the ones you're importing.
Importing the Database
Before you can import the database from your old site, you need to delete (drop) the new tables WordPress has created for you in your old site.
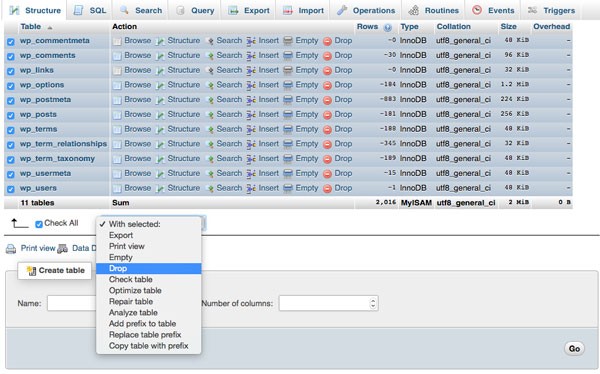
In phpMyAdmin, find the database for your new site and click on the Structure tab.
Select all of the database tables. Click on the With selected: dropdown box, select Drop and click Yes. You can see below where I've selected all of my tables ready to drop them:
Importing the New Database Tables
Still in phpMyAdmin, select the Import tab and click the Choose file button. Select the sql file that you've edited and click Choose or OK. Click Go and your database tables will be imported.
Go and make yourself a coffee—if your site is large, this may take a while!
Final Steps
Clear your browser's cache. This avoids any problems caused by the browser caching content from the old site.
Log in to the WordPress admin for the new site. Your login details will be the same as for your old site—if you specified different login details when installing remotely, these will have been overridden by the imported database.
Visit the Permalinks screen and turn pretty permalinks back on.
Now check that your plugins and widgets are working correctly, and make any tweaks necessary.
Summary
Moving a WordPress site needn't be complicated as long as you know what you need to move and do so in the right order. If you follow the steps above, you'll find that the process goes smoothly. This is something I've done many, many times and as long as I follow my checklist above, it all goes off without a hitch.

Comments