Sometimes a site has been created in a WordPress Multisite network but needs to be moved to its own single site installation. There are a few scenarios where this might happen including:
- The site has grown too large to be contained in the network.
- The site needs its own IP address.
- The site owner is moving providers or taking over complete management of the site themselves.
In some instances you might find that you can move the site out of Multisite by using a plugin or a combination of plugins, but if this doesn't work you'll need to move the relevant database tables. Moving a site out of a Multisite Network in this way is a tricky process as it involves isolating the database tables in the Multisite database that relate to that specific site. However it's not impossible.
What You'll Need
To follow this tutorial, you'll need:
- An installation of WordPress Multisite with a subsite that you want to move to its own WordPress installation.
- A second location which you want to move your site to.
- For manual moves, you will need an FTP client, a code editor, and access to phpMyAdmin.
Note: You can't move the main site out of a Multisite network, because the network won't work without it. If you do need to move the contents of the main site elsewhere, I would recommend creating a duplicate and then replacing the contents of the original site with a dummy site. You won't be able to move the domain name, though, as all of the other sites in your network are using it too.
Using a Plugin to Migrate a Site Out of Multisite
If your site doesn't have a lot of configuration set up via plugin, theme or site settings screens, you may be able to successfully move it using the WordPress Importer plugin. If the site has widgets, you can copy their settings across using the Widget Settings Importer/Exporter plugin.
However, if you've added a lot of bespoke configuration using settings or options screens or the theme customizer, none of these will be copied across. In this case you'll need to do a manual move.
For full details of how to use these plugins to move your site, see my earlier tutorial on using plugins to move a WordPress site. The process is exactly the same for moving a site from a Multisite network to its own WordPress installation.
Migrating a Site out of Multisite Manually
The site you're moving out of Multisite will have three components that you need to copy from the Multisite network:
- theme and plugin files—you might copy these across or reinstall them in the new site
- uploads—you'll find these in the site's subdirectory in
wp‑content/uploads/sites - database tables—you don't need all of the database tables but just the ones relating to this site
Note: If your Multisite network was created prior to WordPress 3.5, you won't have a sites folder. Instead you'll have a blogs.dir folder in wp-content with all of the upload files for the subsites. This will have a numbered folder for the site you're migrating, which you copy instead. I'll cover this in more detail below.
Do You Really Need to Move the Site?
Before you start, think about the reasons you're migrating the site. Could it be purely to have a new domain name? If this is the case, then the free domain mapping plugin will let you give individual sites their own domain, and visitors will never see the domain of your Multisite network.
But if this isn't the only reason, then read on!
Backing Up First
Before you do anything like this, it's a good idea to back up your Multisite installation. Use your preferred backup plugin, or a combination of FTP and phpMyAdmin if you prefer to work manually.
You'll use this backup to copy the relevant files to your new site, and it also gives you some peace of mind in case you have any problems.
Finding the ID of Your Site in the Multisite Network
Each site in a Multisite network has its own unique numerical ID. This is used to identify its folder in the wp-content/uploads/sites directory (or wp-content/blogs.dir if your Multisite network is older—see above), and also to identify the database tables for that site.
Find this by going to Network Admin > Sites and then selecting the Edit option for the site you're working with. The URL WordPress takes you to will give you the site's ID. The URL should be in the form http://mynetwork.com/wp-admin/network/site-info.php?id=XX.
XX is the ID of your site, and will be the name of the folder containing its files, as well as the prefix for its database table names.
Exporting the Site's Tables From the Network
As you're only moving one child site and not the whole installation, you won't need the contents of your entire database.
In PhpMyAdmin, click on the Export tab. Then find the tables relating to the site you're exporting. They will begin with wp_XX_, where XX is the ID of your site. An example is shown below.

Select all of the tables relating to your child site and then export them.
Note: WordPress Multisite stores all data relating to users of the network in the wp_users and wp_usermeta tables: it doesn't create separate ones for each site. If you have a lot of users on your site which you want to copy across from the network, then you might want to export those tables as well, import them to the new site and edit users in the admin screens to remove any that are not relevant to the new site. However, if your site just has one or two users, it's easier to recreate them on the new site. For more information on Multisite and database tables, see this tutorial on the WordPress database and Multisite.
Editing the Database Tables
Make a copy of the sql file that's been downloaded to your machine and give it a name that tells you what it is (for example by adding copy to its name). Open it in a code editor.
Editing Links
Change all instances of the site's domain in the Multisite network to its new single site domain. For example if your site was at http://network.com/mysite, change it to to http://mysite.com. If your network uses subdomains, you'll need to change all instances of http://mysite.network.com. If you do this I'd advise also running a check for the subdirectory version just in case. Save your file.
Note: If your site had a domain mapped to it which isn't the domain you're moving it to, you'll need to replace that with the new domain too. Tread very carefully here, and keep backups!
Editing Table References
The database tables in your new single site installation won't have prefixes for the site ID, so you'll need to remove these. In your sql file, replace all instances of wp_XX_ with wp_, where XX is your site ID.
Now save the sql file.
Installing WordPress and Creating a Database in the New Location
In phpMyAdmin, create a new database in the location for your new site and install WordPress in the normal way.
Uploading Files to the New Site
Identify the plugins used by the child site and either install them in your new WordPress site via the Plugins screen or upload them from the backup you took of your old site.
Do the same for any themes your site is using—copy them from your backup to the wp-content/themes directory of your new standalone WordPress installation, or just reinstall them.
Copy the uploads from your old site to the new one:
- If the network was created after WordPress 3.5, it will have a
sitesfolder inwp-content/uploads. Find the subfolder with your site's ID and upload its contents to thewp-content/uploadsfolder in your new site. - If the network is an older one and has a
blogs.dirfolder, that will also contain a folder with your site's ID. That will then have a subfolder calledfiles. Copy the contents of thefilesfolder to thewp-content/uploadsfolder in your new site.
Note: you may need to delete any folders WordPress has created in your new uploads folder to avoid any clashes.
Once you've done all this, activate any themes and plugins.
Importing Tables to the New Database
Now that you've installed your themes and plugins, you need to import the database tables.
Dropping the Existing Tables
Before you upload the tables from your old site, you'll need to delete the duplicate ones which WordPress has added to your new site.
In phpMyAdmin, drop the following tables from your database:
wp_commentmetawp_commentswp_linkswp_optionswp_postmetawp_postswp_termswp_term_relationshipswp_term_taxonomy
The screenshot shows my database with just those tables selected:
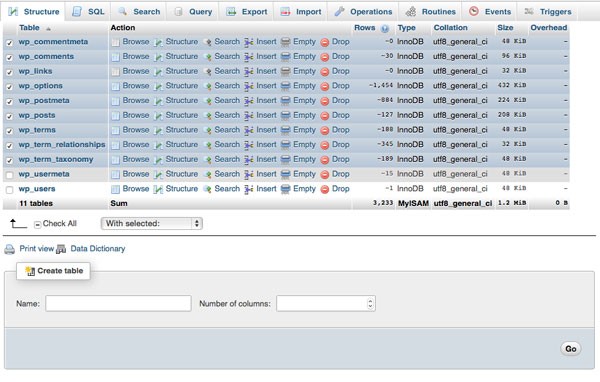
Select them, click on the With selected: dropdown box, and select Drop. When prompted, click Go.
Note: Don't delete the wp_usermeta or wp_users tables, unless you've chosen to copy these across from the network as well (see above).
Uploading the Database Tables
Next upload the database you've edited:
- Click the Import tab.
- Click the Choose file button.
- Select the sql file you've edited and click Choose or OK.
- Click the Go button.
- After a while (depending on the size of your database), you will see a message telling you the upload has successfully finished.
Final Steps
Clear your browser's cache. This avoids any problems you may have if the browser has cached content from the old site.
Now log in to the WordPress admin for the remote site. If you moved the user tables across, your login details will be the same as for your old site, but if you didn't, these will be whatever you specified when you installed WordPress in the new location.
Visit the Permalinks screen and turn pretty permalinks back on.
Check that all your links are working ok and that widgets and plugins are behaving as they should. If not, you can either step back through the process, using your backups where you need to, or simply set up the plugins and widgets from within your new site.
Removing the Site From Your Multisite Network
Once you are completely happy that everything's working as it should, remove the site from your Multisite installation. I'd recommend leaving this a week or so in case you spot anything that hasn't moved across. In the meantime, you can configure the old site's domain to map to the new one, either by using a plugin or in CPanel.
Phew! It was a long and slightly complicated process, but you've done it.
Summary
Migrating a site out of WordPress Multisite and into its own installation isn't something you can do quickly or without being very thorough, but it is possible and I've done it a few times. If you follow the steps above and make sure you have backups in case of any problems, then you should find it works smoothly for you.

Comments