App extensions were introduced during WWDC 14 as a way to extend the functionality of iOS apps to other parts of the system and to allow for better inter-app communication.
To name a few, you can use a Today extension to create a widget that will appear in Notification Center, a Sharing extension that will let the user share to their social network, or an Action extension that lets the user act on current content—either view it in a different way or change it. In this hands-on tutorial, we will build an Action extension from scratch.
Even though the tutorial doesn't require any additional knowledge, I do recommend that you take a look at a few resources if you'd like to learn more about extensions after reading this tutorial.
1. What Are We Going to Build?
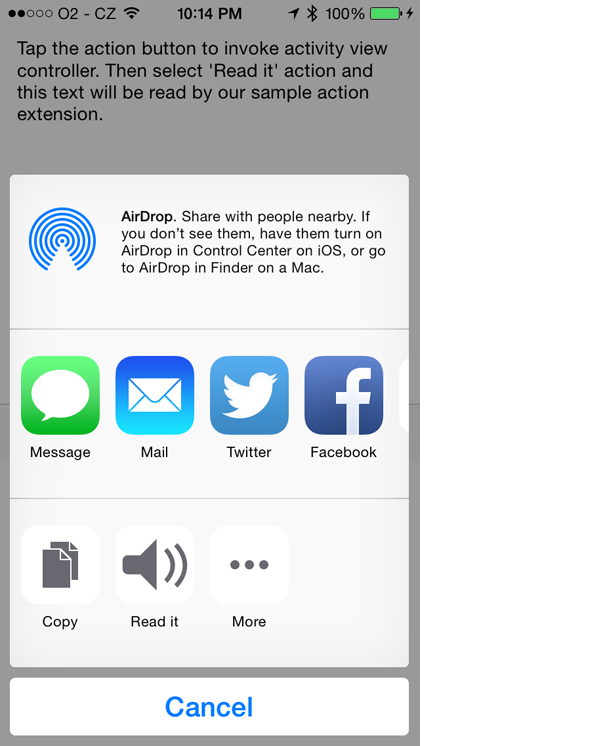
We are going to build a simple Action extension called "Read it". The extension will accept text as input and will read the text using the speech synthesis API of the AVFoundation framework. I think this works well for the tutorial, because we are not introducing any third party dependencies or other difficulties.
This is what the extension will look like when it's finished. You can download the result of this tutorial from GitHub.
2. Creating an Action Extension
Step 1: Project Setup
Start by launching Xcode 6.1 or higher, and create a new project. Select New > Project... from Xcode's File menu and choose Single View Application from the list of templates.
Click Next and give your project a name of SampleActionExtensionApp. Enter an Organization Identifier and set Devices to iPhone. The language we'll be using for this tutorial is Objective-C.
Step 2: Add Target
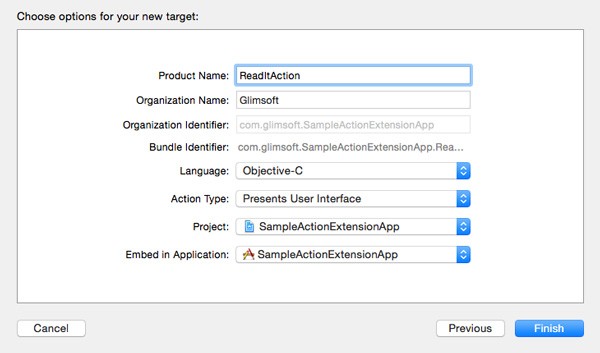
Once you've created the project, you can add a target for the Action extension. Select New > Target... from the File menu. In the left pane, select Application Extension from the iOS section, choose Action extension, and click Next.

Set the Product Name to ReadItAction. Also note the other options, specifically the Action Type. I will get to that one in a minute. Click Finish to create the Action extension.
You will now be asked if you want to activate the ReadItAction scheme. Click Cancel, because we will be installing the Action extension by running the containing app instead.
Action Types
There are two types of Action extensions, one with a user interface and one without one. You may be wondering what the benefit is of having an Action extension without a user interface so let me explain.
Action extensions without a user interface act on the current item in a way that changes it. For example, an Action extension could remove red eyes from photos and it doesn't need a user interface to do that. The containing app then has a chance to use the changed content, the enhanced photo in this case.
Action extensions with a user interface can be either full screen or presented as a form sheet. The template Action extension target uses the full screen presentation so that's what we are going to use.
Step 3: Implement User Interface
Now that we have the basics set up, we can start creating the user interface. We'll start with the containing app.
Click the Main.storyboard in the SampleActionExtensionApp group in the Project Navigator. In the right pane, select the File Inspector and uncheck Use size classes. Note that if you were creating a real app and you'd need to support iPad, it would probably be a good idea to use size classes.
Open the Object Library and drag a text view and a toolbar onto the view. Set the text view's frame to {x:8, y:20, width:304, height:288} in the Size Inspector on the right. As for the toolbar, set its frame to {x:0, y:308, width:320, height:44} in the Size Inspector.
The toolbar contains one bar button. Select it, and, in the Attributes Inspector, set its Style to Plain and its Identifier to Action.
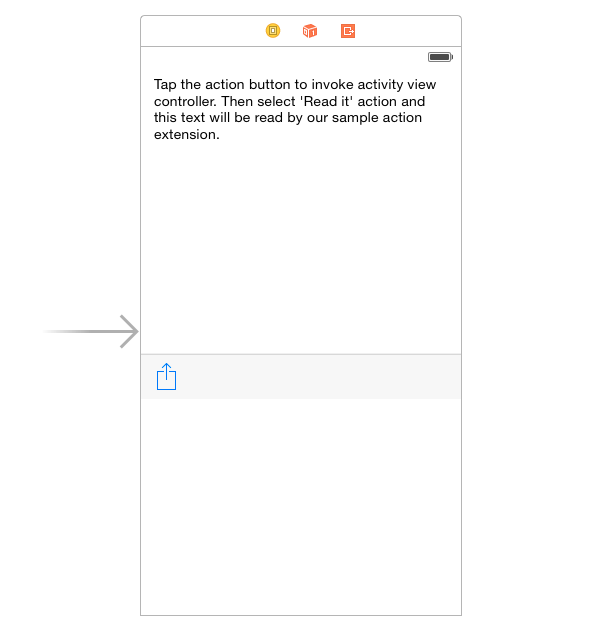
As a final touch, remove the default text of the text view and replace it with "Tap the action button to invoke activity view controller. Then select 'Read it' action and this text will be read by our sample Action extension."
The user interface of the view controller should now should look something like this:
Of course, we could have left the containing app blank. After all, we are building a sample app extension so the app doesn't really have to do anything. But I wanted to show how easy it is to invoke the activity controller from inside your app and provide a point where other Action extensions can come in.
When the button in the toolbar is tapped, an activity view controller is presented and we will be able to invoke our Action extension from within there. Another good reason is that if you wanted to publish your extension on the App Store, it has to be part of a real app and obviously the app has to do something in order for it to be approved.
Step 4: Present Activity View Controller
Next, we need to add some code to ViewController.m. Start by creating an outlet for the text view in the view controller's class extension as shown below.
@interface ViewController ()

@property (nonatomic, weak) IBOutlet UITextView *textView;

@end
Create an action named actionButtonPressed in which we initialize and present an UIActivityViewController instance and present it to the user.
- (IBAction)actionButtonPressed:(id)sender {
    UIActivityViewController *activityVC = [[UIActivityViewController alloc] initWithActivityItems:@[self.textView.text]
                                                                             applicationActivities:nil];
    [self presentViewController:activityVC animated:YES completion:nil];
}
Head back to Main.storyboard and connect the text view outlet to the text view by pressing Control and dragging from the View Controller object in the View Controller Scene to the text view, selecting textView from the popover menu.
To connect the action method, select the bar button in the toolbar and open the Connections Inspector. Drag from selector, under Sent actions, to the View Controller object, selecting actionButtonPressed: from the popover menu.
With the app's user interface ready and wired up, we can move on to building the Action extension.
Step 5: Implement User Interface
In the Project Navigator, expand the ReadItAction group and click on MainInterface.storyboard. You'll notice that the storyboard isn't empty and already contains a few user interface components. We'll use some of them, but we don't need the image view. Select the image view and remove it by pressing Delete.
Open the Object Library and add a text view below the navigation bar. Change its frame to {x: 8, y: 72, width: 304, height: 300}. Finally, double-click the navigation bar's title view and set the title to "Text reader".
Step 6: Implement ActionViewController
It's time to implement the Action extension. In the Project Navigator, select ActionViewController.m and make the following changes.
Below the import statements add an import statement for the AVFoundation framework so we can leverage the speech synthesis API in the Action extension.
@import AVFoundation;
In the class extension of the ActionViewController class, remove the imageView outlet and add one for the text view we added earlier.
@interface ActionViewController ()

@property (nonatomic, strong) IBOutlet UITextView *textView;

@end
We also need to make some changes to the viewDidLoad method of the ActionViewController class.
- (void)viewDidLoad {
    [super viewDidLoad];

    // Get the item[s] we're handling from the extension context.
    // In our Action extension, we only need one input item (text), so we use the first item from the array.
    NSExtensionItem *item = self.extensionContext.inputItems[0];
    NSItemProvider *itemProvider = item.attachments[0];

    if ([itemProvider hasItemConformingToTypeIdentifier:(NSString *)kUTTypePlainText]) {

        // It's a plain text!
        __weak UITextView *textView = self.textView;

        [itemProvider loadItemForTypeIdentifier:(NSString *)kUTTypePlainText options:nil completionHandler:^(NSString *item, NSError *error) {

            if (item) {
                [[NSOperationQueue mainQueue] addOperationWithBlock:^{

                    [textView setText:item];

                    // Set up speech synthesizer and start it
                    AVSpeechSynthesizer *synthesizer = [[AVSpeechSynthesizer alloc]init];
                    AVSpeechUtterance *utterance = [AVSpeechUtterance speechUtteranceWithString:textView.text];
                    [utterance setRate:0.1];
                    [synthesizer speakUtterance:utterance];
                }];
            }
        }];
    }
}
The implementation is pretty easy to understand. In viewDidLoad, we obtain the input text, assign it to the text view, and create a speech synthesizer object that will read it.
Step 7: Configure Action Extension
Even though we are getting close, there are a few things that we still need to take care of. First, we need to connect the text view in the storyboard to the outlet we created a moment ago.
Open MainInterface.storyboard and connect the text view to the Image scene as we did in Main.storyboard a minute ago.
We also need to specify which data types the Action extension supports. In our case, it's only text. Expand the Supporting Files group and select Info.plist. In Info.plist, navigate to NSExtension > NSExtensionAttributes > NSExtensionActivationRule. Change the NSExtensionActivationRule's type from String to Dictionary.
With the dictionary expanded, click the + button next to it. This will add a child key. Set its name to NSExtensionActivationSupportsText, its type to Boolean, and the value to YES. This ensures that the action extension is only visible when the input items contains text.
Still in the Info.plist, change the Bundle Display Name to Read It. It looks better. This is what the related part of the Info.plist file should look:

Step 8
As a finishing touch, you can add an icon for the Action extension. In the Project Navigator, select the project and, under targets, select the ReadItAction target. From the General tab in the App Icons and Launch Images section, tap Use Asset Catalog next to the App Icons Source. In the prompt, click Migrate. Navigate to the asset catalog and drag the below icon to the iPhone App iOS 7,8 60pt 2x place.

Build and run the app to see if everything works as expected. There is one thing though. If the sound icon is not shown on the Action extension, you need to make sure that the main Images.xcassets file is being copied to the extension target.
To do that, select the project in Project Navigator and choose the ReadItAction target from the list of Targets. Open the Build Phases tab at the top and expand Copy Bundle Resources phase. If the Images.xcassets file is not in the list of resource, then click the little plus symbol to add it to the list.
3. Run and Test
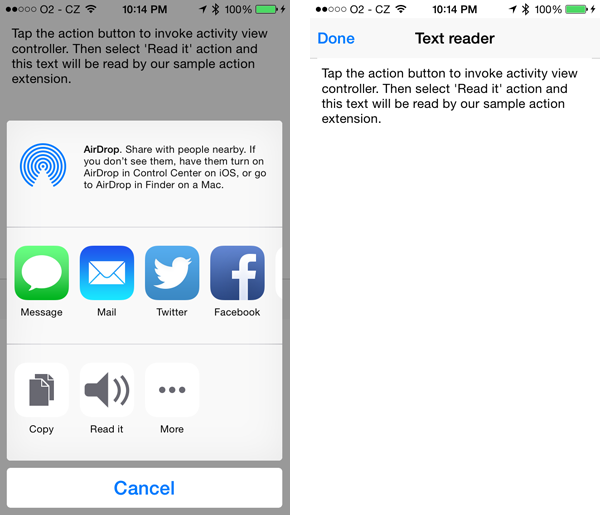
Run the app to try it out. Below are two screenshots that show the extension in action. You can also try invoking this activity view controller from the Notes app and let our extension read some of your notes. Also, try opening the activity sheet in the Photos app, you'll see that our extension is not listed, which is exactly what we'd expect based on the activation rules we set.
Conclusion
In this tutorial, you learned how to build a simple Action extension. We also covered the basics of using the speech synthesis API of the AVFoundation framework. If you're interested in creating other extensions, then check out some other tutorials on Tuts+, such as Cesar Tessarin's tutorial on creating a Today extension.
If you have any comments or questions, you can leave a comment in the comments below or contact me on Twitter.

Comments