The inclusion of jQuery libraries in the core of OpenCart makes Ajax implementation a breeze and more than a pleasant experience. In fact, you'll find several snippets spread across the whole framework that show the heavy use of jQuery, if you try to dig into the view files specifically.
Throughout the course of this article, we'll build a custom page to demonstrate the use of Ajax in OpenCart. It'll be a simple interface that allows you to select a product from the drop-down box and displays a nice product summary block of the selected product. The interesting part of the use-case is the way the product summary block is built—it'll be prepared using Ajax on-the-fly. Of course, it's not something that makes it an out of the world example, but I guess it'll serve the basic purpose of showing how things work in OpenCart.
I assume that you're using the latest version of OpenCart, which is 2.1.x.x! Also, the primary discussion of this article concentrates on Ajax with OpenCart, so I'll skid through the basics of custom module development in OpenCart. However, if you're not familiar with it, a quick explanation of the code snippets in between makes sure that you can follow till the end!
A Quick Glance at File Organization
Let’s quickly go through the file setup required for our custom page.
-
catalog/controller/ajax/index.php: It's a controller file that provides the application logic of the usual controller in OpenCart. -
catalog/language/english/ajax/index.php: It's a language file that helps set up language labels. -
catalog/view/theme/default/template/ajax/index.tpl: It's a view template file that holds the XHTML of the custom page. -
catalog/view/theme/default/template/ajax/product.tpl: It's a view template file that holds the XHTML of the AJAX response.
So, that’s a quick list of the files we’re going to implement today.
Create Module Files
Go ahead and create a file catalog/controller/ajax/index.php with the following contents.
<?php
// catalog/controller/ajax/index.php
class ControllerAjaxIndex extends Controller {
  public function index() {
    $this->load->language('ajax/index');
    $this->load->model('catalog/product');

    $this->document->setTitle($this->language->get('heading_title'));

    // load all products
    $products = $this->model_catalog_product->getProducts();
    $data['products'] = $products;

    $data['breadcrumbs'] = array();

    $data['breadcrumbs'][] = array(
      'href' => $this->url->link('common/home'),
      'text' => $this->language->get('text_home')
    );

    $data['breadcrumbs'][] = array(
      'href' => $this->url->link('ajax/index'),
      'text' => $this->language->get('heading_title')
    );

    $data['heading_title'] = $this->language->get('heading_title');
    $data['text_product_dropdown_label'] = $this->language->get('text_product_dropdown_label');

    $data['column_left'] = $this->load->controller('common/column_left');
    $data['column_right'] = $this->load->controller('common/column_right');
    $data['content_top'] = $this->load->controller('common/content_top');
    $data['content_bottom'] = $this->load->controller('common/content_bottom');
    $data['footer'] = $this->load->controller('common/footer');
    $data['header'] = $this->load->controller('common/header');

    if (file_exists(DIR_TEMPLATE . $this->config->get('config_template') . '/template/ajax/index.tpl')) {
      $this->response->setOutput($this->load->view($this->config->get('config_template') . '/template/ajax/index.tpl', $data));
    } else {
      $this->response->setOutput($this->load->view('default/template/ajax/index.tpl', $data));
    }
  }

  // ajax call method
  public function ajaxGetProduct() {
    if (isset($this->request->get['product_id'])) {
      $product_id = (int) $this->request->get['product_id'];

      if ($product_id > 0) {
        // load the particular product requested in ajax
        $this->load->model('catalog/product');
        $product = $this->model_catalog_product->getProduct($product_id);
        $data['product'] = $product;

        // prepare thumb image
        $this->load->model('tool/image');
        if ($product['image']) {
          $data['thumb'] = $this->model_tool_image->resize($product['image'], $this->config->get('config_image_thumb_width'), $this->config->get('config_image_thumb_height'));
        }

        // format price
        $data['price'] = $this->currency->format($this->tax->calculate($product['price'], $product['tax_class_id'], $this->config->get('config_tax')));

        $this->load->language('product/product');
        $data['text_manufacturer'] = $this->language->get('text_manufacturer');
        $data['text_model'] = $this->language->get('text_model');
        $data['text_note'] = $this->language->get('text_note');
        $data['tab_description'] = $this->language->get('tab_description');

        if (file_exists(DIR_TEMPLATE . $this->config->get('config_template') . '/template/ajax/product.tpl')) {
          $this->response->setOutput($this->load->view($this->config->get('config_template') . '/template/ajax/product.tpl', $data));
        } else {
          $this->response->setOutput($this->load->view('default/template/ajax/product.tpl', $data));
        }
      }
    }
  }
}
To start with, the index method of the controller is used to load the language and model files and set up the common variables for the usual OpenCart template. We're loading the product model available in the core itself, so we don't have to duplicate the code to fetch the product information.
After loading the product model, we're using the getProducts method to load all the products. Finally, we conclude the index method by setting index.tpl as our main template file.
Next is the important ajaxGetProduct method, which is used to build a product summary block based on the product id passed in the Ajax call, as we'll see soon in the template file. It loads the same product model as we did in the index method, and calls the getProduct method to fetch specific product information based on the product id.
At the end, the product.tpl template is set as a template for this method. Specific to the requirements in our case, we're using the template to build our Ajax output, but you could also send the JSON response instead.
Moving ahead, let's create a language file catalog/language/english/ajax/index.php to hold the static label information.
<?php
// catalog/language/english/ajax/index.php
// Heading
$_['heading_title']            = 'Simple Ajax Example';
$_['text_product_dropdown_label']   = 'Select Product';
The view template file, one of the most important files in the context of this tutorial, should be created at catalog/view/theme/default/template/ajax/index.tpl with the following contents.
<!-- catalog/view/theme/default/template/ajax/index.tpl -->
<?php echo $header; ?>
<div class="container">
  <ul class="breadcrumb">
    <?php foreach ($breadcrumbs as $breadcrumb) { ?>
    <li><a href="<?php echo $breadcrumb['href']; ?>"><?php echo $breadcrumb['text']; ?></a></li>
    <?php } ?>
  </ul>
  <div class="row"><?php echo $column_left; ?>
    <?php if ($column_left && $column_right) { ?>
    <?php $class = 'col-sm-6'; ?>
    <?php } elseif ($column_left || $column_right) { ?>
    <?php $class = 'col-sm-9'; ?>
    <?php } else { ?>
    <?php $class = 'col-sm-12'; ?>
    <?php } ?>
    <div id="content" class="<?php echo $class; ?>"><?php echo $content_top; ?>
      <h2><?php echo $heading_title; ?></h2>
      <fieldset id="account">
      <div>
        <label class="col-sm-2 control-label" for="product"><?php echo $text_product_dropdown_label; ?></label>
        <div class="col-sm-10">
          <select name="product" class="form-control" id="product">
            <option>-- <?php echo $text_product_dropdown_label; ?> --</option>
            <?php foreach ($products as $product) { ?>
              <option value="<?php echo $product['product_id']; ?>"><?php echo $product['name']; ?></option>
            <?php } ?>
          </select>
        </div>
      </div>
      </fieldset>
      <div id="product_summary"></div>
      <?php echo $content_bottom; ?></div>
    <?php echo $column_right; ?></div>
</div>
<?php echo $footer; ?>

<script type="text/javascript">
  $('#product').on('change', function() {
    $.ajax({
      url: 'index.php?route=ajax/index/ajaxGetProduct&product_id=' + this.value,
      dataType: 'html',
      success: function(htmlText) {
        $('#product_summary').html(htmlText);
      },
      error: function(xhr, ajaxOptions, thrownError) {
        alert(thrownError + "\r\n" + xhr.statusText + "\r\n" + xhr.responseText);
      }
    });
  });
</script>
The snippet of our interest is at the end of index.tpl, the JavaScript code that makes use of jQuery methods to bind change and Ajax events. When the user selects a product from the drop-down box, the change event is fired that eventually makes an Ajax call. In the Ajax call, we're sending the product_id appended as a GET query-string variable.
On the other hand, as we've already discussed in the controller setup, the ajaxGetProduct sends the XHTML of the product summary block based on the product_id query-string variable. In the success method, we append the XHTML response to the div tag that has the id attribute set to product_summary.
Finally, go ahead and make a template file catalog/view/theme/default/template/ajax/product.tpl with the following contents for an Ajax call.
<!-- catalog/view/theme/default/template/ajax/product.tpl --> <div style="border: 1px solid #CCC;padding:10px;margin:10px;"> <h3><?php echo $product['name']; ?> - <?php echo $price; ?></h3> <p><img src="<?php echo $thumb; ?>"/></p> <p><b><?php echo $text_manufacturer; ?></b> <?php echo $product['manufacturer']; ?></p> <p><b><?php echo $text_model; ?></b> <?php echo $product['model']; ?></p> </div>
Nothing fancy here—We've just included a basic product summary block XHTML.
So, that's it as far as the file setup is concerned. In our next section, we'll go through the front-end to test what we've built so far.
Front-End Testing
So we've done all the hard work, and now it’s time for some testing! Head over to the front-end of OpenCart and visit the URL http://www.yourstore.com/index.php?route=ajax/index. It should display a nice-looking interface as shown in the following screenshot.
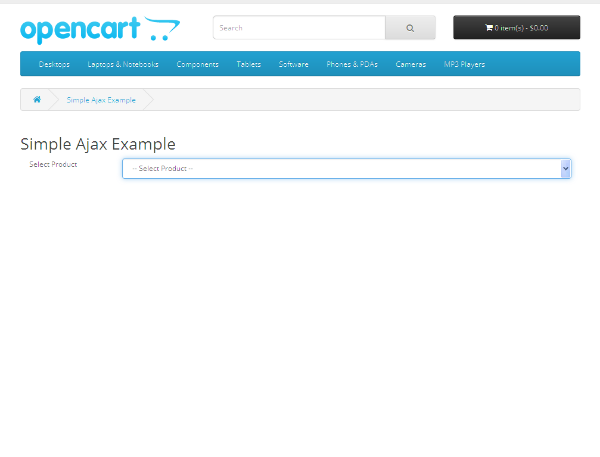
It’s our custom page, and it’s displaying a drop-down box containing the list of all products. Now, let’s try to select a product from the select box, and it’ll make an Ajax call in the background.
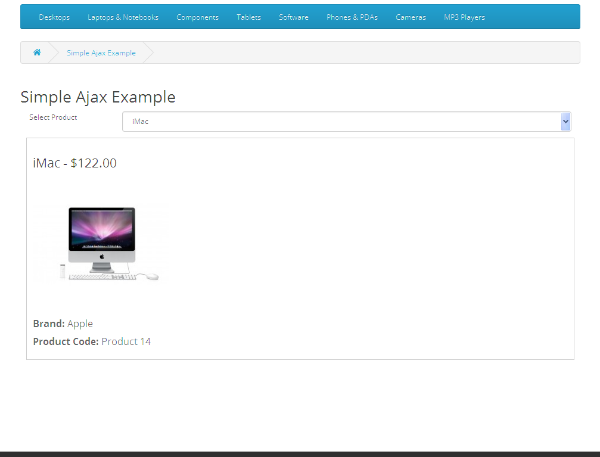
As a result, you should see a nice product summary block displayed right under the drop-down box as shown in the following screenshot.
If you've followed the tutorial and implemented all the files as explained, it should work smoothly for you as well as it did for me! Of course, that was a pretty simple demonstration of how Ajax works in OpenCart, but you could stretch it to the next level as per your requirements.
Go ahead and play with it, and try to make some interactive stuff using Ajax as it's the best way to learn. So, that's it for today, and I'll be back soon with some more exciting stuff.
Conclusion
It was Ajax with OpenCart that was the central attraction of today's article. As usual, we took a custom module approach to demonstrate it and made a simple yet effective use-case.
As always, if you're looking for additional OpenCart tools, utilities, extensions, and so on that you can leverage in your own projects or for your own education, don't forget to see what we have available in the marketplace.
I hope that it was informative and useful, and don't hesitate to leave your queries and comments!

Comments