Learn how to create a simple, automatically generated image gallery plugin with thumbnail navigation for WordPress. The end result is a simple, attractive gallery with thumbnail navigation that is created automatically whenever you upload images to a post or page. No special settings, no options to configure, no hoops to jump through – it just works!
Introduction
Here is a preview of what we will be creating:
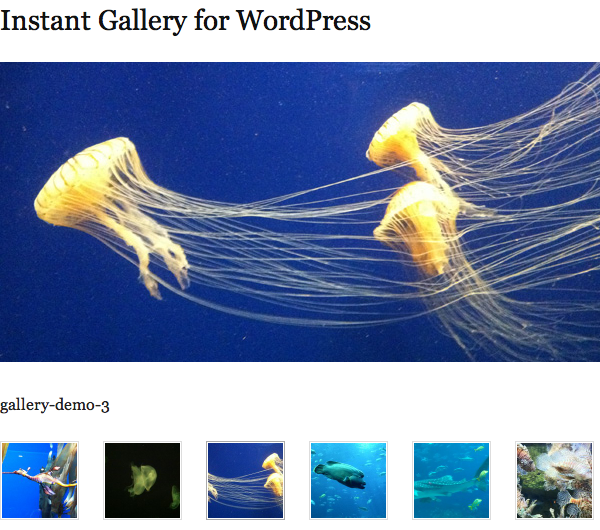
Using Instant Gallery for WordPress
Before we get into the code, let's take a quick look at how easy this gallery is to use. For those of you who just want to grab the code and use it, this section will show you how to do that.
For those that want to learn how to create this gallery, it is still good to get a sense of how it works before we start coding. So, let's check it out!
Instant Gallery: The 2-Minute Quick-Start Guide
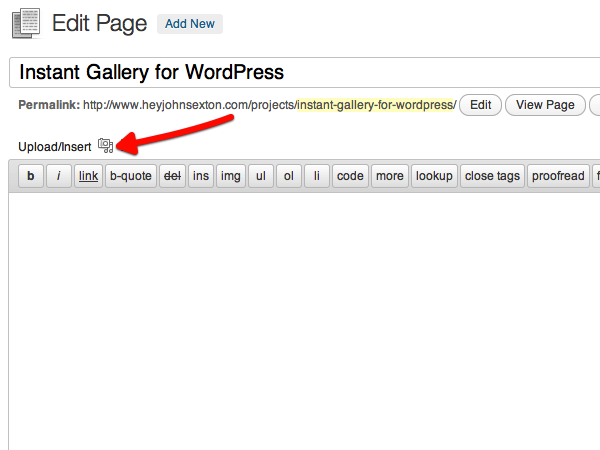
1. Start with a simple, blank Post or Page in WordPress. Hit the "Upload/Insert Media" button.
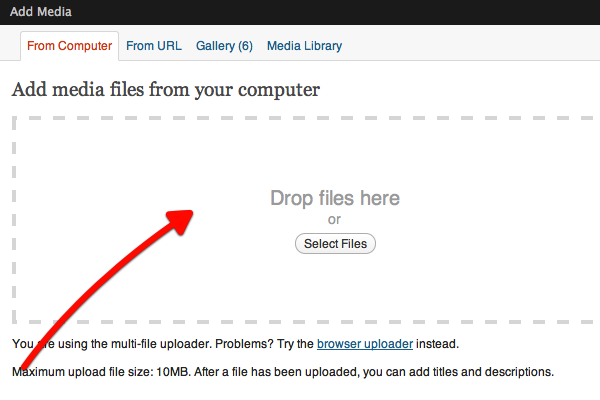
2. Next, upload some images to the Post or Page. Just drag and drop your images into the box.
3. When your images finish uploading, you'll get a list of the images and their properties. You can drag and drop the images to re-order them on this screen. Instant Gallery respects the menu order that you set up in the WordPress media browser, so re-ordering the images here will re-order them on the gallery.
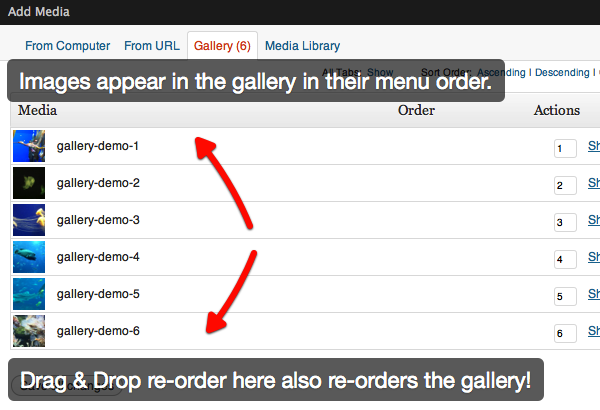
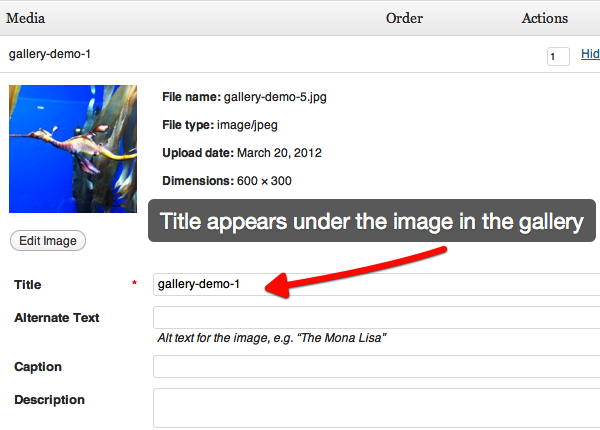
4. If you want to change any properties of the image, such as the Title, Caption or Description, then you can do that just like you normally would. In its current incarnation, Instant Gallery displays the image Title in the Gallery in between the main image and the thumbnails.
Why display the Title and not the other information? As you can see from the image, WordPress automatically fills out the Title of the image (using the image's filename) as soon as you upload it. In keeping with the theme of making Instant Gallery as fast and easy to use as possible, I wanted to use the field that WordPress fills out automatically.
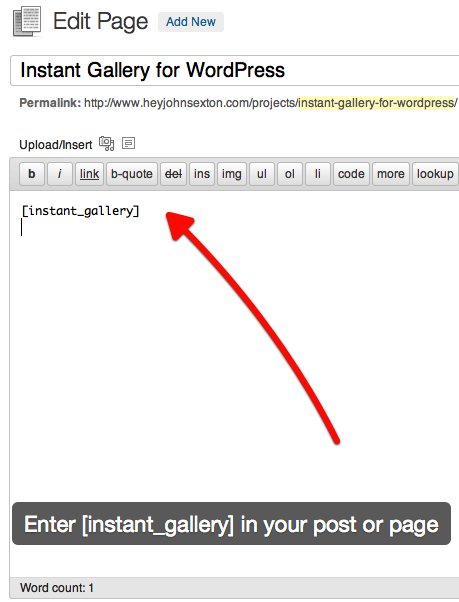
5. Finally, go back to your Post or Page and enter the [instant_gallery] shortcode in the content area. Hit save, and then go view your page. That's it!
So, that's all there is to it. The purpose of Instant Gallery is to be the fastest, easiest way to create an image gallery by uploading images to a Post or Page in WordPress. If you think that will be useful to you, then go ahead and grab the files and have fun!
You'll be creating beautifully simple WordPress image galleries in an instant!
Let's take one more look at the finished product:
Now, if you are interested in learning how Instant Gallery was created, either to improve your skills as a coder, or to build upon Instant Gallery and make it better, then please keep reading!
Creating Instant Gallery
As with most WordPress projects, we'll be using HTML, CSS, PHP, and a little bit of JavaScript to accomplish our goal.
We will proceed in the following way:
- HTML – Start with markup and fill it with static content
- WordPress / PHP – Dynamically populate our markup with content
- JavaScript – Apply the behavior to swap the images
- CSS – Complete the look and feel with CSS
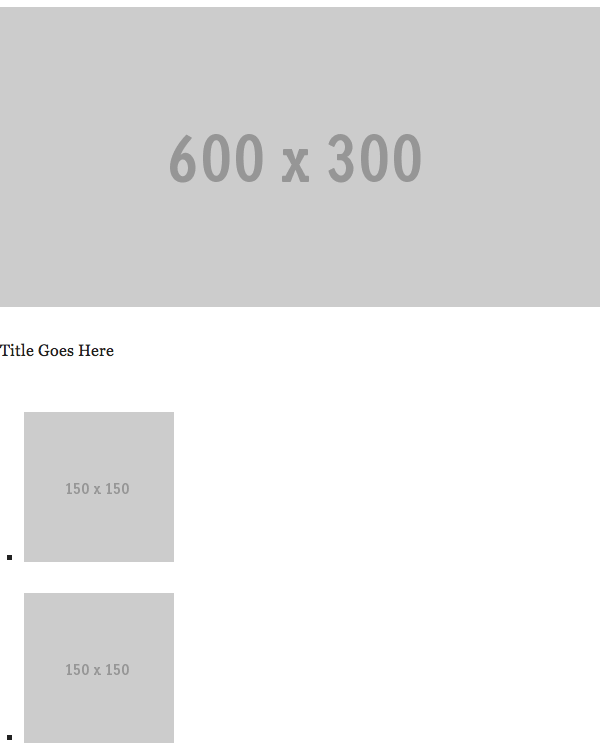
Step 1 The Markup
The markup for our gallery is very simple. We just have a main containing element that encompasses the entire gallery (#instant-gallery), the primary content panel that contains our main image and its title (#ig-main), and then the thumbnail navigation area (#ig-thumbs).
	<div id="instant-gallery">

		<!-- Main Display Area -->
		<div id="ig-main">

				<!-- Main "Hero" Image -->
				<img id="ig-hero" src="http://placehold.it/600x300" />

				<!-- Image Title -->
				<p id="ig-title">Title Goes Here</p>

		<!-- Close the main display area -->
		</div>

		<!-- Open the Thumbnail navigation -->
		<ul id="ig-thumbs">

			<!-- Now, for each of the thumbnail images, label the LI with an ID of the appropriate thumbnail number -->
			<li id="ig-thumb-1">

				<!-- Output a thumbnail-sized version of the image -->
				<img class="thumb" src="http://placehold.it/150x150" />

			</li>

			<li id="ig-thumb-2">

				<img class="thumb" src="http://placehold.it/150x150" />

			</li>

			<li id="ig-thumb-3">

				<img class="thumb" src="http://placehold.it/150x150" />

			</li>

		<!-- Close the thumbnail navigation list -->
		</ul>

	<!-- Close the entire Gallery -->
	</div>
Our navigation is an unordered list and each list item contains a thumbnail image.
For simplicity, we will just use three placeholder thumbnails in the static HTML version. In the next section we will use PHP to dynamically generate as many thumbnails as we need.
If we check out our markup now, we'll get something that looks like this (just showing two thumbnails to keep the image size down):
So, that's the basic markup. Not too exciting, but simple, clean HTML is the foundation of just about everything we do on the web so it's worth taking the time to get it right.
Step 2 The WordPress and PHP
Now let's get into the WordPress part of the tutorial. This may be the most exciting part for you Wptuts+ readers.
Let's start by thinking conceptually about what we want to accomplish. The goal here is to have an image gallery automatically generated from any images that are uploaded to a given post or page.
In order to accomplish this, we need to know the following:
- What post or page are we on?
- Are there any images attached to this page? If so, let's get them and some information about them.
- Then, for the first image, we want to display it in the gallery, along with a caption or descriptive text.
- Then, for all of the images (including the first) images, we want to display them as thumbnails below the gallery.
- The first image should also be highlighted to show that it is currently selected.
With that general concept in mind, let's take a look at the markup code from Step 1, now infused with the WordPress and PHP code we need to get the information we want. There is a fair amount going on here, so let's break it down into smaller sections that correspond with the list above.
Step 2.1: Prepare the Query
//-------------------------------------------------
// Prepare the query
//-------------------------------------------------

	global $post;

	$args = array(
		'post_parent'    => $post->ID,			// For the current post
		'post_type'      => 'attachment',		// Get all post attachments
		'post_mime_type' => 'image',			// Only grab images
		'order'			 => 'ASC',				// List in ascending order
		'orderby'        => 'menu_order',		// List them in their menu order
		'numberposts'    => -1,					// Show all attachments
		'post_status'    => null,				// For any post status
	);
Here we are doing two main things:
First, we set up the global Post variable ($post) so we can have access to the relevant data about our post.
Second, we set up an array of arguments ($args) that define the kind of information we want to retrieve. Specifically, we need to get images that are attached to the current post. We're also going to get all of them, and return them in the same order they appear in the WordPress gallery.
See the comments in the code snippet above to see which lines correspond to which parameters.
Step 2.2: Retrieve the Images
	// Retrieve the items that match our query; in this case, images attached to the current post.
	$attachments = get_posts($args);

		// If any images are attached to the current post, do the following:
		if ($attachments) {

			// Initialize a counter so we can keep track of which image we are on.
			$count = 0;

			// Now we loop through all of the images that we found
			foreach ($attachments as $attachment) {
Here we are using the WordPress get_posts function to retrieve the images that match our criteria as defined in $args. We are then storing the results in a variable called $attachments.
Next, we check to see if $attachments exists. If this variable is empty (as will be the case when your post or page has no images attached to it), then no further code will execute. If $attachments does have content, then we move on to the next step.
Next, we initialize a simple counter variable so we can keep track of which image we are on. We do this because there are certain things we'll want to output only the first time through our loop (such as the main gallery markup). It also gives us a means to assign unique IDs to each thumbnail in the navigation if we would like.
Then we open the loop that will step through each of our images.
Step 2.3: Main Galley Area
//---------------------------------------------------------
// Output the main containers and first large image;
// This is stuff we will only want to output one time.
//---------------------------------------------------------
	if($count == 0) { ?>

		<!-- Whole Gallery container (includes thumbnails) -->
		<div id="instant-gallery">

			<!-- Main Display Area -->
			<div id="ig-main">

					<!-- Set the parameters for the image we are about to display. -->
					<?php $default_attr = array(
							'id' 	=> "ig-hero",
							'alt'   => trim(strip_tags( get_post_meta($attachment_id, '_wp_attachment_image_alt', true) )),
							'title' => trim(strip_tags( $attachment->post_title )),
						);
					?>

					<!-- Display the first image attachment as the large image in the main gallery area -->
					<?php echo wp_get_attachment_image($attachment->ID, 'full', false, $default_attr); ?>

					<!-- Image Title -->
					<p id="ig-title">

					<!-- Display the Title of this image below the image -->
					<?php echo $attachment->post_title; ?>

					</p>

			<!-- Close the main display area -->
			</div>

			<!-- Open the Thumbnail navigation -->
			<ul id="ig-thumbs">

	<!-- End the block of stuff that we only do for the first image  -->
	<?php } ?>
Here we use our counter variable to determine how many times we have been through our loop. If this is the first time, $counter will be equal to zero, and the block of code above will be executed. This code sets up the main structural elements of the gallery and populates the main image section with the first large image. This stuff only needs to happen once. For subsequent trips through the loop, $counter will be greater than zero and this block of code will be skipped.
Ok, so what's actually going on in there? We've already looked at the HTML part in Step 1, so let's focus on the PHP code that inhabits the main gallery area.
	<!-- Set the parameters for the image we are about to display. -->
	<?php $default_attr = array(
			'id' 	=> "ig-hero",
			'alt'   => trim(strip_tags( get_post_meta($attachment_id, '_wp_attachment_image_alt', true) )),
			'title' => trim(strip_tags( $attachment->post_title )),
		);
	?>

	<!-- Display the first image attachment as the large image in the main gallery area -->
	<?php echo wp_get_attachment_image($attachment->ID, 'full', false, $default_attr); ?>

	<!-- Image Title -->
	<p id="ig-title">

	<!-- Display the Title of this image below the main image -->
	<?php echo $attachment->post_title; ?>

	</p>
In the first section here, we define an array of parameters just like we did in Step 2.1. This time, however, instead of parameters for a query, we are setting parameters for a WordPress function called wp_get_attachment_image.
This function grabs the current attachment (our current image), returns the full size of the image (as opposed to a smaller size such as the Thumbnail; we'll get into that later), and applies attributes to the image HTML tag that correspond to the arguments defined in the $default_attr array. The "alt" and "title" tags of the image are defined as you would expect, and the image is given an ID of #ig-hero so that we can easily target it with CSS.
Finally, we output image title again, this time as the Title which appears below the image. By default, WordPress sets the image Title to be equal to the filename of the uploaded image. So, when you use this technique, either (1) make sure the filenames of the images you upload are something you would like to have displayed on your slideshow, (2) edit the Title field of the images when you upload them, or (3) comment this part of the code out so that the title does not display in the slideshow at all.
Step 2.4: Thumbnail Navigation
	<!-- Open the Thumbnail navigation -->
	<ul id="ig-thumbs">

		<!-- End the block of stuff that we only do for the first image  -->
		<?php } ?>

			<!-- Now, for each of the thumbnail images, label the LI with an ID of the appropriate thumbnail number -->
			<li id="ig-thumb-<?php echo $count+1; ?>">

				<?php if ($count==0) {

					// If this is the first thumbnail, add a class of 'selected' to it so it will be highlighted
					$thumb_attr = array(
						'class' => "thumb selected",
						);

				} else {

					// For all other thumbnails, just add the basic class of 'thumb'
					$thumb_attr = array(
						'class' => "thumb",
						);

				} ?>

				<!-- Output a thumbnail-sized version of the image that has the attributes defined above -->
				<?php echo wp_get_attachment_image($attachment->ID, 'thumbnail', false, $thumb_attr); ?>

			</li>

				<!-- Increment the counter so we can keep track of which thumbnail we are on -->
				<?php $count = $count + 1;

			} ?>

		<!-- Close the thumbnail navigation list -->
		</ul>

	<!-- Close the entire Gallery -->
	</div>

	<?php }

	} ?>
Now let's take a closer look at the thumbnail navigation. At the top of this block of code we've repeated the opening of the #ig-thumbs list to help you orient yourself in the code. With that reference point in mind, let's look at the actual list items themselves.
You'll notice that we are using a little snippet of PHP to output the $count variable, plus one, to give each list item its own unique ID. This will give us just one more degree of control over the list items with CSS, should we want it. We use $count+1 so that we don't have to start at zero.
Inside the list item, there is a conditional statement that checks one more time which iteration of the loop we are on. As we have done a few times before, we are setting an array; however, this time it is an attribute for the thumbnail images. The difference here is that we are setting slightly different parameters for the array depending on if we are on the first trip through the loop or not.
We always give the thumbnail a class of "thumb", but on the first trip through the loop we also give the first thumbnail a class of "selected". This is something we will target with CSS later on in order to provide a consistent user experience.
Once the $thumb_attr attributes are set, we use wp_get_attachment_image again to output the image. The main thing to note this time is that we are grabbing the thumbnail version of the image instead of the full size of the image that we grabbed above.
Then, since we are at the end of our loop, we increment our counter and begin the loop again. Once we've exhausted all of our image attachments, we'll hit the end of the loop. When this happens, we close the unordered list, then the whole gallery container, and then our PHP conditional statements.
Step 2.5: Add the Shortcode
It's great have coded up our image gallery, but it is even better if we can display our image gallery! At this point, we still don't have any way to actually show the output on a WordPress Post or Page. We're going to fix that right now, and fortunately this step is easy!
	//-------------------------------------------------
	// Create the Shortcode for Instant Gallery
	//-------------------------------------------------

	add_shortcode('instant_gallery', 'instant_gallery');
It feels good to have a nice quick win after the big block of code from Step 2.4. Here we're just defining a very simple shortcode so that we will be able to add the gallery to our WordPress posts or pages.
This takes our function, called 'instant_gallery' which is defined above, and creates a new shortcode with an identical name. We can then insert the gallery into our posts or pages using the shortcode [instant_gallery].
There are plenty of in-depth articles about shortcodes out there, including some good ones right here on Wptuts+. If you are new to shortcodes, here are some good starting points:
- Getting Started with WordPress Shortcodes
- WordPress Shortcodes: The Right Way
- Quick Tip: Using Shortcodes in Theme Development
- WordPress Shortcode API
Step 2.6: Gather Our Thoughts
Whew! Ok, so that's all the code for the gallery itself. The code we've written so far will retrieve a list of image attachments from the current WordPress post or page and then automatically generate a gallery according to the markup we provided. The shortcode then gives us a convenient way to insert our galleries into our posts or pages.
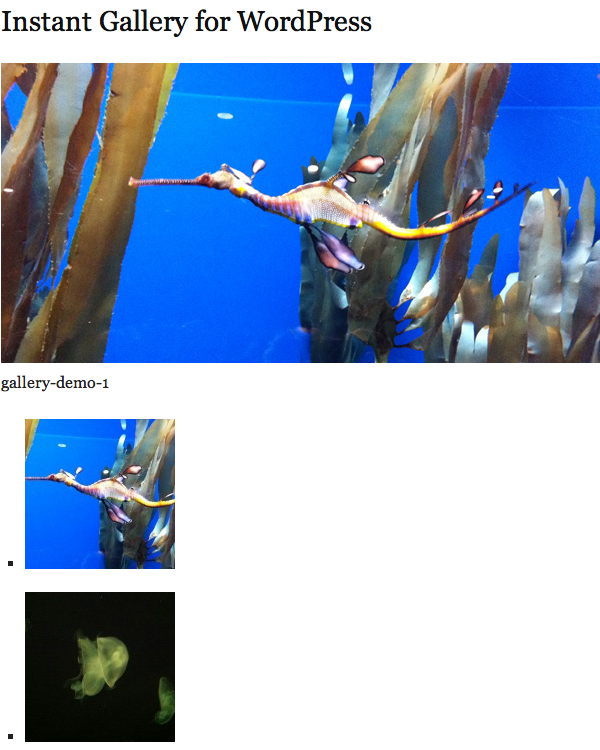
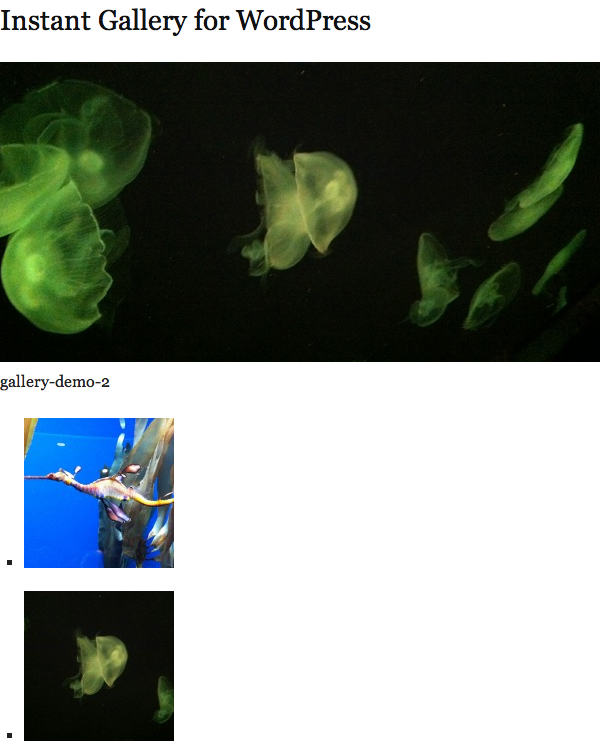
If we upload some awesome images of seahorses and jellyfish and then check our results, here is what we will have at this point:
From a WordPress point of view, we have done what we need to do. Without JavaScript, however, the gallery won't actually do anything. Without CSS, it won't look very good, either. So, let's take a minute to digest what we've done so far, and then we will move on to the next step where we make our gallery come alive!
Step 3 The JavaScript
As you might expect, Instant Gallery relies on the magic of jQuery to achieve the basic level of interactivity that it requires. There are actually two parts to this. The first is loading the jQuery library into our theme correctly, and the second is the actual jQuery code which will create the behavior we need (namely, swapping images and image titles when a thumbnail is clicked).
Both of these parts offer a good opportunity to employ some insights and WordPress best practices, so if you are new to working with jQuery in the context of WordPress, pay special attention!
Step 3.1: Using Enqueue Script to Load jQuery in WordPress
As you may know, jQuery (as well as many other JavaScript libraries) come pre-loaded with WordPress. For the sake of simplicity, we will use the version of jQuery included with WordPress for this example.
This is a good opportunity to use the WordPress wp_enqueue_script function. This is the "right" way to load scripts in WordPress. It ensures that the scripts are loaded at the proper place and time as WordPress executes, and that conflicts are avoided.
The wp_enqueue_script function can be confusing, but fortunately there are plenty of good articles about it out there. Here are some useful resources about wp_enqueue_script:
- How to Include JavaScript and CSS in Your WordPress Themes and Plugins
- Use Google-Hosted JavaScript Libraries (...still the Right Way) (Updated Dec. 2011)
	//-------------------------------------------------
	// Enqueue jQuery
	//-------------------------------------------------

	function wptuts_enqueue_jquery() {

		wp_enqueue_script('jquery');

	}

	// Only add the javascript if we are NOT on the admin screen
	add_action("wp_enqueue_scripts", "wptuts_enqueue_jquery", 11);
Notice that we attach this function to the WordPress hook "wp_enqueue_scripts" which loads all the scripts that have been enqueued by "wp_enqueue_script". Subtle difference there, but it is important!
Here is an important note about wp_enqueue_scripts from the WP Codex:
wp_enqueue_scripts hook (instead of the init hook which many articles reference), we avoid registering the alternate jQuery on admin pages, which will cause post editing (amongst other things) to break after upgrades often.
Step 3.2: Using jQuery to Bring Instant Gallery to Life
Now we can move on to the jQuery code that powers the swapping of images and titles. We only need a few lines of code to accomplish this. Some of you out there who are well versed in jQuery may even be able to suggest some more efficient ways to get the job done!
As we did with the WordPress code in Step 2, let's walk through this conceptually before we get into the code itself. When we click on a thumbnail, we want a few things to happen:
- First and most importantly, we want to swap out the existing image in the main hero position for another large image – the one that corresponds to the thumbnail we clicked on.
- Second, we want to replace the title of the old image with the one that corresponds to the new image. We will do this by taking advantage of the WordPress file naming scheme. We will talk about how to do that in just a moment.
- Third, we want to highlight the thumbnail corresponding to our large image at any given time. As we saw in Step 2.4 above, the way we designate this is with a class of 'selected' on the current thumbnail.
- Finally, when a new image is chosen, we remove the class of 'selected' from all images, and then add it back again to the newly selected thumbnail.
So, with those key actions in mind, let's see what this looks like in jQuery:
	//-------------------------------------------------
	// Activate Instant Gallery
	//-------------------------------------------------

	function activate_instant_gallery() {
	?>

		<script>

			// Wrap the jQuery code in the generic function to allow use of
			// the $ shortcut in WordPress's no-conflict jQuery environment

			( function ($) {

				$('#ig-thumbs').delegate('img','click', function(){		// When someone clicks on a thumbnail

					$('#ig-hero').attr('src',$(this).attr('src').replace('-150x150',''));	// Replace the Full Sized version of selected image

					$('#ig-thumbs li img').removeClass("selected");		// Remove "selected" class from all thumbnails
					$(this).addClass("selected");						// Add "selected" class to selected thumbnail

					$('#ig-title').html($(this).attr('alt'));			// Replace the Title with Title selected image
				});

			})(jQuery);

		</script>

	<?php
	}

	// Hook into footer so gallery becomes active after page loads
	add_action('wp_footer','activate_instant_gallery');

	?>
Fortunately, the jQuery code is relatively simple, and corresponds nicely to our bullet list of required actions above.
The code is pretty well-documented, so if you don't understand a line, the comments should help. Even so, let's break down the jQuery, line by line (leaving aside the generic "wrapper function" of ( function ($) { } ) which we will discuss in a moment).
The line that begins $('#ig-thumbs').delegate is what defines the scope of our function. It is saying, whenever someone clicks on an image object (img) inside a container with an ID of #ig-thumbs, then execute the actions within the function.
The next line, which begins $('#ig-hero'), handles the actual swapping of our current image for the large image that corresponds to the thumbnail that was clicked. In this jQuery function, the thumbnail that was clicked is referred to as "this" because it was the subject of the action "click"; it is the thing that was clicked upon and triggered the function.
The method for accomplishing the image swap takes advantage of the WordPress file naming scheme. For example: When you upload an image called my-image.jpg, WordPress will create several different sizes of that image. One automatically created size will be a "Thumbnail" size which is, by default, a 150x150 square cropped out of your original image. WordPress will name this file my-image-150x150.jpg. It simply adds a "-150x150" to the end of your filename, right before the file extension.
So, if we want to replace a thumbnail version of an image with the full-sized version of that image, then we just have to remove the "-150x150" from the filename. This is what our jQuery is doing to swap the images.
If we wanted to replace the thumbnail with a different size of the image, but not the full sized image, we would need to know the dimensions of that other size, and then we could just switch the dimensions. For example, if we wanted to switch out my-image-150x150.jpg for a Medium sized image of 600x300, then we would just use the jQuery code to swap the "-150x150" with a "-600x300", and we would be left with my-image-600x300.jpg.
Next, with the line that begins $('#ig-thumbs li img'), we just remove the CSS class of "selected" from all of the thumbnails, and then the line below that adds the class of "selected" to "this"; that is, the image that was clicked.
Finally, with the line that begins $('#ig-title'), we switch the Title of the old image with that of the new image. This line takes the contents of a containing element with an ID of #ig-title
Step 3.3: Using jQuery in the Context of WordPress
Now, since we are performing all of these operations within the context of WordPress, we should be aware of an important detail about how WordPress loads jQuery.
WordPress runs jQuery in "no conflict mode" so as to avoid conflicts with other JavaScript libraries. In practical terms this means that the useful $ shortcut commonly used in jQuery won't work in WordPress by default.
Fortunately, this topic has been discussed at length already. If you are interested in learning more about the reasons for this, Chris Coyier has a great article on Digging Into WordPress that addresses precisely this issue. For the purposes of this article, we just need to wrap our jQuery function in a generic function to re-enable use of the $ shortcut within our code snippet.
Finally we add this code using a built in WordPress hook – wp_footer – to load the script correctly and only after the rest of the page has loaded.
With the jQuery in place, let's take a look at what we have so far. Now our gallery is interactive, and clicking on one of the thumbnails correctly replaces the main image and corresponding title. In the example image below, you can see that we've clicked on the second thumbnail and both the main image and its title have been replaced as we would expect.
So, it works, but it still doesn't look very good. Fortunately, we can tidy things up with some basic CSS. And that's just what we'll do in the next step.
Step 4 The CSS
Step 4.1: CSS for Instant Gallery
Now it is finally time to style our creation and make it look more like an actual image gallery. Since the major focus of this tutorial was on the WordPress and jQuery functionality, I've kept the CSS for this gallery extremely simple. Here is the CSS code for the gallery:
	/* Instant Gallery */

	#instant-gallery {
		overflow: hidden;
		display: block;
		width: 100%;
		margin-bottom: 1.5em;
	}

	/* Main Display Area */

	#ig-main {
		width: 100%;
	}

	#ig-hero {
	}

	#ig-title {
		margin-top: 1.5em;
		margin-bottom: 1.5em;
		line-height: 1.5em;
	}

	/* Thumbnails */

	#ig-thumbs {
		overflow: hidden;
		margin: 0;
	}

	#ig-thumbs li {
		margin-right: 1.5em;
		margin-bottom: 1.5em;
		float: left;
		display: block;
		cursor: pointer;
	}

	#ig-thumbs img {
		width: 75px;				/* Customize to change Thumbnail Width */
		height: 75px;				/* Customize to change Thumbnail Height */
		padding: 1px;
		border: 1px solid #ddd;
	}

	#ig-thumbs li img:hover,
	#ig-thumbs li img.selected {
		border: 1px solid #aaa !important;
	}
There is nothing too complicated about our CSS. Just the basic selectors and styles necessary to create the gallery. If you want to modify the CSS to make your gallery a bit more fancy, I have provided all of the selectors you would need to do so.
One thing to notice here is that I've constrained the size of the thumbnails to 75x75 instead of the 150x150 size at which we retrieved them from WordPress. The 150x150 size is a little too large for my tastes; I like the smaller thumbnails so you can fit more under the gallery. If you want to use a different size, all you have to do is change the width and height of the thumbnail images on the two lines marked on the CSS.
Step 4.2: Using Enqueue Style to Load CSS in WordPress
Perhaps more interesting than the CSS itself is the manner that we use to load it. We could just do a simple link tag and hook it into our header using the wp_head hook, but there is a better way.
Taking a hint from the enqueue_script function that we used to load jQuery, we can use a similar function, wp_enqueue_style, to load our style sheet. As with enqueue_script, this is the preferred way to load stylesheets within WordPress. It is good to practice these techniques even with simple projects such as this because it allows you to focus on understanding the technique and why it works without worrying about debugging massive amounts of code. There is a certain satisfaction in doing something simple very well!
	//----------------------------------------------------------------------
	// Import Stylesheet
	//----------------------------------------------------------------------

	function add_stylesheets() {

		// change this path to load your own custom stylesheet
		$css_path = WP_PLUGIN_URL . '/instant-gallery/instant-gallery.css';

		// registers your stylesheet
		wp_register_style( 'instantGalleryStyles', $css_path );

		// loads your stylesheet
		wp_enqueue_style( 'instantGalleryStyles' );
	}

	// Only add the stylesheet if we are NOT on the admin screen
	if (!is_admin()) add_action( 'wp_enqueue_scripts', 'add_stylesheets' );
So that is how you use wp_enqueue_style. Very similar to enqueue_script. You'll notice that there is another command in here as well: wp_register_style. This function simply registers a CSS file with WordPress for later use with wp_enqueue_style.
Now our image gallery finally looks as good as it functions!
All Together Now
Check out the finished product:
It looks very simple, and that's exactly what we want. The point of this gallery is to be the simplest, fastest way to automatically generate an image gallery from images uploaded to a WordPress post of page, nothing more!
Please feel free to check out a live demo of Instant Gallery for WordPress on my personal website.
The completed code is too long to display here in full, so please feel free to download the source files (at the top of the article) and have a look at everything on your own.
Conclusion
We have just created an instant image gallery with thumbnail navigation for a WordPress!
Throughout this tutorial I've done my best to incorporate good practices on everything from clear markup, semantic CSS, and even the way stylesheets and javascript are loaded. If you played along and worked through the steps, then I hope you learned a new technique or two. If you are just here for the finished code, I hope you find it useful and that you can use it confidently and with the knowledge that you are using some simple code that was made with love.
As with all coding projects, there are always ways to make improvements. If you can think of any way to make this code better or more robust, I welcome any and all constructive feedback in the comments!
I also welcome any and all suggestions on how to improve the plugin and make it more powerful or elegant. I am not very interested, however, in making it more complicated or adding a bunch of features. There are lots of full featured image galleries out there already, and I would like this one to remain simple and fulfil one very specific purpose.
Finally, I would like to thank Japh Thomson for giving me the opportunity to write for Wptuts+, and thank Envato for building a great educational community on the web. Most importantly, thank you for reading!
I look forward to your feedback, please let me know in the comments if you use Instant Gallery on any of your websites!

Comments