
In May 2009, Google introduced Rich Snippets, a small block of information displayed in Google's search engine results to make it easier for users to decide which pages are relevant to their search. In June 2011, Google announced the creation of Schema.org, a new initiative from Google, Bing and Yahoo! that aims to improve the web by creating structured data markup schema.
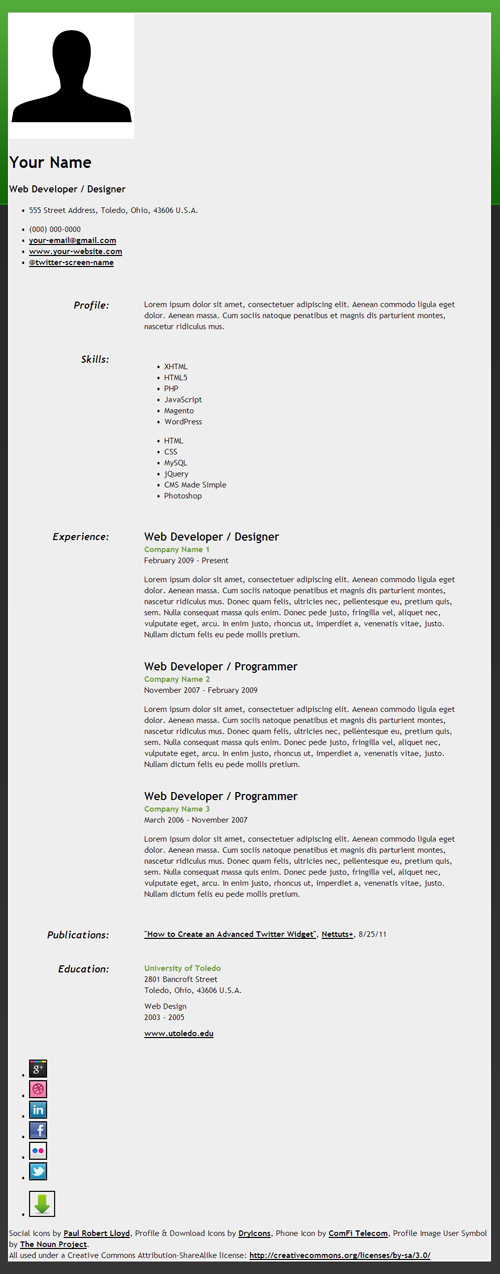
This tutorial demonstrates how to create an online resume that incorporates Schema.org Microdata. The tutorial also includes instructions on how to use Authorship Markup!
Bonus Items Included!

The tutorial demo is a one page site template that you are free to use for your online resume. As a bonus, several color versions are included in the source files zip; dark green, light green, dark blue and light blue.
Please note that this is not a web design or CSS tutorial, so only the HTML5 and Schema.org Microdata markup will be covered.
Now, let's begin!
Step 1: The CSS
Create a CSS style sheet called "style.css" and include the following code. Don't worry; it's fairly simple, and understanding it isn't necessary for this tutorial.
/* Default Styles
--------------------------------------------------- */

body {
	margin: 0px;
	padding: 0px;
	background: url("../images/bg_dark_green.png");
	background-color: inherit;
	font-size: 16px;
	font-family: "Trebuchet MS", Helvetica, sans-serif;
	color: #000;
}

a:link {
	text-decoration: underline;
	color: #000;
	font-weight: bold;
}

a:visited {
	text-decoration: underline;
	color: #000;
	font-weight: bold;
}

a:hover {
	text-decoration: underline;
	color: #669933;
	font-weight: bold;
}

a:active {
	text-decoration: underline;
	color: #000;
	font-weight: bold;
}

#wrapper	{
	width: 965px;
	margin: 0 auto;
}

#content {
	background-color: #eee;
	width: 960px;
	text-align: left;
	overflow: auto;
	position: relative;
	margin: 25px 0px 25px 0px;
	border: #fff solid 2px;
}

.clear	{
	float: none;
	clear: both;
	margin: 20px 0px 20px 0px;
}


/* Header
--------------------------------------------------- */


#contact-details .header_1 {
	float: left;
	width: 350px;
	text-align: center;
	margin: 40px 0px 0px 20px;
}

#contact-details .header_1 img {
	border: #fff solid 4px;
	background: url("../images/bg_img_dark_green.png");
	padding: 16px;
	margin: 10px 0px 0px 0px;
}

#contact-details .header_2 {
	float: left;
	width: 570px;
	margin: 40px 0px 0px 10px;
}

#contact-details .header_2 a {
	font-weight: normal;
}

#contact-details  h1	{
	margin: 0px 0px 0px 20px;
	font-size: 52px;
	font-weight: bold;
}

#contact-details  h3	{
	margin: 0px 0px 32px 20px;
	font-size: 30px;
	font-weight: bold;
	font-style: italic;
}

#contact-details ul.info_1	{
	list-style: none;
	margin: 0px 0px 0px -12px;
	font-size: 18px;
}

#contact-details ul.info_2	{
	list-style: none;
	margin: 0px 0px 15px -12px;
	font-size: 18px;
}

#contact-details li.address	{
    background: url("../images/home.png") no-repeat;
	background-position: 0px 0px;
    padding: 0px 0px 12px 40px;
}

#contact-details li.phone	{
    background: url("../images/phone.png") no-repeat;
	background-position: 0px 0px;
    padding: 0px 0px 12px 40px;
}

#contact-details li.email	{
    background: url("../images/mail.png") no-repeat;
	background-position: 0px 0px;
    padding: 0px 0px 12px 40px;
}

#contact-details li.site_url	{
    background: url("../images/computer.png") no-repeat;
	background-position: 0px 2px;
    padding: 0px 0px 12px 40px;
}

#contact-details li.twitter	{
    background: url("../images/twitter_sm.png") no-repeat;
	background-position: 0px 0px;
    padding: 0px 0px 12px 40px;
}


/* Main Content
--------------------------------------------------- */

h2.top	{
	margin: 0px;
	font-size: 22px;
	font-weight: bold;
}

h2	{
	margin: 40px 0px 0px 0px;
	font-size: 22px;
	font-weight: bold;
}


dl	{
	margin: 0px 50px 0px 0px;
}


dt	{
	float: left;
	width: 200px;
	font-size: 20px;
	font-weight: bold;
	font-style: italic;
	text-align: right;
}

dd	{
	width: 620px;
	float: right;
	margin-right: 20px;
}

dl#contact 	{
	margin: 0px;
}

dt#contact 	{
	margin: 0px;
}

dd#contact 	{
	margin: 0px;
}

p.bus1	{
	margin: 0px;
	font-weight: bold;
	color: #669933;
}

p.edu-info	{
	margin: 10px 0px 0px 0px;
	font-weight: bold;
	color: #669933;
}

p.edu-info a	{
	color: #000;
}

p.edu-info a:hover	{
	color: #669933;
}

p.time	{
	margin: 0px;
}

p.summary	{
	margin: 10px 0px 0px 0px;
}


#skills ul.list1	{
	float: left;
	list-style: none;
	margin: 0px 0px 0px -40px;
	width: 220px;
}

#skills ul.list2	{
	float: left;
	list-style: none;
	margin: 0px 0px 0px 0px;
	width: 220px;
}

#skills li {
    background: url("../images/bullet_green.png") no-repeat;
	background-position: 0px 2px;
    padding: 0px 0px 0px 25px;
}

abbr	{
	border-width: 0px;
}


/* Footer
--------------------------------------------------- */

#footer	{
	margin: 60px 40px 0px 40px;
}

#footer	img {
	border: 0px;
}

#footer .footer_content	{
	width: 700px;
	overflow: auto;
	margin: auto;
	border: #fff solid 2px;
	background-color: #dcdcdc;
}

#footer ul.icons_1	{
	float: left;
	width: 525px;
	margin: 15px 10px 10px 15px;
	padding: 0px;
}

#footer ul.icons_2	{
	float: right;
	width: 100px;
	margin: 10px 20px 10px 10px;
	padding: 0px;
}

#footer .icons_1 li, #footer .icons_2 li {
	margin: 0px 0px 0px 7px;
	padding: 0px;
	list-style-type: none;
	display: inline;
}

#footer a	{
	color: #000;
}

#footer a:hover	{
	color: #669933;
}

#footer	.credits {
	float: none;
	clear: both;
	margin: 10px 0px 20px 0px;
	font-size: 12px;
	text-align: center;
}

#footer	.credits a	{
	font-weight: normal;
}
Step 2: The Markup (Without Schema.org Microdata Included)
Next, we need an .html. This is a basic layout that we're all likely familiar with.
<!DOCTYPE html> <html> <head> <meta charset=UTF-8"> <meta charset="utf-8"> <title>Online Resume of Your Name</title> <!-- Meta --> <meta name="description" content="A few lines about yourself"> <meta name="keywords" content="web,developer,designer,resume" /> <meta name="author" content="Your Name"> <!-- CSS Stylesheet --> <link rel="stylesheet" type="text/css" href="css/style.css" /> <!--[if lt IE 9]> <script src="http://html5shiv.googlecode.com/svn/trunk/html5.js"></script> <![endif]--> </head> <body> <!-- Begin Wrapper --> <div id="wrapper"> <!-- Begin Content Area --> <div id="content"> <!-- Begin Header --> <header> <!-- Begin Contact Section --> <section id="contact-details"> <!-- Begin Profile Image Section --> <div class="header_1"> <img src="images/profile.jpg" width="250" height="250" alt="Your Name" /> </div> <!-- End Profile Image Section --> <!-- Begin Profile Information Section --> <div class="header_2"> <h1><span>Your Name</span></h1> <h3>Web Developer / Designer</h3> <ul class="info_1"> <li class="address">555 Street Address, Toledo, Ohio, 43606 U.S.A.</li> </ul> <ul class="info_2"> <li class="phone">(000) 000-0000</li> <li class="email"><a href="mailto:[email protected]">[email protected]</a></li> <li class="site_url"><a href="http://www.webcodepro.net/about.php" title="www.your-website.com">www.your-website.com</a></li> <li class="twitter"><a href="http://twitter.com/twitter-screen-name" title="Follow Me on Twitter">@twitter-screen-name</a></li> </ul> </div> <!-- End Profile Information Section --> </section> <!-- End Contact Section --> </header> <!-- End Header --> <div class="clear"> </div> <!-- Begin Profile Section --> <dl> <dt>Profile:</dt> <dd> <section class="summary"> Lorem ipsum dolor sit amet, consectetuer adipiscing elit. Aenean commodo ligula eget dolor. Aenean massa. Cum sociis natoque penatibus et magnis dis parturient montes, nascetur ridiculus mus. </section> </dd> </dl> <!-- End Profile Section --> <div class="clear"> </div> <!-- Begin Skills Section --> <dl> <dt>Skills:</dt> <dd> <section id="skills"> <ul class="list1"> <li>XHTML</li> <li>HTML5</li> <li>PHP</li> <li>JavaScript</li> <li>Magento</li> <li>WordPress</li> </ul> <ul class="list2"> <li>HTML</li> <li>CSS</li> <li>MySQL</li> <li>jQuery</li> <li>CMS Made Simple</li> <li>Photoshop</li> </ul> </section> </dd> </dl> <!-- End Skills Section --> <div class="clear"> </div> <!-- Begin Experience Section --> <dl> <dt>Experience:</dt> <dd> <section id="experience"> <!-- Position #1 --> <h2 class="top">Web Developer / Designer</h2> <p class="bus1">Company Name 1</p> <p class="time">February 2009 - Present</p> <p> Lorem ipsum dolor sit amet, consectetuer adipiscing elit. Aenean commodo ligula eget dolor. Aenean massa. Cum sociis natoque penatibus et magnis dis parturient montes, nascetur ridiculus mus. Donec quam felis, ultricies nec, pellentesque eu, pretium quis, sem. Nulla consequat massa quis enim. Donec pede justo, fringilla vel, aliquet nec, vulputate eget, arcu. In enim justo, rhoncus ut, imperdiet a, venenatis vitae, justo. Nullam dictum felis eu pede mollis pretium. </p> <!-- Position #2 --> <h2>Web Developer / Programmer</h2> <p class="bus1">Company Name 2</p> <p class="time">November 2007 - February 2009</p> <p> Lorem ipsum dolor sit amet, consectetuer adipiscing elit. Aenean commodo ligula eget dolor. Aenean massa. Cum sociis natoque penatibus et magnis dis parturient montes, nascetur ridiculus mus. Donec quam felis, ultricies nec, pellentesque eu, pretium quis, sem. Nulla consequat massa quis enim. Donec pede justo, fringilla vel, aliquet nec, vulputate eget, arcu. In enim justo, rhoncus ut, imperdiet a, venenatis vitae, justo. Nullam dictum felis eu pede mollis pretium. </p> <!-- Position #3 --> <h2>Web Developer / Programmer</h2> <p class="bus1">Company Name 3</p> <p class="time">March 2006 - November 2007</p> <p> Lorem ipsum dolor sit amet, consectetuer adipiscing elit. Aenean commodo ligula eget dolor. Aenean massa. Cum sociis natoque penatibus et magnis dis parturient montes, nascetur ridiculus mus. Donec quam felis, ultricies nec, pellentesque eu, pretium quis, sem. Nulla consequat massa quis enim. Donec pede justo, fringilla vel, aliquet nec, vulputate eget, arcu. In enim justo, rhoncus ut, imperdiet a, venenatis vitae, justo. Nullam dictum felis eu pede mollis pretium. </p> </section> </dd> </dl> <!-- End Experience Section --> <div class="clear"> </div> <!-- Begin Publications Section --> <dl> <dt>Publications:</dt> <dd> <section id="publications"> <a href="http://net.tutsplus.com/tutorials/php/how-to-create-an-advanced-twitter-widget/" target="_blank" title="How to Create an Advanced Twitter Widget">"How to Create an Advanced Twitter Widget"</a>, <a href="http://net.tutsplus.com/" target="_blank" title="Nettuts+">Nettuts+</a>, 8/25/11 </section> </dd> </dl> <!-- End Publications Section --> <div class="clear"> </div> <!-- Begin Education Section --> <dl> <dt>Education:</dt> <dd> <section id="education"> <p class="bus1">University of Toledo</p> 2801 Bancroft Street <br /> Toledo, Ohio, 43606 U.S.A. <p class="summary">Web Design</p> <p class="time">2003 - 2005</p> <p class="edu-info"> <a href="http://www.utoledo.edu/" target="_blank" title="University of Toledo">www.utoledo.edu</a> </p> </section> </dd> </dl> <!-- End Education Section --> <div class="clear"> </div> <!-- Begin Footer --> <footer id="footer"> <!-- Begin Footer Content --> <div class="footer_content"> <!-- Begin Schema Person --> <ul class="icons_1"> <li><a href="https://profiles.google.com/jwagner719" title="Google Profile"><img src="http://www.google.com/images/icons/ui/gprofile_button-32.png" width="32" height="32" alt="Google Profile"></a></li> <li><a href="http://dribbble.com/" title="Dribbble"><img src="images/dribbble.png" width="32" height="32" alt="Dribbble" /></a></li> <li><a href="http://www.linkedin.com/" title="LinkedIn"><img src="images/linkedin.png" width="32" height="32" alt="LinkedIn" /></a></li> <li><a href="http://www.facebook.com/" title="Facebook"><img src="images/facebook.png" width="32" height="32" alt="Facebook" /></a></li> <li><a href="http://www.flickr.com/" title="Flickr"><img src="images/flickr.png" width="32" height="32" alt="Flickr" /></a></li> <li><a href="http://twitter.com/" title="Follow Me on Twitter!"><img src="images/twitter.png" width="32" height="32" alt="Follow Me on Twitter!" /></a></li> </ul> <ul class="icons_2"> <li><a href="resume.pdf" title="Download Resume PDF"><img src="images/download.png" width="48" height="48" alt="Download Resume PDF" /></a></li> </ul> <!-- End Schema Person --> </div> <!-- End Footer Content --> <div class="credits"> Social Icons by <a href="http://paulrobertlloyd.com/2009/06/social_media_icons" target="_blank" title="Paul Robert Lloyd">Paul Robert Lloyd</a>, Profile & Download Icons by <a href="http://dryicons.com/" target="_blank" title="DryIcons">DryIcons</a>, Phone Icon by <a href="http://www.comfi.com/telecom-icons/" target="_blank" title="ComFi Telecom">ComFi Telecom</a>, Profile Image User Symbol by <a href="http://thenounproject.com/" target="_blank" title="The Noun Project">The Noun Project</a>. <br /> All used under a Creative Commons Attribution-ShareAlike license: <a href="http://creativecommons.org/licenses/by-sa/3.0/" target="_blank" title="Creative Commons Attribution-ShareAlike license">http://creativecommons.org/licenses/by-sa/3.0/</a> </div> </footer> <!-- End Footer --> </div> <!-- End Content --> </div> <!-- End Wrapper --> </body> </html>
A Few Notes About the Markup
HTML5 Shiv
Because Schema.org Microdata is based on the HTML5 microdata specification, HTML5 markup is being used to create the one page resume site template. Unfortunately, older web browsers like IE7 and IE8 do not recognize certain HTML5 elements. Pages written using HTML5 will not render correctly in these older browsers.
Here is a screenshot of the online resume demo when viewed in (IE8 Click on image to see full image):
To solve the problem with these older IE browser versions, the below code has been added between
tags (just below the CSS Stylesheet):<!--[if lt IE 9]> <script src="http://html5shiv.googlecode.com/svn/trunk/html5.js"></script> <![endif]-->
This code is an HTML5 JavaScript shim for IE to recognise and style the HTML5 elements.
Note: An HTML5 JavaScript shim is not required in IE9+ and other modern browsers that support HTML5.
Definition List
Definition lists, <dd></dd> were used in the markup instead of unordered lists. THis is due to the fact that it makes more sense, when considering how each item has a title and a description.
Section vs Article
There seems to be some confusion regarding HTML5 section and article elements. The section element was used in the markup because none of the sections of the resume are considered to be standalone content.
The HTML5 article element is used for standalone content that would most likely be syndicated like a blog post or news article. This article does a really good job explaining the difference between HTML5 article and section elements.
Step 3: Add Schema.org Microdata - Person and PostalAddress

The first types of schemas that we are going to add to the markup is Person and PostalAddress.
Itemscope Element and Itemtype Attribute
An itemscope element is added to <div></div>tags that are placed around the content that contains the information related to the Schema, like this:
<div itemscope itemtype="http://schema.org/Person">

Content that contains information about a Person

</div>
The itemscope element and itemtype attribute for the Person Schema will be placed in both the Contact and Social Media Links sections of the resume web page, like so:
<!-- Begin Contact Section -->
<section id="contact-details">
<div itemscope itemtype="http://schema.org/Person">

Rest of Code Block Here

</div>
</section>
<!-- End Contact Section -->
<!-- Begin Social Media and Download Links -->
<div itemscope itemtype="http://schema.org/Person">

Rest of Code Block Here

</div>
<!-- End Social Media and Download Links -->
The itemscope element and itemtype attribute for the PostalAddress Schema is nested within the Person Schema and is placed around the unordered list <ul></ul>containing the address information like this:
<!-- Begin PostalAddress Schema -->
<div itemprop="address" itemscope itemtype="http://schema.org/PostalAddress">
<ul class="info_1">
<li class="address"><span itemprop="streetAddress">555 Street Address</span>, <span itemprop="addressLocality"<Toledo</span>, <span itemprop="addressRegion">Ohio</span>, <span itemprop="postalCode"<43606</span> <span itemprop="addressCountry">U.S.A.</span></li>
</ul>
</div>
<!-- End PostalAddress Schema -->
Itemprop Attributes
Itemprop attributes need to be added wherever appropriate using span tags so that additional information is provided to search engines about our web page. Below are the attributes we will be using from these schemas:
Person Schema
itemprop="image"itemprop="name"itemprop="jobTitle"itemprop="telephone"itemprop="email"itemprop="url"
PostalAddress Schema
itemprop="streetAddress"itemprop="addressLocality"itemprop="addressRegion"itemprop="postalCode"itemprop="addressCountry"
Final Markup for the Contact and Social Media Links Sections
<!-- Begin Contact Section -->
<section id="contact-details">
<div itemscope itemtype="http://schema.org/Person">

<!-- Begin Profile Image Section -->
<div class="header_1">
<img src="images/profile.jpg" itemprop="image" width="250" height="250" alt="Your Name" />
</div>
<!-- End Profile Image Section -->

<!-- Begin Profile Information Section -->
<div class="header_2">

<h1><span itemprop="name">Your Name</span></h1>
<h3><span itemprop="jobTitle">Web Developer / Designer</span></h3>

<!-- Begin PostalAddress Schema -->
<div itemprop="address" itemscope itemtype="http://schema.org/PostalAddress">
<ul class="info_1">
<li class="address"><span itemprop="streetAddress">555 Street Address</span>, <span itemprop="addressLocality"<Toledo</span>, <span itemprop="addressRegion">Ohio</span>, <span itemprop="postalCode"<43606</span> <span itemprop="addressCountry">U.S.A.</span></li>
</ul>
</div>
<!-- End PostalAddress Schema -->

<ul class="info_2">
<li class="phone"><span itemprop="telephone">(000) 000-0000</span></li>
<li class="email"><a href="mailto:[email protected]" itemprop="email">[email protected]</a></li>
<li class="site_url"><a rel="me" itemprop="url" href="http://www.webcodepro.net/about.php" title="www.your-website.com">www.your-website.com</a></li>
<li class="twitter"><a rel="me" itemprop="url" href="http://twitter.com/twitter-screen-name" title="Follow Me on Twitter">@twitter-screen-name</a></li>
</ul>

</div>
<!-- End Profile Information Section -->

</div>
</section>
<!-- End Contact Section -->
<!-- Begin Social Media and Download Links -->
<div itemscope itemtype="http://schema.org/Person">

<ul class="icons_1">
<li><a rel="author" itemprop="url" href="https://profiles.google.com/jwagner719" title="Google Profile"><img src="http://www.google.com/images/icons/ui/gprofile_button-32.png" width="32" height="32" alt="Google Profile"></a></li>
<li><a rel="me" itemprop="url" href="http://dribbble.com/" title="Dribbble"><img src="images/dribbble.png" width="32" height="32" alt="Dribbble" /></a></li>
<li><a rel="me" itemprop="url" href="http://www.linkedin.com/" title="LinkedIn"><img src="images/linkedin.png" width="32" height="32" alt="LinkedIn" /></a></li>
<li><a rel="me" itemprop="url" href="http://www.facebook.com/" title="Facebook"><img src="images/facebook.png" width="32" height="32" alt="Facebook" /></a></li>
<li><a rel="me" itemprop="url" href="http://www.flickr.com/" title="Flickr"><img src="images/flickr.png" width="32" height="32" alt="Flickr" /></a></li>
<li><a rel="me" itemprop="url" href="http://twitter.com/" title="Follow Me on Twitter!"><img src="images/twitter.png" width="32" height="32" alt="Follow Me on Twitter!" /></a></li>
</ul>

<ul class="icons_2">
<li><a href="resume.pdf" title="Download Resume PDF"><img src="images/download.png" width="48" height="48" alt="Download Resume PDF" /></a></li>
</ul>

</div>
<!-- End Social Media and Download Links -->
Step 4: Add Schema.org Microdata - Item List

The next schema we are going to add to the markup is ItemList.
Itemscope Element and Itemtype Attribute
The itemscope element and itemtype attribute for the ItemList Schema will be placed in the Skills Section like this:
<!-- Begin Skills Section -->
<div itemscope itemtype="http://schema.org/ItemList">

Rest of Code Block Here

</div>
<!-- End Skills Section -->
Itemprop Attributes
Add the "itemprop" attribute wherever appropriate using <span></span>tags. Below are the attributes we will be using from this schema:
ItemList Schema
itemprop="itemListElement"
Final Markup for the Skills Section
<!-- Begin Skills Section -->
<div itemscope itemtype="http://schema.org/ItemList">

<dl>
<dt itemprop="name">Skills:</dt>
<dd>

<section id="skills">
<ul class="list1">
<li itemprop="itemListElement">XHTML</li>
<li itemprop="itemListElement">HTML5</li>
<li itemprop="itemListElement">PHP</li>
<li itemprop="itemListElement">JavaScript</li>
<li itemprop="itemListElement">Magento</li>
<li itemprop="itemListElement">WordPress</li>
</ul>
<ul class="list2">
<li itemprop="itemListElement">HTML</li>
<li itemprop="itemListElement">CSS</li>
<li itemprop="itemListElement">MySQL</li>
<li itemprop="itemListElement">jQuery</li>
<li itemprop="itemListElement">CMS Made Simple</li>
<li itemprop="itemListElement">Photoshop</li>
</ul>
</section>

</dd>
</dl>

</div>
<!-- End Skills Section -->
Step 5: Add Schema.org Microdata - Organization

Next, the Organization schema is going to be added to the markup.
Itemscope Element and Itemtype Attribute
The itemscope element and itemtype attribute for the Organization Schema will be placed around each "Position" listed in the "Experience" section, like so:
<!-- Position #1 -->
<div itemscope itemtype="http://schema.org/Organization">

Rest of Code Block Here

</div>

<!-- Position #2 -->
<div itemscope itemtype="http://schema.org/Organization">

Rest of Code Block Here

</div>

<!-- Position #3 -->
<div itemscope itemtype="http://schema.org/Organization">

Rest of Code Block Here

</div>
Itemprop Attributes
Add the "itemprop" attribute wherever appropriate using <span></span>tags. Below are the attributes we will be using from this schema:
Organization Schema
itemprop="jobTitle"itemprop="name"itemprop="description"
Final Markup for the Experience Section
<section id="experience"> <!-- Position #1 --> <div itemscope itemtype="http://schema.org/Organization"> <h2 class="top"><span itemprop="jobTitle">Web Developer / Designer</span></h2> <p class="bus1"><span itemprop="name">Company Name 1</span></p> <p class="time">February 2009 - Present</p> <p itemprop="description"> Lorem ipsum dolor sit amet, consectetuer adipiscing elit. Aenean commodo ligula eget dolor. Aenean massa. Cum sociis natoque penatibus et magnis dis parturient montes, nascetur ridiculus mus. Donec quam felis, ultricies nec, pellentesque eu, pretium quis, sem. Nulla consequat massa quis enim. Donec pede justo, fringilla vel, aliquet nec, vulputate eget, arcu. In enim justo, rhoncus ut, imperdiet a, venenatis vitae, justo. Nullam dictum felis eu pede mollis pretium. </p> </div> <!-- Position #2 --> <div itemscope itemtype="http://schema.org/Organization"> <h2><span itemprop="jobTitle">Web Developer / Programmer</span></h2> <p class="bus1"><span itemprop="name">Company Name 2</span></p> <p class="time">November 2007 - February 2009</p> <p itemprop="description"> Lorem ipsum dolor sit amet, consectetuer adipiscing elit. Aenean commodo ligula eget dolor. Aenean massa. Cum sociis natoque penatibus et magnis dis parturient montes, nascetur ridiculus mus. Donec quam felis, ultricies nec, pellentesque eu, pretium quis, sem. Nulla consequat massa quis enim. Donec pede justo, fringilla vel, aliquet nec, vulputate eget, arcu. In enim justo, rhoncus ut, imperdiet a, venenatis vitae, justo. Nullam dictum felis eu pede mollis pretium. </p> </div> <!-- Position #3 --> <div itemscope itemtype="http://schema.org/Organization"> <h2><span itemprop="jobTitle">Web Developer / Programmer</span></h2> <p class="bus1"><span itemprop="name">Company Name 3</span></p> <p class="time">March 2006 - November 2007</p> <p itemprop="description"> Lorem ipsum dolor sit amet, consectetuer adipiscing elit. Aenean commodo ligula eget dolor. Aenean massa. Cum sociis natoque penatibus et magnis dis parturient montes, nascetur ridiculus mus. Donec quam felis, ultricies nec, pellentesque eu, pretium quis, sem. Nulla consequat massa quis enim. Donec pede justo, fringilla vel, aliquet nec, vulputate eget, arcu. In enim justo, rhoncus ut, imperdiet a, venenatis vitae, justo. Nullam dictum felis eu pede mollis pretium. </p> </div> </section>
Step 6: Add Schema.org Microdata - Article
Next the Article schema is going to be added to the markup.
Itemscope Element and Itemtype Attribute for Article
The itemscope element and itemtype attribute for the Article Schema will be placed in the "Article" listed in the Publications Section like this:
<section id="publications">
<div itemscope itemtype="http://schema.org/Article">

Rest of Code Block Here

</div>
</section>
Itemprop Attributes
Add the "itemprop" attribute wherever appropriate using <span></span>tags. Below are the attributes we will be using from this schema:
Article Schema
itemprop="name"itemprop="url"
Final Markup for the Publications Section
<section id="publications">
<div itemscope itemtype="http://schema.org/Article"><span itemprop="name">
<a itemprop="url" href="http://net.tutsplus.com/tutorials/php/how-to-create-an-advanced-twitter-widget/" target="_blank" title="How to Create an Advanced Twitter Widget">"How to Create an Advanced Twitter Widget"</a></span>, <a href="http://net.tutsplus.com/" target="_blank" title="Nettuts+">Nettuts+</a>, 8/25/11
</div>
</section>
Step 7: Add Schema.org Microdata - EducationalOrganization and PostalAddress

Next the EducationalOrganization and PostalAddress schemas are going to be added to the markup.
Itemscope Element and Itemtype Attribute for EducationalOrganization
The itemscope element and itemtype attribute for the EducationalOrganization Schema will be placed in the Education Section like this:
<section id="education">
<div itemscope itemtype="http://schema.org/EducationalOrganization">

Rest of Code Block Here

</div>
</section>
Itemscope Element and Itemtype Attribute for PostalAddress
The itemscope element and itemtype attribute for the PostalAddress Schema is nested within the EducationalOrganization Schema and is placed around the code containing the address information in the Education section like this:
<div itemprop="address" itemscope itemtype="http://schema.org/PostalAddress">
<span itemprop="streetAddress">2801 Bancroft Street</span>
<br />
<span itemprop="addressLocality">Toledo</span>, <span itemprop="addressRegion">Ohio</span>, <span itemprop="postalCode">43606</span><span itemprop="addressCountry">U.S.A.</span>
</div>
Itemprop Attributes
Add the "itemprop" attribute wherever appropriate using <span></span>tags. Below are the attributes we will be using from these schemas:
EducationalOrganization Schema
itemprop="name"itemprop="url"
PostalAddress Schema
itemprop="streetAddress"itemprop="addressLocality"itemprop="addressRegion"itemprop="postalCode"itemprop="addressCountry"
Final Markup for the Education Section
<section id="education"> <div itemscope itemtype="http://schema.org/EducationalOrganization"> <p class="bus1"><span itemprop="name">University of Toledo</span></p> <div itemprop="address" itemscope itemtype="http://schema.org/PostalAddress"> <span itemprop="streetAddress">2801 Bancroft Street</span> <br /> <span itemprop="addressLocality">Toledo</span>, <span itemprop="addressRegion">Ohio</span>, <span itemprop="postalCode">43606</span><span itemprop="addressCountry">U.S.A.</span> </div> <p class="summary"><span itemprop="name">Web Design</span></p> <p class="time">2003 - 2005</p> <p class="edu-info"> <a itemprop="url" href="http://www.utoledo.edu/" target="_blank" title="University of Toledo">www.utoledo.edu</a> </p> </div> </section>
About Authorship Markup

Image shows Authorship Markup (John Resig) displayed in Google search results.
In June 2011, Google began to support "Authorship Markup". Through the use of markup, such as
rel="author"andrel="me", search engines can identify content created by the same author across the web. Using Authorship Markup, a multi-authored website can link all articles and posts written by each author to their own specific "author page".
Individual articles and posts of a multi-authored website need to link to the appropriate author page using rel="author" tag. If the author page also includes a link to the author's Google Profile using the rel="me" tag, then the author information may appear in search results.
To help users discover quality content, Google is piloting the display of author information in search engine results. This feature is being rolled out gradually and may become a very important part of search engine results and rankings.
Rel Tags
Both the Contact and Social Media Links sections of the one page resume site template contain URLs linking to a primary website and social media pages. The "rel" attribute needs to be added to the links of these sections so that Authorship Markup can be implemented. Authorship Markup allows search engines to identify content created by the same author across the web.
There are two specific rel tags used for Authorship markup:
rel="me"rel="author"
Most of the links included in the resume web page point to sites that are about the same person. So the rel="me" tag has been added. For the Google Profile link, the rel="author" tag has been added. Depending on where you post your online resume, you may need to use the rel="me" tag for the Google Profile link instead.
Step 8: Create a Google Profile
If you want to start identifying your original content across the web using Authorship Markup, you first need to create a Google Profile.
If you already have a Google Profile page, then you should update your profile information accordingly (add a picture of yourself, information about yourself, occupation, etc.)
You also need to make sure there is a +1 tab displayed on the page.
If your Google profile includes a good, clear head shot of yourself, it will be eligible to appear as a thumbnail in search results.
Step 9: Link Web Page(s) to Your Google Profile
According to Google, to establish authorship of a web page, you need to do two things:
- Link that web page to your Google Profile
- Update your Google Profile with a link back to the home page of the site the web page is on.
You can link your content to your Google Profile using a text link:
<a href="[https://plus.google.com/your_profile]?rel=me">Google+</a>
or by using the Google Profile Button code:
<a rel="me" href="https://profiles.google.com/your_profile">
  <img src="http://www.google.com/images/icons/ui/gprofile_button-32.png" width="32" height="32">
</a>
Google recently made changes to their authorship markup instructions which affect the use of
rel="author"andrel="me"tags. The new instructions say to userel="author"for both the text and profile button links. However, therel="me"tag needs to be used instead ofrel="author". See screenshot below.

Screenshot of "Error: Author profile page does not have a rel=me link to a Google Profile"
Using John Resig as an example:
- On the About Page of John Resig's primary website he linked to his Google Profile using rel="me"
- In John Resig's Google Plus Profile he linked to the Home Page and About Page of his primary website
Step 10: Complete Google Authorship Form (Important!)
One you have added the Schema.org microdata and completed steps 8 and 9, Complete and submit the Google Authorship Request Form.
Your Authorship Markup may not work correctly until the Google Authorship Form is completed and submitted.
Step 11: Test Microdata Markup Using Rich Snippets Testing Tool
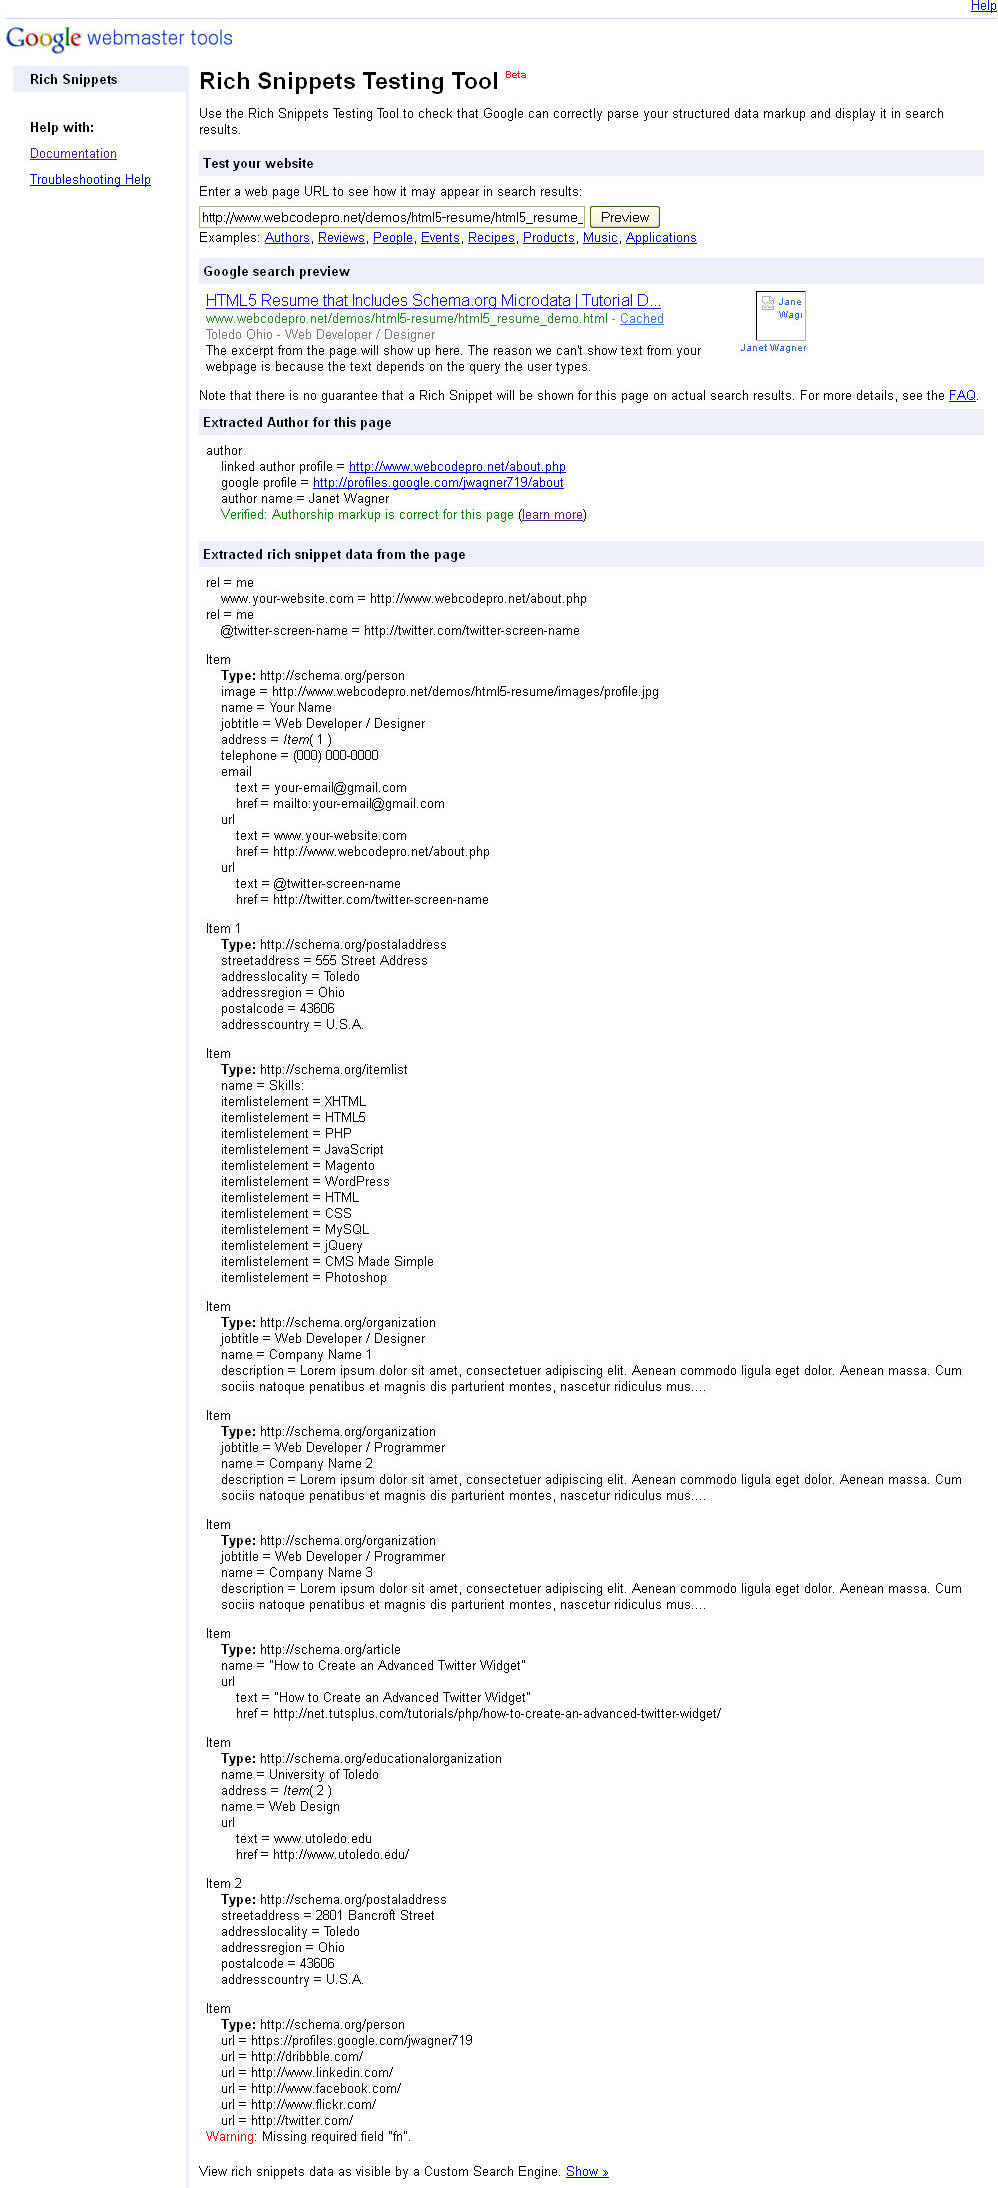
Click on image to see complete testing results
You can make sure that Google can correctly parse and display your microdata markup in search results by checking your web page using the Google Rich Snippets Testing Tool. This Testing Tool can check several types of structured data markup including Microdata, Micro formats and RDFa.
Note: The Google Rich Snippets Testing Tool is in Beta and can have unexpected results. The results shown in the full size screenshot include an error "Warning: Missing required field fn." Schema.org does not use the "fn" tag, however the tag is used with Microformats. This is most likely a glitch.
All Done!
You have now created a nice looking online resume using HTML5 and Schema.org Microdata, which provides information about you that may be displayed in search engine results. Additionally, by using Authorship Markup, you can help search engines identify all of your original content across the web!
Have any questions? Let us know in the comments and thank you so much for reading!

Comments