With the rise of the maker movement—Maker Faire, 3D printers, DIY robots, drones, and so on—the popularity of Arduino, an open-source, microcontroller-based kit, has turned many software engineers into hardware hackers. You can connect an Arduino to your computer with a USB cable, download the IDE, and boom: you’re ready to go.
However, I see many web engineers feeling left out because Sketch, the C-based language required for programming an Arduino board, is not something web developers feel comfortable with. But what if you could use JavaScript, a language you’re already familiar with? Wouldn’t you want to play with one?
In this tutorial, I’ll show you how to get started with Arduino using Node.js, and I'll walk through prototyping an Internet of Things application using PubNub’s JavaScript APIs.
Johnny-Five: JavaScript Robotics Framework
Now, I would like to introduce you Johnny-Five, a JavaScript Robotics programming framework. Johnny-Five is open source and has growing developer communities, as we have started seeing community-driven NodeBots Days all over the world.
So let’s get started with Johnny-Five to program the Arduino Uno!
1. Setting Up Arduino
Hardware and software you need:
First connect your Arduino Uno to your computer with a USB cable. Meanwhile, download the Arduino IDE and install it on your computer. You will need the IDE only for the initial setup.
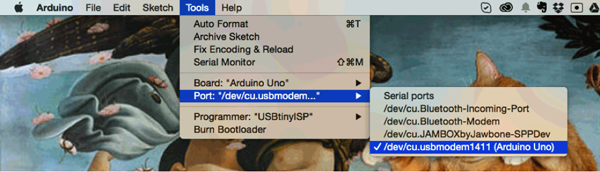
On Arduino IDE, go to Tools > Port and make sure the right board, Arduino Uno, is connected to the right port (tty.usbmodem… for Mac, cu.usbmodem… for Windows).
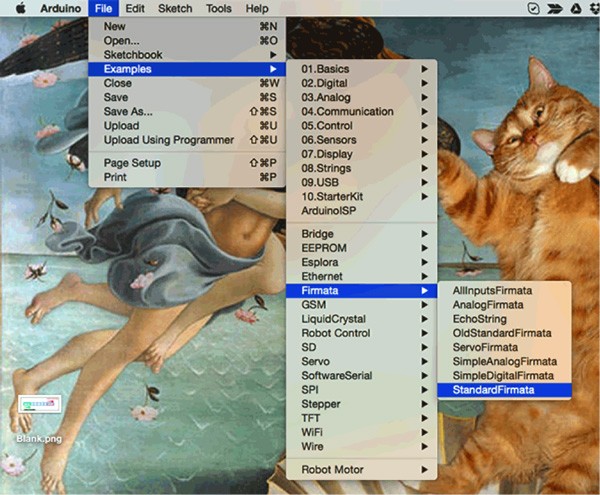
Johnny-Five communicates with Arduino using the Firmata protocol, so you need to install StandardFirmata:
- On IDE, open File > Examples > Firmata > StandardFirmata.
- Click the upload button (arrow button).
- Wait until the IDE message window says “Done uploading”.
- Close the IDE. You don’t need the IDE anymore unless you want to keep using it for coding.

2. Hello World
Make sure Node.js is installed on your machine. Create an appropriate directory like js-hello, and then cd into the directory and install Johnny-five using the npm package manager.
$ npm install johnny-five
Now, let’s write Hello World with Johnny-Five. Since you’ve got some shiny hardware, you’re going to create the “Hello world” of hardware, which is a blinking LED light!
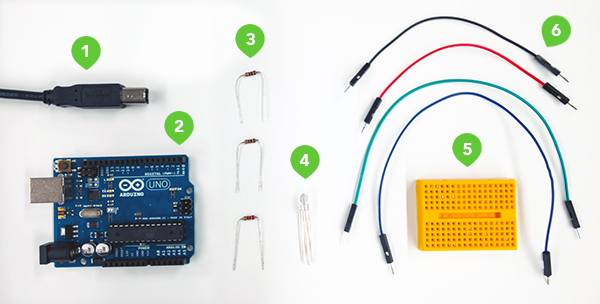
Hardware You Need
- 1 Arduino Uno
- 1 LED
- 1 breadboard
- 2 male/male jumper wire (1 red, 1 black)
- 1 resistor(200 - 330Ω)

Know Your LEDs
LEDs, short for light-emitting diodes, are polarized: the positive (+) side is called the anode, and the negative side is called the cathode. Usually, each LED has two legs, and the longer leg is an anode pin. This is important when you build a circuit.
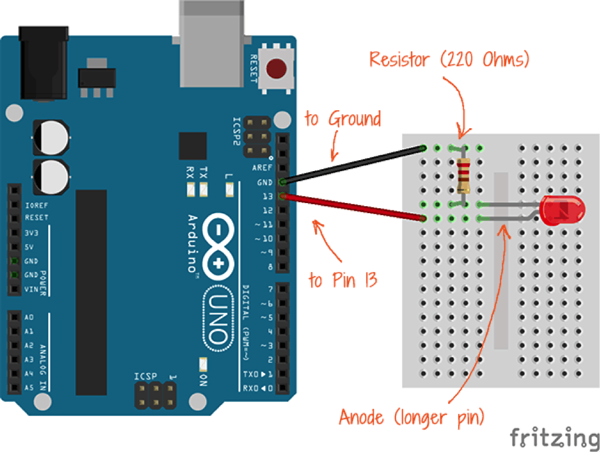
Assembling a Circuit
Let’s use a color convention to avoid confusion:
- Black wires for ground
- Red wires for voltage
Your wires do not have to be red and black, but do use two different colors so you don’t confuse yourself. The best practice is to use red to connect to the positive end (in this practice, use pin 13), and block to ground (GND pin).
You can learn more about breadboards, resistors, and all the basics of the parts at Adafruit!
Blinking an LED With Johnny-Five
Now, you are going to work on the software side.
Create a file, blink.js, and paste the code below:
var five = require('johnny-five');
var board = new five.Board();

board.on('ready', function() {
  var led = new five.Led(13); // pin 13
  led.blink(500); // 500ms interval
});
Run:
$ sudo node blink.js
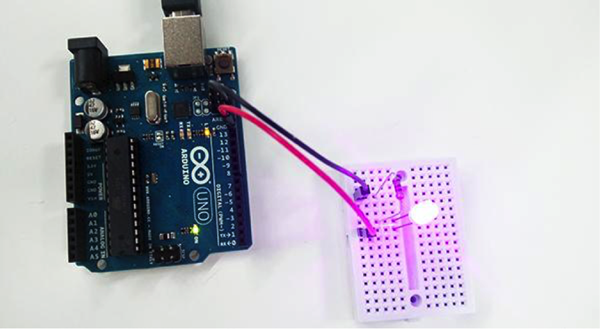
The LED should blink at a 500ms interval, otherwise check both the circuit and code.
You have learned the basics, so let’s move on and learn how to make your hardware talk to the Internet and prototype your first smart device!
3. Prototyping a Smart Lighting System
There are varieties of smart LED light bulbs on the market, such as Philips HUE and LIFX. They let you change the brightness and color from your smartphones and tablets.
Now you are going to prototype something similar that lets you remote-control from a browser with Arduino and an LED!
Internet of Things With JavaScript
An important point here is making your hardware into an IoT (Internet of Things) device by connecting it to the Internet. Unlike with Bluetooth, once things are connected on the Internet, you can operate your LED from anywhere in the world. To make communicating with a socket connection easy, we will use the PubNub JavaScript API!
PubNub Data Stream Network (DSN) provides global infrastructure, and allows you to build and scale real-time apps and IoT devices quite easily. The smart LED you are going to create works as follows:
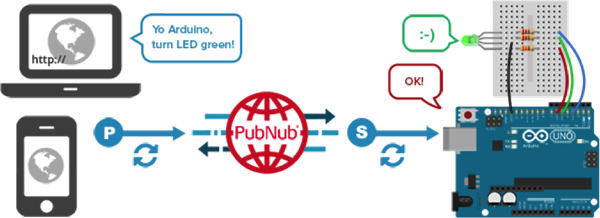
For example, when a user in San Francisco is controlling an Arduino in Tokyo:
- The user publishes a message, “Make the light green”, from a mobile phone.
- The message is sent to a data center in San Francisco.
- The data is synchronized across all the data center.
- The Arduino subscribes the data from Tokyo data center, and changes the light color.
The operation is done in only a quarter of a second.
In this tutorial, you are going to make a prototype. However, if you use the embedded SDK, you can actually build real consumer products, like the Emberlight smart lighting platform.
Hardware You Need
- 1 Arduino Uno
- 1 RGB LED (Common cathode)
- 1 Breadboard
- 4 male/male jumper wires (red, green, blue, black)
- 1 Resistor (220Ω x 2, 330Ω x 1)
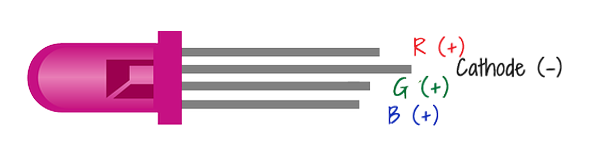
Know Your LED
An RGB LED is a three-in-one LED that houses red, green, and blue colors in a single package. RGB LEDs combine these colors to produce millions of hues. Each LED comes with four legs—one leg per color—and a common cathode (or anode). In this tutorial, you are going to use one with a common cathode.
Assembling the Circuit
Try building the circuit as follows. Unlike in the previous “LED blink” exercise, you will use PWM (Pulse Width Modulation) pins, which are denoted by “~” on your Arduino board.
The difference between these pins is basically the difference between analog and digital results. For example, when you connect an LED to a digital pin, you only get two states: on or off. Blinking the LED is simply toggling the two states. However, to generate millions of hues using an RGB LED, you need in-between states, so you need to use analog PWM pins.
Connect the RGB LED using wires and breadboard to Arduino pins 6, 5, and 3 for red, green, and blue respectively. The common pin is connected to GND.
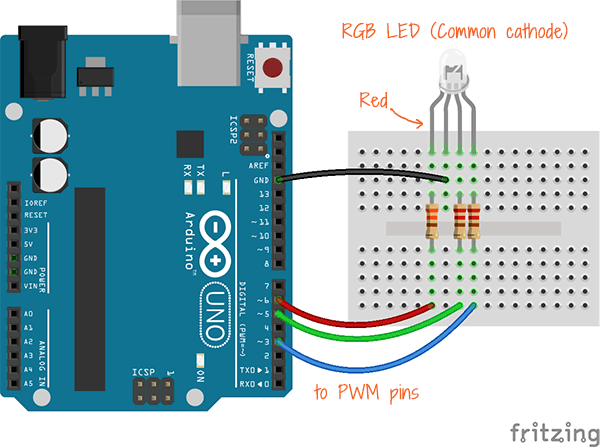
In this diagram, I used 220Ω (for red) and 330Ω (for green and blue) resistors, because red light gets too intense when using the same resistance with green and blue. You can adjust as you work. If you would like to learn more about resistance and how to calculate with Ohm’s Law, I recommend learning from Adafruit.
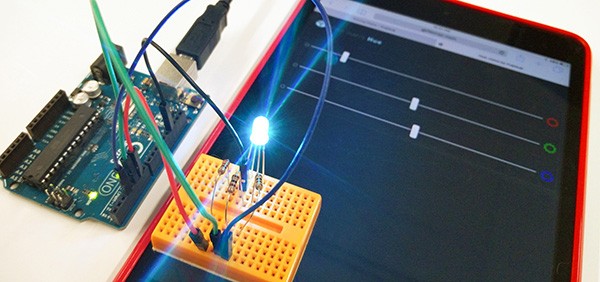
Creating the Web User Interface
Now, you are going to build a web interface to control the LED.
Use the HTML5 element <input type="range"> to draw a slider bar to let a user to change the value of each “R”, “G”, and “B”. Each color has the values of 0 to 255 (min="0" max="255") and uses only integer values by setting the increment by 1 (step="1").
<input id="red" type="range" min="0" max="255" step="1" value="0">
This controls the intensity of the red color. I won’t talk about styling with CSS in this tutorial, but you can view the source code on GitHub at the gh-pages branch to see how I style the UI visual components.
Next, we will learn how to use PubNub JavaScript API to reflect the color data from the UI to Arduino.
Get your own API keys, and then import the JavaScript library from CDN, or locally.
<script src="//cdn.pubnub.com/pubnub-3.7.18.min.js"></script>
Initialize the instance:
var pubnub = PUBNUB({
 subscribe_key : 'you_subscribe_key',
 publish_key   : 'your_publish_key'
});
Let’s send data to change the color of the LED, as the UI event is fired.
Listen to the change event of the slider DOM, and send any changes to PubNub with the publish method.
var red = document.getElementById('red');

red.addEventListener('change', function(){
  pubnub.publish({
    channel: 'smart-led',
    message: {color: 'red', brightness: +this.value}
  });
}, false);
You can use any channel name in the string, but remember to use the same name when you receive the data later.
Next, you are going to use Node.js to receive the data with hardware!
IoT-ifying Arduino With Johnny-Five and PubNub
It’s very easy to light up RGB LEDs with Johnny-Five. To install johnny-five with npm, try this code below:
var five = require('johnny-five');
var led;

five.Board().on('ready', function() {
  console.log('ready');

  // Initialize the RGB LED
  led = new five.Led.RGB({
    pins: { // pin numbers
      red: 6,
      green: 5,
      blue: 3
    }
  });

  // test
  led.color({red: 255, blue: 0, green: 0});

  led.on();
});
Is your LED turned on in red? If not, check your code and circuit. If it is still not working, you may be using a common anode LED, instead of cathode. Try removing the ping to GND and rewire to 5V pin.
Now, see the line under the comment, // test. You will notice the color method specifies the color. In this case, the value for red is 255, and the others are 0, so that your LED is in pure red.
With Johnny-Five, you can specify the RGB values in 0 to 255, just like the CSS color property. Try changing the values and experimenting with the color of your LED!
Next, you’ll dynamically change the value using the data sent from the browser UI.
To receive the data, use the PubNub subscribe method.
Install pubnub using npm:
$ npm install pubnub
Initialize the instance, just like the browser-side code:
var pubnub = require('pubnub').init({
  subscribe_key: 'your_subscribe_key',
  publish_key:   'your_publish_key'
});
You can read the data by accessing the same channel that you are sending the data from. Once the data is received, the callback function is called, so you can reflect the value to the LED.
pubnub.subscribe({
  channel: 'smart-led',
  callback: function(m) {
    if(led) {
      r = (m.color === 'red') ? m.brightness : r;
      g = (m.color === 'green') ? m.brightness : g;
      b = (m.color === 'blue') ? m.brightness : b;

      led.color({red: r, blue: b, green: g});

      console.log( 'color change to...' );
      console.log( led.color() );
    }
  }
  error: function(err) {console.log(err);}
});
The returned object m is a message coming from the browser side. For instance, when the value of blue is 150, you get {color: 'blue', brightness: 150}, and then when the next data is {color: 'red', brightness: 150}, the red = 150 adds to the blue = 150, to make a purple color.
To view the entire source code, see /node/index.js on the GitHub master branch.
Ta-da! You just prototyped your first IoT smart LED!
You can use other microcontrollers like Raspberry Pi with Johnny-Five and PubNub, so you should try creating more IoT apps!
References
- Johnny-Five: The original JavaScript Robotics programming framework
- PubNub: The Realtime Data Stream Network that enables developers to build and scale real-time apps for IoT, Mobile, and web applications

Comments