I run a few sites which include notices and important information in a banner on their home page. I tend to use a custom post type for this, adding my banners and displaying them where I need to in my theme. (If you want to do something similar, it's explained in this tutorial.)
But invariably my banners have an expiry date. They might contain information about an upcoming event or a vacancy, for example. Once the event has passed or the vacancy has been filled, I have to go into the site and manually trash the post.
It would be so much easier if, when creating posts like these, I could give them an expiry date after which they'll no longer be visible on my site.
In this tutorial I'll show you how to do exactly that. There are three steps:
- Create a meta box in the post editing screen for the expiry date.
- Apply the jQuery UI datepicker to the meta box field to enhance the interface.
- Finally, use the
pre_get_postshook to ensure that posts past their expiry date aren't displayed.
What You Will Need
To complete this tutorial you will need:
- a development installation of WordPress
- a code editor
You'll create a plugin with all the code necessary for the expiry date, and activate it on your site. So let's get started!
Setting Up the Plugin
First you need to create your plugin. In the plugins folder in your wp-content directory, create an empty file called tutsplus-post-expiry-date-php.
Open the file in your code editor and add the following to it:
<?php
/*
Plugin Name: Add an Expiry Date to Posts
Plugin URI: http://.tutsplus.com/tutorials/add-an-expiry-date-to-wordpress-posts--cms-22665
Description: Adds an expiry date to posts, using a the jQuery UI datepicker
Author: Rachel McCollin
Version: 1.0
 */
You'll need to edit the file to use your own name and plugin URL, but this is what you'll need to tell WordPress that this is a plugin and what it does.
Now go to your Plugins screen in the WordPress admin and activate the plugin.
Creating the Meta Box
First we're going to create the meta box for the expiry date.
Using add_meta_box() to Display a Meta Box
The first step is to create the function that will add the meta box to the post editing screen. Add this to your plugin file:
function tutsplus_add_expiry_date_metabox() {
    add_meta_box(
        'tutsplus_expiry_date_metabox',
        __( 'Expiry Date', 'tutsplus'),
        'tutsplus_expiry_date_metabox_callback',
        'post',
        'side',
        'high'
    );
}
add_action( 'add_meta_boxes', 'tutsplus_add_expiry_date_metabox' );
This uses the add_meta_box() function, which has six parameters:
-
'tutsplus_expiry_date_metabox': the unique ID of this meta box -
__( 'Expiry Date', 'tutsplus'): this is displayed as the meta box's title
-
'tutsplus_expiry_date_metabox_callback': the callback function which will populate the meta box (we'll create this next)
-
'post': the post type whose editing screen this meta box will appear on
-
'side': which part of the screen the meta box will appear in
-
'high': which position the meta box will appear in
The function is then attached to the add_meta_boxes hook to make it fire at the right time.
Creating the Callback Function
If you were to save your plugin and load your editing screen now, you'd see an error, because the callback function hasn't been defined. So we'll do that next.
Add this to your plugin file:
function tutsplus_expiry_date_metabox_callback( $post ) { ?>

	<form action="" method="post">

		<?php
		//retrieve metadata value if it exists
		$tutsplus_expiry_date = get_post_meta( $post->ID, 'expires', true );
		?>

		<label for "tutsplus_expiry_date"><?php __('Expiry Date', 'tutsplus' ); ?></label>

		<input type="text" class="MyDate" name="tutsplus_expiry_date" value=<?php echo esc_attr( $tutsplus_expiry_date ); ?> / >

	</form>

<?php }
Let's walk through what this does:
- It defines the
tutsplus_expiry_date_metabox_callback()callback function, with$postas its object. - It opens a form element.
- It creates a variable called
$tutsplus_expiry_datewith the value of the'expires'meta key as its value. - It creates a label for the field in the meta box.
- It creates an input element with the
MyDateclass needed for the datepicker to work, the nametutsplus_expiry_datewhich we'll use later when saving data from the field, and the value$tutsplus_expiry_date. - It closes the form.
So now we have the form, but it won't actually do anything unless we create another function to save the data users add to it.
Saving Data on Post Save
To save any data input to the form, we need to create a function and then attach that to the save_post hook.
In your plugin file, add this:
function tutsplus_save_expiry_date_meta( $post_id ) {

	// Check if the current user has permission to edit the post. */
	if ( !current_user_can( 'edit_post', $post->ID ) )
    return;

	if ( isset( $_POST['tutsplus_expiry_date'] ) ) {
		$new_expiry_date = ( $_POST['tutsplus_expiry_date'] );
		update_post_meta( $post_id, 'expires', $new_expiry_date );
	}

}
add_action( 'save_post', 'tutsplus_save_expiry_date_meta' );
This does the following:
- It checks if the current user has the
edit_postcapability for the current post. - If so, it checks if data has been added to the meta box field using
isset. - If that's the case, it creates a variable called
$new_expiry_dateand defines that as the value that's been input. - Finally, it updates the metadata for the post with that value.
So we now have a meta box which will let users add text and save it to the post metadata. Let's make it more secure.
Adding a Nonce for Security
To ensure that the post metadata is only edited via this form, we'll add a nonce.
In the callback function, before the rest of the function's contents, add the following code:
wp_nonce_field( 'tutsplus_expiry_date_metabox_nonce', 'tutsplus_nonce' );
Next, in the tutsplus_save_expiry_date_meta() function for saving data, add this at the beginning of the function:
if( !isset( $_POST['tutsplus_nonce'] ) ||
    !wp_verify_nonce( $_POST['tutsplus_nonce'],
	'tutsplus_expiry_date_metabox_nonce'
	) )
return;
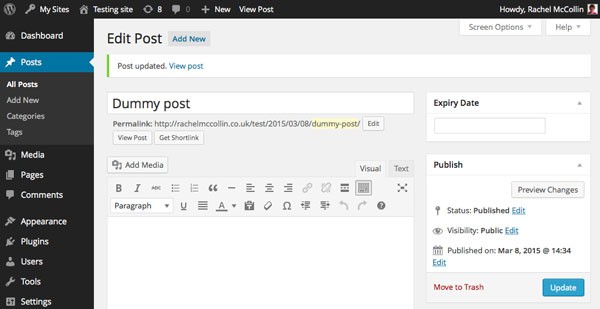
Now save your plugin and take a look at your post editing screen. You'll see your meta box:

This is a good start, but the problem is that at the moment this is a normal text field so there's no way to ensure that your users only input dates to it, and in the correct format. We'll correct that by adding the jQuery UI datepicker.
Adding the JQuery UI Datepicker
The great news is that the jQuery UI datepicker comes preloaded with WordPress, so you don't have to register or install it: you just enqueue it in a function.
At the top of your plugin file, add this:
function tutsplus_load_jquery_datepicker() {
	wp_enqueue_script( 'jquery-ui-datepicker' );
	wp_enqueue_style( 'jquery-style', 'http://ajax.googleapis.com/ajax/libs/jqueryui/1.8.2/themes/smoothness/jquery-ui.css' );
}
add_action( 'admin_enqueue_scripts', 'tutsplus_load_jquery_datepicker' );
This enqueues both the script itself and the stylesheet for the script, which is stored on Google APIs. Note that you must hook it to the admin_enqueue_scripts action hook and not to wp_enqueue_scripts as you would if you were using the script in the front end.
Next you need to add a script to the callback function that outputs your form. After the input element and before the closing </form> tag, add this:
<script type="text/javascript">
    jQuery(document).ready(function() {
		jQuery('.MyDate').datepicker({
			dateFormat : 'dd-mm-yy'
		});
	});
</script>
This references the MyDate class you already added to the input element and adds the datepicker script to it.
Your callback function will now look like this:
function tutsplus_expiry_date_metabox_callback( $post ) { ?>

	<form action="" method="post">

		<?php
		// add nonce for security
		wp_nonce_field( 'tutsplus_expiry_date_metabox_nonce', 'tutsplus_nonce' );

		//retrieve metadata value if it exists
		$tutsplus_expiry_date = get_post_meta( $post->ID, 'expires', true );
		?>

		<label for "tutsplus_expiry_date"><?php __('Expiry Date', 'tutsplus' ); ?></label>

		<input type="text" class="MyDate" name="tutsplus_expiry_date" value=<?php echo esc_attr( $tutsplus_expiry_date ); ?> / >

		<script type="text/javascript">
			jQuery(document).ready(function() {
				jQuery('.MyDate').datepicker({
					dateFormat : 'dd-mm-yy'
				});
			});
		</script>

	</form>

<?php }
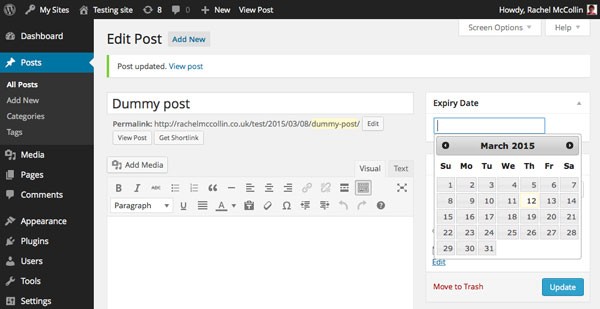
Now let's take a look at how the meta box looks after I save my plugin file:

That's much nicer! But although you can now add an expiry date to your posts, it won't make any difference to whether or not they're displayed on your site. Let's change that now.
Amending the Query to Exclude Expired Posts
The final step is to amend the main query using the pre_get_posts hook.
Still working in your plugin file, add this code:
function tutsplus_filter_expired_posts( $query ) {

    // doesn't affect admin screens
    if ( is_admin() )
        return;
    // check for main query
	if ( $query->is_main_query() ) {

    	//filter out expired posts
        $today = date('d-m-Y');
        $metaquery = array(
            array(
                 'key' => 'expires',
                 'value' => $today,
                 'compare' => '<',
                 'type' => 'DATE',
			)
        );
        $query->set( 'meta_query', $metaquery );
	}
}
add_action( 'pre_get_posts', 'tutsplus_filter_expired_posts' );
This does six things:
- First it defines the
tutsplus_filter_expired_posts()function with$queryas its object. - It checks if we're in the admin screens, as we don't want to exclude expired posts from them.
- Next it checks if the main query is being run.
- If so, it defines the variable
$todayas today's date, using the same date formatting as the datepicker uses. - It then defines
$metaqueryto exclude posts whose expiry date is before today's date, using thecompareoperator. - Finally, it resets the query using the
$metaqueryvariable.
The function is hooked to pre_get_posts which will make it run as the query fetches posts.
Now save your plugin file and try it out. Create a post with a publication date a few days in the past, and then give it an expiry date of yesterday. Save it and switch to your main blog page. You'll find that the post you've just created isn't there!
Summary
Being able to have your posts automatically expire on a given date can be very useful. If a post's content is no longer relevant, or you don't want people seeing it after a given date, adding an expiry date saves you from having to remember to edit or delete the post once it's no longer needed.
By using the jQuery datepicker, you've created a user-friendly meta box that you can use to save you time and your visitors confusion.


Comments