
This article helps you, the developer, to begin using Redux Framework in the most basic of ways: adding fields. In the past, working with Redux required some understanding of PHP Classes and how they work. With Redux 3.5+ the learning curve has all but disappeared.
I'm one of the creators of Redux Framework, and in this tutorial, I will discuss the inner structure of Redux, how fields and sections work, and global configuration arguments.
Redux ships with a sample-config.php file containing multiple examples of setting up Redux, as well as examples for almost every field we offer. For more extensive understanding, review the sample config or check out the Redux Documentation.
Loading Redux
In order to begin using Redux Framework, it must be loaded. There are two ways in which to make this happen.
First, Redux can easily be installed as a plugin and activated. The plugin is freely available at WordPress.org. Installation is then done through the plugin installer interface.
The second way to install Redux Framework is to embed it within your theme or plugin. Embedding is fairly easy to do as well. Simply copy the ReduxCore folder to your theme or plugin (renaming the directory to whatever name you desire) and include the framework.php file found within, through standard PHP include functions.
If these embed instructions are too difficult, Redux also offers the Redux Builder which allows you to output a fully functional theme with Redux already loaded. Best of all, the builder service is completely free.
Now that Redux Framework is loaded, we can begin using it.
Understanding How Redux Runs
In order to understand how Redux Framework runs, one must first understand what a Redux instance is. Redux can be run by a theme and any number of plugins at the same time, all from within one WordPress install. Each instance has its own unique set of characteristics and arguments; each can behave very differently from other Redux instances.
The reason Redux runs as it does is simply to ensure the greatest level of flexibility. Far too many option frameworks only allowed for one instance of their framework to run. We wanted plugin and theme developers alike to work with Redux unhindered by one another’s code.
The opt_name Argument
How exactly does one keep instances separate? It’s all through a unique key called the opt_name. This is where your data is stored in WordPress and also counts as your unique key throughout the Redux Framework. It's important to understand that before you begin working with Redux Framework, you'll need to choose a unique opt_name. Once that determination has been made, it’s time to dig into global arguments.
Setting Global Arguments
The Redux Framework options panel is built using PHP arrays. The global arguments below apply only to our sample instance of Redux Framework. A full list of global arguments can be found on the Redux website. For the purpose of this tutorial, we will work with a very basic arguments array, and show you how to set it.
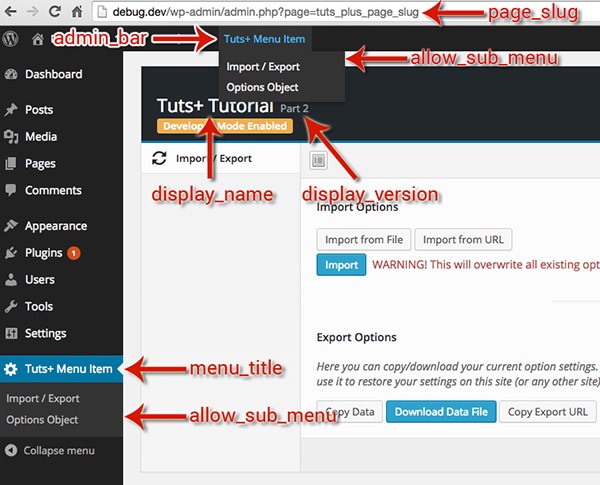
Redux::setArgs(
   'tuts_plus_tutorial', // This is your opt_name,
   array( // This is your arguments array
       'display_name' => 'Tuts+ Tutorial',
       'display_version' => 'Part 2',
       'menu_title' => 'Tuts+ Menu Item',
       'admin_bar' => 'true',
       'page_slug' => 'tuts_plus_page_slug', // Must be one word, no special characters, no spaces
       'menu_type' => 'menu', // Menu or submenu
       'allow_sub_menu' => true,
   )
);
Once this code is run, Redux Framework will produce a fully functional panel. The picture below explains how each argument affects this panel.
Setting Sections
Now that our panel is running, let's add some sections and fields. Redux uses nested arrays for fields and arguments, though with Redux 3.5+ these procedures are separated easily. Let's begin by making a section which we can add fields to. For more extensive documentation on sections, have at look at the sections documentation.
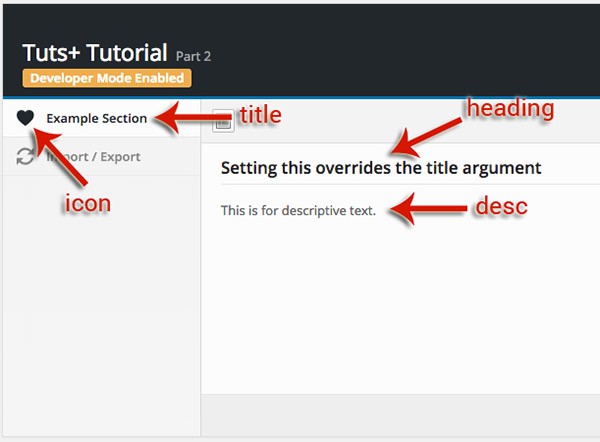
Redux::setSection(
   'tuts_plus_tutorial', // This is your opt_name,
   array( // This is your arguments array
        'id'    => 'section_example_1', // Unique identifier for your panel. Must be set and must not contain spaces or special characters
        'title' => 'Example Section',
        'desc' => 'This is for descriptive text.',
        'heading' => 'Setting this overrides the title argument',
        'icon' => 'el el-heart', // http://elusiveicons.com/icons/
        //'subsection' => true, // Enable this as subsection of a previous section
    )
);
Icons
The team behind Redux Framework also maintains Elusive Icons. As such, the Elusive icon set is baked directly into the Redux core. Adding icons is as easy as specifying a class, as in the example. If you wish to have another icon pack, such as FontAwesome, there is documentation for those procedures as well.
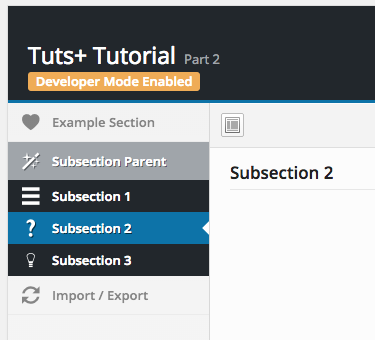
Subsections
Sections may also be converted into subsections for easier organization of your panel. Below is an example, with the example source.
Setting Fields
Setting fields is no different than setting sections or arguments; it all begins with an array. Before we go too far, we need to point out that Redux has over 30 different field “types”, each with its own set of arguments and a myriad of options. To see the different types, it's once again suggested to read our docs, over on the Redux Documentation on Fields.
Fields can be added to sections in two ways. First, append the field arrays to the setSections function outlined above. In the examples above you can easily add a “fields” argument and add any number of fields to that section.
The second way requires an additional Redux API function call, but it's just as simple.
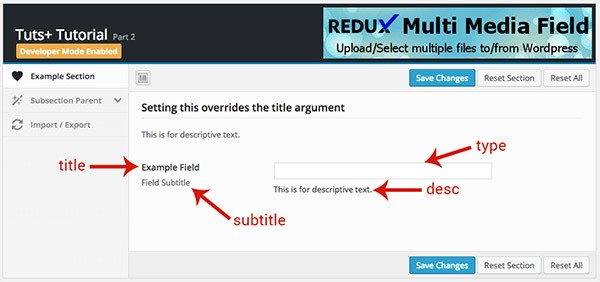
Redux::setField(
    'tuts_plus_tutorial', // This is your opt_name,
    array( // This is your arguments array
        'id'         => 'section_example_1', // Unique identifier for your panel. Must be set and must not contain spaces or special characters
        'type'       => 'Text',
        'section_id' => 'section_example_1',
        'title'      => 'Example Field',
        'subtitle'   => 'Field Subtitle',
        'desc'       => 'This is for descriptive text.',
    )
);
Let’s look at what this does to our example panel.
Take some time to thoroughly examine the different field types. Redux Framework contains some really powerful fields. For example, the typography field auto-enqueues the selected Google fonts to your page. The background field—should the output argument be set to your CSS selector—will auto-generate the required CSS and append to your site. Simply stated, Redux Framework truly does a lot of the heavy lifting for you!
Feeling a Little Lost?
The easiest way to get started is to first look at the Redux demo site. It demonstrates all the different types of fields Redux offers with a bunch of their configurations.
What's really useful is that the demo site config ships with Redux. Inside ~/sample/sample-config.php is everything you see on the demo site.
If you're still lost, there is a thriving community behind Redux that will help, though you'll find most everything you need on the Redux Documentation site.
Get the Full Example
The complete example config presented in this tutorial is attached for you to download from the right sidebar. This is only an example. The embedded Redux sample-config has many more extensive examples.
Conclusion
In this second part of the series, we took a closer look at how Redux works, and how to get started. We also examined ways in which to add sections and fields to an instance of Redux.
We also looked at sections and how they could be displayed differently, based on arguments and how fields are tied to sections, and how they can be easily customized to match your needs.
In the next tutorial of the series, we are going to look at next steps of really using Redux in your themes and plugins. We'll outline how to use Redux's dynamic CSS and font output. We'll also talk about other advanced features Redux has to offer you.

Comments