Do you want to spice up your web applications by making them real-time — but don't want to create new infrastructures for the sole purpose of getting web sockets to work? In this article, we'll explore how to use and implement Pusher, an HTML5 WebSocket-powered real-time messaging service for your applications.
Introduction
What are WebSockets?
 According to the WebSocket Wikipedia page, WebSocket is a technology providing for bi-directional, full-duplex communication channels, over a single TCP socket.
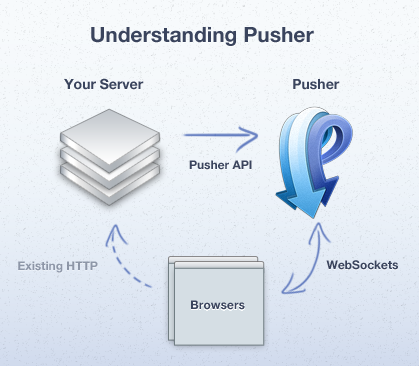
In layman's terms, WebSockets enable a client and a server to communicate in both directions. It lets a server send messages to the client, and vice-versa.
How is this relevant to my web application?
Over the years, data expiration has always been a problem with web applications, specifically those that have multiple people logged in and working on the same things. For example, in a project management application, users sometimes create to-do items which their team members are creating at the same time. With WebSockets, this can be mitigated by allowing the server to push notifications to all connected parties, allowing browsers to receive new data in real-time. In effect, before you create a duplicate to-do item, you'll see that someone else has already created it.
What is Pusher?
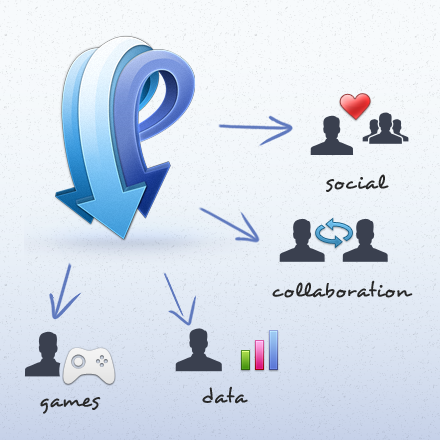
Pusher is a hosted API for quickly, easily and securely adding scalable real-time functionality via WebSockets to web and mobile apps.
Essentially, Pusher encapsulates WebSockets implementation, functionality, debugging, and hosting for you.
Instead of having to run your own WebSockets server, it allows you to offload the entire process to Pusher's servers, saving you both time and money.
Pusher is a hosted API for quickly, easily and securely adding scalable real-time functionality via WebSockets to web and mobile apps.
For Pusher to work, you'll need both a client library and a publisher library. Client libraries are used with the client that's interfacing with your application. This might be a browser (via JavaScript), an iPhone app (via Objective-C), or a Flash app (via ActionScript). Publisher libraries are used on your server to send events to your clients.
Currently, Pusher has client libraries for JavaScript, Objective-C, ActionScript, .NET and Silverlight, Ruby, and Arduino. It has publisher libraries for Node.js, Java, Groovy, Grails, Clojure, Python, VB.NET, C#, PHP, Ruby, Perl, and ColdFusion.
For the purposes of this tutorial, we'll be using the JavaScript client library and the PHP publisher library. The implementation shouldn't be too different if you're using another programming language.
I feel like building a live chat widget so people can chat in real-time on a website. With this in mind, let's continue.
Setting up Pusher
Step 1: Register for a free Pusher developer account
To begin, go to the Pusher website and register for your account. They offer a free account for Sandbox plan users, which includes 20 connections and 100,000 messages per day. When you're ready, you can always upgrade to a paid plan, but since we're only going to use it for our sample application, a free Sandbox plan will do the trick!
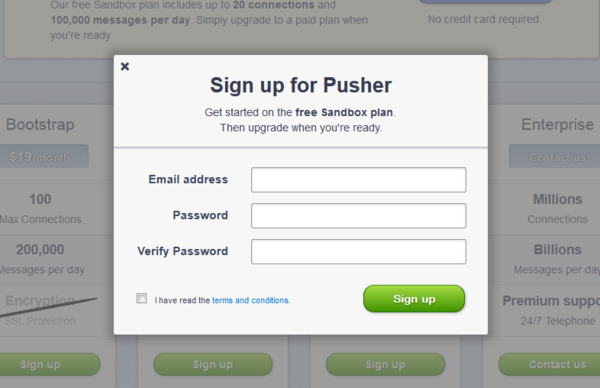
Pusher Registration
On the site, click on the Sign Up button that you'll find on the top-right corner and enter the required details. Once done, click on the Sign Up button again to complete your registration.
Step 2: Log in for the first time
After you register, you'll be redirected to your Pusher Administration page. This is where you can manage all your Pusher applications. A single account can host multiple applications.
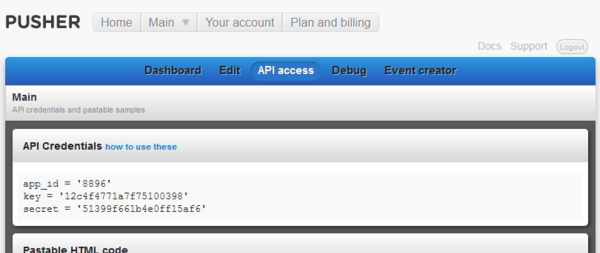
Pusher Administration Page
On top, you have your navigation bar, where you will find the following sections:
- Dashboard - this is where you'll see your Pusher application's statistics. You can see the Message Rate (number of messages sent per minute), Connections (number of open connections at a certain time), and Messages (total messages your application sends per day).
- Edit - here, you can rename the current application and choose whether or not to use SSL encryption.
- API Access - this contains your application's API Credentials, which we'll require later.
- Debug - this will display all the events triggered and messages sent by your Pusher application, as well as when clients connect or disconnect. This is extremely useful when developing your web app, since you can see here exactly what Pusher sends and receives and who's online to receive them.
- Event Creator - this is a useful tool for sending test events to your connected clients — without having to trigger the events yourself from your web application.
You're now ready to begin developing with Pusher!
Developing with Pusher
Step 1: Create the HTML, CSS, JavaScript, and PHP
Let's begin developing our live chat widget by creating the HTML. What I have in mind is a widget that will appear at the bottom of the screen, with a “Who's Online” list on the side, like IRC.
<!DOCTYPE HTML>
<html>
<body>
	<div id="chat_widget_container">
		<div id="chat_widget_login">
			<label for="chat_widget_username">Name:</label>
			<input type="text" id="chat_widget_username" />
			<input type="button" value="Login!" id="chat_widget_login_button" />
			<img src="http://nettuts.s3.amazonaws.com/1059_pusher/loading.gif" alt="Logging in..." id="chat_widget_login_loader" />
		</div>

		<div id="chat_widget_main_container">
			<div id="chat_widget_messages_container">
				<div id="chat_widget_messages">
					chat messages go here
				</div>
			</div>
			<div id="chat_widget_online">
				<p>Who's Online (<span id="chat_widget_counter">0</span>)</p>
				<ul id="chat_widget_online_list">
					<li>online users go here</li>
				</ul>
			</div>
			<div class="clear"></div>
			<div id="chat_widget_input_container">
				<form method="post" id="chat_widget_form">
					<input type="text" id="chat_widget_input" />
					<input type="submit" value="Chat" id="chat_widget_button" />
					<img src="http://nettuts.s3.amazonaws.com/1059_pusher/loading.gif" alt="Sending..." id="chat_widget_loader" />
				</form>
			</div>
		</div>
	</div>
</body>
</html>
Some CSS to style our HTML:
#chat_widget_container{padding:20px 20px 5px 20px; background-color:#F2F2F2; border:5px solid #AFAFAF;
border-bottom:0px; width:333px; font-size:11px; font-family:"Lucida Grande",Arial,Helvetica,sans-serif;
position:fixed; bottom:0px; right:20px}

#chat_widget_login{width:333px; text-align:center; height:166px; margin-top:80px}

#chat_widget_main_container{display:none}

#chat_widget_messages_container{float:left; width:200px; border:1px solid #DDD; height:200px; overflow:auto;
padding:5px; background-color:#FFF; position:relative}

#chat_widget_messages{overflow-x:hidden; overflow-y:auto; position:absolute; bottom:0px}

#chat_widget_online{width:100px; height:210px; float:left; padding:0px 10px; border:1px solid #DDD;
border-left:0px; background-color:#FFF; overflow: auto;}

#chat_widget_online_list{list-style:none; padding:0px}

#chat_widget_online_list >li{margin-left:0px}

#chat_widget_input_container{margin-top:10px; text-align:left}

#chat_widget_input{width:260px; margin-right:10px; border:1px solid #DDD; padding:2px 5px}

#chat_widget_loader{display:none}

#chat_widget_login_loader{display:none}

.clear{clear:both}
The combined HTML and CSS above should render something along the lines of:
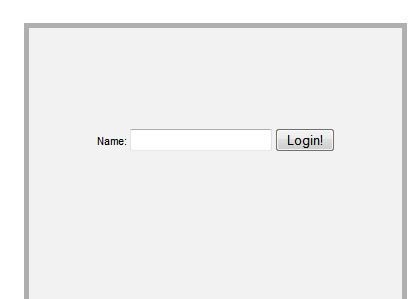
Demo Login
We'll need to create a function that triggers when we click the Login button and checks the value entered, so let's do that:
$('#chat_widget_login_button').click(function() {
	$(this).hide(); //hide the login button
	$('#chat_widget_login_loader').show(); //show the loader gif
	username = $('#chat_widget_username').val(); //get the username
	username = username.replace(/[^a-z0-9]/gi, ''); //filter it
	if( username == '' ) { //if blank, then alert the user
		alert('Please provide a valid username (alphanumeric only)');
	} else { //else, login our user via start_session.php
		ajaxCall('start_session.php', { username : username }, function() {
			//We're logged in! Now what?
		});
	}
});
Next, we need to inform the server when we've logged in. To do this, we'll create a start_session.php file which will essentially log in the user.
<?php
//Start a PHP session
session_start();

//Get the username sent from the user
$username = $_REQUEST['username'];

//filter it
$username = trim(filter_var($username, FILTER_SANITIZE_STRING, FILTER_FLAG_NO_ENCODE_QUOTES));

//set the username for the session
$_SESSION['username'] = $username;

//set a unique id for the user. since we don't have a working user system, we'll just use the time()
//variable to generate a unique id, and add the user's name to it and the user's session id, then
//MD5 the whole thing
$_SESSION['userid'] = md5(time() + '_' + $username + '_' + session_id());

//echo the json_encoded success message for our ajax call
echo json_encode(array('success' => true));
exit();
?>
You'll notice that I've created an ajaxCall function, which basically just wraps around the jQuery $.ajax function. Just add this before the $(document).ready() line.
function ajaxCall(ajax_url, ajax_data, successCallback) {
	$.ajax({
		type : "POST",
		url : ajax_url,
		dataType : "json",
		data: ajax_data,
		time : 10,
		success : function(msg) {
			if( msg.success ) {
				successCallback(msg);
			} else {
				alert(msg.errormsg);
			}
		},
		error: function(msg) {
		}
	});
}
Now, let's load the Pusher JavaScript library and jQuery as well. Place the following script references within the <head> of your HTML:
<script src="http://js.pusherapp.com/1.9/pusher.min.js"></script>
<script src="https://ajax.googleapis.com/ajax/libs/jquery/1.6.4/jquery.min.js"></script>
Step 2: Take note of your API Credentials
Remember the API Access page from above? Go back to it and note down your API Credentials. We'll need these values when we set up the client and publisher libraries.
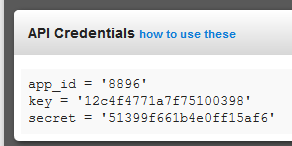
Pusher API Credentials
Feel free to use mine, however, I highly recommend you get your own, since a free account is limited and you might be cut off midstream.
Step 3: Implement the Pusher code
Before we begin implementing Pusher into our application, we need to understand some Pusher terms:
- Channel - a way of differentiating streams of data inside an application. An application can have multiple channels, and one channel can have multiple clients. We can compare this with a chat room in IRC — all messages sent to a specific chat room can be seen by all the people who are inside.
- Events - This is akin to the server sending data to the client so you can view messages in the chat room. Events are triggered by the publisher library, and clients can subscribe to these events. In our analogy, subscribing to an event is similar to listening when people chat in the room and taking note of what they're saying.
There are three types of channels:
- Public channels - channels that anybody can subscribe to, as long as they know the channel's name.
- Private channels - channels that only authenticated users can subscribe to.
- Presence channels - similar to private channels, but also allow us to notify other connected clients with information about the client connecting. We'll be using this channel in our chat widget.
Presence channels are special since they let us send information about users when they connect. They also have special events that we can subscribe to in order to know when a user connects and disconnects. Presence channels are ideal for secure, private channels that need to know when a user goes in or out.
Connecting to the Pusher service
Let's begin by connecting our client to the Pusher service. To do so, we'll need to create a new instance of the Pusher object (from the library), and call the subscribe function. Add the following code after the //We're logged in! Now what? comment.
The Subscribe function essentially makes the client join the channel. Once inside the channel, the client will be able to receive events that are happening inside it.
pusher = new Pusher('12c4f4771a7f75100398'); //APP KEY
Pusher.channel_auth_endpoint = 'pusher_auth.php'; //override the channel_auth_endpoint
nettuts_channel = pusher.subscribe('presence-nettuts'); //join the presence-nettuts channel
What's a “channel_auth_endpoint”?
When subscribing to a presence or private channel, we need to ensure that the connecting user is allowed to access the channel. Therefore, before letting the client fully connect to it, the Pusher client automatically makes a call to the URL defined in the channel_auth_endpoint variable and sends it information about the user connecting. Then, through channel_auth_endpoint, we can figure out if the connecting user is authorized.
By default, this call is made to /pusher/auth, but we can override it by setting the channel_auth_endpoint variable.
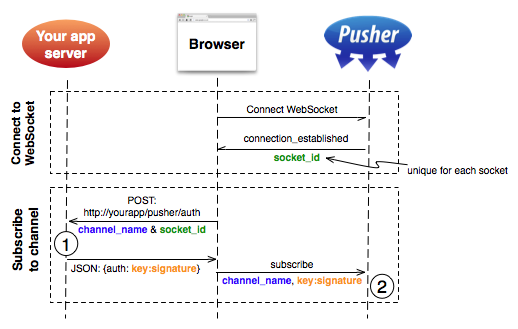
A unique
socket_idis generated and sent to the browser by Pusher. When an attempt is made to subscribe to a private- or presence- channel thesocket_idandchannel_nameis sent to your application, (1) via an AJAX POST request which authorizes the user to access the channel against your existing authentication system. If successful your application returns an authorization string to the browser signed with your Pusher secret. This is sent to Pusher over the WebSocket, which completes the authorization (2) if the authorization string matches.
Going back to our application, we need to create our channel_auth_endpoint. Create a file, called pusher_auth.php and place this inside:
<?php
//Start the session again so we can access the username and userid
session_start();

//include the pusher publisher library
include_once 'Pusher.php';

//These values are automatically POSTed by the Pusher client library
$socket_id = $_POST['socket_id'];
$channel_name = $_POST['channel_name'];

//You should put code here that makes sure this person has access to this channel
/*
if( $user->hasAccessTo($channel_name) == false ) {
	header('', true, 403);
	echo( "Not authorized" );
	exit();
}
*/

$pusher = new Pusher(
	'12c4f4771a7f75100398', //APP KEY
	'51399f661b4e0ff15af6', //APP SECRET
	'8896' //APP ID
);

//Any data you want to send about the person who is subscribing
$presence_data = array(
	'username' => $_SESSION['username']
);

echo $pusher->presence_auth(
	$channel_name, //the name of the channel the user is subscribing to
	$socket_id, //the socket id received from the Pusher client library
	$_SESSION['userid'],  //a UNIQUE USER ID which identifies the user
	$presence_data //the data about the person
);
exit();
?>
Now that we can authenticate our connecting users, we'll need to bind some JavaScript functions to Pusher events to show that we've already logged in. Update the code below the //We're logged in! Now what? comment, like so:
//We're logged in! Now what?
pusher = new Pusher('12c4f4771a7f75100398'); //APP KEY
Pusher.channel_auth_endpoint = 'pusher_auth.php'; //override the channel_auth_endpoint
nettuts_channel = pusher.subscribe('presence-nettuts'); //join the presence-nettuts channel

pusher.connection.bind('connected', function() { //bind a function after we've connected to Pusher
	$('#chat_widget_login_loader').hide(); //hide the loading gif
	$('#chat_widget_login_button').show(); //show the login button again

	$('#chat_widget_login').hide(); //hide the login screen
	$('#chat_widget_main_container').show(); //show the chat screen

	//here, we bind to the pusher:subscription_succeeded event, which is called whenever you
	//successfully subscribe to a channel
	nettuts_channel.bind('pusher:subscription_succeeded', function(members) {
		//this makes a list of all the online clients and sets the online list html
		//it also updates the online count
		var whosonline_html = '';
		members.each(function(member) {
			whosonline_html += '<li class="chat_widget_member" id="chat_widget_member_' +
			member.id + '">' + member.info.username + '</li>';
		});
		$('#chat_widget_online_list').html(whosonline_html);
		updateOnlineCount();
	});

	//here we bind to the pusher:member_added event, which tells us whenever someone else
	//successfully subscribes to the channel
	nettuts_channel.bind('pusher:member_added', function(member) {
		//this appends the new connected client's name to the online list
		//and updates the online count as well
		$('#chat_widget_online_list').append('<li class="chat_widget_member" ' +
		'id="chat_widget_member_' + member.id + '">' + member.info.username + '</li>');
		updateOnlineCount();
	});

	//here, we bind to pusher:member_removed event, which tells us whenever someone
	//unsubscribes or disconnects from the channel
	nettuts_channel.bind('pusher:member_removed', function(member) {
		//this removes the client from the online list and updates the online count
		$('#chat_widget_member_' + member.id).remove();
		updateOnlineCount();
	});
});
Remember to add the updateOnlineCount(); function above the $(document).ready() line:
function updateOnlineCount() {
	$('#chat_widget_counter').html($('.chat_widget_member').length);
}
An explanation of what we just added
The pusher.connection.bind function allows us to bind a callback function whenever the Pusher connection status changes. There are many possible statuses, such as initialized, connecting, unavailable, failed, and disconnected. We won't be using them in this tutorial, but you can read more about them in the Pusher documentation.
The channel_name.bind function allows us to bind a function to a specific event that might happen inside the channel. By default, presence channels have events of their own which we can bind functions to, like the pusher:subscription_succeeded event which we used above. You can read more about them in the Client Presence Events documentation.
Let's test out the app now and see what happens. To do so, open two tabs of your app and log in twice. You should see something like this:
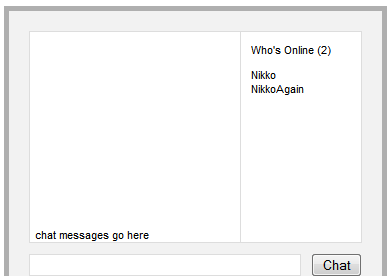
First Test
When you close one tab, the second client closes as well, triggering our pusher:member_removed event, and removing the client from the online list:
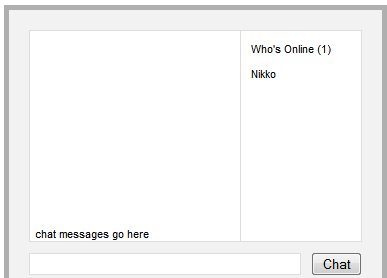
Second Test
Now that that's working, we can finally implement the core functionality of our application — the live chat.
Implementing the live chat functionality
Let's begin by binding a function to the submit event of our chat form:
$('#chat_widget_form').submit(function() {
  var chat_widget_input = $('#chat_widget_input'),
  		chat_widget_button = $('#chat_widget_button'),
  		chat_widget_loader = $('#chat_widget_loader'),

  		message = chat_widget_input.val(); //get the value from the text input

	chat_widget_button.hide(); //hide the chat button
	chat_widget_loader.show(); //show the chat loader gif

	ajaxCall('send_message.php', { message : message }, function(msg) {
		//make an ajax call to send_message.php
		chat_widget_input.val(''); //clear the text input
		chat_widget_loader.hide(); //hide the loader gif
		chat_widget_button.show(); //show the chat button

		newMessageCallback(msg.data); //display the message with the newMessageCallback function
	});

	return false;
});
The newMessageCallback function:
function newMessageCallback(data) {
	if( has_chat == false ) { //if the user doesn't have chat messages in the div yet
		$('#chat_widget_messages').html(''); //remove the contents i.e. 'chat messages go here'
		has_chat = true; //and set it so it won't go inside this if-statement again
	}

	$('#chat_widget_messages').append(data.message + '<br />');
}
Afterward, we'll need to create send_message.php to receive our AJAX call from above and trigger the new_message event:
<?php
//Start the session again so we can access the username
session_start();
//include the pusher publisher library
include_once 'Pusher.php';
$pusher = new Pusher(
'12c4f4771a7f75100398', //APP KEY
'51399f661b4e0ff15af6', //APP SECRET
'8896' //APP ID
);
//get the message posted by our ajax call
$message = $_POST['message'];
//trim and filter it
$message = trim(filter_var($message, FILTER_SANITIZE_STRING, FILTER_FLAG_NO_ENCODE_QUOTES));
//wrap it with the user's name when we display
$message = "<strong><{$_SESSION['username']}></strong> {$message}";
//trigger the 'new_message' event in our channel, 'presence-nettuts'
$pusher->trigger(
'presence-nettuts', //the channel
'new_message', //the event
array('message' => $message) //the data to send
);
//echo the success array for the ajax call
echo json_encode(array(
'message' => $message,
'success' => true
));
exit();
?>
You're probably wondering why we abstracted the newMessageCallback into its own function. Well, we'll have to call it again when we receive a new_message event from Pusher. The following code binds a function to an event, called new_message, which will trigger every time a user sends a message. Add this code after the nettuts_channel.bind('pusher:member_removed') code block:
nettuts_channel.bind('new_message', function(data) {
	newMessageCallback(data);
});
The data variable in the binding function above will be the data the server sends in the $pusher->trigger() call, which should contain the message data.
Testing
Let's try our app again with two browsers, not tabs. (Or try it with a friend if you've uploaded it somewhere.)
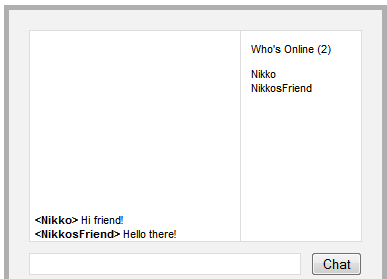
Hello friend!
Congratulations! You've successfully created a working application using Pusher.
Conclusion
There you have it, a working real-time application powered by Pusher. Feel free to visit the live chat demo I've set up here.
There's a lot more that I didn't discuss in this tutorial, such as debugging your apps, excluding recipients from events, and triggering client-side events, but you can learn these simply by reading the Pusher documentation. You can even check out their showcase of websites and applications that use Pusher to work in real-time.
This tutorial only scratches the surface of Pusher and WebSockets in general. With this kind of technology, what you can do is only limited by what you can imagine building.
Have you tried creating something with Pusher, or are you planning to do so soon? Let me know in the comments!
Note: Pusher has requested that we reset the API Credentials used by the demo account on this tutorial as a precaution to it being abused. I apologize to you guys and hopefully you can just get your own :) Thanks!


Comments