In this video from my course on building a material design app, you'll learn how to create the user interface of a material design app. You’ll learn how to use FABs (FloatingActionButtons), input widgets with floating labels, action bar menu items, and more.
The tutorial builds on the basic setup work done earlier in the course, but you should be able to follow along, and you can always check the source code on GitHub.
How to Create FloatingActionButtons and TextInputLayouts
Create Two Activities
Start by creating two activities: one for the home screen (shown on the left in the screenshot below) and one for the other two screens shown, which are identical except for their titles.
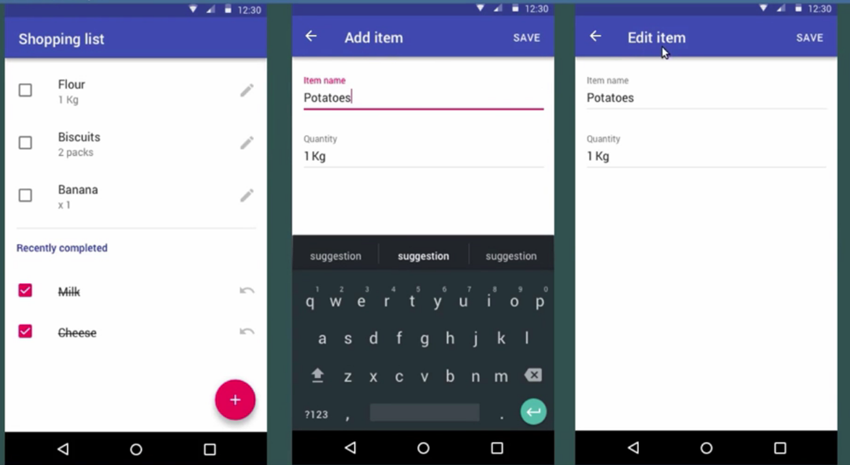
Home Screen
Let's start by creating the activity for the home screen: right-click on your package name and select New > Activity > Blank Activity. You'll see the following screen:
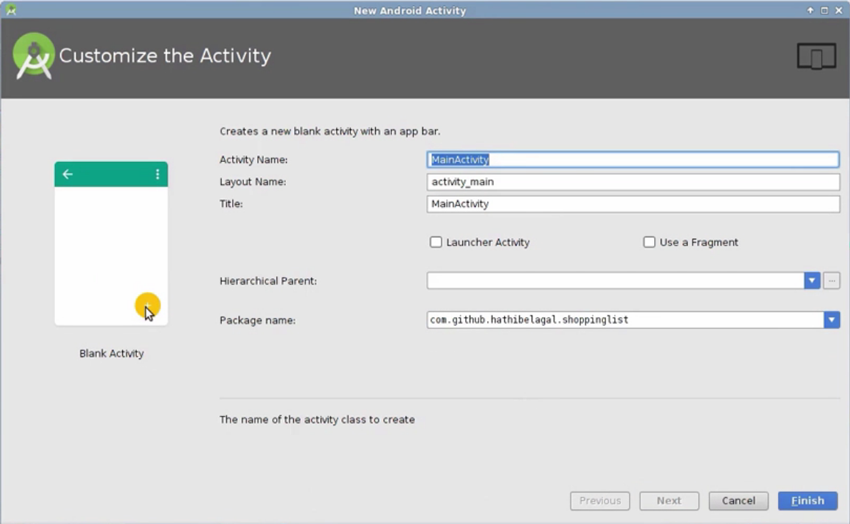
As you can see, this activity template already has a floating action button in it. Change the title of the activity to shopping list and pick the Launcher Activity field to let Android Studio know that this is going to be the home screen. Press Finish to generate the activity. Android Studio tries to follow the material design guidelines closely.
If you open activity_main.xml, you will see the code for the floating action button. Change the value of the source property to @drawable/ic_add_24dp because we want this button to display the plus symbol. Change the tint property to add @android:color/white to change the color of the plus symbol to white.
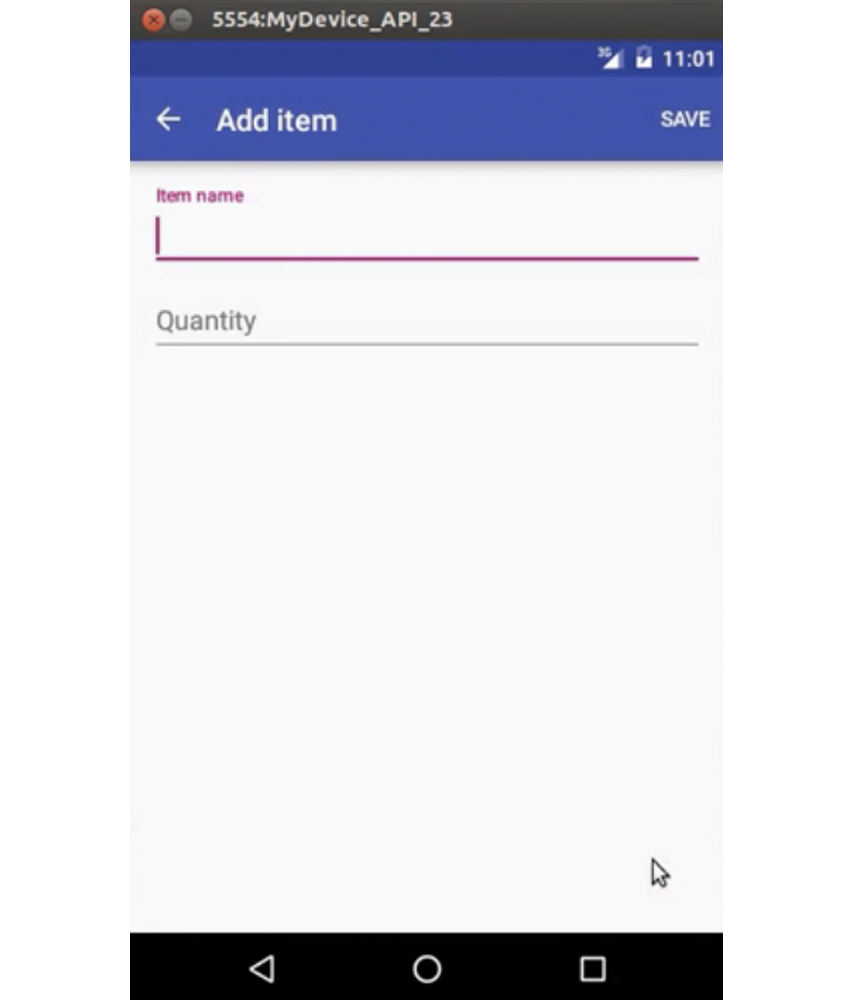
Add and Edit Item Screens
The floating action button is now ready. Let us now move on to creating the activity for the add and edit item screens. Right-click on the package name again and select New > Activity > Empty Activity.
I'm going to call this ItemActivity and press Finish. This layout is going to have two text input widgets, one below the other. Therefore, it is easier to use a linear layout instead of a relative layout. Set its orientation to vertical.
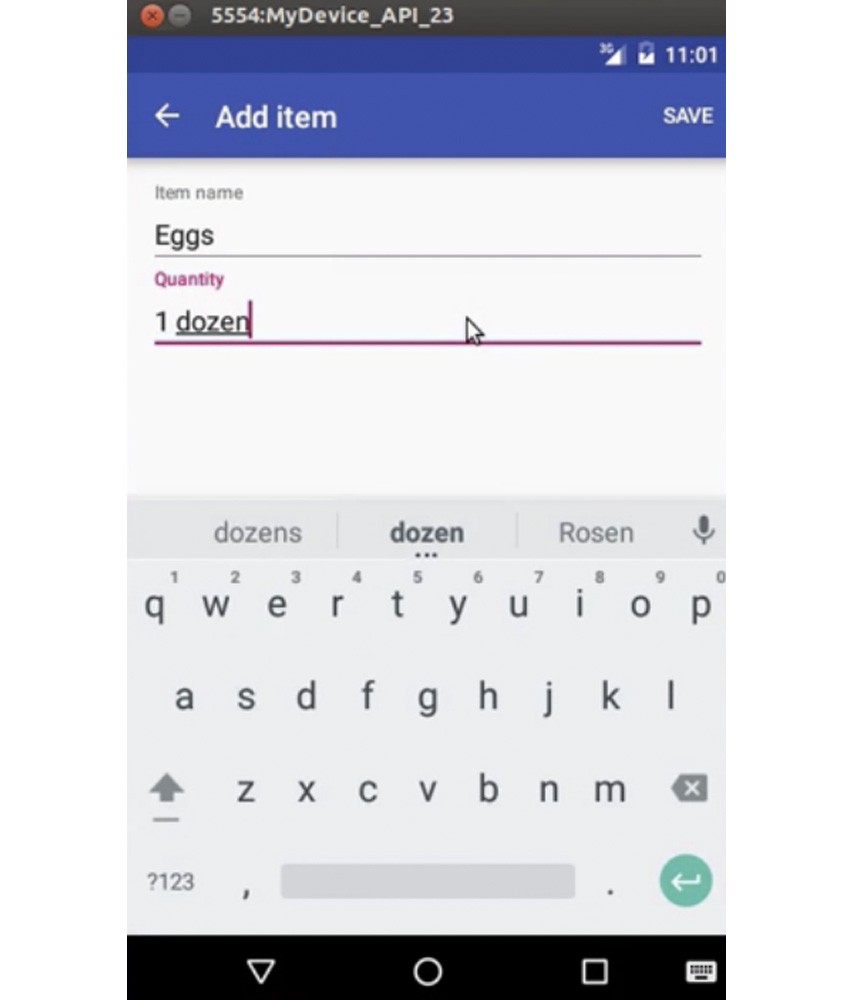
Inside the layout, create a tag for a text input layout. Set its width to match_parent and set its height to wrap_content. Inside the tag, add an edit text tag and set its width to match_parent and height to wrap_content. Call it input_item_name. Next, set its hint attribute to Item name. The value you specify for the hint is going to be rendered as an animated floating label.
Now we have to repeat the same steps for the second input widget. So you can simply copy and paste all of this code. Change the id to input_item_quantity and change the hint to Quantity.
Add a Save Button
The layout of the activity is almost complete. What's missing is a save button. To add a button inside the action bar, we need to add it as a menu item.
Right-click on the Resources folder and select a New Android resource file. Change the Resource type to Menu and name the file menu_item_activity. Add the application namespace to the root element by simply typing in appNs and pressing Enter.
Next, create a new item tag to represent the save button. Set its id to save_action and set the title to Save. And now add an attribute called app:showAsAction, and set its value to always. This attribute is important because if you forget to add it, the save button is going to end up inside the overflow menu of the action bar.
We should now inflate the menu file inside ItemActivity. To do so, open ItemActivity.java and override its onCreate options menu method.
Next, override the onOptionsItemSelected method so that we are notified when the user presses the button. Inside it, add an if statement and use getItemId to check if the id of the selected option matches the id of the save button, which is R.id.save_action.
Code to Open ItemActivity
Let us now write code to open ItemActivity when the user presses the floating action button. So open MainActivity.java. The floating action button already has an onClick event listener attached to it. It contains some placeholder code which you can delete. We will now use an Intent to launch ItemActivity.
Initialize the Intent using MainActivity as the context and ItemActivity as the class. When ItemActivity opens this way, its TITLE should be Add item. We can use an extra for this purpose. And finally call startActivity to actually launch ItemActivity.
Open ItemActivity.java now because we need to use the extra we send. So add a condition here to check if the return value of the getIntent method has an extra called TITLE. If the condition is true, use setTitle to change the title. Note that you must use the getStringExtra method to fetch the value of the extra.
Add a "Back" Icon
Let us now add this "back" icon to our activity.
To do that, open AndroidManifest.xml. Here, inside the tag for ItemActivity, add a parentActivityName attribute and set its value to MainActivity.
Run the App
We can now run our app to see what we have just created.
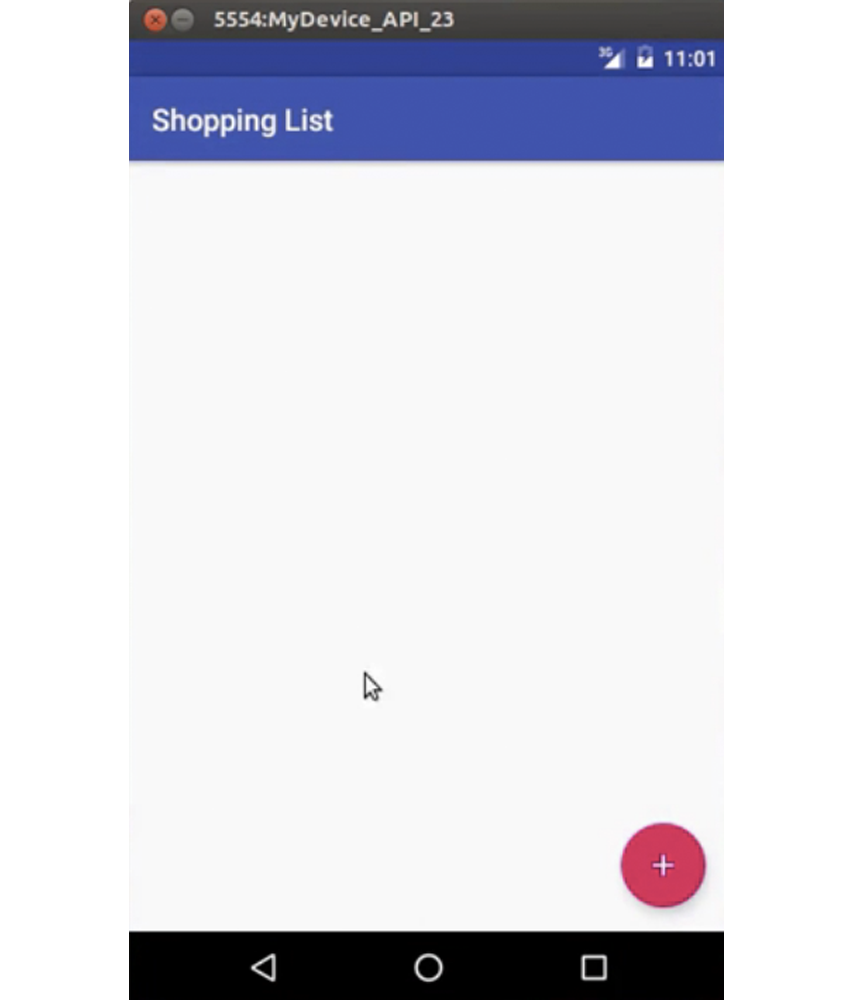
Our home screen now has a floating action button. If you click on it, you will be taken to ItemActivity.
And if you try typing something into the input widgets, you should be able to see their floating labels.
Conclusion
You now know how to create user interfaces which have floating action buttons and text input layouts. Now, before we finish up, let me give you a quick tip. If you don't like the default colors of the app, which are shades of indigo and pink, you can easily change them by simply going to colors.xml and changing the hex values for the colors here.
In the next lesson of the course, you are going to learn how to use another material design compliant UI widget called a recycler view.
Watch the Full Course
Google's material design has quickly become a popular and widely implemented design language. Many Android users now expect their apps to conform to the material design spec, and app designers will expect you to be able to implement its basic principles.
In the full course, Build a Material Design App, I'll show you how to build a practical, fully functional material design app that is ready to publish on Google Play. Starting from the app design created by instructor Adi Purdila in his course Getting to Know Material Design, you will learn how to work with the various material design UI widgets available in the Android Support library. You will also learn how to perform read and write operations on a modern mobile database called Realm.

Comments