In this article we'll take a look at how we can better integrate Chrome DevTools into our Sass development workflow.
Tutorial Sneak Peek!
Here's a peek of what we'll be doing in this tutorial via an animated GIF:
On the left is a terminal and the Sublime text editor, and on the right is Chrome. Changes to the .scss file are being persisted to disk, which is reflected in Sublime, the Sass watch command is generating a new version of a CSS file when it detects changes to the Sass file, which is in turn picked up by DevTools and reflected onto the page.
The Need for a Better Workflow
So what are we trying to solve here? Why would we want a better workflow? Well, let's review an example of debugging some Sass-generated CSS, given the following .scss file, which contains:
$myColor: green;

body {
	.box {
		color: $myColor;
	}
}
And now the CSS, which is generated by the above Sass file, would look like this:
body .box {
  color: green; }
Now we just need a little bit of HTML to apply our styling to:
<div class="box">Hello</div>
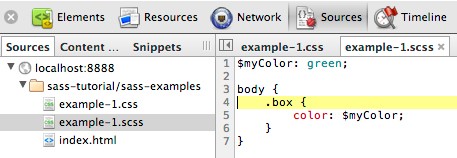
Ok, so far so good. Now we want to start designing and developing our page using Chrome DevTools. First we inspect the div with a class of box by right clicking on it and selecting Inspect Element. Then we can check out the styles pane, which shows a green value for the color property, a note on the filename it's contained within, along with the line number that the selector appears on. Now here's where the problem lies - the processed CSS does not follow, line for line, what the source .scss file looks like, which can have a negative impact on our development workflow.
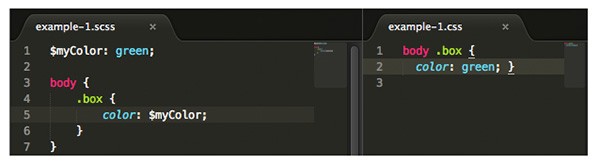
In the image above, the left pane shows a source .scss file and the right side shows the processed version. (Note I'm using the SCSS bundle for syntax highlighting in Sublime Text)
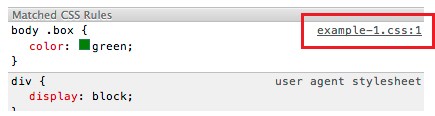
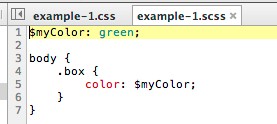
DevTools then provides a link to the file and line number of the selector, highlighted in red above, which unsurprisingly links to the processed file (image below). This now acts as a limitation for editing the file within DevTools as we can't benefit from file saving. For example, if we persist changes to the processed file, they'll just be overwritten when Sass next runs.
In fact, we don't even have a clear indication of what the corresponding line number is - of course, practically speaking, our above example is very simple and we can very quickly understand what line maps to what, by looking at the code. However in a larger .scss file, things can get trickier.
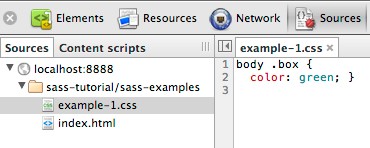
As you can see above, DevTools has no understanding of our .scss file, we can address this however by utilizing a DevTools and Sass workflow, which is what we'll be looking at in this tutorial. To summarize, a lack of Sass support in the DevTools could mean:
- We don't immediately know the line number a selector and/or CSS property exists on, within our source file.
- Persisting our CSS changes to the file system is pretty much out of the question.
- Even simply viewing the
.scssfile in the sources panel is difficult as DevTools doesn't recognize the extension as one which should be viewed.
Preparing for Sass Support
Chrome
Important: Sass support is an experimental feature. Please keep in mind that, while it has been around for a while now, things may change. If they do, we'll do our best to update this article, accordingly.
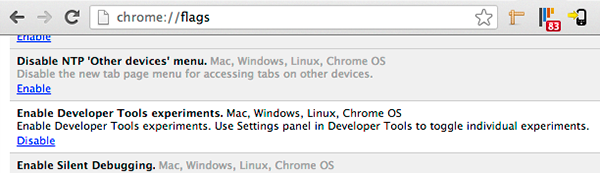
Now let's navigate to about:flags in the omnibox, then find Enable Developer Tools experiments, enable it and restart Chrome.
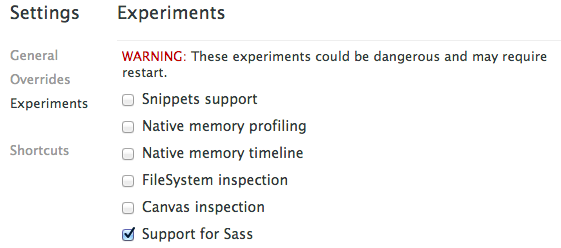
The image below shows an experiments panel, you can reach this by clicking on the cogwheel at the bottom right corner of DevTools and clicking 'Experiments', then check the box for Support for Sass.
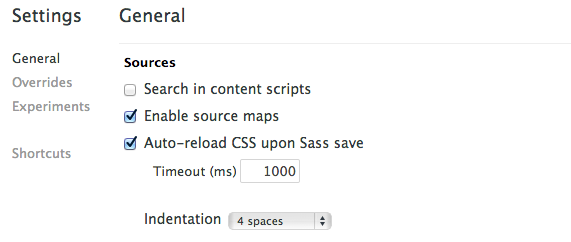
After closing and opening DevTools, you can now go to the General menu item in the left sidebar of the settings window and navigate to the Sources section, from there, check 'Enable source maps' and 'Auto-reload CSS upon Sass save'. The timeout can be left at the default value.
Sass
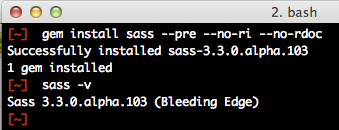
This tutorial uses the latest version of Sass (3.3.0 at the current time of this writing) as there is some initial support for source maps. Here's how you can install Sass using Rubygems:
gem install sass --pre
We now need to tell Sass to compile our .scss files, using the following command:
sass --watch --scss --sourcemap styles.scss:styles.css
From above, the styles.scss is your source file and the styles.css is the processed file, which your HTML page would use. Here's how you would link in the processed .css file:
<link rel="stylesheet" type="text/css" href="styles.css">
If you see something similar to the image below in your terminal:

...and you see a generated .map file, then, congratulations: Sass debugging is working! Here's what those other command options are doing from the previous compile command:
-
--watch: Will watch for changes to the source.scssfile and compile it as soon as it has detected a change. -
--scss: Will display what style of Sass we are using. -
--sourcemap: Will generate corresponding source map files.
Now, having an understanding of source maps isn't critical to follow along, however it's certainly something worth reading about as it's intended to help the development process. See below for a few resources on source maps:
- Introduction to JavaScript Source Maps on HTML5Rocks
- Source maps: languages, tools and other info on Github
- Source Maps 101 on Nettuts
From Elements to Sources
Assuming all went well, opening up your page where Sass support is enabled in DevTools should allow for Sass debugging. The first thing to note is that the filename will show the corresponding .scss source file, which is useful, in addition to that, the line number correctly reflects the line number in our source file.

Clicking on the filename will take you right to the sources panel with the line corresponding to the selector in question highlighted.
Note: You now have a viewable Sass file right in your browser with syntax highlighting!
Ok, so finding the corresponding CSS selector from the Elements panel is cool, but what about CSS properties?
In the screenshot below, the Sources panel has highlighted the CSS property I was interested in, to get there I had Command-Clicked on the property from within the Elements panel. The fact that it has taken me to the line where the value was defined (rather than the line: property: $value;) is very powerful!
Note: Navigating to a CSS property in the sources panel from command clicking the property in the Elements panel is not specific to Sass, it can be achieved with regular CSS too.
Sass Editing With Persistent Changes
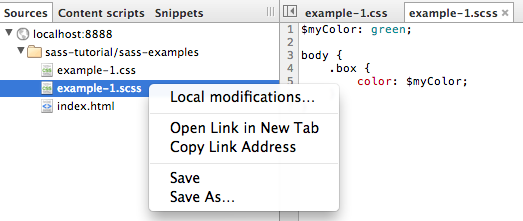
Editing a Sass file is not much different than editing a regular CSS file, one thing we will need to do however is ensure DevTools knows where the .scss file is located at on the file system. From within the Sources panel, the left hand sidebar should have a Sources pane which displays the .scss file, right click it and choose Save as, then overwrite the existing .scss source file.
Because we checked 'Auto-reload CSS upon Sass save' and because Sass is running in the terminal with the watch flag, changes are made pretty quickly and the DevTools are able to show us those changes.
Even mixins work as expected, pasting the following, in an almost empty .scss file within the sources panel results in the correct CSS being generated, which DevTools is able to reload from within a second.
@mixin button {
    border: 2px solid green;
    display: inline-block;
    padding: 10px;
    border-radius: 4px;
}

.box {
    @include button;
}
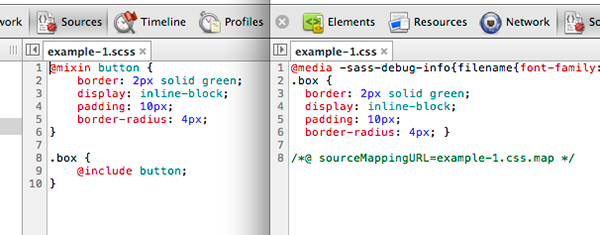
As you can see in the image above, the left hand side shows the .scss source file, which is what we would make changes to, the right hand side shows the generated .css file which DevTools has picked up changes from (almost immediately thanks to the watch flag in the terminal)
Sass Debugging at Fluent Conf
Paul Irish gave a great talk at Fluent which had lots of juicy information on the Chrome DevTools, but also the use of Sass. Skip ahead to 5:30 for the Sass information.
Summary
Let's go over some of the main points discussed in this tutorial:
- Sass capabilities in Chrome DevTools are a great way to view and modify Sass resources, although don't forget to enable it in both about:flags and in the settings panel.
- When using Sass and the Chrome DevTools in a project, you're likely to have a more efficient workflow with viewing/editing the source file, rather than the generated file.
- CSS properties in the elements panel can be Command-clicked, the file name displayed to the right of the selector is also clickable. Both will take you to the relevant portion in the sources panel.
- Utilize the Sources panel's editing capabilities by doing a 'Save as' on the
.scssfile, future saves (Command+S) should overwrite the file. - Chrome Canary and the latest version of Sass 3.3.0 (due to Source maps) were used in this tutorial, be sure to try them out!
Interesting links
As you can see, the development workflow with Sass is not perfect, but it's definitely a lot better than what it used to be. As time goes on, DevTools will provide a more streamlined workflow for editing CSS files and bugs will be fixed! Any issues you do find can be raised as a bug at crbug.com.
- Debug LESS With Chrome Developer Tools by Rob Dodson
- Changeset: Web Inspector: SASS source mapping
- The Breakpoint Ep. 2 - At about 3 minutes in, it has a Sass demo
- Using Sass source maps in WebKit Inspector - On bricss.net
- Debugging Sass with Source Maps - By @Snugug
Thanks for reading this article!
Like what you've learned? Learn More About Chrome DevTools!

Comments