The WordPress Customizer has been actively developed since its inception. The APIs are continually evolving, including the JavaScript API. However, it is one of the least documented APIs in the WordPress Codex. Hence there are only a few extensive records that show how to leverage the JavaScript API practically.
Leveraging the JavaScript API in the WordPress Customizer can actually enable us to serve a more compelling real-time experience while customizing the theme beyond casting the change from the Control to the Preview window.
You may be familiar with how the Customizer JavaScript API is being used to cast a change to the Preview window in real time. To do so, we set the Setting transport mode to postMessage and add the corresponding JavaScript code, as follows.
wp.customize( 'blogname', function( value ) {
	value.bind( function( to ) {
		$( '.site-title a' ).text( to );
	} );
} );
However, we can also stretch the API further to, for example, hide, show, or move a Section, Panel, a Control, change the value of a Setting based on another Setting value, and interconnect the Preview and the Control interactions. And these are what we are going to look into in this tutorial.
A Quick Primer
We have covered the WordPress Customizer quite extensively with a handful articles and a couple of series covering the ins and outs of the Customizer APIs.
I assume you have grasped the core concept of the WordPress Customizer as well as the components such as Panel, Section, Setting, and Control. Otherwise, I highly recommend that you spend some time on our tutorials and video courses on the subject before stepping even further.
- A Guide to the WordPress Theme Customizer
- The WordPress Theme Customizer
- Write Customizer-Ready WordPress Themes
The Settings and Controls
To begin with, we'll examine the "Settings" and "Controls" in the Customizer that we have added for the purpose of this tutorial. We will also look into the code that puts them in their place.
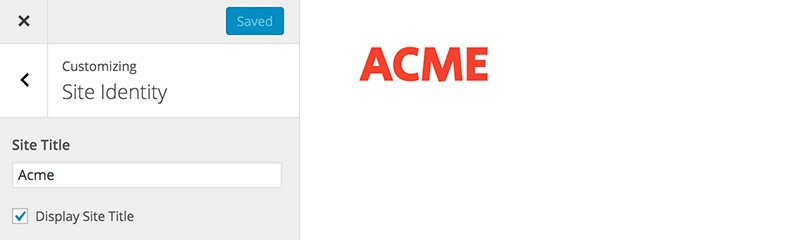
In this tutorial, we will be focusing on the website "Site Title". And as you can see above, we have two Controls: the native WordPress "Site Title" input field and our custom checkbox to enable or disable the "Site Title". These two Controls reside in the "Site Identity" section. And on the right side of the image is the Preview, where you can see the "Site Title" being rendered.
Furthermore, as you can see below, we also have two Controls that reside in the Colors section to change the "Site Title" color and its hover state color.

The Underlying Code
Our theme herein is based on Underscores, which has all the Customizer-related code placed in the /inc/customizer.php file.
function tuts_customize_register( $wp_customize ) {

	$wp_customize->get_setting( 'blogname' )->transport = 'postMessage';

	$wp_customize->get_setting( 'blogdescription' )->transport = 'postMessage';
	$wp_customize->get_control( 'blogdescription' )->priority = '12';

	$wp_customize->get_setting( 'header_textcolor' )->default = '#f44336';
	$wp_customize->get_setting( 'header_textcolor' )->transport = 'postMessage';

	// Checkbox to Display Blogname
	$wp_customize->add_setting( 'display_blogname', array(
		'transport' => 'postMessage',
	) );

	$wp_customize->add_control( 'display_blogname', array(
		'label'     => __( 'Display Site Title', 'tuts' ),
		'section'   => 'title_tagline',
		'type'      => 'checkbox',
		'priority'  => 11,
	) );

	// Add main text color setting and control.
	$wp_customize->add_setting( 'header_textcolor_hover', array(
		'default'           => '#C62828',
		'sanitize_callback' => 'sanitize_hex_color',
		'transport'         => 'postMessage',
	) );

	$wp_customize->add_control( new WP_Customize_Color_Control( $wp_customize, 'header_textcolor_hover', array(
		'label'    => __( 'Header Text Color: Hover', 'tuts' ),
		'section'  => 'colors',
		'priority' => '11'
	) ) );
}
add_action( 'customize_register', 'tuts_customize_register' );
And as you can see above, we have made a few modifications to the code, adhering to our need in this tutorial.
- We lower the WordPress built-in Setting,
blogdescription, to12so that the checkbox Setting,display_blogname, appears below the "Site Title" input field. - We create a new Control named
display_blogname. We set thepriorityto11which, in our case, resides between the "Site Title" and the "Tagline" input field. - Set the
header_textdefault color to#f44336and thetransporttype topostMessage. - We also create a new Setting,
header_text_color. Similarly, we also set the priority to11so that it appears just below theheader_textcolorSetting.
All these Settings are set with postMessage instead of with refresh. The postMessage option allows the value to be transported asynchronously and displayed in the Preview window in real time. However, we will also have to write our own JavaScript to handle the change.
Loading JavaScript
We need to create two JavaScript files: one file, customizer-preview.js, to deal with the Preview and the other file, customizer-control.js, to handle the Controls inside the Customizer panel.
js
├── customizer-preview.js // 1. File to handle the Preview
├── customizer-control.js // 2. File to handle the Controls
├── navigation.js
└── skip-link-focus-fix.js
Within customizer-preview.js is the following code.
( function( $ ) {
	// Codes here.
} )( jQuery );
It is currently an empty enclosed JavaScript function. We will discuss more specifically how we preview changes in the Preview window in the next tutorial of this series.
In the other file, customizer-control.js, we add the following code:
(function( $ ) {
	wp.customize.bind( 'ready', function() {
		var customize = this;
		// Codes here
	} );
})( jQuery );
As you can see above, we will wrap the code in this file upon the Customizer ready event. This will ensure everything within the Customizer is fully ready, including the Settings, Panels, and Controls, before we begin executing any customized functions.
Finally, once we have added the code, we will load these two JavaScript files in two different locations.
// 1. customizer-preview.js
function tuts_customize_preview_js() {
	wp_enqueue_script( 'tuts_customizer_preview', get_template_directory_uri() . '/js/customizer-preview.js', array( 'customize-preview' ), null, true );
}
add_action( 'customize_preview_init', 'tuts_customize_preview_js' );

// 2. customizer-control.js
function tuts_customize_control_js() {
	wp_enqueue_script( 'tuts_customizer_control', get_template_directory_uri() . '/js/customizer-control.js', array( 'customize-controls', 'jquery' ), null, true );
}
add_action( 'customize_controls_enqueue_scripts', 'tuts_customize_control_js' );
The customizer-preview.js file will be loaded within the Customizer Preview window through the customize_preview_init Action hook. The customizer-control.js file will be loaded in the Customizer back-end, where the Setting and Control elements are accessible through the customize_controls_enqueue_scripts Action hook.
What's Next?
WordPress has been heavily invested in PHP since its inception. Thus, it won't be a surprise that the majority of developers supporting the ecosystem are more proficient and familiar with the PHP APIs than the JavaScript APIs.
It is only recently that it has integrated JavaScript extensively through the Customizer and WP-API. Grasping the JavaScript APIs in the WordPress Customizer can be quite a challenge. As mentioned, it is the side of WordPress that is currently least documented. Therefore, we will go through this subject thoroughly.
In the meantime, if you're looking for other utilities to help you build out your growing set of tools for WordPress or for code to study and become more well-versed in WordPress, don't forget to see what we have available in Envato Market.
Herein we have prepared all the essential elements to work with WordPress JavaScript APIs. And we will end here. In the next part of the series, we will uncover more what lies beneath the JavaScript APIs in WordPress, and start writing functional scripts that you can immediately implement in your theme.
Stay tuned!

Comments