
For those who are familiar with WooCommerce, you may also be aware of its sale-flash functionality. This is primarily used to display when an item is on sale.
In this tutorial, we're going to take a look at how we can customize and improve the WooCommerce sale-flash display to show the effective discount percentage and to change the color of the label based on said percentage.
WooCommerce’s sale-flash is visualized in the archives and single pages for the sale products, i.e. the products that have a Sale Price lower than the Regular Price.

In the current system, users can’t perceive the Dimension—or quality—of the discount.
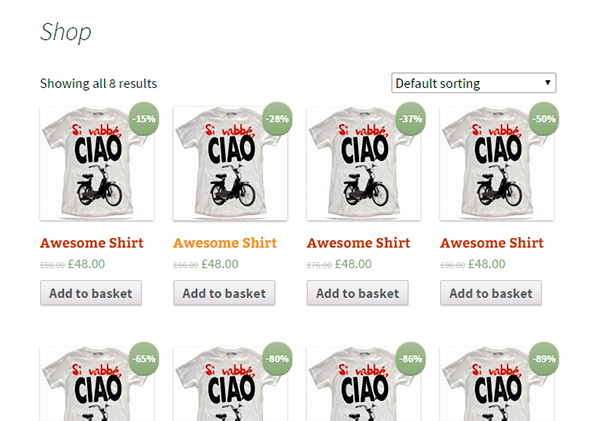
For example, a 70% discount is more attractive than a 15% one, but they are both displayed by WooCommerce with a simple sale-flash on the product image. In order to solve this problem, we will modify the algorithm that controls the sale-flash so that its content (Sale) will be overwritten by the effective discount percent.
Modifying the Sale-Flash
The file that generates the sale-flash is located in the following folder:
your-site/wp-content/plugns/woocommerce/templates/loop/sale-flash.php
Usually, it’s not such a good idea to change plugin files because all the changes will be lost during the first update, and disabling updates is not an option.
Fortunately, we can make as many changes as we like on the WooCommerce templates without compromising the integrity of the plugin, simply by copying the file in a sub-folder of our theme that we’ll call woocommerce. In our case, we copy the sale-flash.php file, which is located in:
your-site/wp-content/yourtheme/woocommerce/loop/sale-flash.php
Every file inside the WooCommerce folder has priority over the original template files of the plugin. This way we can be sure that by updating WooCommerce we don’t lose any of our changes.
Note that if you’re using a child theme, the file has to be copied in the same sub-folder of the child theme.
Also note that if your theme already has a file yourtheme/woocommerce/loop/sale-flash.php then it is very likely that it already modifies the original behavior of the sale-flash. In this case there are two solutions:
- Overwrite this file with the original file that you find in the plugin folder and continue modifying it by following this tutorial.
- Try to adapt this tutorial to your needs.
Let’s take a look at the sale-flash.php file:
<?php global $post, $product; ?>

<?php if ( $product->is_on_sale() ) : ?>
    <?php echo apply_filters( 'woocommerce_sale_flash', '<span class="onsale">' . __( 'Sale!', 'woocommerce' ) . '</span>', $post, $product ); ?>
<?php endif; ?>
The code is very simple: it generates a span tag with the text “SALE” every time an object is on sale. All that we have to do is to make the following changes to the code:
<?php
    if ( ! defined( 'ABSPATH' ) ) exit; // Exit if accessed directly
    global $post, $product;
    if ( ! $product->is_in_stock() ) return;
    $sale_price = get_post_meta( $product->id, '_price', true);
    $regular_price = get_post_meta( $product->id, '_regular_price', true);
    if (empty($regular_price)){ //then this is a variable product
        $available_variations = $product->get_available_variations();
        $variation_id=$available_variations[0]['variation_id'];
        $variation= new WC_Product_Variation( $variation_id );
        $regular_price = $variation ->regular_price;
        $sale_price = $variation ->sale_price;
    }
    $sale = ceil(( ($regular_price - $sale_price) / $regular_price ) * 100);
?>
<?php if ( !empty( $regular_price ) && !empty( $sale_price ) && $regular_price > $sale_price ) : ?>
    <?php echo
        apply_filters( 'woocommerce_sale_flash', '<span class="onsale">-' . $sale . '%</span>', $post, $product );
    ?>
<?php endif; ?>
Code Summary
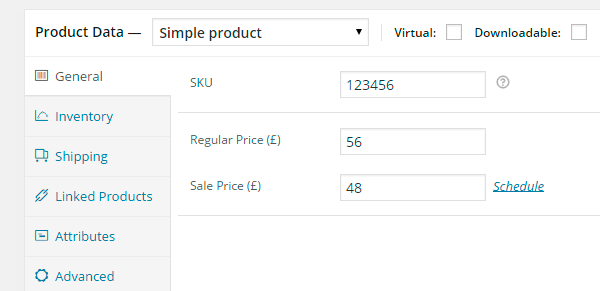
The first thing we have to do is calculate the discount, and in order to do that we’ll need the Regular Price and the Sale Price. For simple products and grouped products, we can get this information by simply using the two meta fields: _price and _regular_price (see rows 5 and 6).
If the obtained Regular Price is empty, then we are talking about a variable product, and in this case we’ll have to do as it follows:
- Obtain the ID of the first available variation (rows 8 and 9).
- Load the variation (row 10).
- Extract the information we need, the Regular Price and the Sale Price (rows 11 and 12).
At this point, all we need to do is apply a simple formula to calculate the discount, using the Regular Price and the Sale Price. To make it simpler we could avoid using decimals by rounding off the number to the closest integer using the ceil(num) function, as in the example I’ve just shown you, or by truncating to the closest smaller number using the floor(num) function.
Changing the Color of the Sale-Flash
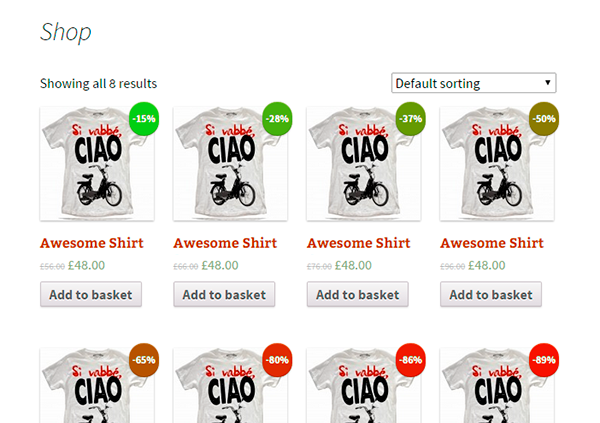
We can add some color to our solution by using a chromatic scale to represent the discount percentage. Green is 0% and red is 100%.
The two colors have the following RGB codes:
- Red: 255, 0, 0
- Green: 0, 255, 0
With these simple formulas we can add to the red channel and take from the green channel.
The blue channel remains unchanged; it will always be zero.
R = (255 * sale) / 100G = (255 * (100 - sale)) / 100B = 0
Once we have the red and green values, we can modify the sale-flash background by adding the rule directly to the span tag.
The full code is the following:
<?php
    if ( ! defined( 'ABSPATH' ) ) exit; // Exit if accessed directly
    global $post, $product;
    if ( ! $product->is_in_stock() ) return;
    $sale_price = get_post_meta( $product->id, '_price', true);
    $regular_price = get_post_meta( $product->id, '_regular_price', true);
    if (empty($regular_price)){ //then this is a variable product
        $available_variations = $product->get_available_variations();
        $variation_id=$available_variations[0]['variation_id'];
        $variation= new WC_Product_Variation( $variation_id );
        $regular_price = $variation ->regular_price;
        $sale_price = $variation ->sale_price;
    }
    $sale = ceil(( ($regular_price - $sale_price) / $regular_price ) * 100);
?>
<?php if ( !empty( $regular_price ) && !empty( $sale_price ) && $regular_price > $sale_price ) : ?>
    <?php
        $R=floor((255*$sale)/100);
        $G=floor((255*(100-$sale))/100);
        $bg_style = 'background:none;background-color: rgb(' . $R . ',' . $G . ',0);';
    ?>
    <?php echo
        apply_filters( 'woocommerce_sale_flash', '<span class="onsale" style="'. $bg_style .'">-' . $sale . '%</span>', $post, $product );
    ?>
<?php endif; ?>
And the result:
Final Notes
Setting the Background
For those who have been following along, you may be asking why we set the background:none before setting the background-color?
In this specific case, the style sheet had a rule for the background property that always had priority over the background-color. The correct way of doing this would have been to change the style sheet and overwrite or cancel the rule that sets the background of the sale-flash.
Generally speaking, you should select the proprieties and the style rules that you want to override or change with tools like Firebug. Once you understand where and what to change, you must try not to use inline styles. Instead, try to use an external style sheet.
What About the Background Color?
In this case, we have an exception to the rule. The RGB code is calculated through a very simple algorithm and you could always change the algorithm by changing a few lines of PHP code instead of changing hundreds of CSS classes.
Conclusion
At this point, the customization of the sale-flash is done. We've modified the template that does the visualization of the relevant label.
Rather than modifying the original file that is located in the plugin folder, we used a copy in our theme folder in order to safeguard the changes we just made in the event of updates to the plugin.
Generally this is a rule that is valid for all the files in the template folder of the WooCommerce plugin. I hope you've found this tutorial useful not only to improve the sale-flash's behavior but also to better comprehend how some of the WooCommerce mechanisms work.

Comments