This series is focused on tips and strategies that we can employ to write WordPress plugins - specifically those that employ meta boxes - that are logically organized and easy to maintain.
In the first two posts of the series, we laid out the initial directory structure, setup the code for the plugin, and discussed what the plugin will do. In the last post, we began to create the meta box and introduce the tabs that will contain each of the features that we're going to work.
This article will continue building on what we've done thus far. We're going to be introducing content in each of the tabs, implementing functionality that allows us to toggle said content, and we'll begin introducing the fields for content on the first tab.
Tab Templates
Before we go about implementing the tabs that will toggle between all of the able options, we need to introduce partials, templates, views, or whatever you'd like to call them so that we have files specifically for handling our information.
First, navigate to the admin/views/partials directory and add the following files (all of which can be empty, for now though I've provided some basic code below):
drafts.phpresources.phppublished.php
Each of these files will correspond to one of the tabs in the meta boxes interface. Let's go ahead and introduce some placeholder content for each of the tabs. Before we're done with the article, we'll implement the UI of the first tab, but this will give us something visual with which to work before we continue working on the actual tab functionality.
1. Drafts
Add the following code to drafts.php.
<?php

/**
 * Provides the 'Drafts' view for the corresponding tab in the Post Meta Box.
 *
 * @link       http://code.tutsplus.com/tutorials/creating-maintainable-wordpress-meta-boxes-the-front-end--cms-22383
 * @since      0.3.0
 *
 * @package    Authors_Commentary
 * @subpackage Authors_Commentary/admin/partials
 */
?>

<div class="inside">
    <p>This is where the Draft content will reside.</p>
</div>
We'll be taking a look at this partial later in the article.
2. Resources
Add the following code to resources.php.
<?php

/**
 * Provides the 'Resources' view for the corresponding tab in the Post Meta Box.
 *
 * @link       http://code.tutsplus.com/tutorials/creating-maintainable-wordpress-meta-boxes-the-front-end--cms-22383
 * @since      0.3.0
 *
 * @package    Authors_Commentary
 * @subpackage Authors_Commentary/admin/partials
 */
?>

<div class="inside">
    <p>This is where the Resources content will reside.</p>
</div>
We'll be taking a look at this partial later in the series.
3. Published
Add the following code topublished.php.
<?php

/**
 * Provides the 'Published' view for the corresponding tab in the Post Meta Box.
 *
 * @link       http://code.tutsplus.com/tutorials/creating-maintainable-wordpress-meta-boxes-the-front-end--cms-22383
 * @since      0.3.0
 *
 * @package    Authors_Commentary
 * @subpackage Authors_Commentary/admin/partials
 */
?>

<div class="inside">
    <p>This is where the Published content will reside.</p>
</div>
We'll also be taking a look at this partial later in the series.
Update The Main View
We have one more thing to do before we test this out in the WordPress Dashboard: We need to actually include these files in the meta box view so that we can see the information.
This is simple to do. First, open authors-commentary-navigation.php. Add the following code to the file (note that all of the new code is a series of include_once statements).
<div id="authors-commentary-navigation">

    <h2 class="nav-tab-wrapper current">
		<a class="nav-tab nav-tab-active" href="javascript:;">Draft</a>
		<a class="nav-tab" href="javascript:;">Resources</a>
		<a class="nav-tab" href="javascript:;">Published</a>
	</h2>

	<?php
		include_once( 'partials/drafts.php' );
		include_once( 'partials/resources.php' );
		include_once( 'partials/published.php' );
	?>
</div>
Assuming that you created all of your files and included them correctly, we're ready to take a look at the Dashboard. If all has been implemented correctly, you should see something like this:
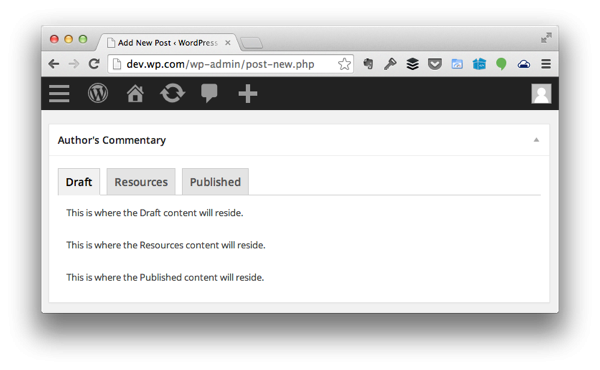
Obviously, we don't want all of the content showing up in the first tab, so we need to make some changes. So let's do that.
Hide Inactivate Views
Ultimately, our goal is to use as built-in styles and functions that WordPress provides. Each time you introduce something that's outside the core WordPress functionality that's something that you're going to be responsible for maintaining over time.
On top of that, you're also working to create a plugin that's as tightly integrated with the WordPress UI as possible. That end, we'll be using a combination of built-in styles and custom styles and JavaScript to achieve exactly what it is that we're hoping to achieve.
We know that the first thing that we want to do is to hide everything except the first view (that is, everything except Drafts).
To do this, we need to add a class attribute of hidden to the partials for the Resources tab and to the Published tab.
Each of the following files should look like this:
drafts.php:
<?php

/**
 * Provides the 'Drafts' view for the corresponding tab in the Post Meta Box.
 *
 * @link       http://code.tutsplus.com/tutorials/creating-maintainable-wordpress-meta-boxes-the-front-end--cms-22383
 * @since      0.3.0
 *
 * @package    Authors_Commentary
 * @subpackage Authors_Commentary/admin/partials
 */
?>

<div class="inside">
    <p>This is where the Draft content will reside.</p>
</div>
resources.php:
<?php

/**
 * Provides the 'Resources' view for the corresponding tab in the Post Meta Box.
 *
 * @link       http://code.tutsplus.com/tutorials/creating-maintainable-wordpress-meta-boxes-the-front-end--cms-22383
 * @since      0.3.0
 *
 * @package    Authors_Commentary
 * @subpackage Authors_Commentary/admin/partials
 */
?>

<div class="inside hidden">
    <p>This is where the Resources content will reside.</p>
</div>
published.php:
<?php

/**
 * Provides the 'Published' view for the corresponding tab in the Post Meta Box.
 *
 * @link       http://code.tutsplus.com/tutorials/creating-maintainable-wordpress-meta-boxes-the-front-end--cms-22383
 * @since      0.3.0
 *
 * @package    Authors_Commentary
 * @subpackage Authors_Commentary/admin/partials
 */
?>

<div class="inside hidden">
    <p>This is where the Published content will reside.</p>
</div>
And the result of this minor change should be the following:
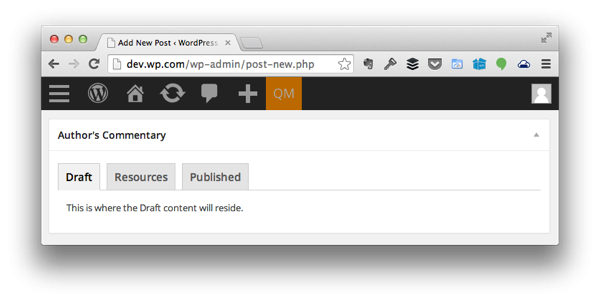
Easy, right? This is exactly why I recommend sticking with the core WordPress functionality and styles as much as possible.
Toggling The Tabs
Of course, we still need to introduce the code for toggling the data among the tabs, right? So let's do that now.
First, we need to make sure that the first tab is mark as active. Assuming you've been following along with this tutorial and its corresponding GitHub repository, then your code should look like this:
<h2 class="nav-tab-wrapper current">
    <a class="nav-tab nav-tab-active" href="javascript:;">Draft</a>
	<a class="nav-tab" href="javascript:;">Resources</a>
	<a class="nav-tab" href="javascript:;">Published</a>
</h2>
Which is great because it already marks your first tab as active with using the nav-tab-active class attribute. We have our work cut out for us:
- When the user clicks on a tab, it marks the current tab as active and removes the active class from any other tabs. If you click on an active tab, nothing happens.
- When a new active tab is selected, then the corresponding partial should display.
Now, there are a number of ways to accomplish step two. We'll be doing it in one way that's documented and explained in the course of this article, but know that there are other alternatives that you're likely to see and that they are not necessarily wrong.
The bottom line is there are a number of ways to handle this, we're handling it one of the many ways that are available.
So first, let's add a JavaScript file to admin/assets/js and we'll call is tabs.js. The skeleton for the file should look like the following:
(function( $ ) {
    'use strict';

	$(function() {

	});

})( jQuery );
Next, make sure that we're importing the JavaScript on post pages only. To do this, we introduce a hook into our constructor where we've already included some stylesheets. The full constructor is below:
<?php

/**
 * Initialize the class and set its properties.
 *
 * @since    0.1.0
 * @var      string    $name       The name of this plugin.
 * @var      string    $version    The version of this plugin.
 */
public function __construct( $name, $version ) {

    $this->name = $name;
    $this->version = $version;

    $this->meta_box = new Authors_Commentary_Meta_Box();

    add_action( 'admin_enqueue_scripts', array( $this, 'enqueue_admin_styles' ) );
    add_action( 'admin_enqueue_scripts', array( $this, 'enqueue_admin_scripts' ) );

}
And then we implement the function:
<?php

/**
 * Includes the JavaScript necessary to control the toggling of the tabs in the
 * meta box that's repretented by this class.
 *
 * @since    0.2.0
 */
public function enqueue_admin_scripts() {

    if ( 'post' === get_current_screen()->id ) {

		wp_enqueue_script(
			$this->name . '-tabs',
			plugins_url( 'authors-commentary/admin/assets/js/tabs.js' ),
			array( 'jquery' ),
			$this->version
		);

	}

}
At this point, we have everything we need in order to implement the JavaScript to control the tabs. Below, you'll find the commented code for that and a short explanation following the code snippet, as well:
(function( $ ) {
    'use strict';

	$(function() {

		// Grab the wrapper for the Navigation Tabs
		var navTabs = $( '#authors-commentary-navigation').children( '.nav-tab-wrapper' ),
			tabIndex = null;

		/* Whenever each of the navigation tabs is clicked, check to see if it has the 'nav-tab-active'
		 * class name. If not, then mark it as active; otherwise, don't do anything (as it's already
		 * marked as active.
		 *
		 * Next, when a new tab is marked as active, the corresponding child view needs to be marked
		 * as visible. We do this by toggling the 'hidden' class attribute of the corresponding variables.
		 */
		navTabs.children().each(function() {

			$( this ).on( 'click', function( evt ) {

				evt.preventDefault();

				// If this tab is not active...
				if ( ! $( this ).hasClass( 'nav-tab-active' ) ) {

					// Unmark the current tab and mark the new one as active
					$( '.nav-tab-active' ).removeClass( 'nav-tab-active' );
					$( this ).addClass( 'nav-tab-active' );

					// Save the index of the tab that's just been marked as active. It will be 0 - 3.
					tabIndex = $( this ).index();

					// Hide the old active content
					$( '#authors-commentary-navigation' )
						.children( 'div:not( .inside.hidden )' )
						.addClass( 'hidden' );

					$( '#authors-commentary-navigation' )
						.children( 'div:nth-child(' + ( tabIndex ) + ')' )
						.addClass( 'hidden' );

					// And display the new content
					$( '#authors-commentary-navigation' )
						.children( 'div:nth-child( ' + ( tabIndex + 2 ) + ')' )
						.removeClass( 'hidden' );


				}


			});
		});

	});

})( jQuery );
Just in case the code comments aren't clear, the above code setups up an event handler for all of the tabs. When a tab is clicked, it looks to see if it has the nav-tab-active class. If so, then nothing happens.
Otherwise, we toggle the tab and hide the content that was active and display the new content by removing the hidden class name that we added earlier in the article.
By now, you should be able to switch between tabs and see each of the three different implementations without any problem. With that said, let's go ahead and move on to implementing the functionality for the first tab.
Adding The Drafts UI
Though we won't complete the full functionality during this tutorial, we'll have our work cut out for us in the following article. Let's assume that for the purposes of this plugin, the Drafts UI will be a place where the user simply treats it like a scratch pad for ideas.
It may include links to articles, links to tweets, short notes about the outline, a few sentences, and so on. Generally, it serves as a "catch-all" for all of the artifacts that the author may be using throughout his or her post.
To that end, we're going to use a simple, single textarea. Furthermore, we don't want to introduce any more UI elements than are necessary so we will not be introducing a submit button. Instead, we'll save the data whenever the user clicks "Update" on the post editor.
That way, everything is saved all at the same time.
Again, we won't be getting into the validation, sanitization, and serialization process, but we will be placing a text area within the Drafts partial to get us in a nice place for the follow up article.
Open drafts.php, add the following code, and your final code should look like this:
<?php

/**
 * Provides the 'Drafts' view for the corresponding tab in the Post Meta Box.
 *
 * @link       http://code.tutsplus.com/tutorials/creating-maintainable-wordpress-meta-boxes-the-front-end--cms-22383
 * @since      0.3.0
 *
 * @package    Authors_Commentary
 * @subpackage Authors_Commentary/admin/partials
 */
?>

<div class="inside">
    <textarea id="authors-commentary-drafts"></textarea>
</div>
After that, update the admin.css file to make sure the textarea fits in well with the rest of the meta box:
#authors-commentary-drafts {
    width:  100%;
    height: 250px;
}
Now, when you view the meta box, you should see a well-formatted textarea with the meta box with tabs that function when clicked.
Coming Up Next...
In the next article, we'll continue to implement the user interface for each of the tabs that exist in the meta box.
Then, we'll begin the process of sanitization, serialization, and validation as we begin to actually save information that the user puts into the meta box. We'll also move forward with introducing additional fields into the plugin.
Until then, check out the GitHub repository (we're now up to 0.3.0 of the plugin), and please feel free to leave all comments and questions in the feed below and I'll follow-up as soon as possible.

Comments