As we begin the final article in the series on creating custom WordPress administration pages in WordPress, I think it's important to reiterate that this is not meant to say we should be circumventing the Settings API (or any of the native APIs).
In fact, each API has its place, and we obviously use many of them through this code. But there are likely to be times where you're working on a custom plugin or custom application and you need to be able to implement a bit of your own custom validation, serialization, routing, and so on.
And that's what we've been doing throughout this series. So as we move forward in completing our plugin, I want to make sure that you understand I'm not advocating circumventing any of the native APIs. I'm advocating using what APIs are available for the requirements of your project.
For Your Review
At this point, I'm assuming you're caught up with the previous articles. If not, you're likely going to have a hard time understanding where we've come from and why we're making some of the decisions we are making as it relates to code.
Furthermore, you're going to miss out on some of the principles we've previously discussed. In short, I recommend catching up and then returning to this article.
Before We Start
With that said (and speaking of requirements), there are just a few more things we need to wrap up as it relates to this plugin.
Specifically, we need to:
- retrieve the information from the database
- validate the information
- display it on the dashboard
- display the information on the front-end
Luckily, the majority of the work has been done for us. We've got all of the information we need in the database. At this point, it's a matter of introducing functionality that will do something with that data.
As usual, I assume that you have the latest version of the source code and you're ready to continue with this series adding to it the remaining bit of code.
With that said, let's get started.
Completing the Plugin
Before we begin writing code, I want to make it clear that the code that we're going to write is straightforward, but there's a level of refactoring we may need to introduce once we get to the point of making the information available on both the back-end and the front-end.
That's a good thing, though.
Not only will it give us a chance to think critically about the organization of our code, but it will also expose us to some additional object-oriented techniques that we haven't seen throughout the tutorial series thus far.
With that in mind, let's work to retrieve the information from the database.
Retrieve Information From the Database
Grabbing the information from the database is a simple process. Since we've previously worked with functions like update_option, this should be very easy.
We're going to be working with get_option. It only requires a single argument, and that is the ID or the key that we used to store the information. In our case, that's tutsplus-custom-data. If you want to get creative, you can pass an optional second argument that will be returned if the information isn't found.
For the sake of showing how this can be used, I'll have the function return an empty string so that we have something valid to display to the user (even if it's nothing). The snippet of code for doing this looks like this:
<?php

$data = get_option( 'tutsplus-custom-data', '' );
But this raises two questions:
- Where does this go (especially if we're going to render this in two places in the plugin)?
- Shouldn't we validate this information?
We'll look at the first question a little bit later in the tutorial. First, let's talk about validation.
Validate the Information
There's a lot that can be said about validation in WordPress. But to keep this tutorial as straightforward as possible, we're going to talk about input validation. After all, we're dealing with user input via an input element, so it makes sense.
You can read all about it in the Codex, but input validation is often defined as the following:
Data validation is the process of ensuring that a program operates on clean, correct and useful data.
In the last article, we covered the topic of sanitization, which is basically making sure that data is clean before being inserted into the database. Similarly, validation is ensuring that it's clean, safe, and readable for our users.
To that end, it's not enough just to grab the information from the database. We need to validate it, as well. In the case of our plugin, the data is simple enough that it might seem like overkill to validate it; however, the purpose of the exercise is to help develop the mindset for how we need to go about sanitizing, saving, retrieving, validating, and displaying data.
Validation Techniques
And just as is the case with sanitization, WordPress offers some functions that make validation easy, especially as it relates to input validation. In this situation, we can be as aggressive as we like.
In our case, it might be enough just to use esc_attr when rendering the options. If we've permitted users to input any type of HTML, then we may want to use wp_kses.
The latter function may require a tutorial all on its own, especially if you're new to WordPress, so we're going to stick with the former for our purposes.
Deserialization
Earlier in the project, we created a class specifically for saving information to the database. We called this class Serializer. For those who don't recall exactly what it does:
- The class defines a function that fires on the
admin_posthook and saves the information that's sent to the server. - The function verifies that the information is safe to save and the user has permission to save to the database.
- The function sanitizes the data and writes it to the database.
But we don't want to overload that class with a responsibility that doesn't make sense. And since we're going to be displaying this information on both the options page and the front-end of the site, it would stand to reason that we have a class for deserializing the value and making it accessible to the entire WordPress application.
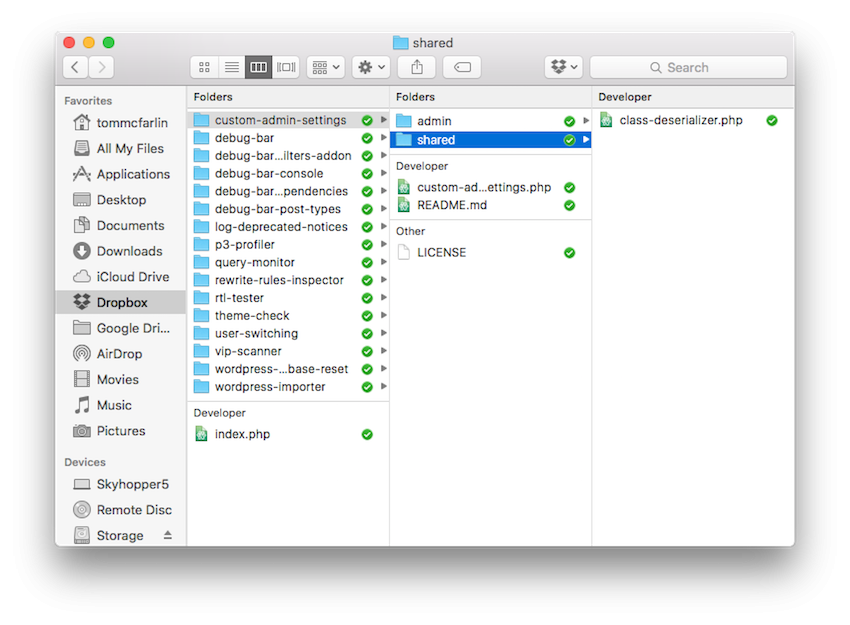
So in the root of your plugin directory, create a shared directory and add a file called class-deserializer.php.
Next, we want our code to be set up so that it:
- is based on object-oriented principles
- retrieves the information for which it's asked
- validates the information
- returns it to the caller
To that end, the initial skeleton of the class may look something like this:
<?php

class Deserializer {

    public function get_value( $option_key ) {
    }
}
It's simple, to be sure. We'll be adding more code to it throughout this tutorial, but remember the single responsibility principle, and this is a class that must be used between two parts of the WordPress application.
Notice that in the code above, we've defined three functions. Let's discuss what each one will do:
-
get_valuewill use the incoming option key which, in our case istutsplus-custom-data, and will return the value to the caller. As per the WordPress Coding Standards, we need to use "late escaping" to make sure we're properly validating the information. We'll see this play out momentarily.
With that said, let's go ahead and stub out the functions. I'll also provide PHP DocBlocks to explain what each function does.
<?php
/**
 * Retrieves information from the database.
 *
 * @package Custom_Admin_Settings
 */

/**
 * Retrieves information from the database.
 *
 * This requires the information being retrieved from the database should be
 * specified by an incoming key. If no key is specified or a value is not found
 * then an empty string will be returned.
 *
 * @package Custom_Admin_Settings
 */
class Deserializer {

    /**
     * Retrieves the value for the option identified by the specified key. If
     * the option value doesn't exist, then an empty string will be returned.
     *
     * @param  string $option_key The key used to identify the option.
     * @return string             The value of the option or an empty string.
     */
    public function get_value( $option_key ) {
        return get_option( $option_key, '' );
    }
}
At this point, the above code should be easy to follow given the bulleted points above and the comments within the code.
Show It on the Options Page
In order to show this on the options page, we need to revisit the way we're instantiating the Submenu_Page in the custom-admin-settings.php file. Specifically, we need to instantiate the deserializer and pass it into the constructor of the Submenu_Page.
First, we need to include the file. This can happen right after we check to see if the main plugin file is accessed directly:
<?php

// If this file is called directly, abort.
if ( ! defined( 'WPINC' ) ) {
    die;
}

// Include the shared dependency.
include_once( plugin_dir_path( __FILE__ ) . 'shared/class-deserializer.php' );
The code in the main function of the root of the plugin should now look like this:
<?php

add_action( 'plugins_loaded', 'tutsplus_custom_admin_settings' );
/**
 * Starts the plugin.
 *
 * @since 1.0.0
 */
function tutsplus_custom_admin_settings() {

    $serializer = new Serializer();
    $serializer->init();

    $deserializer = new Deserializer();

    $plugin = new Submenu( new Submenu_Page( $deserializer ) );
    $plugin->init();

}
And then the constructor for the Submenu_Page should look like this:
<?php

public function __construct( $deserializer ) {
    $this->deserializer = $deserializer;
}
From here, we can tackle the options page. We simply update the value attribute by making a call to the function in the deserializer. Remember, since we're unconditionally retrieving the value and ultimately returning an empty string if nothing exists, it should work just fine.
<p>
    <label>What message would you like to display above each post?</label>
	<br />
	<input type="text" name="acme-message"
	value="<?php echo esc_attr( $this->deserializer->get_value( 'tutsplus-custom-data' ) ); ?>"
	/>
</p>
And with that, you should be able to save and retrieve your value on the options page.
Show It on the Front-End
We're almost done. The last thing we need to do is set up the plugin to display the custom message on the front-end. Specifically, we want to display whatever the user has entered on the single post page (versus an archive page or any other type of page) and to do it above each post.
This means we're going to need to do the following:
- Set up a function that will use the_content hook.
- Read the value using our deserializer.
- Prepend the value before the content (perhaps in its own element).
Fortunately, it's not that much work, especially because we have most of the work that we're going to need to get started. Still, we need to create an area of the plugin specifically responsible for handling the front-end of the site.
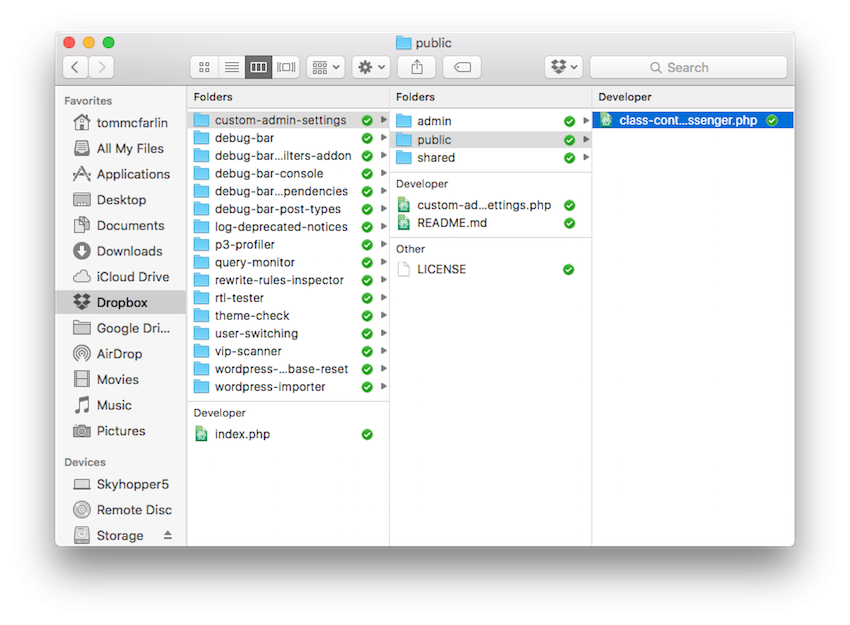
To that end, create a public directory in the root of your plugin directory and add class-content-messenger.php.
In the class, we need to define a constructor that will accept the deserializer as a dependency. The constructor (and the necessary property) should look like this:
<?php

/**
 * A reference to the class for retrieving our option values.
 *
 * @access private
 * @var    Deserializer
 */
private $deserializer;

/**
 * Initializes the class by setting a reference to the incoming deserializer.
 *
 * @param Deserializer $deserializer Retrieves a value from the database.
 */
public function __construct( $deserializer ) {
    $this->deserializer = $deserializer;
}
Then we need to create an init function that will register an internal function (that we'll call display) to render the content along with the new message.
<?php

/**
 * Initializes the hook responsible for prepending the content with the
 * option created on the options page.
 */
public function init() {
    add_filter( 'the_content', array( $this, 'display' ) );
}
After that, we'll need to update the main plugin file so that it instantiates our new class and passes the deserializer to the constructor. Then it will initialize the class.
First, we'll include it:
<?php

// Include the shared and public dependencies.
include_once( plugin_dir_path( __FILE__ ) . 'shared/class-deserializer.php' );
include_once( plugin_dir_path( __FILE__ ) . 'public/class-content-messenger.php' );
Then we'll instantiate it:
<?php

function tutsplus_custom_admin_settings() {

    // Code removed for brevity...

    // Setup the public facing functionality.
    $public = new Content_Messenger( $deserializer );
    $public->init();

}
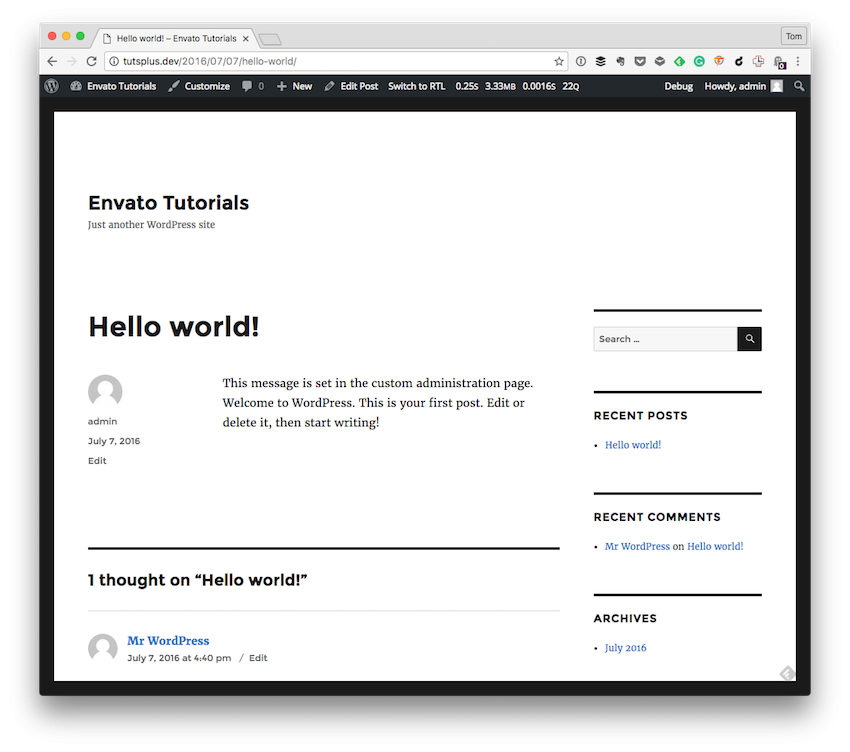
From here, we should be ready to go. Make sure that you've entered a value on the options page. Save your work and check out a single post page on your site. It should look something like this:
If not, then compare your code to what's above (or what's attached) and make sure that you've set up all of your classes, functions, and hooks properly.
A Word About Views and Dependencies
Though we've talked about the single responsibility principle throughout this series, we haven't actually talked much about more advanced topics that we could use to make the code even cleaner and follow better practices.
Some of these topics include things such as PHP autoloading and things like Dependency Injection. I've not talked about these because they are outside the core focus and primary point this particular series is aiming to teach.
Depending on how this particular series is received, I'll be considering creating some tutorials specifically about these topics.
Conclusion
And with that, we conclude the series on creating custom administration pages. I hope that, throughout this series, you've learned a few things beyond the standard way of creating administration pages.
Additionally, I hope you've seen how you can apply a few software development techniques in your day-to-day work with WordPress. Furthermore, I hope the discussion on views and dependencies has sparked an interest in more advanced topics, as well. These are things that I hope to cover in future tutorials, as well.
As usual, you can see my courses and tutorials on my profile page, and you can follow me on my blog and/or Twitter at @tommcfarlin where I talk about various software development practices and how we can employ them in WordPress.
Don't forget to download the code on the sidebar of this post, review it, play around with it, and see what you can do to extend it and add your own functionality to it. As usual, don't hesitate to contact me via the comments regarding the tutorial.

Comments