In this series, we are exploring how to integrate the UberGallery script with OpenCart. To achieve that, we are building a module in OpenCart, so we could do the things natively. In the first part of this series, we discussed the back-end section of our custom module, and the end product was a nice configuration form which allows us to configure the UberGallery parameters easily. Today, we’ll see the front-end counterpart of that, which actually displays the gallery on the front-end.
If you haven’t gone through the first part yet, it’s strongly recommended to do so as the code we’re going to write today heavily depends on it. In the first part, we did all the prerequisites for our back-end to work properly, specifically our UberGallery configuration page. In this part, we’ll concentrate on the front-end setup.
Let’s move our journey ahead to build something useful from the perspective of a front-end user.
A Quick Fix to the UberGallery
We need to tweak the UberGallery script a bit in order to make it work smoothly with our OpenCart module.
Go ahead and open system/library/uberGallery/resources/UberGallery.php and find the following line:
'file_path' => htmlentities($relativePath),
Replace it with the following:
'file_path' => htmlentities(UBER_ORIG_IMG_PATH . $key),
That’s it. The reason behind that is the way file_path is handled in the core UberGallery script. In our case, we’ll have the directory of original images in a completely different location as compared to UberGallery. So, that’s a simple fix.
Finally, create a new directory image/uberGallery and make it writable by the web server. This is the place where we’ll upload the original images of the gallery.
Front-End File Setup—in a Nutshell
Let’s quickly go through the file setup required for the front-end.
-
catalog/controller/module/uber_gallery.php: It's a controller file that provides the application logic of the usual controller in OpenCart. -
catalog/language/english/module/uber_gallery.php: It's a language file that helps set up language labels. catalog/view/theme/default/template/module/uber_gallery.tpl: It's a view template file that holds the XHTML of the configuration form.
So, that’s a quick list of files we’re going to implement today.
Create Module Files
Go ahead and create a file catalog/controller/module/uber_gallery.php with the following contents.
<?php
class ControllerModuleUberGallery extends Controller {
    public function index($setting) {
        $this->load->language('module/uber_gallery');

        define('UBER_ORIG_IMG_PATH', HTTP_SERVER.'image/uberGallery/');

        include_once(DIR_SYSTEM.'library/uberGallery/resources/UberGallery.php');
        $gallery = UberGallery::init();

        $data['heading_title'] = $setting['name'];
        $data['responsive_css_url'] = HTTP_SERVER . "system/library/uberGallery/resources/themes/uber-responsive/css/style.css";
        $data['uber_css_url'] = HTTP_SERVER . "system/library/uberGallery/resources/UberGallery.css";
        $data['cbox_url'] = HTTP_SERVER . "system/library/uberGallery/resources/colorbox/1/colorbox.css";
        $data['js_url'] = HTTP_SERVER . "system/library/uberGallery/resources/colorbox/jquery.colorbox.js";
        $data['gallery'] = $gallery;

        if (file_exists(DIR_TEMPLATE . $this->config->get('config_template') . '/template/module/uber_gallery.tpl')) {
            return $this->load->view($this->config->get('config_template') . '/template/module/uber_gallery.tpl', $data);
        } else {
            return $this->load->view('default/template/module/uber_gallery.tpl', $data);
        }
    }
}
Starting from the top, the UBER_ORIG_IMG_PATH constant is something you should be aware of as that was introduced at the beginning of this article. We used that to make a simple fix in the UberGallery script itself.
Also, there’s one important snippet in the index method that includes the UberGallery library and creates the corresponding gallery object.
define('UBER_ORIG_IMG_PATH', HTTP_SERVER.'image/uberGallery/');
include_once(DIR_SYSTEM.'library/uberGallery/resources/UberGallery.php');
$gallery = UberGallery::init();
Next, we need to include a couple of CSS and JavaScript files required by the UberGallery script.
$data['responsive_css_url'] = HTTP_SERVER . "system/library/uberGallery/resources/themes/uber-responsive/css/style.css";
$data['uber_css_url'] = HTTP_SERVER . "system/library/uberGallery/resources/UberGallery.css";
$data['cbox_url'] = HTTP_SERVER . "system/library/uberGallery/resources/colorbox/1/colorbox.css";
$data['js_url'] = HTTP_SERVER . "system/library/uberGallery/resources/colorbox/jquery.colorbox.js";
So that’s it for the controller. Let’s move on to our next file.
Create a language file catalog/language/english/module/uber_gallery.php with the following contents.
<?php
// Heading
$_['heading_title'] = 'uberGallery';
It just provides the title for our gallery block in the front-end.
Finally, let’s move on to our view template file. Create a file catalog/view/theme/default/template/module/uber_gallery.tpl with the following contents.
<!-- FIRST DO STATIC, after that CONVERT ALL PATH AND SETTINGS DYNAMIC -->
<link rel="stylesheet" type="text/css" href="<?php echo $uber_css_url; ?>" />
<link rel="stylesheet" type="text/css" href="<?php echo $responsive_css_url; ?>" />
<link rel="stylesheet" type="text/css" href="<?php echo $cbox_url; ?>" />
<script type="text/javascript" src="<?php echo $js_url; ?>"></script>

<script type="text/javascript">
$(document).ready(function(){
    $("a[rel='colorbox']").colorbox({maxWidth: "90%", maxHeight: "90%", opacity: ".5"});
});
</script>
<h3><?php echo $heading_title; ?></h3>
<div class="row">
  <?php $gallery->createGallery(DIR_SYSTEM.'../image/uberGallery'); ?>
</div>
Again, it’s pretty straightforward and usual stuff—we’re loading CSS and JavaScript files followed by the colorbox initialization script that builds the gallery. Also, we need to call the createGallery method as we've passed the $gallery object from the controller. That should end our front-end file setup.
At the end, there’s one more step required before we go ahead and actually test our gallery. Upload a couple of images to the image/uberGallery directory as it’s the path we provided as an argument when we called the createGallery method in our template file.
Assign the uberGallery Module to the Home Page Layout
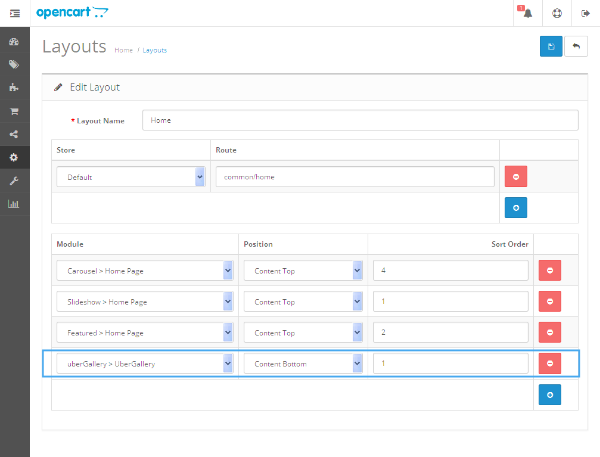
Head over to the back-end and navigate to System > Design > Layouts. Edit the Home layout and add our uberGallery module to the Content Bottom position, as shown in the following screenshot.

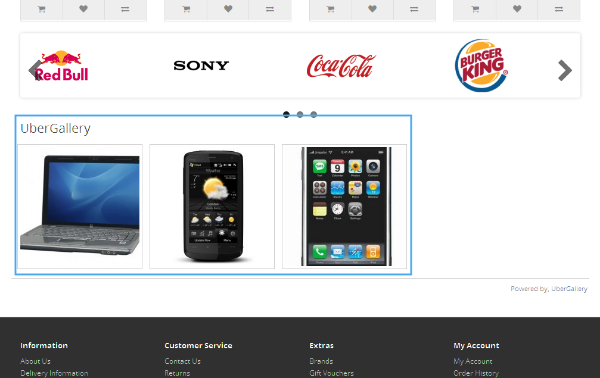
Hit the Save button to commit the changes and head over to front-end home page. To your surprise, you should see a nice-looking image gallery on that page! We have also integrated colorbox with it, so you could click on the image and witness a beautiful overlay kind of slideshow functionality.

Play with it and I’m sure that you’ll be happy with the fact that your hard work has paid off! Anyway, it was just a simple yet effective demonstration of what you could do using an OpenCart custom module.
So, that’s it folks for this tutorial, and it ends the series as well. Hopefully, I’ll be back soon with some new and refreshing stuff in OpenCart. Till then, allow me to go for some coffee and read some of the great tutorials on Envato Tuts+ as usual!
Conclusion
In this series, we integrated the popular web gallery script UberGallery with OpenCart. In the two-part series, we conquered a couple of different aspects of custom modules in OpenCart and successfully completed the back-end and front-end implementation.
I strongly believe that it also served the purpose of demonstrating what OpenCart custom modules are capable of. Use the comment feed below, which is exclusively designed for you to post your feedback and queries!


Comments