Building a WordPress plugin is not that hard, especially when you know what you're doing. Sometimes it can get tricky though when working with multiple scripts, styles, and new functionality that sometimes requires some imagination.
In this tutorial we are going to look at a way to create a simple countdown timer plugin. We'll look at integrating it into the WordPress installation as a widget and a shortcode in the content using settings from a meta box inside the WordPress admin editor.
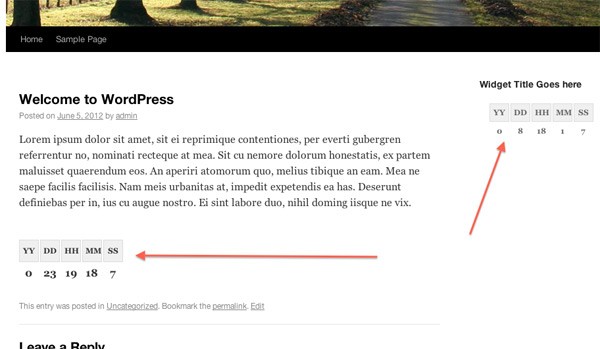
A preview of the end result of this tutorial looks like this:
The Widget and Content Shortcode:
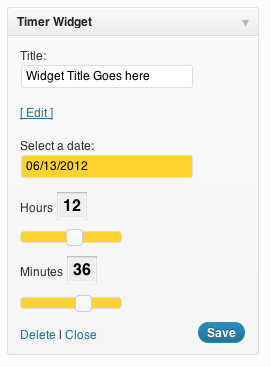
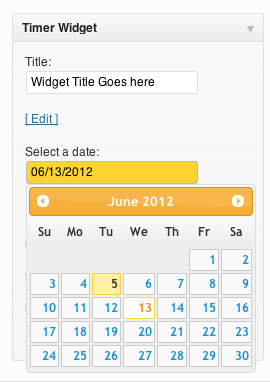
Widget and Meta-Box Admin Interface:
A short example screenshot of how the widget admin and meta box in the edit page/post interface will look like at the end of the tutorial:
Step 1 Plugin File Headers
Each WordPress plugin mush have compatible, up to date code in its headers, so that it can function and be recognised by WordPress. This allows it to be installed, activated and removed. The kind of information that is available in the header information is crucial for the plugin but also contains information about it like title, version, description, tags, author info, license, etc.
First, the plugin is a file placed in a directory. We are going to name our plugin Timer Plugin and place it in our wp-content/plugins folder under the directory timer_plugin. Then inside that, the file timer_plugin.php will be our main plugin file where we insert the header source code.
<?php
/*
	Plugin Name: Timer Plugin
	Description: A timer plugin tutorial
	Author: Ciprian Turcu
	Version: 1.0
*/
We are just going to use the basic variables needed to get the plugin up and running. One of the variables is the Plugin Name, that is very important in order to identify the plugin in the plugin installation page. For the purposes of this tutorial we are just going to name it Timer Plugin. Next, the Description that is a short line of text describing the plugin. That will also be visible under the plugin installation page right next to the plugin, along with the next variables, the Author and Version.
"All header plugin variables are strings of text written after the : preceding the header variable names."
Step 2 Adding Actions
In WordPress, actions are hooks to specific functions that you might want to use in your functionality. In this tutorial we are going to use a number of hooks to get the desired result.
First, the actions are going to be added using the add_action function for each action, and we are going to add them at the end of the PHP file as the next example:
add_action('widgets_init', 'TP_widgets_init');
add_action('admin_print_scripts', 'TP_admin_register_scripts');
add_action('admin_print_styles', 'TP_admin_register_styles');
add_action('wp_print_scripts', 'TP_register_scripts');
add_action('wp_print_styles', 'TP_register_styles');
Next, in the above example, the wp_print_scripts and wp_print_styles hooks add actions to functions that are used to register and include the styles and scripts needed in the WordPress front end. More precisely in the website theme, for the functionality of the sidebar widget timer and the content shortcode. The admin_print_scripts and admin_print_styles hooks are used to register the WordPress admin panel script and CSS style files used later on in the tutorial.
add_action('admin_init', 'TP_admin_init');
add_action('save_post', 'TP_save_postdata');
Finally, the admin_init hook pointing to the function that runs before the headers are generated and run. A hook that we will cover at the end of the tutorial is save_post. This hook is required to work with the post or page submitted information in WordPress admin.
"For more detailed information on how to use the
add_actionfunction seeAdd_Actionin the WordPress Codex."
Step 3 Registering and Including Scripts and Styles
For this tutorial we are going to require a number of script and style files that are required for good functionality and look on both the admin and the theme implementation of the Timer Plugin. Here is how we are going to do this:
Including Styles for WordPress Admin Functionality:
The Timer Plugin requires a few elements in the admin panel that we will need to style slightly as the default look is not exactly very welcoming. In order to do this we have called in step 3 the tag hooks that help us do that, now we are going to look at the functions that run when the hooks are called and how they work exactly.
First, the TP_admin_register_styles function for the registered and included admin panel styles.
function TP_admin_register_styles() {

}
Downloading the Styles
Because we are building a countdown timer plugin, we require a specific date and time to countdown to from the present. To do this, amongst other integrations, we are using the wp_register_style function to register the latest custom jQuery UI style so that we may use its design properly in its functionality when generating the sliders and calendar date picker later. The CSS file is generated by downloading the latest jQuery UI from http://jqueryui.com/download selecting Core, Widget, Mouse, Slider, DatePicker from the list of options, jQuery Ui 1.8.20 in the version section, and UI Lightness in the theme dropdown section.
Registering the Styles
There will be a CSS file named jquery-ui-1.8.20.custom.css and an images folder inside the css/jquery-ui folder in the custom generated and downloaded archive that you will get from the previous instructions. We are going to replace the jquery-ui-1.8.20.custom.css file name to jquery-ui.css for a friendlier name and copy it alongside the images folder with all its files in our plugin folder.
After that we can start adding the registration and inclusion functions inside the TP_admin_register_styles function mentioned previously.
	// register
	wp_register_style('jquery-ui-theme', plugins_url('jquery-ui.css', __FILE__));
	wp_register_style('tp-admin-style', plugins_url('admin-style.css', __FILE__));
The previous example uses wp_register_style to register the jquery-ui.css file by the name of jquery-ui-theme that is later used in the wp_register_style function in the next example. The same approach is used to include the main admin style.css file using this time the name tp-admin-style used in the following examples with the wp_enqueue_style function to include it in WordPress headers properly.
Including the Styles
	// enqueue
	wp_enqueue_style('jquery-ui-theme');
	wp_enqueue_style('tp-admin-style');
The tp-admin-style is used to register and include the style.css file that will be used for styling the widget and meta-box design that comes by default in the jQuery UI implementation and WordPress default style.
Including Styles for Theme Functionality:
Using the exact same approach as before for registering and including style files we are going to include into the WordPress theme the style files necessary for the design of the widget timer and the shortcode.
function TP_register_styles() {
	// register
	wp_register_style('tp-style', plugins_url('style.css', __FILE__));

	// enqueue
	wp_enqueue_style('tp-style');
}
In this case we are including a simple style.css file from our plugin directory that we will include later.
Including Scripts for WordPress Admin Functionality:
Because we are going to build a widget and a meta box with jQuery UI calendar and date time picker functionality, we are going to have to have jQuery, jQuery UI and all the plugins necessary to include and use the slider and datepicker that we will implement later. To do this, we have to make use of the previously written action for the admin_print_scripts hook. The next function will implement the functionality we need.
function TP_admin_register_scripts() {
	// register
	wp_register_script('tp-admin-script', plugins_url('admin-script.js', __FILE__));
	// enqueue
	wp_enqueue_script('jquery-ui-core');
	wp_enqueue_script('jquery-ui-datepicker');
	wp_enqueue_script('jquery-ui-slider');
	wp_enqueue_script('tp-admin-script');
}
As we are working inside the WordPress admin panel, we are going to have jQuery and jQuery UI already registered and included in the header, as well as the dependencies and plugins we need: jquery-ui-mouse and jquery-ui-widget. All we are including now is the jquery-ui-core that is not included by default and the datepicker and slider plugins that we need and last, the admin-script.js file that contains all the custom rules for our date-time jquery-ui functionality.
Including Scripts for Theme Functionality:
We need to be able to have inside the front end of the website, a timer that decrements to 0 somewhere in the sidebar as a widget and in the content as a shortcode. As a very easy way to do this, I chose jQuery and some plain javascript to work the timer. As a result we are going to include the script.js file inside the function that registers scripts for the front end hook previously declared.
function TP_register_scripts() {
	// register
	wp_register_script('tp-script', plugins_url('script.js', __FILE__), 'jquery');

	// enqueue
	wp_enqueue_script('tp-script');
}
We are going to also specify jQuery as a dependency as the front end does not have it included by default.
Step 4 Creating the Widget
The plugin is supposed to use a widget as one of the two methods to integrate a timer into the theme, more specifically, the sidebar in this case. To be able to add the timer to the sidebar we need to implement widget functionality for our plugin into WordPress.
Building the Class
To implement widget functionality in the plugin, we must include a widget class named TP_Widget. This name is of course not mandatory but it is mandatory for this class to extend the WP_Widget class in order to inherit its functionality. Therefore we create the class like the next example:
class TP_Widget extends WP_Widget {
	// the following code will be here
}
Next comes the code we add inside the class so that we work with the widget the way it's intended to in WordPress, using all the necessary functions that are required in order to have a functional widget created in WordPress.
First we are going to write the __construct function for the initial required code integration. The __construct function is the place where the widget actually processes. We are going to give the widget a name and description inside this function by inheriting and using the parent's __construct method like in the following example:
	public function __construct() {
		// widget actual processes
		parent::__construct('TP_Widget', 'Timer Widget', array('description' => __('A Timer Plugin Widget', 'text_domain')));
	}
The first parameter is a widget ID, second is a widget name, third an array with the description. The following function is going to be the form function. We are going to build and use this function to set and work with the admin panel widget content form. The next code will run inside the widget placeholder in the admin panel widgets page:
	public function form() {
		if (!$_POST) {
			$tp_arr = unserialize(get_option('tp_ID_' . $this->number));
		}
		else {
			if ($_POST['tp-hidd'] == 'true') {
				$tp_arr['tp-title'] = $_POST['tp-title'];
				$tp_arr['tp-date'] = $_POST['tp-date'];
				$tp_arr['tp-hour'] = $_POST['tp-hour-val'];
				$tp_arr['tp-minute'] = $_POST['tp-minute-val'];
				update_option('tp_ID_' . $this->number, serialize($tp_arr));
			}
		}
		// outputs the options form on admin
In this part we have widget information like Title, Date, Hour and Minute. This information is extracted from a serialized array string that is stored into the database by the name tp_ID_X, where X is an unique identifier of the widget, used to identify the data being extracted relative to the widget used.
In this part the widget values are also stored into the array one by one, serialized and stored in the database as an option field for later use.
The next part is the admin widget form elements that are used in the front end.
	<label>Title:</label><br/>
	<input type="text" name="tp-title" class="tp-title" value="<?php echo $tp_arr['tp-title']; ?>" /><br/><br/>
	<a class="tp-time-edit" href="javascript:void(0);">[ Edit ]</a><br/><br/>
	<label>Select a date:</label><br/>
	<input type="text" name="tp-date" class="tp-date" readonly="true" value="<?php echo $tp_arr['tp-date']; ?>" />
	<p><div class="tp-time"><label>Hours</label>
	<input name="tp-hour-val" class="tp-hour-val" value="<?php echo $tp_arr['tp-hour']; ?>" readonly="true" /><div class="tp-hour"></div>
	</p>
	<p><label>Minutes</label>
	<input name="tp-minute-val" class="tp-minute-val" readonly="true" value="<?php echo $tp_arr['tp-minute']; ?>"><div class="tp-minute"></div></div></p>
	<input type="hidden" name="tp-hidd" value="true" />
There are two aspects to look after in this particular section:
First, the tags classes like tp-date, tp-hour, tp-minute that are later worked with in javascript and second, the input fields. Firstly, there is some PHP code inserted in the input fields that exist in the code above, code that is used for storing data either for forms in order to be submitted, or for javascript to be implemented into jQuery and worked with.
At the end of the HTML code above the form function is closed.
Updating the Widget Data
When the widget Save button is pressed in the admin panel, the form information is submitted and processed by the following function:
	public function update() {
		// processes widget options to be saved
		if ($_POST['tp-hidd'] == 'true') {
			$tp_Arr['tp-title'] = $_POST['tp-title'];
			$tp_Arr['tp-date'] = $_POST['tp-date'];
			$tp_Arr['tp-hour'] = $_POST['tp-hour-val'];
			$tp_Arr['tp-minute'] = $_POST['tp-minute-val'];

			$tp_Arr['tp-date'] = $_POST['tp-date'];
			update_option('tp_ID_' . $this->number, serialize($tp_Arr));
		}
	}
The update function is the function used to update the information in the widget in WordPress widgets.
Writing the Widget Output in the Sidebar
This next part is the code that generates and outputs the widget in the sidebar as a widget. Basically it is the contents of the already generated widget code that has the purpose of a compatible wrapper.
Here is an example of just half of the function, namely the PHP code that is used to get the required information for the widget output.
	public function widget($args, $instance) {
		$tp_arr = unserialize(get_option('tp_ID_' . $this->number));
		$temp_date = explode("/", $tp_arr['tp-date']);
		$tp_arr['tp-date'] = $temp_date[2] . "/" . $temp_date[0] . "/" . $temp_date[1];
		extract($args);
		$title = apply_filters('widget_title', $tp_arr['tp-title']);

		echo $before_widget;
		if (!empty($title))
			echo $before_title . $title . $after_title;
So we are extracting the widget data previously saved in the admin panel. The next part is the HTML and PHP code that represents the timer and/or has the values used later by jQuery to calculate the time and function as a timer.
	<div class="timer-main">
	<input type="hidden" class="tp-widget-date" value="<?php echo $tp_arr['tp-date']; ?>" />
	<input type="hidden" class="tp-widget-time" value="<?php echo $tp_arr['tp-hour'] . ":" . $tp_arr['tp-minute']; ?>:0" />
	<ul class="tp-head">
	<ol>YY</ol>
	<ol>DD</ol>
	<ol>HH</ol>
	<ol>MM</ol>
	<ol>SS</ol>
	</ul>
	<ul>
	<li>-</li>
	<li>-</li>
	<li>-</li>
	<li>-</li>
	<li>-</li>
	</ul>
	</div>
The UL tag is used to create later on a row and column style so that the timer has an ordered look and is given a class in order to easily control the LI tags with jQuery later on.
Also, you may notice the input elements with PHP data in them. Those elements are also used by jQuery to store the values of the saved date and time.
The function is ending after the HTML code with a dynamic variable that closes the widget using WordPress compatible values.
<?php
	echo $after_widget;
	// outputs the content of the widget
}
Integrating the Class
Last but not least, if you remember, one of the actions written in step 1 was using the widgets_init tag and pointing to the TP_widgets_init function. We need to write its functionality in order to link the class properly to WordPress.
function TP_widgets_init() {
	register_widget("TP_Widget");
}
"For a more extensive look of the standard WordPress widget functionality check out WordPress Widget API"
Step 5 Creating the Meta Box
The meta box is a box located in one of the sidebar panels located in the admin editor of any page or post. Because we are using almost the same HTML, CSS and JavaScript code we are going to use almost the same PHP and HTML code as the widget. Some modifications of some parent element classes are required for jQuery functionality. But first, the meta box must be created and implemented into WordPress from the plugin settings. Another one of the actions written in Step 1 that we did not finish implementing is the admin init hook tag. That hook runs before headers take place and is going to be used by us to implement the meta box functionality with the add_meta_box function like the example below:
	function TP_admin_init() {
		add_meta_box('TP_metaid', __('Timer Plugin Post Settings', 'TP_textdomain'), 'TP_inner_custom_box', 'post', 'side');
		add_meta_box('TP_metaid', __('Timer Plugin Page Settings', 'TP_textdomain'), 'TP_inner_custom_box', 'page', 'side');
	}
What this code does is it creates a custom box on the side of each post and page edit page in the admin panel with the content and functionality of the function TP_inner_custom_box. For a more comprehensive view of how add_meta_box should be used, see add_meta_box in WordPress Codex.
Functionality and Front End Code
The meta box has a similar front end with the widget and the back end code is not that different, just slightly different database option field names to save in. Just like the widget admin form it is made out of both PHP and HTML functionality. Starting with the TP_inner_custom_box function we are creating the meta box admin front and back end functionality like the next sample:
	function TP_inner_custom_box() {
		global $post;
		// Use nonce for verification
		wp_nonce_field(plugin_basename(__FILE__), 'cuschost_noncename');
		$tp_arr = unserialize(get_option('tp_pp_ID_' . $post->ID));
After that, the HTML code sample is strikingly similar. The only differences are an extra input button after which, the function is enclosed with the semicolon and ends.
	<a class="tp-time-edit" href="javascript:void(0);">[ Edit ]</a><br/><br/>
	<label>Select a date:</label><br/>
	<input type="text" name="tp-date" class="tp-date" readonly="true" value="<?php echo $tp_arr['tp-date']; ?>" />
	<p><div class="tp-time"><label>Hours</label>
	<input name="tp-hour-val" class="tp-hour-val" value="<?php echo $tp_arr['tp-hour']; ?>" readonly="true" /><div class="tp-hour"></div>
	</p>
	<p><label>Minutes</label>
	<input name="tp-minute-val" class="tp-minute-val" readonly="true" value="<?php echo $tp_arr['tp-minute']; ?>"><div class="tp-minute"></div></div></p>
	<input type="hidden" name="tp-hidd" value="true" />
	<input type="button" class="tp-insert-shortcode button-primary" id="publish" value="Insert Short-Code" />
Saving the data
The previous form sends data when the post or page is updated, and we need to get that data and store it for later user. In order to do that we use another hook that we already implemented, mainly the save_post hook tag that points to the callback function TP_save_postdata. The callback function gets the data from post variables and stores it into the database under a post ID unique identifier formed name and it looks like this:
	function TP_save_postdata() {
		global $post;
		if ( $_POST['tp-hidd'] == 'true' ) {
			$tp_arr['tp-date'] = $_POST['tp-date'];
			$tp_arr['tp-hour'] = $_POST['tp-hour-val'];
			$tp_arr['tp-minute'] = $_POST['tp-minute-val'];
			update_option( 'tp_pp_ID_' . $post->ID, serialize( $tp_arr ) );
		}
	}
Step 6 Implementing the Shortcode
To implement the shortcode we need to add a new action to the add_action function list. The next sample is going to cover it:
add_shortcode('tp-shortcode', 'tp_shortcode');
It goes without saying that we must create the tp_shortcode function that handles the new shortcode.
	function tp_shortcode($atts,$content="") {
		global $post;
		$tp_arr = unserialize(get_option('tp_pp_ID_' . $post->ID));
		$temp_date = explode("/", $tp_arr['tp-date']);
		$tp_arr['tp-date'] = $temp_date[2] . "/" . $temp_date[0] . "/" . $temp_date[1];
		return '<div class="timer-content"><input type="hidden" class="tp-widget-date" value="'.$tp_arr["tp-date"].'" />
			<input type="hidden" class="tp-widget-time" value="'.$tp_arr["tp-hour"].':'.$tp_arr["tp-minute"].':0" />
			<ul class="tp-head">
				<ol>YY</ol>
				<ol>DD</ol>
				<ol>HH</ol>
				<ol>MM</ol>
				<ol>SS</ol>
			</ul>
			<ul>
				<li>-</li>
				<li>-</li>
				<li>-</li>
				<li>-</li>
				<li>-</li>
			</ul>
		</div>';
	}
Familiar code? It's the front end for the sidebar widget code used previously in the widget function inside the TP_Widget class.
"For more detailed information on how to use the
add_shortcodefunction seeadd_shortcodein the WordPress Codex."
Step 7 Editing the Style Files, Styling the Timer
This is a very easy and quick step as it covers just 2 small files that handle the design of the timer widget, shortcode and admin section.
The Admin Section:
In this section the style file added in step one we are going to edit now is admin-style.css and it should look like this:
.tp-hour, .tp-minute { padding: 0px !important; z-index:0; width:100px; margin:10px 0px 10px 0px; height:10px; }
.tp-hour-val, .tp-minute-val { font-weight:bold; font-size:16px; width:20px; }
.tp-time { margin-top: 10px; margin-bottom: 10px; font-size:12px; }
.widget .editable, .inside .editable { background-color:#FED22F; }
.widget .ui-slider-horizontal, .inside .ui-slider-horizontal { background:#FED22F; }
This stylesheet file handles the width, height, colors and position of the admin widget sliders and calendar jQuery UI popup when choosing hours and minutes from the front-end.
The Timer Front-End Style:
The style.css file is the CSS file that covers the design of the UL, LI, OL of the timer in the front end. See the next sample:
.timer-content { width:300px; }
.timer-main ul, .timer-content ul { float:left; display:inline; overflow:hidden; width:180px; margin:0px; padding:0px; margin-top: 0px; font-weight: bold; }
.timer-main ul.tp-head, #content .timer-content ul.tp-head { margin:0px; padding:0px; margin-top:20px; font-size:12px; }
.timer-main ul ol, .timer-content ul ol { float:left; display:inline; overflow:hidden; width:20px; margin:0px; padding:0px; margin-right:2px; text-align: center; border:1px solid #dcdcdc; padding:4px; background:#f0f0f0; }
.timer-main ul li, .timer-content ul li { float:left; display:inline; overflow:hidden; width:20px; margin:0px; padding:0px; margin-right:2px; text-align: center; padding:4px; border: 1px solid white; }
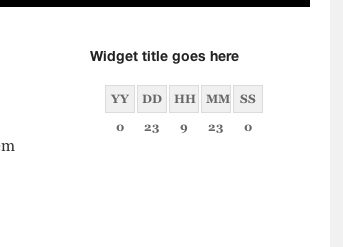
Some elements are floated, resized and positioned with margins so they will look as intended. A result of this style is the design in the next picture:
Step 8 Admin Widget and MetaBox Javascript Code
The admin Widget requires very specific jQuery functionality mixed perfectly with HTML classes for tags. All of the following code should be put inside the admin-script.js file.
jQuery(document).ready(function($){
	$('.tp-insert-shortcode').click(function(){
		send_to_editor('[tp-shortcode]');
	});
	$('.tp-time-edit').live('click',function(){
		$('.tp-date').datepicker({
			format:'m/d/Y',
			hourGrid: 4,
			minuteGrid: 10,
			position: 'right',
			onBeforeShow: function(){
				$(this).DatePickerSetDate($(this).val(), true);
			}
		});
		$('.tp-date').addClass('editable');
		$( ".tp-hour").slider({
			value:0,
			min: 0,
			max: 23,
			step: 1,
			slide: function( event, ui ) {
				$(".tp-hour-val" ).val(ui.value);
			}
		});
		$( ".tp-minute" ).slider({
			value:0,
			min: 0,
			max: 59,
			step: 1,
			slide: function( event, ui ) {
				$(".tp-minute-val" ).val(ui.value);
			}
		});
	});
});
In this example, after a jQuery initialization and a document load event all the code that works with the widget and shortcode is loaded for use.
Now, because the widget has ajax-loaded dynamic content in it all its content is invisible to jQuery unless used with a live action. For this purpose, a link with the class name of tp-time-edit and tag option javascript functionality of void(0) was created and when clicked, runs the live hook and makes all HTML tags in the event function call available.
Inside the callback function we are using the functionality needed to create the datepicker for the date textbox by using the tp-date CSS class.
Last but not least, actually at the beginning of the code lies the shortcode javascript functionality, more specifically the jQuery insertion of the tp-insert-shortcode CSS class value found in the input field inside the shortcode function previously written in Step 6. When the button with the class tp-insert-shortcode is pressed, it should add the [tp-schortcode] string value to the WYSIWYG editor.
"Very Important! jQuery UI requires classes in tag properties to be used for the sliders and datepicker plugins. It does not work with ID's"
Step 9 Timer Javascript Code
This is the most important and slightly most hard to visualise at first sight piece of code in the entire tutorial as it is the part dealing with a lot of math.
This part is referring exclusively to the script.js file that holds the javascript source code dealing with the actual timer both on the widget part and on the shortcode part in the front end.
jQuery(document).ready(function($) {
	function start_by_parent(tp_parentClass){
		var tp_timer ='';
		tp_date=$(tp_parentClass+' input.tp-widget-date').val();
		tp_time=$(tp_parentClass+' input.tp-widget-time').val();

		tp_timer = setInterval("tp_set('"+tp_parentClass+"','"+tp_date+"','"+tp_time+"');", 1000);
	}
	start_by_parent('.timer-main');
	start_by_parent('.timer-content');
});
The parent class handling the widget is timer-main, as for the shortcode the timer-content CSS class is used as a parent tag element that is used to affect the li tag elements containing the timer values for DD(days), HH(Hours), MM(Minutes) and SS(Seconds). The above implementation is a dynamic approach to both of them in jQuery after the values are sent to the calc_data function to handle all the math.
The tp_set function is actually using the calc_data method to calculate the values before it inserts them in the appropriate HTML tag elements. Here is the implemented tp_set method that needs to go inside the same file, script.js.
function tp_set(tp_parentClass,tp_date, tp_time){
	calc_data(tp_date, tp_time);

	jQuery(tp_parentClass+' ul').find('li:nth-child(1)').html(tp_years);
	jQuery(tp_parentClass+' ul').find('li:nth-child(2)').html(tp_days);
	jQuery(tp_parentClass+' ul').find('li:nth-child(3)').html(tp_hours);
	jQuery(tp_parentClass+' ul').find('li:nth-child(4)').html(tp_minutes);
	jQuery(tp_parentClass+' ul').find('li:nth-child(5)').html(tp_seconds);

	var tp_timer = setInterval('tp_set(\''+tp_parentClass+'\',\''+tp_date+'\',\''+tp_time+'\');', 1000 );
    clearTimeout(tp_timer);
}
Finally, one of the most important parts of this script file, the calc_data method, that calculates the number of seconds between the present and the user selected date and returns the appropriate values so that the timer shows the amount of time left until that date.
function calc_data(tp_date,tp_time){

	tempdate = tp_date.split("/");
	temptime = tp_time.split(":");

	var seconds=1000;
	var minutes=seconds*60;
	var hours=minutes*60;
	var days=hours*24;
	var years=days*365;

	var db_time = new Date(tempdate[0], tempdate[1]-1, tempdate[2], temptime[0], temptime[1], 00);
	var now_time = new Date();
	db_time = db_time.getTime();
	now_time = now_time.getTime();
	var tp_result = db_time-now_time;
	if(tp_result < 0) {
		tp_years=tp_days=tp_hours=tp_minutes=tp_seconds=0;
	}
	else{
		tp_years = Math.floor(tp_result/years);
		tp_days = Math.floor(tp_result/days)-(tp_years*365);
		tp_hours = Math.floor(tp_result/hours)-(tp_days*24)-(tp_years*365*24);
		tp_minutes = Math.floor(tp_result/minutes)-(tp_hours*60)-(tp_days*24*60)-(tp_years*365*24*60);
		tp_seconds = Math.floor(tp_result/seconds)-(tp_minutes*60)-(tp_hours*60*60)-(tp_days*60*24*60)-(tp_years*365*24*60*60);
		singlebox=false;
		if(tp_years > 99){
			tp_years=99;
		}
		if(tp_days > 99){
			singlebox=true;
		}
		if(tp_years < 0)tp_years=0;
		if(tp_days < 0)tp_days=0;
		if(tp_hours < 0)tp_hours=0;
		if(tp_minutes > 60)tp_minutes=60;
		if(tp_minutes < 0)tp_minutes=0;
		if(tp_seconds < 0)tp_seconds=0;
	}
}
A very important aspect that needs to be mentioned is that these functions use global variables that were not mentioned yet. It is recommended that you add the following code with global variables at the top of the script.js file before any other code:
tp_days = 0;
tp_hours = 0;
tp_minutes = 0;
tp_seconds = 0;
Conclusion
Building a countdown timer in jQuery is not exactly a very fast and easy project as there are many aspects that need to be taken into consideration when starting. Things like what javascript classes, plugins and styles will be used, what design it will have in the front and back end, how it stores data and how it pulls it back out. Also the compatibility of all of these with other plugins or scripts and how exactly everything is calculated and what it outputs.
Let us know what you think, and if you have any additional recommendations, in the comments below!
Update: This post has been updated to amend the issues mentioned in the comments.
Update #2: Source files are now available for download at the top of this tutorial.

Comments