In this tutorial, we are going to create a widget that will display sites from a WordPress Network of sites. This short tutorial will show you how simple it is, to create a widget and use it to navigate to different network sites.
Step 1 Adding the Base for the Widget
Assuming that you have already set up a Network of sites, we will begin by creating a file mynetwork.php. Add the following code for the base to extend the WordPress Widget Class.
/*
Plugin Name: Your Plugin Name Here
Plugin URI: http://yourpluginsite.com
Description: This displays your Blogs in your WP Network
Author: The Author Name Here
Version: 1.0.0
Author URI: http://theauthoraddress.com
*/
class MyNetwork_Widget extends WP_Widget {

	public function __construct() {
		// widget actual processes
	}

	public function form( $instance ) {
		// outputs the options form on admin
	}

	public function update( $new_instance, $old_instance ) {
		// processes widget options to be saved
	}

	public function widget( $args, $instance ) {
		// outputs the content of the widget
	}
}
add_action( 'widgets_init', create_function( '', 'register_widget( "mynetwork_widget" );' ) );
"The function add_action( 'widgets_init','') is used to register our widget"
Step 2 Writing the Construct Function
Now that we have the base of our widget, let's start adding actual functionalities to it. We'll start by adding a new object attribute called blogs. This attribute will be used as an array to hold the list of registered blogs on your site.
class MyNetwork_Widget extends WP_Widget {
	public $blogs = null;
Now we will add some small snippets to our __construct function. First we will assign an array of blogs to the object attribute by using the WordPress function get_blog_list. Any time we plan to reference the array, we simply use $this->blogs.
public function __construct() {
	$this->blogs = get_blog_list( 0, 'all' );
Lastly, we'll call the parent constructor function and add some information about our widget. The function takes a Base ID(string), Name(string), Options(array) and Control Options(array). This information will will be displayed in the widget panel.
	parent::__construct(
		'mynetwork_widget', // Base ID
		'MyNetwork_Widget', // Name
		array(
			'description' => __( 'Display List of Blogs in Site Network', 'text_domain' )
		)
	);
}

Step 3 Writing the Form Function
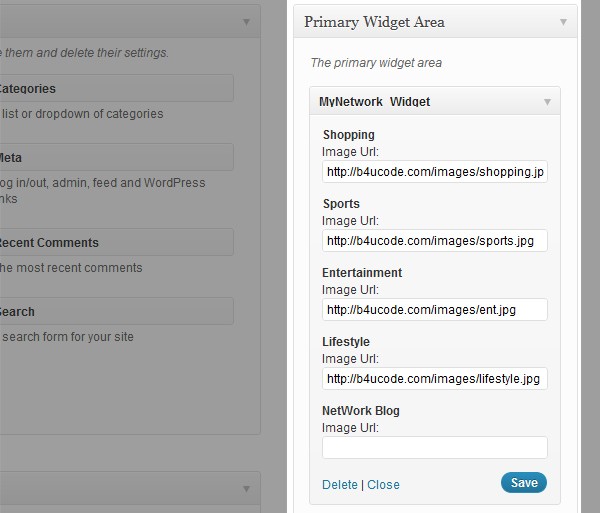
In this step we will create the widget form found in the administrator. Our form will have an Image Url field for each blog on the site. The URL field will hold a thumbnail of the site being referenced.
Looping Through Blogs
The first thing we do is create a foreach loop that will loop through each site's blogs created on your site. The loop does not include the blog name, so for this purpose we use the get_blog_details function. The function takes the blog id and can return Blog Name, ID, Post Count, Path and more. We will add the blog name above each URL field. If you you look closely, you will see that our get_field_id function uses the blog_id, this will make our name tag look like this image-1 which will be important for us in our other functions.
	public function form( $instance ) {
		// outputs the options form on admin
		foreach ($this->blogs AS $blog) {
			$image =  $instance['image-'.$blog['blog_id']];
			?>
			<p>
				<label><strong><?php echo get_blog_details($blog['blog_id'])->blogname; ?></strong></label><br />
				<label for="<?php echo $this->get_field_id( 'image-'.$blog['blog_id'] ); ?>"><?php _e( 'Image Url:' ); ?></label>
				<input class="widefat" id="<?php echo $this->get_field_id( 'image-'.$blog['blog_id'] ); ?>" name="<?php echo $this->get_field_name( 'image-'.$blog['blog_id']); ?>" type="text" value="<?php echo esc_attr( $image ); ?>" />
			</p>
			<?php
		}
	}
Step 4 Writing the Update Function
The Update Function will save the values entered in our widget form. First we make the variable $instance an array, then we make another loop of each blog. During the loop we will update the old $instance with $new_instance then we return the variable.
	public function update( $new_instance, $old_instance ) {
		// processes widget options to be saved
		$instance = array();
		foreach ($this->blogs AS $blog) {
			$instance['image-'.$blog['blog_id']] = strip_tags( $new_instance['image-'.$blog['blog_id']]);
		}
		return $instance;
	}
Step 5 Writing the Widget Function
Finally, we have our widget function which will render HTML in our widget position. Within this function we add a foreach loop of our registered blogs and during each loop, we will define the image, link and name of the blog. We add an if statement to check to see if an Image Url was added in the widget panel, if no images were selected then the respectful blog will not be shown. This is one way that admin can choose to hide a blog from their widget list. Next we add some HTML, with an image of each blog wrapped in its blog path and at the bottom we call the blog's name. We finish the function by closing all open tags.
	public function widget( $args, $instance ) {
		// outputs the content of the widget
		foreach ($this->blogs AS $blog) {
			$image = $instance['image-'.$blog['blog_id']];
			$link = $blog['path'];
			$name = get_blog_details($blog['blog_id'])->blogname;
			if ($image) {
			?>
				<div>
					<div>
						<a href="<?php echo $link; ?>"><img src="<?php echo $image; ?>" width="125" border="0" alt="<?php echo $name; ?>" /></a>
					</div>
					<div><h3><?php echo $name; ?></h3></div>
				</div>
			<?php
			}
		}
	}

Finished Code
<?php
/**
 * @package MyNetwork
 * @version 1.0.0
 */
/*
Plugin Name: Your Plugin Name Here
Plugin URI: http://yourpluginsite.com
Description: This displays your Blogs in your WP Network
Author: The Author Name Here
Version: 1.0.0
Author URI: http://theauthoraddress.com
*/
?>
<?php
class MyNetwork_Widget extends WP_Widget {
	public $blogs = null;

	public function __construct() {
		$this->blogs = get_blog_list( 0, 'all' );
		parent::__construct(
			'mynetwork_widget', // Base ID
			'MyNetwork_Widget', // Name
			array(
				'description' => __( 'Display List of Blogs in Site Network', 'text_domain' )
			) // Args
		);
	}

	public function form( $instance ) {
		// outputs the options form on admin
		foreach ($this->blogs AS $blog) {
			$image =  $instance['image-'.$blog['blog_id']];
			?>
			<p>
				<label><strong><?php echo get_blog_details($blog['blog_id'])->blogname; ?></strong></label><br />
				<label for="<?php echo $this->get_field_id( 'image-'.$blog['blog_id'] ); ?>"><?php _e( 'Image Url:' ); ?></label>
				<input class="widefat" id="<?php echo $this->get_field_id( 'image-'.$blog['blog_id'] ); ?>" name="<?php echo $this->get_field_name( 'image-'.$blog['blog_id']); ?>" type="text" value="<?php echo esc_attr( $image ); ?>" />
			</p>
			<?php
		}
	}

	public function update( $new_instance, $old_instance ) {
		// processes widget options to be saved
		$instance = array();
		foreach ($this->blogs AS $blog) {
			$instance['image-'.$blog['blog_id']] = strip_tags( $new_instance['image-'.$blog['blog_id']]);
		}
		return $instance;
	}

	public function widget( $args, $instance ) {
		// outputs the content of the widget
		foreach ($this->blogs AS $blog) {
			$image = $instance['image-'.$blog['blog_id']];
			$link = $blog['path'];
			$name = get_blog_details($blog['blog_id'])->blogname;
			if ($image) {
				?>
				<div>
					<div>
						<a href="<?php echo $link; ?>"><img src="<?php echo $image; ?>" width="125" border="0" alt="<?php echo $name; ?>" /></a>
					</div>
					<div><h3><?php echo $name; ?></h3></div>
				</div>
				<?php
			}
		}
	}
}
add_action( 'widgets_init', create_function( '', 'register_widget( "mynetwork_widget" );' ) );
?>
Conclusion
The styling of the blog was not covered in this tutorial but one can style the divs into a horizontal display or add some jQuery effects to make them scroll, fade or jump. I hope you find this tutorial useful and you adapt some of the snippets into your own widget. A great idea would be a carousel of registered site blogs. Please leave your feedback below. Happy coding!

Comments