In this tutorial I'll show you how to build a weather app in NativeScript using the TypeScript language.
In the previous article in this series we created a note-taking app using plain JavaScript. This time we're going to use TypeScript. First let's find out why TypeScript is a good option for building NativeScript apps.
1. Why TypeScript?
TypeScript is a first-class citizen in NativeScript. It is used by the core NativeScript team to build the NativeScript framework itself. Here are a couple of reasons why you would want to use TypeScript for developing NativeScript apps:
- TypeScript compiles to JavaScript. When the compiler runs, it catches any errors that you might have in your code so that you can act on them immediately without waiting for the NativeScript compiler to finish. This means more productivity for you as the developer.
- TypeScript allows you to use ES6 Features such as classes, modules, arrow functions, template literals, and much more. This means more tools at your disposal to organize and write better code.
If I did a poor job at convincing you or you want to know more about why TypeScript is good for developing with NativeScript, you can check out Build Better NativeScript Apps With TypeScript.
2. Tooling
To fully take advantage of the features that TypeScript offers, I recommend that you use the Visual Studio Code text editor. It has an IntelliSense feature which provides smart auto-completion while you're writing TypeScript code, it integrates with Git, and it has debugging capabilities as well.
Best of all, there's also a NativeScript plugin which will make you more productive when developing NativeScript apps. One feature that I find useful is the emulator integration. This allows you to run the emulator directly from the text editor and debug the app from the text editor itself. Visual Studio Code is free and available on all major platforms (Windows, Linux, OS X).
However, if you don't want to leave the comfort of your text editor, you can also install extensions that will make coding with TypeScript better. For Atom, there's the atom-typescript plugin. For Sublime Text, there's the TypeScript Sublime plugin.
3. Overview of the App
The app that we're going to create is a weather app. It will have the following pages:
- A main page which shows the current weather along with some relevant information such as the temperature, air pressure, and humidity.
- A forecast page which shows a five-day forecast of what the weather is going to be for the next five days.
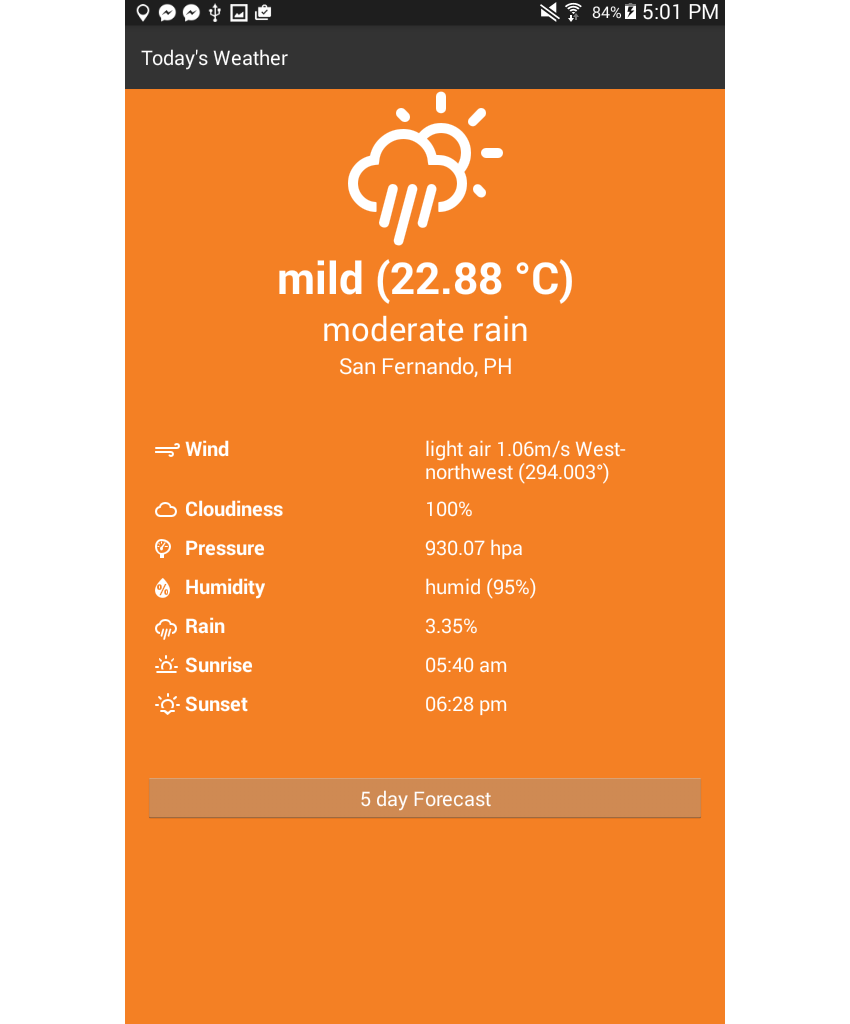
Here's what the main page will look like:
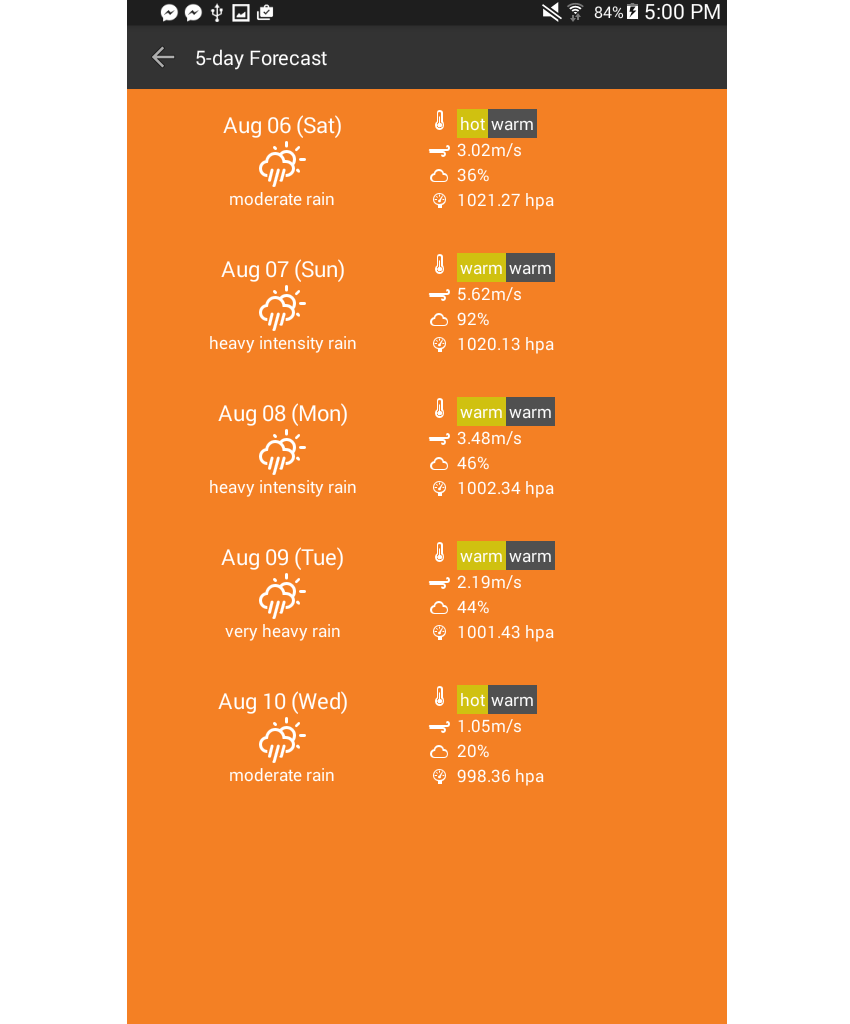
And here's the forecast page:
You can find the completed source code for this app on its GitHub repo.
4. OpenWeatherMap
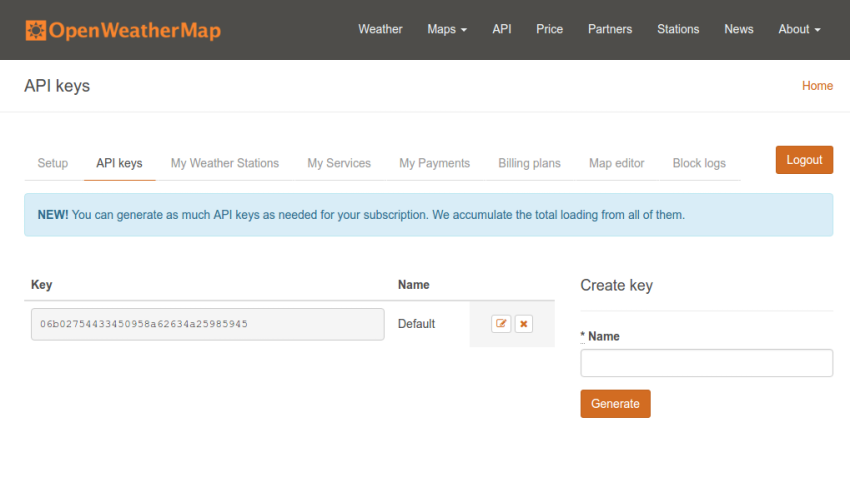
The weather data will come from the OpenWeatherMap API, and just like any other API, you need to sign up for an API key in order to use it. Go ahead and sign up for an account, I'll wait. Once you're logged in, go to the API keys page, copy the value of the key field, and keep it somewhere safe. You'll need it later, once you start creating the app.
5. Creating the App
Now that you know what the app will look like, it's time to actually start creating it. Start by creating a new NativeScript project which uses the TypeScript template:
tns create weatherApp --template typescript
Once that's done, navigate into the app folder and create the following folders and files. For your convenience, you can also download or clone the GitHub repo and copy the files from the app folder.
- common
    + constants.ts
    + navigation.ts
    + requestor.ts
    + utilities.ts
- fonts
- pages
    + forecast
        * forecast.css
        * forecast.ts
        * forecast.xml
        * forecast-view-model.ts
    + main
        * main.css
        * main.ts
        * main.xml
        * main-view-model.ts
- stores
    + location.ts
- app.css
- app.ts
We will only ever work inside the app directory, so every time I reference a file path or a folder, assume that the app directory is the root.
Install the Dependencies
The app requires a couple of dependencies: the NativeScript Geolocation Module and Moment. You can install the Geolocation module with the following command:
tns plugin add nativescript-geolocation
And install Moment with:
npm install moment
The Geolocation module is used to determine the current location of the user. Moment allows easy formatting of the Unix timestamps, which we will be getting from the API later on.
Common Modules
Before we take a look at the code for each of the pages of the app, let's first take a look at the custom modules which will be used throughout the app.
Constants
The constants module (common/constants.ts) contains all the constant values used throughout the app: things like the base URL of the OpenWeatherMap API, the API key that you got earlier, the paths to the endpoints that we will be using, the character codes of the weather icons, and the wind directions.
export const WEATHER_URL = 'http://api.openweathermap.org/data/2.5/';
export const WEATHER_APIKEY = 'YOUR OPENWEATHERMAP API KEY';
export const CURRENT_WEATHER_PATH = 'weather/';
export const WEATHER_FORECAST_PATH = 'forecast/daily/';

export const WEATHER_ICONS = {
  day: {
    'clear': 0xf00d,
    'clouds': 0xf002,
    'drizzle': 0xf009,
    'rain': 0xf008,
    'thunderstorm': 0x010,
    'snow': 0xf00a,
    'mist': 0xf0b6
  },
  night: {
    'clear': 0xf02e,
    'clouds': 0xf086,
    'drizzle': 0xf029,
    'rain': 0xf028,
    'thunderstorm': 0xf02d,
    'snow': 0xf02a,
    'mist': 0xf04a
  },
  neutral: {
    'temperature': 0xf055,
    'wind': 0xf050,
    'cloud': 0xf041,
    'pressure': 0xf079,
    'humidity': 0xf07a,
    'rain': 0xf019,
    'sunrise': 0xf046,
    'sunset': 0xf052
  }
};

export const WIND_DIRECTIONS = [
  "North", "North-northeast", "Northeast",
  "East-northeast", "East", "East-southeast", "Southeast",
  "South-southeast", "South", "South-southwest", "Southwest",
  "West-southwest", "West", "West-northwest", "Northwest", "North-northwest"
];
Utilities
The utilities module includes all sorts of utility functions: things like converting degrees to directions, determining a descriptive text for the wind speed, converting Kelvin to Celsius, and converting character codes into a character. You'll see how all of these functions are used later on in the pages.
import constants = require('./constants');

export function degreeToDirection(num) {
  var val= Math.floor((num / 22.5) + .5);
  return constants.WIND_DIRECTIONS[(val % 16)];
}

export function describeWindSpeed(speed) {
  if(speed < 0.3) {
    return 'calm';
  } else if(speed >= 0.3 && speed < 1.6) {
    return 'light air';
  } else if (speed >= 1.6 && speed < 3.4) {
    return 'light breeze';
  } else if (speed >= 3.4 && speed < 5.5) {
    return 'gentle breeze';
  } else if (speed >= 5.5 && speed < 8) {
    return 'moderate breeze';
  } else if(speed >= 8 && speed < 10.8) {
    return 'fresh breeze';
  } else if(speed >= 10.8 && speed < 13.9) {
    return 'strong breeze';
  } else if(speed >= 13.9 && speed < 17.2) {
    return 'moderate gale';
  } else if (speed >= 17.2 && speed < 20.8) {
    return 'gale';
  } else if (speed >= 20.8 && speed < 24.5) {
    return 'strong gale';
  } else if (speed >= 24.5 && speed < 28.5) {
    return 'storm';
  } else if (speed >= 28.5 && speed < 32.7) {
    return 'violent storm';
  } else if (speed >= 32.7 && speed < 42) {
    return 'hurricane force';
  }
  return 'super typhoon';
}

export function describeHumidity(humidity) {
  if (humidity >= 0 && humidity <= 40) {
    return 'very dry';
  } else if (humidity >= 40 && humidity <= 70) {
    return 'dry';
  } else if (humidity >= 85 && humidity <= 95) {
    return 'humid';
  }
  return 'very humid';
}

export function describeTemperature(temp) {
  var celsius = convertKelvinToCelsius(temp);
  if (celsius >= 0 && celsius < 7) {
    return 'very cold';
  } else if (celsius >= 8 && celsius < 13) {
    return 'cold';
  } else if (celsius >= 13 && celsius < 18) {
    return 'cool';
  } else if (celsius >= 18 && celsius < 23) {
    return 'mild';
  } else if (celsius >= 23 && celsius < 28) {
    return 'warm';
  } else if (celsius >= 28 && celsius < 32) {
    return 'hot';
  }
  return 'very hot';
}

export function convertKelvinToCelsius(celsius) {
  return celsius - 273.15;
}

export function getTimeOfDay() {
  var hour = (new Date()).getHours();
  var time_of_day = 'night';
  if(hour >= 5 && hour <= 18){
    time_of_day = 'day';
  }
  return time_of_day;
}

export function getIcons(icon_names) {
  var icons = icon_names.map((name) => {
    return {
      'name': name,
      'icon': String.fromCharCode(constants.WEATHER_ICONS.neutral[name])
    };
  });
  return icons;
}
Navigation
The navigation module is a custom helper module which allows us to easily navigate between all the pages of the app. Open the common/navigation.ts file and add the following:
import frame = require('ui/frame');

export function getStartPage() {
  return 'pages/main/main';
}

export function goToForecastPage() {
  frame.topmost().navigate('pages/forecast/forecast');
}

export function goToMainPage() {
  frame.topmost().goBack();
}
This uses the Frame module to navigate to other pages of the app. The getStartPage() method simply returns the location of the main app page. The goToForecastPage(), as the name suggests, allows the user to navigate to the forecast page.
When navigating in NativeScript, you need to have a reference of where you currently are. That's why you first need to call the topmost() function to get the current or uppermost page, and then the navigate() function to go to another page. This function accepts the path to the page where you want to go.
Requestor
The Requestor module performs the actual request to the OpenWeatherMap API. As mentioned in the Introduction to NativeScript article, NativeScript uses a JavaScript virtual machine to run JavaScript code. This means that we can also use functions that are available in the browser.
One such function is fetch, which allows us to make HTTP requests to a remote server. The parameter is the URL where you want to make the request. It returns a promise so we use then() to wait for the raw response. Note the use of the word "raw"; the fetch function returns the response with headers and other low-level information—that's why we need to call the json() function to get the actual JSON data. This will return another promise so we use then() one more time to get the actual object.
export function get(url){
  return fetch(
    url
  ).then(function(response){
    return response.json();
  }).then(function(json){
    return json;
  });
}
Alternatively, you can use the Http module, which is a more robust way of making HTTP requests in NativeScript.
Location Store
The location store serves as the storage for the location information. This allows us to update and get the current location from any file which imports this module.
export var location;

export function saveLocation(loc) {
  location = loc;
}

export function getLocation() {
  return location;
}
Main Page
Now it's time to take a look at the code for each of the pages of the app. But before we do that, first open up the entry-point file (app.ts). This uses the navigation module to get the starting page of the app:
import application = require("application");
import navigation = require('./common/navigation');
application.mainModule = navigation.getStartPage();
application.start();
Next, let's break down the pages/main/main.xml file.
The navigatingTo event is used to execute a similarly named function in the TypeScript file every time the user navigates to this specific page. The CSS class is also dynamically determined from the TypeScript file.
<Page xmlns="http://schemas.nativescript.org/tns.xsd" navigatingTo="navigatingTo" class="{{ background_class }}">
...
</Page>
The ScrollView component is used to wrap everything so that a vertical scrollbar is automatically generated when the content goes beyond what the screen size can display.
And because we're going to load the data from a remote server, the ActivityIndicator component is used to show the default loading animation of the platform. This requires you to supply a busy attribute, which accepts a boolean value that controls whether to start the animation or not. By default, this is set to true and only updated to false once the app is done making the request to the server.
The visibility attribute is also used to make sure that the component doesn't consume any space while it's not animating.
<StackLayout>
  <ScrollView>
    <ActivityIndicator busy="{{ is_loading }}" visibility="{{ is_loading ? 'visible' : 'collapsed' }}" />
    <StackLayout visibility="{{ !is_loading ? 'visible' : 'collapsed' }}">
      ...
    </StackLayout>
  </ScrollView>
</StackLayout>
For the main content, we have the general overview of the current weather at the top, and the details below it. The general overview shows an icon representing the current weather, the current temperature, the weather description, and the place.
<Label text="{{ icon }}" class="icon" />
<Label text="{{ temperature }}" class="temperature" />
<Label text="{{ weather }}" class="weather" textWrap="true"/>
<Label text="{{ place }}" class="place" textWrap="true"/>
For the details, there's a whole bunch of information about the current weather which you can probably guess by looking at the text attribute. Each one is also accompanied by its own icon.
On the screenshot that I showed you earlier, you saw that it uses a two-column layout for both pages. That's the reason why we're using GridLayout. But as you can see from the code below, we're also using a GridLayout for the first column of each row.
You might ask why we're doing this instead of just creating a three-column layout with the icon on the first column, the weather attribute on the second, and the value on the third. That's perfectly understandable, and it would make the code more concise.
But the problem is that NativeScript version 2.1 doesn't currently allow percentage units for its GridLayout. This means we can't use something like 10% for the icon while the other two columns consume 45% each.
The layout that we've used below works around that problem by using a GridLayout to wrap the icon and weather attribute, with the icon consuming 30 pixels and the weather attribute consuming the amount of space required to contain the text. Note the use of the row and col attribute on the GridLayout as well.
<GridLayout columns="*,*" rows="auto,auto,auto,auto,auto,auto,auto" cssClass="details">

  <GridLayout columns="30,auto" rows="auto" row="0" col="0">
    <Label text="{{ wind_icon }}" class="small-icon" row="0" col="0" />
    <Label text="Wind" textWrap="true" row="0" col="1" class="label" />
  </GridLayout>
  <Label text="{{ wind }}" textWrap="true" row="0" col="1" />

  <GridLayout columns="30,auto" rows="auto" row="1" col="0">
    <Label text="{{ cloud_icon }}" class="small-icon" row="0" col="0" />
    <Label text="Cloudiness" textWrap="true" row="1" col="1" class="label" />
  </GridLayout>
  <Label text="{{ clouds }}" textWrap="true" row="1" col="1" />

  <GridLayout columns="30,auto" rows="auto" row="2" col="0">
    <Label text="{{ pressure_icon }}" class="small-icon" row="0" col="0" />
    <Label text="Pressure" textWrap="true" row="2" col="1" class="label" />
  </GridLayout>
  <Label text="{{ pressure }}" textWrap="true" row="2" col="1" />

  <GridLayout columns="30,auto" rows="auto" row="3" col="0">
    <Label text="{{ humidity_icon }}" class="small-icon" row="0" col="0" />
    <Label text="Humidity" textWrap="true" row="3" col="1" class="label" />
  </GridLayout>
  <Label text="{{ humidity }}" textWrap="true" row="3" col="1" />

  <GridLayout columns="30,auto" rows="auto" row="4" col="0">
    <Label text="{{ rain_icon }}" class="small-icon" row="0" col="0" />
    <Label text="Rain" textWrap="true" row="4" col="1" class="label" />
  </GridLayout>
  <Label text="{{ rain }}" textWrap="true" row="4" col="1" />

  <GridLayout columns="30,auto" rows="auto" row="5" col="0">
    <Label text="{{ sunrise_icon }}" class="small-icon" row="0" col="0" />
    <Label text="Sunrise" textWrap="true" row="5" col="1" class="label" />
  </GridLayout>
  <Label text="{{ sunrise }}" textWrap="true" row="5" col="1" />

  <GridLayout columns="30,auto" rows="auto" row="6" col="0">
    <Label text="{{ sunset_icon }}" class="small-icon" row="0" col="0" />
    <Label text="Sunset" textWrap="true" row="6" col="1" class="label" />
  </GridLayout>
  <Label text="{{ sunset }}" textWrap="true" row="6" col="1" />

</GridLayout>
The last markup for the main page is the button that leads to the forecast page:
<Button text="5 day Forecast" tap="goToForecastPage" />
Main Page JavaScript
Open the pages/main/main.ts file and add the following code:
import { EventData } from "data/observable";
import { Page } from "ui/page";
import { MainViewModel } from "./main-view-model";
import navigation = require('../../common/navigation');

export function navigatingTo(args: EventData) {
  var page = <Page>args.object;
  page.bindingContext = new MainViewModel();
}

export function goToForecastPage () {
  navigation.goToForecastPage();
}
In the above code, we import a couple of built-in NativeScript modules, the main view-model, and the navigation.
The EventData object is extracted using object destructuring, an ES6 feature made available by TypeScript. The EventData is what we pass in as an argument to the navigatingTo function so that it will have access to any data passed in by any page which navigates to this page.
This has an object property, which is basically whatever component triggered the event. In this case, we know that it's triggered on the Page component, and that's why we use <Page> as a type-assertion. After that, we bind the main view-model to the page. This will allow us to add or update a property in the class, and it will instantly get reflected on the page.
In the main view model (pages/main/main-view-model.ts), first import all the modules that we will be using:
import observable = require("data/observable");
import requestor = require("../../common/requestor");
import constants = require("../../common/constants");
import geolocation = require("nativescript-geolocation");
import moment = require('moment');
import utilities = require('../../common/utilities');
import locationStore = require('../../stores/locationStore');
Create the view model by extending the Observable module, which makes all the properties in this class observable. This means that all references of each property in the UI will get updated every time it is changed in this class.
export class MainViewModel extends observable.Observable {

  constructor() {
    ...
  }

}
Inside the constructor, check if geolocation is enabled. If it's not enabled then try to enable it by calling the enableLocationRequest() function. This triggers the app to ask the user to enable geolocation.
super(); //call the constructor method of the parent class
//check if geolocation is not enabled
if (!geolocation.isEnabled()) {
  geolocation.enableLocationRequest(); //try to enable geolocation
}
Next, determine whether it's day or night and set the page background according to the result. Then set the icons in the page.
var time_of_day = utilities.getTimeOfDay();
this.set('background_class', time_of_day);
this.setIcons();
After that, try to determine the current location. Note that if the user didn't allow geolocation then the app wouldn't work at all, because the weather depends on the user's location. The app will try to determine the user's location in 10 seconds. If it fails to do so, then an error message is shown to the user.
var location = geolocation.getCurrentLocation({timeout: 10000}).
  then(
    (loc) => {
      if (loc) {
        ...
      }
    },
    (e) => {
      //failed to get location
      alert(e.message);
    }
);
If the location request succeeded, we save it using the locationStore. This allows us to access the location on other pages later on without requesting it again.
locationStore.saveLocation(loc);
For your reference, here's a sample response that you might get when requesting the location in NativeScript. You can check out the Location documentation for NativeScript to learn more about each of the properties below.
{
   "latitude":51.50853,
   "longitude":-0.12574,
   "altitude":0,
   "horizontalAccuracy":37.5,
   "verticalAccuracy":37.5,
   "speed":0,
   "direction":0,
   "timestamp":"2016-08-08T02:25:45.252Z",
   "android":{

   }
}
We can construct the full API request URL using template literals and make the request using the Requestor module.
this.set('is_loading', true); //show the loader animation
var url = `${constants.WEATHER_URL}${constants.CURRENT_WEATHER_PATH}?lat=${loc.latitude}&lon=${loc.longitude}&apikey=${constants.WEATHER_APIKEY}`;
requestor.get(url).then((res) => {
  ...
});
Once a response comes back, extract and format it, and then set the resulting value as a property of the class. And because the class is observable, this will automatically update the UI of the app.
this.set('is_loading', false); //stop loader animation
var weather = res.weather[0].main.toLowerCase();
var weather_description = res.weather[0].description;

var temperature = res.main.temp;
var icon = constants.WEATHER_ICONS[time_of_day][weather];

var rain = '0';
if(res.rain){
  rain = res.rain['3h'];
}

this.set('icon', String.fromCharCode(icon));
this.set('temperature', `${utilities.describeTemperature(Math.floor(temperature))} (${utilities.convertKelvinToCelsius(temperature).toFixed(2)} °C)`);
this.set('weather', weather_description);
this.set('place', `${res.name}, ${res.sys.country}`);
this.set('wind', `${utilities.describeWindSpeed(res.wind.speed)} ${res.wind.speed}m/s ${utilities.degreeToDirection(res.wind.deg)} (${res.wind.deg}°)`);
this.set('clouds', `${res.clouds.all}%`);
this.set('pressure', `${res.main.pressure} hpa`);
this.set('humidity', `${utilities.describeHumidity(res.main.humidity)} (${res.main.humidity}%)`);
this.set('rain', `${rain}%`);
this.set('sunrise', moment.unix(res.sys.sunrise).format('hh:mm a'));
this.set('sunset', moment.unix(res.sys.sunset).format('hh:mm a'));
For your reference, here's a sample response that might be returned by the API:
{
   "coord":{
      "lon":-0.13,
      "lat":51.51
   },
   "weather":[
      {
         "id":803,
         "main":"Clouds",
         "description":"broken clouds",
         "icon":"04d"
      }
   ],
   "base":"cmc stations",
   "main":{
      "temp":291.44,
      "pressure":1031.7,
      "humidity":82,
      "temp_min":290.37,
      "temp_max":292.25
   },
   "wind":{
      "speed":0.3,
      "deg":45,
      "gust":1
   },
   "rain":{
      "3h":0.075
   },
   "clouds":{
      "all":68
   },
   "dt":1470545747,
   "sys":{
      "type":3,
      "id":1462694692,
      "message":0.0043,
      "country":"GB",
      "sunrise":1470544455,
      "sunset":1470598626
   },
   "id":2643743,
   "name":"London",
   "cod":200
}
You can find the detailed information about each property in the documentation for the current weather data.
Finally. there's the setIcons() function, which sets all the icons used in the page:
setIcons() {
  var icons = utilities.getIcons([
    'temperature', 'wind', 'cloud',
    'pressure', 'humidity', 'rain',
    'sunrise', 'sunset'
  ]);
  icons.forEach((item) => {
    this.set(`${item.name}_icon`, item.icon);
  });
}
Main Page Styles and Icons
Here are the styles for the main page:
.temperature {
  font-size: 40px;
  font-weight: bold;
  text-align: center;
}

.weather {
  font-size: 30px;
  text-align: center;
}

.place {
  font-size: 20px;
  text-align: center;
}

.icon {
  font-family: 'weathericons';
  font-size: 100px;
  text-align: center;
}

.small-icon {
  font-family: 'weathericons';
  font-size: 18px;
  margin-right: 5px;
}

.details {
  margin-top: 20px;
  padding: 30px;
  font-size: 18px;
}

.label {
  font-weight: bold;
}

.details Label {
  padding: 5px 0;
}

Button {
  margin: 20px;
}
Notice the use of the weathericons as the font-family for the icon and small-icon classes. This is how we use icon fonts in NativeScript. If you're fond of icon fonts like Font Awesome on your web pages, you can use them the same way in NativeScript apps.
First, download the icon font that you want to use. For this app, the Weather Icons Font is used. Extract the zip archive and inside the extracted folder go to the font directory. Copy the .ttf file to the fonts directory in your app and rename it to weathericons.ttf. The filename is what you use as the value for the font-family every time you want to use that specific font icon. Aside from that, you also have to add the font-size to control the size of the icons.
Forecast Page
Now let's take a look at the markup for the forecast page (pages/forecast/forecast.xml). In the header, there's a back button which allows the user to go back to the main page. Note that instead of the general-purpose Button component, we're using a NavigationButton, which is the NativeScript equivalent of the iOS back button and the Android navigation button.
<Page xmlns="http://schemas.nativescript.org/tns.xsd" navigatingTo="navigatingTo" class="{{ background_class }}">
  <Page.actionBar>
    <ActionBar title="5-day Forecast" class="header">
      <NavigationButton text="Back" android.systemIcon="ic_menu_back" tap="goToMainPage" />
    </ActionBar>
  </Page.actionBar>
  ...
</Page>
For the main content, the Repeater component is used instead of the usual ListView. Both components can be used to generate a list, but ListView comes with more bells and whistles. For example, it automatically generates a vertical scrollbar when the list goes over the screen size. Infinite scrolling functions are also built-in.
The Repeater component is used in this case because there's no real need for the features I just mentioned. All we need is a bare-bones list.
<StackLayout>
  <ScrollView>
    <ActivityIndicator busy="{{ is_loading }}" visibility="{{ is_loading ? 'visible' : 'collapsed' }}" />
    <Repeater items="{{ forecast }}">
      <Repeater.itemTemplate>
       ...
      </Repeater.itemTemplate>
    </Repeater>
  </ScrollView>
</StackLayout>
Inside each Repeater.itemTemplate is a GridLayout with two columns, one for the general weather information and one for the details.
The first column is a StackLayout containing the date, weather icon, and the weather description. The second column is also a StackLayout containing four GridLayouts that will contain the four weather attributes (temperature, wind speed, cloudiness, and air pressure).
The first GridLayout has three columns for containing the icon, the day temperature, and the night temperature. The other three rows only have two columns—for the icon and the value of the weather attribute.
<GridLayout class="item" columns="*,*" rows="auto">
  <StackLayout class="day-weather" row="0" col="0">
    <Label text="{{ day }}" class="date" />
    <Label text="{{ icon }}" class="icon" />
    <Label text="{{ description }}" textWrap="true" />
  </StackLayout>

  <StackLayout class="details" row="0" col="1">
    <GridLayout columns="30,auto,auto" rows="auto" row="0" col="0">
      <Label text="{{ $parents['Page'].temperature_icon }}" class="small-icon" row="0" col="0" />
      <Label text="{{ temperature.day }}" class="temp day-temp" row="0" col="1" />
      <Label text="{{ temperature.night }}" class="temp night-temp" row="0" col="2" />
    </GridLayout>

    <GridLayout columns="30,auto" rows="auto" row="1" col="0">
      <Label text="{{ $parents['Page'].wind_icon }}" class="small-icon" row="0" col="0" />
      <Label text="{{ wind }}" row="0" col="1" />
    </GridLayout>

    <GridLayout columns="30,auto" rows="auto" row="2" col="0">
      <Label text="{{ $parents['Page'].cloud_icon }}" class="small-icon" row="0" col="0" />
      <Label text="{{ clouds }}" row="0" col="1" />
    </GridLayout>

    <GridLayout columns="30,auto" rows="auto" row="3" col="0">
      <Label text="{{ $parents['Page'].pressure_icon }}" class="small-icon" row="0" col="0" />
      <Label text="{{ pressure }}" row="0" col="1" />
    </GridLayout>

  </StackLayout>
</GridLayout>
Note the use of $parents['Page']. When using the Repeater or ListView component, you can't have access to data outside the array that you specified for the list to use—not unless you explicitly specify the parent component where the data is available. That is where $parents['Page'] comes in. $parents is a special variable in NativeScript that allows you to access data available on a specific component. In this case, we specified Page to access the icons for each weather attribute.
<GridLayout columns="30,auto" rows="auto" row="1" col="0">
  <Label text="{{ $parents['Page'].wind_icon }}" class="small-icon" row="0" col="0" />
  <Label text="{{ wind }}" row="0" col="1" />
</GridLayout>
Forecast Page JavaScript
The code for the forecast page is pretty much the same as the code for the main page. The only difference is that the navigation function is for going to back to the main page, and we're using the ForecastViewModel as the view-model.
import { EventData } from "data/observable";
import { Page } from "ui/page";
import { ForecastViewModel } from "./forecast-view-model";
import navigation = require('../../common/navigation');

export function navigatingTo(args: EventData) {
  var page = <Page>args.object;
  page.bindingContext = new ForecastViewModel();
}

export function goToMainPage() {
  navigation.goToMainPage();
}
Here's the code for the view model (pages/forecast/forecast-view-model.ts):
import observable = require("data/observable");
import requestor = require("../../common/requestor");
import constants = require("../../common/constants");
import moment = require('moment');
import utilities = require('../../common/utilities');
import locationStore = require('../../stores/locationStore');

export class ForecastViewModel extends observable.Observable {

  constructor() {
    super();
    var location = locationStore.getLocation();
    var url = `${constants.WEATHER_URL}${constants.WEATHER_FORECAST_PATH}?cnt=6&lat=${location.latitude}&lon=${location.longitude}&apikey=${constants.WEATHER_APIKEY}`;

    var time_of_day = utilities.getTimeOfDay();
    this.set('is_loading', true);
    this.set('background_class', time_of_day);
    this.setIcons();

    requestor.get(url).then((response) => {
      this.set('is_loading', false);
      var forecast = this.getForecast(response);
      this.set('forecast', forecast);
    });
  }

  private getForecast(response) {
    var forecast = [];
    var list = response.list.splice(1); //remove first item from array of forecasts
    //format and push all the necessary data into a new array
    list.forEach((item) => {
      forecast.push({
        day: moment.unix(item.dt).format('MMM DD (ddd)'),
        icon: String.fromCharCode(constants.WEATHER_ICONS['day'][item.weather[0].main.toLowerCase()]),
        temperature: {
          day: `${utilities.describeTemperature(item.temp.day)}`,
          night: `${utilities.describeTemperature(item.temp.night)}`
        },
        wind: `${item.speed}m/s`,
        clouds: `${item.clouds}%`,
        pressure: `${item.pressure} hpa`,
        description: item.weather[0].description
      })
    });

    return forecast;
  }

  private setIcons() {
    var icons = utilities.getIcons(['temperature', 'wind', 'cloud', 'pressure']);
    icons.forEach((item) => {
      this.set(`${item.name}_icon`, item.icon);
    });
  }

}
Inside the constructor, we get the current location from the location store and construct the URL endpoint for the 16-day weather forecast. But instead of 16, we only want five days, so we specify 6 for the count (cnt). We use 6 because the time zone is dependent on the server and not on the location specified. This means that there's a possibility that the API will return the weather for the previous day or the current day. That's why there's an extra 1 day which serves as the padding.
var location = locationStore.getLocation();
var url = `${constants.WEATHER_URL}${constants.WEATHER_FORECAST_PATH}?cnt=6&lat=${location.latitude}&lon=${location.longitude}&apikey=${constants.WEATHER_APIKEY}`;
Next, make the request and update the UI with the API response by calling the getForecast() function:
requestor.get(url).then((response) => {
  this.set('is_loading', false);
  var forecast = this.getForecast(response);
  this.set('forecast', forecast);
});
Here's a sample response returned by the 16-day forecast endpoint. Note that to make the sample more concise, I've set the count to 1, which is why the list property only contains one object.
{
   "city":{
      "id":2643743,
      "name":"London",
      "coord":{
         "lon":-0.12574,
         "lat":51.50853
      },
      "country":"GB",
      "population":0
   },
   "cod":"200",
   "message":0.0347,
   "cnt":1,
   "list":[
      {
         "dt":1470571200,
         "temp":{
            "day":24.69,
            "min":17.37,
            "max":24.69,
            "night":17.37,
            "eve":23.29,
            "morn":19.02
         },
         "pressure":1029.77,
         "humidity":0,
         "weather":[
            {
               "id":500,
               "main":"Rain",
               "description":"light rain",
               "icon":"10d"
            }
         ],
         "speed":8.27,
         "deg":253,
         "clouds":0
      }
   ]
}
Forecast Page Styles
Here are the styles for the forecast page (pages/forecast/forecast.css):
Page {
  font-size: 15px;
}

.item {
  padding: 20px 10px;
}

.day-weather {
  text-align: center;
}

.details {
  horizontal-align: left;
}

.date {
  font-size: 20px;
}

.icon {
  font-family: 'weathericons';
  font-size: 30px;
}

.temp {
  padding: 3px;
  text-align: center;
  font-size: 15px;
}

.day-temp {
  background-color: #d0c110;
}

.night-temp {
  background-color: #505050;
}

.small-icon {
  font-family: 'weathericons';
  margin-right: 5px;
  text-align: center;
}
Global App Styles
Open the app.css file and add the following styles:
.header {
  background-color: #333;
  color: #fff;
}

.day {
  background-color: #f48024;
  color: #fff;
}

.night {
  background-color: #924da3;
  color: #fff;
}
6. Changing the Default App Icon
You can change the default app icon by going to the App_Resources folder. There you can see an Android and iOS folder. For Android, you can replace the image file in each of the following folders to change the icon:
drawable-hdpidrawable-ldpidrawable-mdpi
For iOS, it's the images inside the Assets.xcassets/AppIcon.appiconset folder that you want to replace.
If you want to easily create icons for both Android and iOS, check out MakeAppIcon. Simply choose an image file to use as the icon, and it will automatically generate different sizes for both Android and iOS. You can then move those to the folders mentioned above. Just make sure you got the correct sizes, and the names are the same as the images they replace.
7. Running the App
You can run the app on your device or emulator as usual by executing the following tns commands:
tns run {platform}
tns livesync {platform} --watch
The only difference now that we're using TypeScript is that there's an additional step at the start of each task, to compile the TypeScript files into JavaScript. TypeScript's strong type-checking acts a safety net for catching some errors before NativeScript even compiles the app.
Conclusion
In this tutorial, you learned how to build an app with NativeScript using the TypeScript language. Specifically, you learned the following concepts:
- Structuring your app by putting related files into their own folder.
- Code re-use using modules.
- Using view-models to provide data and functionality for the pages of the app.
- Determining location with the geolocation plugin.
- Making HTTP requests.
- Using font icons.
- Navigating between pages.
I'll leave you with a few resources to continue with your journey in developing awesome apps with NativeScript:
- Read the guide on how to publish your NativeScript app on Google Play or the App Store.
- Subscribe to the NativeScript Newsletter and be updated of what's going on in the NativeScript community.
- Check out Awesome NativeScript, a collection of awesome NativeScript libraries, tools, resources, and applications.
- Watch our Envato Tuts+ course on Getting Started With TypeScript.

Comments