A lot of the popular weather apps on Google Play are either full of ads, require too many permissions, or include features that most of us never use. Wouldn't it be great if you could build your own weather app from scratch?
In this tutorial, I'm going to show you how. Our app will have a simple and minimalist user interface, showing the user exactly what they need to know about the current weather conditions. Let's get started.
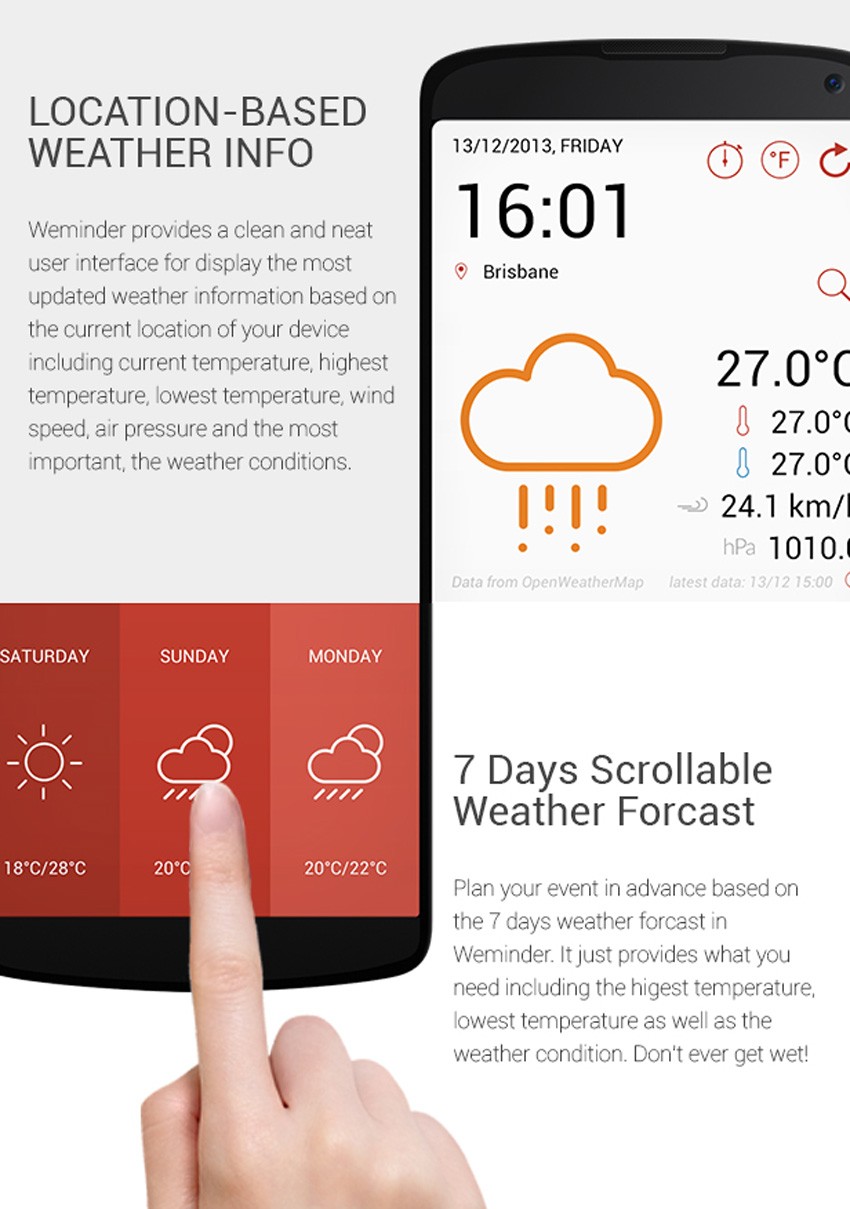
Looking for a Shortcut?
This tutorial will teach you to build a weather app from scratch, but one alternative is to use one of the Android weather app templates on Envato Market.
For example, Weminder provides a simple, clean user interface and all the essential features of a weather app, so that you can then customize it for your own purposes.
Or, if you want something unique and custom-built, head over to Envato Studio to check out the selection of mobile and app development services on offer there.
1. Prerequisites
Before you continue, double-check that you have the following set up:
-
Eclipse ADT Bundle: You can download it at the Android Developer website.
-
OpenWeatherMap API Key : This isn't required to complete the tutorial, but it's free. You can obtain one by signing up at the OpenWeatherMap website.
-
Icons: I recommend you download the weather icons font created by Erik Flowers. You need to download the TTF file, because we'll be using it in a native app. We'll use the font to render various icons depending on the weather conditions.
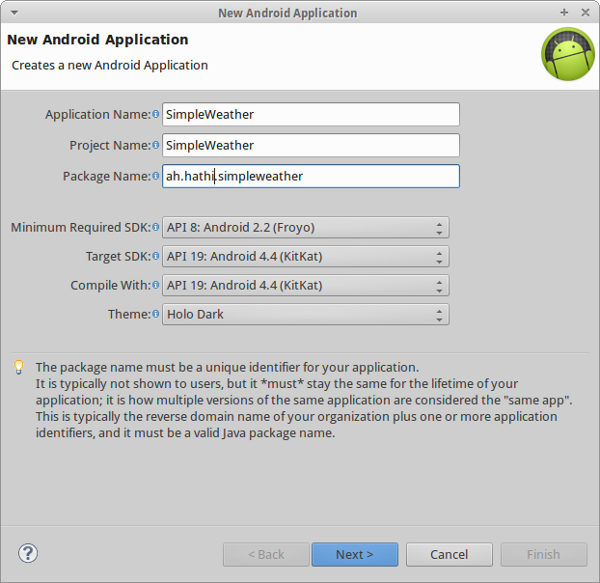
2. Create a New Project
I'm going to call this app SimpleWeather, but feel free to give it any name you like. Enter a unique package name, set the minimum required SDK to Android 2.2, and set the target SDK to Android 4.4. You can leave the theme at Holo Dark.
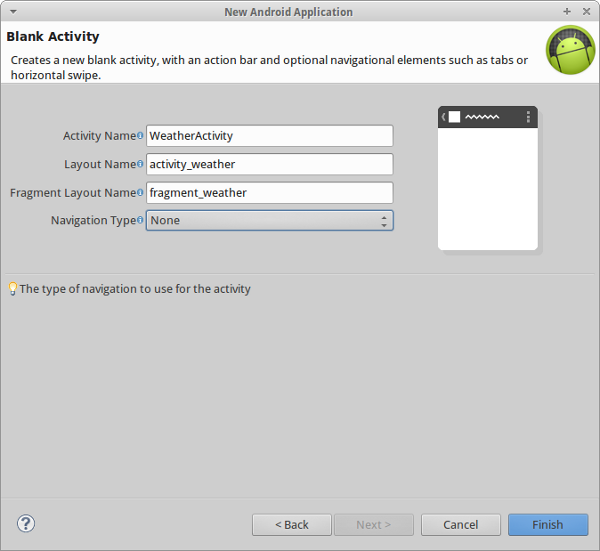
This app will only have one Activity and it will be based on the Blank Activity template as shown below.
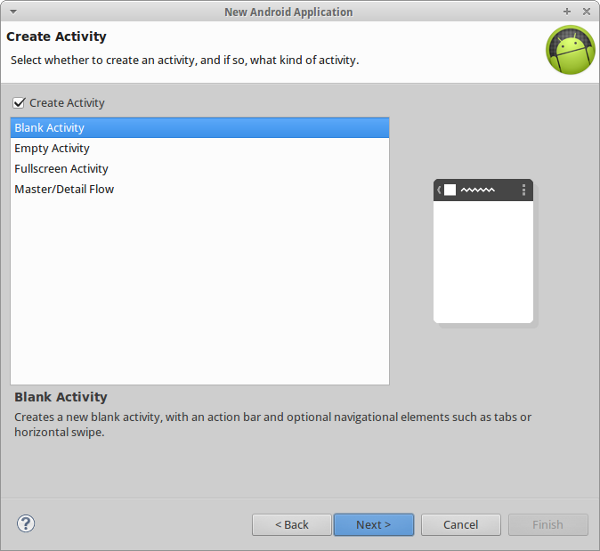
Name the Activity WeatherActivity. We'll be using a Fragment inside this Activity. The layout associated with the Activity is activity_weather.xml. The layout associated with the Fragment is fragment_weather.xml.
3. Add the Custom Font
Copy weathericons-regular-webfont.ttf to your project's assets/fonts directory and rename it to weather.ttf.
4. Edit the Manifest
The only permission this app needs is android.permission.INTERNET.
<uses-permission android:name="android.permission.INTERNET"/>
To keep this tutorial simple, we're only going to support portrait mode. The activity node of the manifest should look like this:
<activity
    android:name="ah.hathi.simpleweather.WeatherActivity"
    android:label="@string/app_name"
    android:screenOrientation="portrait"
    >
    <intent-filter>
      <action android:name="android.intent.action.MAIN" />
      <category android:name="android.intent.category.LAUNCHER" />
    </intent-filter>
</activity>
5. Edit the Activity's Layout
There isn't much to change in activity_weather.xml. It should already have a FrameLayout. Add an extra property to change the color of the background to #FF0099CC.
<FrameLayout xmlns:android="http://schemas.android.com/apk/res/android"
    xmlns:tools="http://schemas.android.com/tools"
    android:id="@+id/container"
    android:layout_width="match_parent"
    android:layout_height="match_parent"
    tools:context="ah.hathi.simpleweather.WeatherActivity"
    tools:ignore="MergeRootFrame"
    android:background="#FF0099CC" />
6. Edit the Fragment's Layout
Edit fragment_weather.xml by adding five TextView tags to show the following information:
- city and country
- current temperature
- an icon showing the current weather condition
- a timestamp telling the user when the weather information was last updated
- more detailed information about the current weather, such as description and humidity
Use a RelativeLayout to arrange the text views. You can adjust the textSize to suit various devices.
<RelativeLayout xmlns:android="http://schemas.android.com/apk/res/android"
    xmlns:tools="http://schemas.android.com/tools"
    android:layout_width="match_parent"
    android:layout_height="match_parent"
    android:paddingBottom="@dimen/activity_vertical_margin"
    android:paddingLeft="@dimen/activity_horizontal_margin"
    android:paddingRight="@dimen/activity_horizontal_margin"
    android:paddingTop="@dimen/activity_vertical_margin"
    tools:context="ah.hathi.simpleweather.WeatherActivity$PlaceholderFragment" >

    <TextView
        android:id="@+id/city_field"
        android:layout_width="wrap_content"
        android:layout_height="wrap_content"
        android:layout_alignParentTop="true"
        android:layout_centerHorizontal="true"
        android:textAppearance="?android:attr/textAppearanceLarge" />

    <TextView
        android:id="@+id/updated_field"
        android:layout_width="wrap_content"
        android:layout_height="wrap_content"
        android:layout_below="@+id/city_field"
        android:layout_centerHorizontal="true"
        android:textAppearance="?android:attr/textAppearanceMedium"
        android:textSize="13sp" />

    <TextView
        android:id="@+id/weather_icon"
        android:layout_width="wrap_content"
        android:layout_height="wrap_content"
        android:layout_centerVertical="true"
        android:layout_centerHorizontal="true"
        android:textAppearance="?android:attr/textAppearanceLarge"
        android:textSize="70sp"
        />

    <TextView
        android:id="@+id/current_temperature_field"
        android:layout_width="wrap_content"
        android:layout_height="wrap_content"
        android:layout_alignParentBottom="true"
        android:layout_centerHorizontal="true"
        android:textAppearance="?android:attr/textAppearanceLarge"
        android:textSize="40sp" />

    <TextView
        android:id="@+id/details_field"
        android:layout_width="wrap_content"
        android:layout_height="wrap_content"
        android:layout_below="@+id/weather_icon"
        android:layout_centerHorizontal="true"
        android:textAppearance="?android:attr/textAppearanceMedium"
        />

</RelativeLayout>
7. Edit strings.xml
This file contains the strings used in our app as well as the Unicode character codes that we'll use to render the weather icons. The application will be able to display eight different types of weather conditions. If you want to handle more, then refer to this cheat sheet. Add the following to values/strings.xml:
<?xml version="1.0" encoding="utf-8"?>
<resources>
<string name="app_name">Simple Weather</string>
<string name="change_city">Change city</string>
<!-- Put your own APP ID here -->
<string name="open_weather_maps_app_id">11111</string>
<string name="weather_sunny"></string>
<string name="weather_clear_night"></string>
<string name="weather_foggy"></string>
<string name="weather_cloudy"></string>
<string name="weather_rainy"></string>
<string name="weather_snowy"></string>
<string name="weather_thunder"></string>
<string name="weather_drizzle"></string>
<string name="place_not_found">Sorry, no weather data found.</string>
</resources>
8. Add a Menu Item
The user should be able to choose the city whose weather they want to see. Edit menu/weather.xml and add an item for this option.
<menu xmlns:android="http://schemas.android.com/apk/res/android"
    xmlns:app="http://schemas.android.com/apk/res-auto"
    xmlns:tools="http://schemas.android.com/tools"
    tools:context="ah.hathi.simpleweather.WeatherActivity" >

    <item
        android:id="@+id/change_city"
        android:orderInCategory="1"
        android:title="@string/change_city"
        app:showAsAction="never"/>

</menu>
Now that all the XML files are ready to use, let's move on and query the OpenWeatherMap API to fetch weather data.
9. Fetch Data From OpenWeatherMap
We can get the current weather details of any city formatted as JSON using the OpenWeatherMap API. In the query string, we pass the city's name and the metric system the results should be in.
For example, to get the current weather information for Canberra, using the metric system, we send a request to http://api.openweathermap.org/data/2.5/weather?q=Canberra&units=metric
The response we get back from the API looks like this:
{
    "base": "cmc stations",
    "clouds": {
        "all": 90
    },
    "cod": 200,
    "coord": {
        "lat": -35.28,
        "lon": 149.13
    },
    "dt": 1404390600,
    "id": 2172517,
    "main": {
        "humidity": 100,
        "pressure": 1023,
        "temp": -1,
        "temp_max": -1,
        "temp_min": -1
    },
    "name": "Canberra",
    "sys": {
        "country": "AU",
        "message": 0.313,
        "sunrise": 1404335563,
        "sunset": 1404370965
    },
    "weather": [
        {
            "description": "overcast clouds",
            "icon": "04n",
            "id": 804,
            "main": "Clouds"
        }
    ],
    "wind": {
        "deg": 305.004,
        "speed": 1.07
    }
}
Create a new Java class and name it RemoteFetch.java. This class is responsible for fetching the weather data from the OpenWeatherMap API.
We use the HttpURLConnection class to make the remote request. The OpenWeatherMap API expects the API key in an HTTP header named x-api-key. This is specified in our request using the setRequestProperty method.
We use a BufferedReader to read the API's response into a StringBuffer. When we have the complete response, we convert it to a JSONObject object.
As you can see in the above response, the JSON data contains a field named cod. Its value is 200 if the request was successful. We use this value to check whether the JSON response has the current weather information or not.
The RemoteFetch.java class should look like this:
package ah.hathi.simpleweather;

import java.io.BufferedReader;
import java.io.InputStreamReader;
import java.net.HttpURLConnection;
import java.net.URL;

import org.json.JSONObject;

import android.content.Context;
import android.util.Log;

public class RemoteFetch {

    private static final String OPEN_WEATHER_MAP_API =
			"http://api.openweathermap.org/data/2.5/weather?q=%s&units=metric";

	public static JSONObject getJSON(Context context, String city){
		try {
			URL url = new URL(String.format(OPEN_WEATHER_MAP_API, city));
			HttpURLConnection connection =
					(HttpURLConnection)url.openConnection();

			connection.addRequestProperty("x-api-key",
					context.getString(R.string.open_weather_maps_app_id));

			BufferedReader reader = new BufferedReader(
					new InputStreamReader(connection.getInputStream()));

			StringBuffer json = new StringBuffer(1024);
			String tmp="";
			while((tmp=reader.readLine())!=null)
				json.append(tmp).append("\n");
			reader.close();

			JSONObject data = new JSONObject(json.toString());

			// This value will be 404 if the request was not
			// successful
			if(data.getInt("cod") != 200){
				return null;
			}

			return data;
		}catch(Exception e){
			return null;
		}
	}
}
10. Store the City as a Preference
The user shouldn't have to specify the name of the city every time they want to use the app. The app should remember the last city the user was interested in. We do this by making use of SharedPreferences. However, instead of directly accessing these preferences from our Activity class, it is better to create a separate class for this purpose.
Create a new Java class and name it CityPreference.java. To store and retrieve the name of the city, create two methods setCity and getCity. The SharedPreferences object is initialized in the constructor. The CityPreference.java class should look like this:
package ah.hathi.simpleweather;

import android.app.Activity;
import android.content.SharedPreferences;

public class CityPreference {

	SharedPreferences prefs;

	public CityPreference(Activity activity){
		prefs = activity.getPreferences(Activity.MODE_PRIVATE);
	}

    // If the user has not chosen a city yet, return
    // Sydney as the default city
	String getCity(){
		return prefs.getString("city", "Sydney, AU");
	}

	void setCity(String city){
		prefs.edit().putString("city", city).commit();
	}

}
11. Create the Fragment
Create a new Java class and name it WeatherFragment.java. This fragment uses fragment_weather.xml as its layout. Declare the five TextView objects and initialize them in the onCreateView method. Declare a new Typeface object named weatherFont. The TypeFace object will point to the web font you downloaded and stored in the assets/fonts folder.
We will be making use of a separate Thread to asynchronously fetch data from the OpenWeatherMap API. We cannot update the user interface from such a background thread. We therefore need a Handler object, which we initialize in the constructor of the WeatherFragment class.
public class WeatherFragment extends Fragment {
    Typeface weatherFont;

	TextView cityField;
	TextView updatedField;
	TextView detailsField;
	TextView currentTemperatureField;
	TextView weatherIcon;

	Handler handler;

	public WeatherFragment(){
		handler = new Handler();
	}

    @Override
    public View onCreateView(LayoutInflater inflater, ViewGroup container,
            Bundle savedInstanceState) {
        View rootView = inflater.inflate(R.layout.fragment_weather, container, false);
        cityField = (TextView)rootView.findViewById(R.id.city_field);
        updatedField = (TextView)rootView.findViewById(R.id.updated_field);
        detailsField = (TextView)rootView.findViewById(R.id.details_field);
        currentTemperatureField = (TextView)rootView.findViewById(R.id.current_temperature_field);
        weatherIcon = (TextView)rootView.findViewById(R.id.weather_icon);

        weatherIcon.setTypeface(weatherFont);
        return rootView;
    }
}
Initialize the weatherFont object by calling createFromAsset on the Typeface class. We also invoke the updateWeatherData method in onCreate.
@Override
public void onCreate(Bundle savedInstanceState) {
    super.onCreate(savedInstanceState);
	weatherFont = Typeface.createFromAsset(getActivity().getAssets(), "fonts/weather.ttf");
	updateWeatherData(new CityPreference(getActivity()).getCity());
}
In updateWeatherData, we start a new thread and call getJSON on the RemoteFetch class. If the value returned by getJSON is null, we display an error message to the user. If it isn't, we invoke the renderWeather method.
Only the main Thread is allowed to update the user interface of an Android app. Calling Toast or renderWeather directly from the background thread would lead to a runtime error. That is why we call these methods using the handler's post method.
private void updateWeatherData(final String city){
    new Thread(){
		public void run(){
			final JSONObject json = RemoteFetch.getJSON(getActivity(), city);
			if(json == null){
				handler.post(new Runnable(){
					public void run(){
						Toast.makeText(getActivity(),
								getActivity().getString(R.string.place_not_found),
								Toast.LENGTH_LONG).show();
					}
				});
			} else {
				handler.post(new Runnable(){
					public void run(){
						renderWeather(json);
					}
				});
			}
		}
	}.start();
}
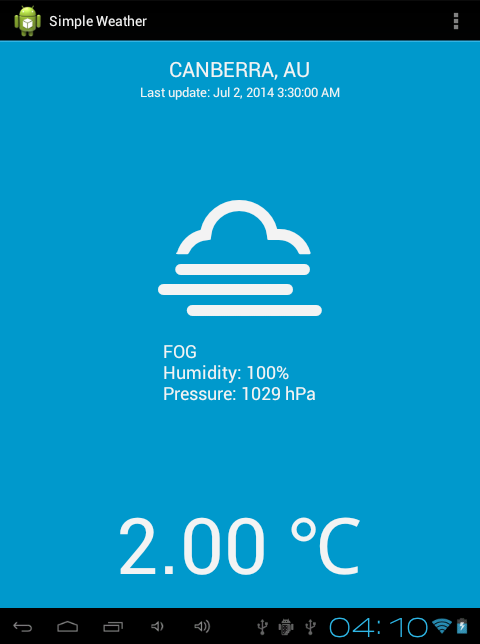
The renderWeather method uses the JSON data to update the TextView objects. The weather node of the JSON response is an array of data. In this tutorial, we will only be using the first element of the array of weather data.
private void renderWeather(JSONObject json){
    try {
    	cityField.setText(json.getString("name").toUpperCase(Locale.US) +
    			", " +
    			json.getJSONObject("sys").getString("country"));

    	JSONObject details = json.getJSONArray("weather").getJSONObject(0);
    	JSONObject main = json.getJSONObject("main");
    	detailsField.setText(
    			details.getString("description").toUpperCase(Locale.US) +
    			"\n" + "Humidity: " + main.getString("humidity") + "%" +
    			"\n" + "Pressure: " + main.getString("pressure") + " hPa");

    	currentTemperatureField.setText(
    				String.format("%.2f", main.getDouble("temp"))+ " ℃");

    	DateFormat df = DateFormat.getDateTimeInstance();
    	String updatedOn = df.format(new Date(json.getLong("dt")*1000));
    	updatedField.setText("Last update: " + updatedOn);

    	setWeatherIcon(details.getInt("id"),
    			json.getJSONObject("sys").getLong("sunrise") * 1000,
    			json.getJSONObject("sys").getLong("sunset") * 1000);

	}catch(Exception e){
		Log.e("SimpleWeather", "One or more fields not found in the JSON data");
	}
}
At the end of the renderWeather method, we invoke setWeatherIcon with the id of the current weather as well as the times of sunrise and sunset. Setting the
weather icon is a bit tricky, because the OpenWeatherMap API supports
more weather conditions than we can support with the web font we're using. Fortunately, the weather ids follow a pattern, which you can read more about on the OpenWeatherMap website.
This is how we map a weather id to an icon:
- the weather codes in the 200 range are related to thunderstorms, which means we can use
R.string.weather_thunderfor these - the weather codes in the 300 range are related to drizzles and we use
R.string.weather_drizzlefor these - the weather codes in the 500 range signify rain and we use
R.string.weather_rainfor them - and so on ...
We use the sunrise and sunset times to display the sun or the moon, depending on the current time of the day and only if the weather is clear.
private void setWeatherIcon(int actualId, long sunrise, long sunset){
    int id = actualId / 100;
	String icon = "";
	if(actualId == 800){
		long currentTime = new Date().getTime();
		if(currentTime>=sunrise && currentTime<sunset) {
			icon = getActivity().getString(R.string.weather_sunny);
		} else {
			icon = getActivity().getString(R.string.weather_clear_night);
		}
	} else {
    	switch(id) {
    	case 2 : icon = getActivity().getString(R.string.weather_thunder);
		 		 break;
    	case 3 : icon = getActivity().getString(R.string.weather_drizzle);
		 		 break;
    	case 7 : icon = getActivity().getString(R.string.weather_foggy);
    			 break;
    	case 8 : icon = getActivity().getString(R.string.weather_cloudy);
		 		 break;
    	case 6 : icon = getActivity().getString(R.string.weather_snowy);
		 		 break;
    	case 5 : icon = getActivity().getString(R.string.weather_rainy);
    			 break;
    	}
	}
	weatherIcon.setText(icon);
}
Of course, you can handle more weather conditions by adding more case statements to the switch statement of the setWeatherIcon method.
Finally, add a changeCity method to the fragment to let the user update the current city. The changeCity method will only be called from the main Activity class.
public void changeCity(String city){
    updateWeatherData(city);
}
12. Edit the Activity
During the project's setup, Eclipse populated WeatherActivity.java with some boilerplate code. Replace the default implementation of the onCreate method with the one below in which we use the WeatherFragment. The onCreate method should look like this:
@Override
protected void onCreate(Bundle savedInstanceState) {
    super.onCreate(savedInstanceState);
    setContentView(R.layout.activity_weather);

    if (savedInstanceState == null) {
        getSupportFragmentManager().beginTransaction()
                .add(R.id.container, new WeatherFragment())
                .commit();
    }
}
Next, edit the onOptionsItemSelected method and handle the only menu option we have. All you have to do here is invoke the showInputDialog method.
In the showInputDialog method, we use AlertDialog.Builder to create a Dialog object that prompts the user to enter the name of a city. This information is passed on to the changeCity method, which stores the name of the city using the CityPreference class and calls the Fragment's changeCity method.
@Override
public boolean onOptionsItemSelected(MenuItem item) {
    if(item.getItemId() == R.id.change_city){
		showInputDialog();
	}
	return false;
}

private void showInputDialog(){
	AlertDialog.Builder builder = new AlertDialog.Builder(this);
	builder.setTitle("Change city");
	final EditText input = new EditText(this);
	input.setInputType(InputType.TYPE_CLASS_TEXT);
	builder.setView(input);
	builder.setPositiveButton("Go", new DialogInterface.OnClickListener() {
		@Override
		public void onClick(DialogInterface dialog, int which) {
			changeCity(input.getText().toString());
		}
	});
	builder.show();
}

public void changeCity(String city){
	WeatherFragment wf = (WeatherFragment)getSupportFragmentManager()
							.findFragmentById(R.id.container);
	wf.changeCity(city);
	new CityPreference(this).setCity(city);
}
Your weather app is now ready. Build the project and deploy it to an Android device for testing.

Conclusion
You now have a fully functional weather application. Feel free to explore the OpenWeatherMap API to further enhance your application. You may also want to make use of more weather icons, because we are currently using only a small subset of them.

Comments