Sliders seem to be all the rage these days, and for good reason! You can add photos, content, videos, and more to an eye-catching, animated area of your website. While there is a wealth of slider plugins out there (my current favorite is the one for Nivo Slider), there is not one for FlexSlider, a slider that has keyboard shortcuts and works with swipe on touch screens. In this tutorial, we'll create that plugin!
Step 1 Plugin Setup
The first thing we need to do is set up the plugin. Create the folder /envato-flex-slider/, and in it, a file called 'envato-flex-slider.php'. Here we will add all of the necessary information and code for our plugin, starting with the plugin definition block:
<?php

/*
Plugin Name: Envato FlexSlider
Plugin URI:
Description: A simple plugin that integrates FlexSlider (http://flex.madebymufffin.com/) with WordPress using custom post types!
Author: Your Name
Version: 1.0
Author URI: Your URL
*/

?>
I also like to set up some constants for information I'll be using a lot throughout the plugin. Under the definition block, but before the closing php tag, I add this info:
define('EFS_PATH', WP_PLUGIN_URL . '/' . plugin_basename( dirname(__FILE__) ) . '/' );
define('EFS_NAME', "Envato FlexSlider");
define ("EFS_VERSION", "1.0");
I create three constants: the plugin's path, the plugin's name, and the plugin's version, which is used for upgrades, and to notify the WordPress Plugin Directory of changes, if needed. Notice I start all of my constants with "EFS." I'll do the same thing for function names so that we don't create a conflict with other plugins or the WordPress core.
Now that we have the setup done, let's add in the FlexSlider files & code.
Step 2 Adding FlexSlider
It's time to add the important part: the javascript & CSS for FlexSlider. We'll do this using WordPress' wp_enqueue_script and wp_enqueue_style to avoid conflicts. You can download FlexSlider here. We will need 2 files: jquery.flexslider-min.js, and flexslider.css, and the /theme/ folder.
wp_enqueue_script('flexslider', EFS_PATH.'jquery.flexslider-min.js', array('jquery'));
wp_enqueue_style('flexslider_css', EFS_PATH.'flexslider.css');
In both lines, we assign a name to each script, then link to the .js and .css files. Notice we are using our constant ESF_PATH. We need to use the whole path or the files won't be linked to properly. You'll also notice that we have a 3rd parameter in wp_enqueue_script. This is an array of other scripts our script depends on. In this case, it's only one, and it's JQuery. Here is a full list of scripts included with WordPress. You can use any handle in the dependencies array.
The next thing we want to do is include the actual JavaScript that will make the slider work. We do this with our own function and a WordPress Action.
function efs_script(){

print '<script type="text/javascript" charset="utf-8">
  jQuery(window).load(function() {
    jQuery(\'.flexslider\').flexslider();
  });
</script>';

}

add_action('wp_head', 'efs_script');
The important line here is add_action('wp_head', 'efs_script');, which will run our function, efs_script() when wp_head is called. Our function simply prints the required JavaScript to make FlexSlider do its thing!
You'll notice that I'm using 'JQuery' instead of the traditional '$' usually used in JQuery scripts. This is so our script does not conflict with other JavaScript libraries, like Scriptaculous.
Finally, just copy the /theme/ folder into your /envato-flex-slider/ folder.
Step 3 The Shortcode and Template Tag
Next up, we're going to set up our shortcode and template tag. The shortcode will allow users to insert the slider into any page or post. We have a really nice introduction tutorial on shortcodes here. The template tag will allow theme developers to insert the slider right into their themes. As a theme developer myself, I think it's incredibly important to include both, and to make them easy to find in documentation. You never know who'll be using your plugin.
function efs_get_slider(){

//We'll fill this in later.

}


/**add the shortcode for the slider- for use in editor**/

function efs_insert_slider($atts, $content=null){

$slider= efs_get_slider();

return $slider;

}


add_shortcode('ef_slider', 'efs_insert_slider');


/**add template tag- for use in themes**/

function efs_slider(){

	print efs_get_slider();
}
Right now this code look pretty simple. For the shortcode, we call our general function, efs_get_slider() and return the results. For the template tag, we print the results. We also use WordPress' add_shortcode() function to register our shortcode. I've purposely left out the implementation of efs_get_slider() because we haven't set up how we're going to do the images yet. To make it easy for users to add any number of images to their slider, we're going to create a custom post type.
Step 4 The Slider Image Custom Post Type
The first thing we'll do is create a new file called 'slider-img-type.php', where all of our code for the custom post type will go. First, we'll do some set up like we did for the plugin.
<php
define('CPT_NAME', "Slider Images");
define('CPT_SINGLE', "Slider Image");
define('CPT_TYPE', "slider-image");

add_theme_support('post-thumbnails', array('slider-image'));
?>
As you can see, all I've done so far is create some constants (which would come in handy for more advanced custom post types), and added thumbnail support for our new type. The only other thing we'll do in this file is register the new custom post type. For more on custom post types, you can see my tutorial on making a killer portfolio. Right before the closing php tag, we'll add this code:
function efs_register() {
    $args = array(
        'label' => __(CPT_NAME),
        'singular_label' => __(CPT_SINGLE),
        'public' => true,
        'show_ui' => true,
        'capability_type' => 'post',
        'hierarchical' => false,
        'rewrite' => true,
        'supports' => array('title', 'editor', 'thumbnail')
       );

    register_post_type(CPT_TYPE , $args );
}

add_action('init', 'efs_register');
We've created a function to register a custom post type that uses the title, editor, and thumbnail boxes. Then we add a WordPress action to call that function as soon as WordPress is initialized. That's it! The last thing to do is include our new file by adding require_once('slider-img-type.php'); to envato-flex-slider.php. I added it right above where we enqueue our scripts.
Now that we know the how we're implementing the slider images, let's go back and fill in our general function for the slider.
Step 5 Generating the Slider
Head back to where we defined efs_get_slider() and replace the comment //We'll fill this in later with the following:
$slider= '<div class="flexslider">
	  <ul class="slides">';

	$efs_query= "post_type=slider-image";
	query_posts($efs_query);


	if (have_posts()) : while (have_posts()) : the_post();
		$img= get_the_post_thumbnail( $post->ID, 'large' );

		$slider.='<li>'.$img.'</li>';

	endwhile; endif; wp_reset_query();


	$slider.= '</ul>
	</div>';

	return $slider;
The first two lines are needed because of how FlexSlider works. It will look for an unordered list called 'slides' within a div called 'flexslider' and apply the javascript/animations to that. Our CSS is also set up to define .flexslider and ul.slides. After that, we create a WordPress loop grabbing all of the posts of type slider-image (our custom post type) and we get it to print the large version of the featured image. We then return all of the generated HTML as a variable, which can be printed, as with our template tag, or returned, as with our shortcode.
A Couple of Notes
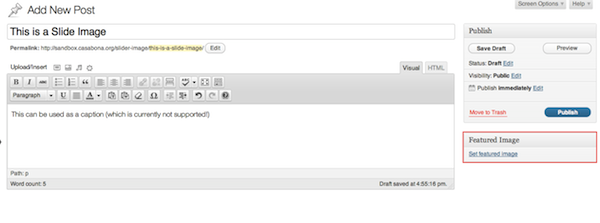
- With our custom post type, we can add a title, and featured image, and we've included the post editor box. While right now we only use the featured image (and title for the alt text), we've included the editor if, for instance, in the future we want to support captions on the slider.
- When adding a new Slider Image, we must upload a featured image for the slider to work. It will not just grab the post attachment.
Step 6 Testing it Out
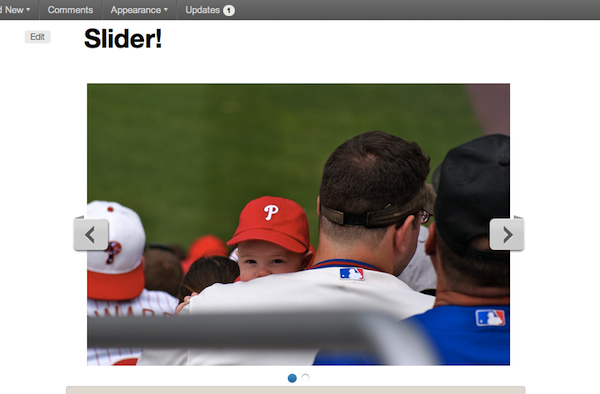
Now it's time to test! Once you add a couple of images to your new custom post type, create a new page (I just called mine Slider) and add our newly created shortcode, [ef_slider]. Save the page and view it. You should see something like this:
Conclusion
That's about it for now. There are definitely a few things we can do to improve upon the plugin, like add options support for the advanced customizations FlexSlider has to offer or adding caption support. That being said, this plugin gives you everything you need to make a fairly simple, easy to manage, easy to insert version of FlexSlider for WordPress! If you're unsure about placement or the files to include, you can download the source files using the link at the top of the tutorial. Enjoy!

Comments