This is the second installment in our Corona SDK Pinball Game tutorial. In today's tutorial, we'll add to our interface and then code the game interaction. Read on!
Where We Left Off. . .
Please be sure to check part 1 of the series to fully understand and prepare for this tutorial.
Step 1: Show Game View
When the Start button is tapped, the title view is tweened and removed, revealing the game view. There are many parts involved in this view, so we'll split them up in the next few steps.
function showGameView:tap(e)
	transition.to(titleView, {time = 300, x = -titleView.height, onComplete = function() startButtonListeners('rmv') display.remove(titleView) titleView = nil end})
Step 2: Add the Left Wall
Here we place the left wall, remember that it was split into parts to apply the physics later.
-- Left Wall Parts

	l1 = display.newImage('l1.png')
	l2 = display.newImage('l2.png', 0, 214)
	l3 = display.newImage('l3.png', 0, 273)
	l4 = display.newImage('l4.png', 0, 387)
Step 3: Add Right Wall
This code places the right wall using the same method.
	-- Right Wall Parts

	r1 = display.newImage('r1.png', 238, 0)
	r2 = display.newImage('r2.png', 274, 214)
	r3 = display.newImage('r3.png', 291, 273)
	r4 = display.newImage('r4.png', 195, 387)
Step 4: Ball & HitLines
Add the ball and HitLines with the next code:
	ball = display.newImage('ball.png', display.contentWidth * 0.5, 0)
	hitLine1 = display.newImage('hitLine.png', 70, 28)
	hitLine2 = display.newImage('hitLine.png', 110, 28)
Step 5: Hit Balls
The targets are added using the next few lines:
	-- Hit balls

	hitBall1 = display.newImage('hitBall.png', 160, 186)
	hitBall2 = display.newImage('hitBall.png', 130, 236)
	hitBall3 = display.newImage('hitBall.png', 187, 236)
	hitBall1.name = 'hBall'
	hitBall2.name = 'hBall'
	hitBall3.name = 'hBall'
Step 6: Paddles
Next we add the paddles and give them a name to use it later.
	pLeft = display.newImage('paddleL.png', 74, 425)
	pRight = display.newImage('paddleR.png', 183, 425)
	pLeft.name = 'leftPaddle'
	pRight.name = 'rightPaddle'
Step 7: Paddle Buttons
These buttons will control the paddles, add them using this code:
	lBtn = display.newImage('lBtn.png', 20, 425)
	rBtn = display.newImage('rBtn.png', 260, 425)
	lBtn.name = 'left'
	rBtn.name = 'right'
Step 8: Score TextField
Lastly, we add the score textfield.
	-- Score TextField

	score = display.newText('0', 2, 0, 'Marker Felt', 14)
	score:setTextColor(255, 206, 0)
Step 9: Wall Physics Bodies

You're probably wondering why we added the walls in parts. Since we are performing pixel perfect collisions on them, we cannot just use the addBody method (as this will add a box covering the alpha channel too) , instead we use the shape parameter to define a polygon for the image.
Why not a single polygon?
The shape parameter only accepts convex shapes and a maximum of 8 sides, our wall is neither, so we simply split it into pieces.
	-- Left Wall Parts

	physics.addBody(l1, 'static', {shape = {-40, -107, -11, -107, 40, 70, 3, 106, -41, 106}})
	physics.addBody(l2, 'static', {shape = {-23, -30, 22, -30, 22, 8, 6, 29, -23, 29}})
	physics.addBody(l3, 'static', {shape = {-14, -56, 14, -56, 14, 56, -14, 56}})
	physics.addBody(l4, 'static', {shape = {-62, -46, -33, -46, 61, 45, -62, 45}})

	-- Right Wall Parts

	physics.addBody(r1, 'static', {shape = {10, -107, 39, -107, 40, 106, -5, 106, -41, 70}})
	physics.addBody(r2, 'static', {shape = {-22, -30, 22, -30, 22, 29, -6, 29, -23, 9}})
	physics.addBody(r3, 'static', {shape = {-14, -56, 14, -56, 14, 56, -14, 56}})
	physics.addBody(r4, 'static', {shape = {32, -46, 61, -46, 61, 45, -62, 45}})
Step 10: Ball, Hit Areas, & Paddles
Similar methods are used with the other shapes, except for the circles that use the radius parameter.
	physics.addBody(ball, 'dynamic', {radius = 8, bounce = 0.4})
	physics.addBody(hitLine1, 'static', {shape = {-20, -42, -15, -49, -6, -46, 18, 39, 15, 44, 5, 44, }})
	physics.addBody(hitLine2, 'static', {shape = {-20, -42, -15, -49, -6, -46, 18, 39, 15, 44, 5, 44, }})
	physics.addBody(hitBall1, 'static', {radius = 15})
	physics.addBody(hitBall2, 'static', {radius = 15})
	physics.addBody(hitBall3, 'static', {radius = 15})
	physics.addBody(pRight, 'static', {shape = {-33, 11, 27, -12, 32, 1}})
	physics.addBody(pLeft, 'static', {shape = {-33, 1, -28, -12, 32, 11}})
Step 11: Top Wall
A simple line is added to the top of the screen as a wall to bounce the ball.
	-- Top Wall

	local topWall = display.newLine(display.contentWidth * 0.5, -1, display.contentWidth * 2, -1)
	physics.addBody(topWall, 'static')
Step 12: Game Listeners
This function adds the necessary listeners to start the game logic.
function gameListeners(action)
	if(action == 'add') then
		lBtn:addEventListener('touch', movePaddle)
		rBtn:addEventListener('touch', movePaddle)
		ball:addEventListener('collision', onCollision)
		Runtime:addEventListener('enterFrame', update)
	else
		lBtn:removeEventListener('touch', movePaddle)
		rBtn:removeEventListener('touch', movePaddle)
		ball:removeEventListener('collision', onCollision)
		Runtime:removeEventListener('enterFrame', update)
	end
end
Step 12: Rotate Paddle
The buttons on the screen will trigger the rotation of the paddles. This code handles that.
function movePaddle(e)
	if(e.phase == 'began' and e.target.name == 'left') then
		pLeft.rotation = -40
	elseif(e.phase == 'began' and e.target.name == 'right') then
		pRight.rotation = 40
	end
Step 14: Return to Original Rotation
The rotation will return to its initial state when the button is no longer being pressed.
	if(e.phase == 'ended') then
		pLeft.rotation = 0
		pRight.rotation = 0
	end
end
Step 15: Shoot
The ball will be shot when a collision with the paddle occurs, but only if the paddle rotation is active. This avoids shooting the ball when the buttons are not pressed.
function onCollision(e)
	-- Shoot
	if(e.phase == 'began' and e.other.name == 'leftPaddle' and e.other.rotation == -40) then
		ball:applyLinearImpulse(0.05, 0.05, ball.y, ball.y)
	elseif(e.phase == 'began' and e.other.name == 'rightPaddle' and e.other.rotation == 40) then
		ball:applyLinearImpulse(0.05, 0.05, ball.y, ball.y)
	end
Step 16: Increase the Score
The score will increase after a collision occurs with any hitBall.
	if(e.phase == 'ended' and e.other.name == 'hBall') then
		score.text = tostring(tonumber(score.text) + 100)
		score:setReferencePoint(display.TopLeftReferencePoint)
		score.x = 2
		audio.play(bell)
	end
end
Step 17: Check for Loss
This code checks if the ball falls through the space between the paddles and resets the ball if true.
function update()
	-- Check if ball hit bottom
	if(ball.y > display.contentHeight) then
		ball.y = 0
		audio.play(buzz)
	end
end
Step 18: Call Main Function
In order to initially start the game, the Main function needs to be called. With the above code in place, we'll do that here:
Main()
Step 19: Loading Screen
The Default.png file is an image that will be displayed right when you start the application while the iOS loads the basic data to show the Main Screen. Add this image to your project source folder, it will be automatically added by the Corona compliler.
Step 20: Icon
Using the graphics you created before, you can now create a nice and good looking icon. The icon size for the non-retina iPhone icon is 57x57px, but the retina version is 114x114px, and the iTunes store requires a 512x512px version. I suggest creating the 512x512 version first and then scaling down for the other sizes. The icon doesn't need to have the rounded corners or the transparent glare, iTunes and the iPhone will do that for you.
Step 21: Testing in the Simulator
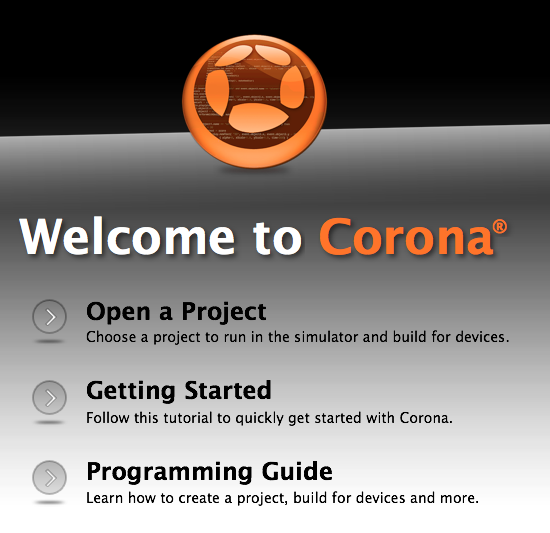
It's time to run the final test. Open the Corona Simulator, browse to your project folder, and then click open. If everything works as expected, you are ready for the final step!
Step 22: Build
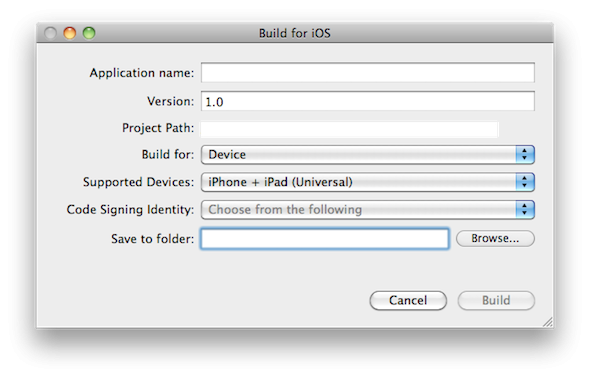
In the Corona Simulator, go to File > Build and select your target device. Fill the required data and click build. Wait a few seconds and your app will be ready for device testing and/or submission for distribution!
Conclusion
Experiment with the final result and try to make your custom version of the game!
I hope you liked this tutorial series and found it helpful. Thank you for reading!

Comments