In this tutorial, I'll be showing you how to create a balance game in Corona SDK. You'll learn more about touch controls and collision detection without physics. The objective of the game is to keep the ball from touching the floor. Read on.
1. Application Overview
Using ready-made graphics, we'll create an entertaining game using Lua and the Corona SDK APIs. The player will be able to move a ping-pong paddle on the screen in order to hit a ball. You can modify the parameters in the code to customize the game.
2. Target Device
The first thing we need to do is select the platform we want to run our application on so we're able to choose the size of the images we'll use.
The iOS platform has the following requirements:
- iPad 1/2/Mini: 1024px x 768px, 132 ppi
- iPad Retina: 2048px x 1536px, 264 ppi
- iPhone/iPod Touch: 320px x 480px, 163 ppi
- iPhone/iPod Retina: 960px x 640px, 326 ppi
- iPhone 5/iPod Touch: 1136px x 640px, 326 ppi
Because Android is an open platform, there are many different devices and resolutions. A few of the more common screen characteristics are:
- Asus Nexus 7 Tablet: 800px x 1280px, 216 ppi
- Motorola Droid X: 854px x 480px, 228 ppi
- Samsung Galaxy SIII: 720px x 1280px, 306 ppi
In this tutorial, we'll be focusing on the iOS platform in terms of graphics. In particular, we'll be developing for the iPhone and iPod touch. However, the code of this tutorial can also be used if you target the Android platform.
3. Interface
We'll use a simple user interface involving multiple shapes, buttons, bitmaps, and more. The graphics that we'll use for this tutorial can be found in the project included with this tutorial.
4. Export Graphics
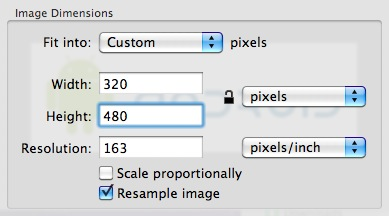
Depending on the device you've selected, you may need to convert the graphics to the recommended resolution (ppi), which you can do in your favorite image editor. I used the Adjust Size... option in the Tools menu in the Preview application on OS X. Remember to give the images a descriptive name and save them in your project folder.
5. Application Configuration
We'll use a configuration file, config.lua, to make the application go full screen across devices. The configuration file shows the original screen size and the method used to scale the content in case the application is run on another resolution.
application =
{
    content =
    {
        width = 320,
        height = 480,
        scale = "letterbox"
    },
}
6. main.lua
Let's write the actual application. Open your preferred Lua editor. Any plain text editor will work, but it is recommended to use a text editor that has syntax highlighting. Create a new file and save it as main.lua in your project folder.
7. Project Structure
We'll structure our code as if it were a class. If you're familiar with ActionScript or Java, you should find the project structure familiar.
Necesary Classes

Variables and Constants

Declare Functions

    contructor (Main function)

    class methods (other functions)

call Main function
8. Hide Status Bar
display.setStatusBar(display.HiddenStatusBar)
This code snippet hides the status bar. The status bar is the bar at the top of the device's screen that shows the time, signal, and other indicators.
9. Background

A simple background for the application's user interface. The code snippet below draws the background to the screen.
-- Graphics

-- [Background]

local bg = display.newImage('bg.png')
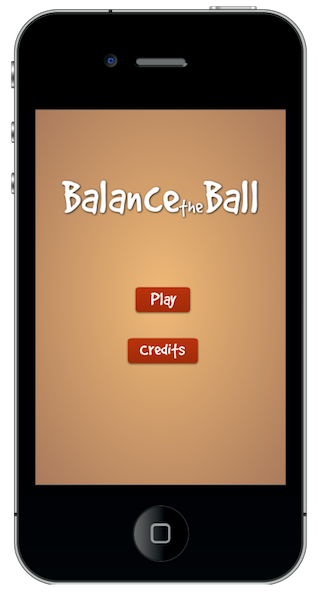
10. Title View
This is the title view. It's the first interactive screen to appear in our game. These variables store its components.
-- [Title View]

local title
local playBtn
local creditsBtn
local titleView
11. Credits View
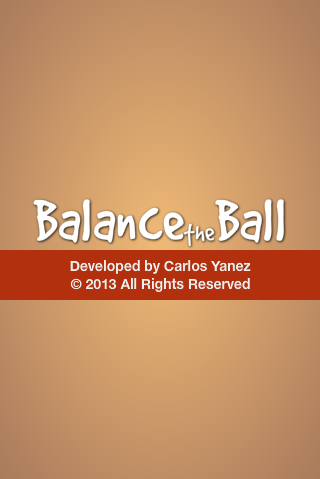
The credits view shows the credits and copyright of the application. This variable is used to store it.
-- [CreditsView]

local creditsView
12. Instructions Message
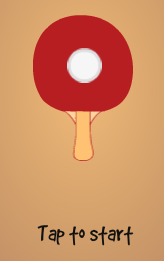
A message with instructions will appear at the start of the game and it will disappear after the first tap.
-- Instructions

local ins
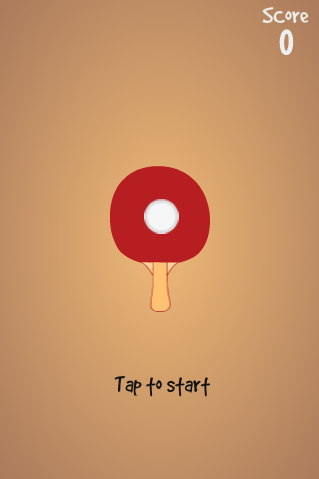
13. Paddle

This is the graphic for the ping-pong paddle. It will be placed at the view's center.
-- Paddle

local paddle
local paddleTop
local paddleBottom
14. Ball

And this is the graphic for the ping-pong ball used in the game.
-- Ball

local ball
15. Alert

The alert is displayed when the player misses the ball and the game is over. It displays a message and ends the game.
-- Alert

local alertView
16. Sounds

We'll use sound effects to spice up the game. The sounds used in this game can be found on freesound, a collaborative database of Creative Commons Licensed sounds.
-- Sounds

local pong = audio.loadSound('pong.mp3')
17. Variables
The following code snippet shows the variables that we'll use. Read the comments to understand what each variable is used for.
-- Variables

local scoreTF -- score textfield
local scale = 1.1 -- initial ball scale
local variation = 0.05 -- controls the scale variation
local ballX = 0
local ballY = 0
local ballVar = 0.5 -- ball variation
18. Declare Functions
Declare all functions as local at the start.
-- Functions

local Main = {}
local startButtonListeners = {}
local showCredits = {}
local hideCredits = {}
local showGameView = {}
local gameListeners = {}
local startGame = {}
local hitTestObjects = {}
local update = {}
local movePaddle = {}
local alert = {}
19. Constructor
Next, we create the function that will initialize the game logic.
function Main()
  -- code...
end
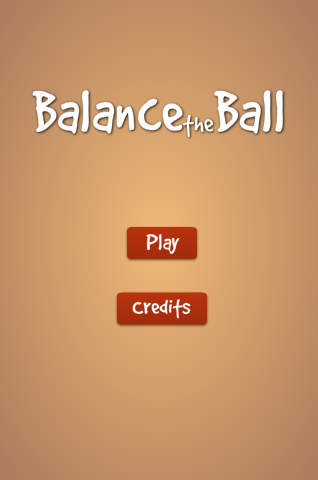
20. Add Title View
We start by placing the title view in the stage and call a function that will add tap listeners to the buttons.
function Main()
  titleBg = display.newImage('titleBg.png', 26, 72)
  playBtn = display.newImage('playBtn.png', 125, 225)
  creditsBtn = display.newImage('creditsBtn.png', 115, 290)
  titleView = display.newGroup(titleBg, playBtn, creditsBtn)

  startButtonListeners('add')
end
21. Start Button Listeners
The following function adds the necessary listeners to the TitleView's buttons.
function startButtonListeners(action)
  if(action == 'add') then
    playBtn:addEventListener('tap', showGameView)
    creditsBtn:addEventListener('tap', showCredits)
  else
    playBtn:removeEventListener('tap', showGameView)
    creditsBtn:removeEventListener('tap', showCredits)
  end
end
22. Show Credits
The credits screen is shown when the user taps the about button. A tap listener is added to the credits view to dismiss it when the user taps it.
function showCredits:tap(e)
  playBtn.isVisible = false
  creditsBtn.isVisible = false
  creditsView = display.newImage('credits.png', 0, display.contentHeight)

  lastY = titleBg.y
  transition.to(titleBg, {time = 300, y = (display.contentHeight * 0.5) - (titleBg.height + 50)})
  transition.to(creditsView, {time = 300, y = (display.contentHeight * 0.5) + 35, onComplete = function() creditsView:addEventListener('tap', hideCredits) end})
end
23. Hide Credits
When the user taps credits view, it is animated out of the stage and removed.
function hideCredits:tap(e)
  transition.to(creditsView, {time = 300, y = display.contentHeight + 25, onComplete = function() creditsBtn.isVisible = true playBtn.isVisible = true creditsView:removeEventListener('tap', hideCredits) display.remove(creditsView) creditsView = nil end})
  transition.to(titleBg, {time = 300, y = lastY});
end
24. Show Game View
When the play button is tapped, the title view is animated off the screen and the game view is revealed. There are a number of moving parts so we'll take a closer look at each of them.
function showGameView:tap(e)
  transition.to(titleView, {time = 300, x = -titleView.height, onComplete = function() startButtonListeners('rmv') display.remove(titleView) titleView = nil bg:addEventListener('tap', startGame) end})
25. Instructions Message
The following code snippet adds the instruction message.
ins = display.newImage('ins.png', 112, 370)
26. Paddle Parts
Next, we add the paddle parts. It is split up into two parts for better collision detection.
-- Paddle

  paddleBottom = display.newImage('paddleBottom.png', 138.6, 262)
  paddleTop = display.newImage('paddleTop.png', 110, 166)
  paddle = display.newGroup(paddleBottom, paddleTop)
27. Ball
We add the ball and set its scale.
-- Ball

  ball = display.newImage('ball.png', 146, 201)
  ball:scale(scale, scale)
28. Score
We create a score text field at the top right of the stage.
-- Score

  score = display.newImage('score.png', 260, 0)
  scoreTF = display.newText('0', 278, 21, 'Marker Felt', 30)
  scoreTF:setTextColor(238, 238, 238)

  gameListeners('add')
end
29. Game Listeners
The following function adds the necessary listeners for starting the game logic.
function gameListeners(action)
  if(action == 'add') then
    bg:addEventListener('touch', movePaddle)
  else
    bg:removeEventListener('touch', movePaddle)
    Runtime:removeEventListener('enterFrame', update)
  end
end
30. Start Function
The startGame function removes the instruction message and adds a listener to the main function of the game. In the function, a random y position is selected from the previously created table and subsequently adds physics to the newly created object. We add a collision listener to every enemy and also add them to the enemies table.
function startGame()
  display.remove(ins)
  bg:removeEventListener('tap', startGame)
  Runtime:addEventListener('enterFrame', update)
end
31. Hit Test Objects
For collision detection without using physics, we use a great function, which you can find on the Corona Labs Code Exchange website.
function hitTestObjects(obj1, obj2)
        local left = obj1.contentBounds.xMin <= obj2.contentBounds.xMin and obj1.contentBounds.xMax >= obj2.contentBounds.xMin
        local right = obj1.contentBounds.xMin >= obj2.contentBounds.xMin and obj1.contentBounds.xMin <= obj2.contentBounds.xMax
        local up = obj1.contentBounds.yMin <= obj2.contentBounds.yMin and obj1.contentBounds.yMax >= obj2.contentBounds.yMin
        local down = obj1.contentBounds.yMin >= obj2.contentBounds.yMin and obj1.contentBounds.yMin <= obj2.contentBounds.yMax
        return (left or right) and (up or down)
end
32. Scale Ball
The update function, shown below, runs every frame. In this function, we first scale the ball based on the values set by the variables.
function update()
  -- Scale Balls
  scale = scale - variation
  ball.xScale = scale
  ball.yScale = scale
33. Ball Raise
This part increases the ball size to simulate an increase in its height.
-- Raising
  if(math.floor(ball.xScale * 10) >= 15) then
    variation = 0.05
  end
34. Ball Missed
The same method is used to check if the ball has touched the floor, an essential aspect of the game.
-- Missed
  if(math.floor(ball.xScale * 10) < 3) then
    alert()
  end
35. Move Ball
In the following code snippet, we move the ball. Based on the value of the variables, it is moved up or down.
-- Move Ball

  ball.x = ball.x - ballX
  ball.y = ball.y - ballY
36. Ball Hit
A scale is set to be the same paddle height, which means that the ball has touched the paddle. We then increase the score and play a sound to provide feedback to the user.
-- Falling and Hit with paddle
  if(math.floor(ball.xScale * 10) == 3 and hitTestObjects(paddleTop, ball)) then
    variation = -0.05
    -- Increase Score
    scoreTF.text = tostring(tonumber(scoreTF.text) + 1)
    -- Play Sound
    audio.play(pong)
37. Change Ball Direction
The paddle is divided in four sections, top left, top right, bottom left, and bottom right. Each section moves the ball in a different direction.
-- Move Ball based on where it hits
    if(ball.x < paddle.x + 50) then       ballX = (math.random() * 0.5) + ballVar     end     if(ball.x  > paddle.x) then
      ballX = (math.random() * -0.5) - ballVar
    end
    if(ball.y < paddle.y + 75) then       ballY = (math.random() * 0.5) + ballVar     end     if(ball.y > paddle.y - 70) then
      ballY = (math.random() * -0.5) - ballVar
    end
    -- Increase moving distance
    ballVar = ballVar + 0.025 -- Every four hits increases 0.1
  end
end
38. Move Paddle
The movePaddle function handles the movement of the paddle using touch controls.
function movePaddle(e)
  if(e.phase == 'moved') then
    paddle.x = e.x
    paddle.y = e.y
  end
end
39. Alert
The alert function creates an alert view. The function animates the alert view onto the screen and ends the game.
function alert()
  gameListeners('rmv')
  alert = display.newImage('alert.png', (display.contentWidth * 0.5) - 105, (display.contentHeight * 0.5) - 55)
  transition.from(alert, {time = 300, xScale = 0.5, yScale = 0.5})
end
40. Call Main Function
In order to start the game, the Main function needs to be invoked. With the rest of the code in place, we do that here.
Main()
41. Loading Screen
On the iOS platform, the file named Default.png is displayed while the application is launching. Add this image to your project's source folder, it will be automatically added by the Corona compiler.
42. Icon
Using the graphics you created earlier, you can now create a nice icon. The dimensions of the icon size for a non-retina iPhone are 57px x 57px, while the retina version needs to be 114px x 114px. The artwork for iTunes is required to be 1024px x 1024px. I suggest creating the iTunes artwork first and then creating the smaller sized images by scaling the iTunes artwork down to the correct dimensions. There is no need to make the application icon glossy or add rounded corners as this is taken care of by the operating system for you.
43. Testing in Simulator
It's time to test our application in the simulator. Open the Corona Simulator, browse to your project folder, and click Open. If everything works as expected, you're ready for the final step.
44. Build Project
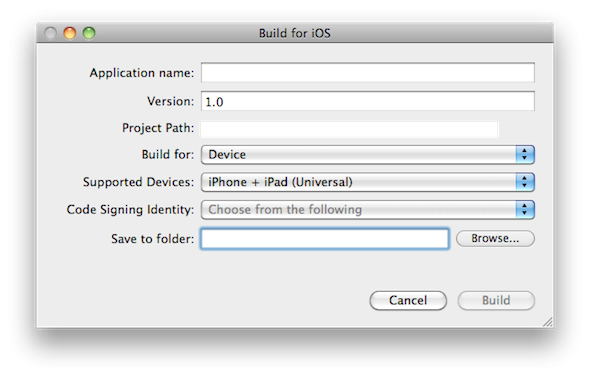
In the Corona Simulator, go to File > Build and select the target device. Fill out the required fields and click Build. Wait a few seconds and your application is ready to test on a device and/or to be submitted for distribution.
Conclusion
In this tutorial, we've learned about touch listeners, and collision detection. Experiment with the final result and try to modify the game to create your own version of the game. I hope you liked this tutorial and found it helpful. Thank you for reading.

Comments