Welcome to the final tutorial in our Three Shell game series! In this tutorial, we'll handle the shell animation, tap events, and the steps to build the final app.
Where We Left Off. . .
Please be sure to check part 1 and part2 of the series to fully understand this tutorial.
Step 1: Place Bet
This function runs when the BetBtn is pressed. It will subtract a credit from the bank and remove the listener from the button to avoid pressing it while the shells are moving.
function placeBet:tap(e)
	-- Place Bet

	bank.text = bank.text - 1;

	-- Remove Button Listener

	betBtn:removeEventListener('tap', placeBet)
Step 2: Change Message
The message in the bottom will change depending on the current game state. The next line changes that message.
msg.text = ''
Step 3: Reset Total Movements
The shells movements are calculated by this variable. Resetting the value will make the shells make the correct moves every time.
totalMoves = 5
Step 4: Hide Ball
The next line of code performs the tween that hides the ball using the shell. The function that moves the shells is called when the animation is complete.
transition.to(s2, {time = moveSpeed, y = s2.y + 30, onComplete = randomShellMove})
Step 5: Calculate Random Shell
This code uses Math to generate a number that will be used in the Table to select two random shells every movement.
function randomShellMove()
	local randm = math.floor(math.random() * 2) + 1

	local shell1 = shells[randm]
	local shell2

	if(shell1 ~= 3) then
		shell2 = shells[randm + 1]
	elseif(shell1 ~= 1) then
		shell2 = shells[randm - 1]
	end

	ball.isVisible = false

	totalMoves = totalMoves -1
Step 6: Tween Shells
These lines of code are very important as they perform the animation of the shells. They calculate the final position of the selected shells based on its last position.
transition.to(shell1, {time = moveSpeed, x = shell2.x, y = shell2.y})
transition.to(shell2, {time = moveSpeed, x = shell1.x, y = shell1.y, onComplete = checkMovesLeft})
Step 7: Check Moves Left
When the animation is complete, we check the moves left in our variable to determine if another shell movement should be made.
function checkMovesLeft()
	if(totalMoves > 0) then
		randomShellMove()
Step 8: Add Shell Tap Listeners
If the shuffle part is complete its time to add interactivity to the shells and change the message instructions.
else
		s1:addEventListener('tap', revealBall)
		s2:addEventListener('tap', revealBall)
		s3:addEventListener('tap', revealBall)

		-- Change Msg

		msg.text = 'Click where the ball is'
		msg:setReferencePoint(display.TopLeftReferencePoint)
		msg.x = -20
	end
end
Step 9: Reveal Ball
Any shell the player clicks will run this function. This part will remove the shell tap listeners to avoid unwanted behavior. It will also move the ball to the correct position and perform the animation that will make the ball visible. If the correct shell is selected it will add a credit to the bank. Finally, it will check if there are credits left in the bank to perform another game or it will call an alert if there aren't.
function revealBall:tap(e)
	-- Remove Shell Mouse Listeners

	s1:removeEventListener('tap', revealBall)
	s2:removeEventListener('tap', revealBall)
	s3:removeEventListener('tap', revealBall)

	-- Move Ball to correct position

	ball.x = s2.x + 75
	ball.y = s2.y + 150
	ball.isVisible = true

	-- Give credits if correct guess

	if(e.target.name == 's2') then
		bank.text = bank.text + 2

		-- Change Msg

		msg.text = 'Correct! Click Bet to play again'
		msg:setReferencePoint(display.TopLeftReferencePoint)
		msg.x = -20
	else
		msg.text = 'Wrong! Click Bet to play again'
		msg:setReferencePoint(display.TopLeftReferencePoint)
		msg.x = -20
	end

	-- Reveal Ball

	transition.to(s2, {time = moveSpeed, y = s2.y - 30})

	-- Add Bet button listener

	betBtn:addEventListener('tap', placeBet)

	-- Check for bank credits

	if(bank.text == '0') then
		betBtn:removeEventListener('tap', placeBet)

		alert()
	end
end
Step 10: Alert
This function will stop the game by using the alert background and tweening it.
function alert()
	timer.cancel(timerSource)
	lastWorm.isVisible = false

	local alert = display.newImage('alertBg.png')
	alert:setReferencePoint(display.CenterReferencePoint)
	alert.x = display.contentCenterX
	alert.y = display.contentCenterY
	transition.from(alert, {time = 300, xScale = 0.3, yScale = 0.3})

	local score = display.newText(wormsHit .. '/' .. totalWorms, 220, 190, native.systemFontBold, 20)
	score:setTextColor(204, 152, 102)
end
Step 11: Restart
When the alert graphic is tapped, the graphics will be cleared and the app will start again.
function restart()
	display.remove(gameView)
	gameView = nil
	display.remove(alert)
	alert = nil

	Main()
end
Step 12: Call Main Function
In order to initially start the game, the Main function needs to be called. With the above code in place, we'll do that here:
Main()
Step 13: Loading Screen

The Default.png file is an image that will be displayed right when you start the application while iOS loads the basic data to show the Main Screen. Add this image to your project source folder. It will be automatically added by the Corona compiler.
Step 14: Icon

Using the graphics you created before, you can now create a nice and good looking icon. The icon size for the non-retina iPhone icon is 57x57px, but the retina version is 114x114px and the iTunes store requires a 512x512px version. I suggest creating the 512x512 version first and then scaling down for the other sizes.
It doesn't need to have the rounded corners or the transparent glare, iTunes and the iPhone will do that for you.
Step 15: Testing in Simulator
It's time to do the final test. Open the Corona Simulator, browse to your project folder, and then click open. If everything works as expected, you should be ready for the final step!
Step 16: Build
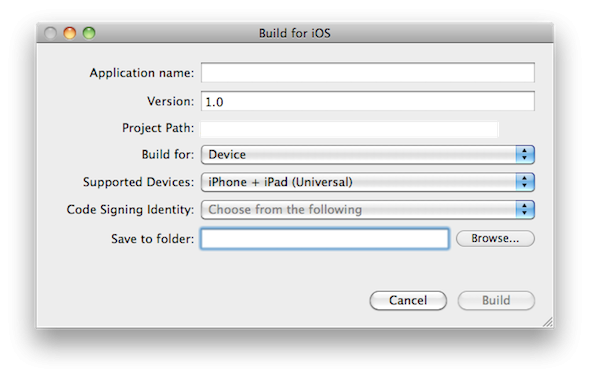
In the Corona Simulator, go to File > Build and select your target device. Fill the required data and click build. Wait a few seconds and your app will be ready for device testing and/or submission for distribution!
Conclusion
Experiment with the final result and try to make your custom version of the game!
I hope you liked this tutorial series and find it helpful. Thank you for reading!

Comments