Welcome to the third installment on our endless runner game! This tutorial is going to cover how to create sprites via sprite sheets and the animation of our game character. So far in our game we should have a nice view with three layers of images scrolling at different speeds, making for some awesome parrallax scrolling-ness! The next logical step for us is going to be adding our hero to the game. We are going to do this in two steps. This tutorial will cover the first step. The next tutorial will cover actually adding the hero into our existing game and adding controls to make him follow our every command.
Intro to Sprites and Sprite Sheets
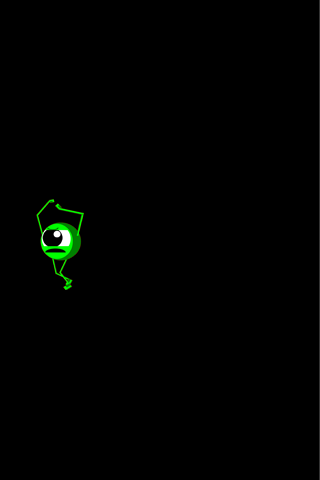
Now, before we get started on the game, let's talk quickly about sprites, sprite sheets, and animation in general terms. If you have experience with graphics, animation, or game development, this is probably a familiar topic to you. However, for our discussion, we are going to assume you have no experience with any of the aforementioned topics. So, let's start with animation. Animation in games is done the exact same way that it's done in cartoons and movies. Think about what happens when you go to the movies and they start the film. When you are watching the film you aren't actually watching people move and talk, but you are watching a series of flashing images with sound being played along the reel at the same time, giving the illusion that you are watching something that is alive and breathing. This is the same thing that happens with our games. We create the illusion of "life" by rapidly flashing images on screen. When this is done fast enough, it becomes a smooth animation. So, the question is how do we get these smooth animations into our game. The answer is to use sprites. The Corona SDK provides the functionality of sprites for us, so the only thing that we need to worry about is creating our sprites and assigning our animations to them. Take a look at the animated gif below:

When you see that animation, it looks like a little monster running and flailing his arms. What you are really looking at is a series of images, taken from a single sprite sheet, flashing over and over. Note that the last image in the sequence is not included in the animation. This is a simple sprite sheet, and it is how you will be setting up the images for your game as well.
So, the question of precisely why we use sprite sheets has probably popped into your mind. The answer is two fold and fairly simple: memory and simplicity. I want you to look at the four images I made below. All very simple, checkered board design (although the sprites are very small so they don't appear to be that, but open them up in any program and zoom in and you will see the checker board :D), with sizes ranging from 8x8 all the way up to 256x256.


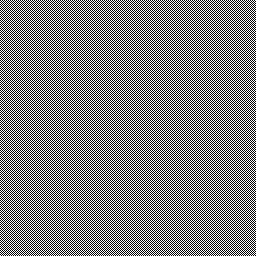
The first reason, memory, will become very apparent if you download the images and look at their sizes. Notice the size difference from going from 8x8 all the way up to 256x256. If you don't want to download them I will spare you the 30 seconds it would have taken.
Let's assume that all of our images are going to be 16x16 pixels in dimension (of course this is not realistic, but our example holds true for much larger images as well). The images are 16x16 and take up a whopping 2.74KB each. Let's say we have 256 sprites that make up our character. These images might include him walking in different directions, jumping, shooting a weapon, or doing anything else you might want your characters to do. If we were to put them in individual 16x16 PNG files (PNG is a common format for mobile games as they have a very small memory footprint), it would take up to 701.44KB to hold all the images. That doesn't seem so large because most devices have lots of memory, right? Yes, but remember we are likely going to have hundreds of such images in our game. Even so, 701K for a little image on a mobile device is WAY too big. On the iPhone most small games try to stay under 20MB because the is the largest file you can download over 3G. Larger files must be done over WiFi or downloaded via iTunes. If you think a 20MB limit is bad, it used to be 10MB! Now, let's look at why it is beneficial to group our sprites into sprite sheets.
Let's say you put those 256 16x16 sprites onto just one sprite sheet. How large do you think that the resulting file would be? If you downloaded the files and looked at the sizes you know that the 256x256 image is only 3.42KB! That is a savings of 698.02KB! But how is that possible!?! The answer has to do with how images scale and are compressed and a lot of other technical stuff that we are not going to go into. The important thing to take away is that doubling an image in size doesn't necessarily double it in memory. In fact, if you look at the other sizes of the images you will notice that the size of the images from 16x16 to 128x128 sprite only moves up to 2.98KB, and the 256x256 only moves up to 3.43KB! I know, awesome right!?!
The second reason we do this is for simplicity's sake. Sprite sheets provide a nice way to organize all of our images. If you have ever played a game on the Atari, NES, Sega Saturn, SNES, Gameboy, or pretty much anything that is 2D, then you have seen sprite sheets at work. Some of those games have thousands and thousands of sprites in them. Take a game like Final Fantasy 3 on the Super Nintendo (which we all know is really Final Fantasy 6, right?). They have dozens of characters, hundreds of enemies, spells, items, terrain types, and probably several dozen other things that I'm leaving out. So how do they keep track of all of those individual sprites? Again, the answer is sprite sheets. Imagine that instead of having dozens of sprites or sprite sheets for each character, they had all of the images for each character on 1 sheet. That way they always knew exactly what to reference. Life becomes exponetially easier when working on large projects. As a quick reference, google image search for "Finaly Fantasy 6 Sprite Sheets" and check out some of the sprite sheets from Final Fantasy to get an idea of how they are used in large games.
The overall process of creating sprites with animations is a pretty simple process. Open up a blank file and name it main.lua. The first thing that we need to do is to set up our sprite handler. Go ahead and put the following code in:
--This should look familiar, hides the status bar from view
display.setStatusBar(display.HiddenStatusBar)
--'sprite' is what we will be using to create our sprite sheets
--'require' lets Corona know that we are making calls out to already
--established functions in another file. "sprite" is already built into
--Corona so we don't have to do any more work on that end
--We will use sprite as a 'sprite handler' to create spritesheets
local sprite = require("sprite")
Because Corona has already done most of the work for us, we are left with a fairly simple process. Here is what you need to remember. From our sprite handler we create a sprite sheet. From our sprite sheet we create 'sets'. From our sets, we create animations and sprite objects. For this method of sprite sheet creation to work, each sprite should be the same dimension. So each frame of our little monster is 100x100. In this example there is one long sheet of sprites. In order for this to work the best and most efficiently, sprite sheets should always be made in powers of 2. 2x2, 4x4, 16x16, 32x32, 64x64, etc... Of course you will never use anything that small for the most part, but this holds true all the way up to 1024x1024. You can theoretically go even larger than that, however, each device has a max texture size and if you go above that texture size your app will not be able to load the sprite sheets. So, before you go adding sprite sheets that are 4096x4096, be sure to do your research to make sure your target device can handle it! Another thing to note is that when you have your images in a square, it will read them the same way you would read a book. Top to bottom, left to right, like so:
1 2 3 4
5 6 7 8
9 10 11 12
13 14 15 16
So when you tell your sprite to look at frames 6 to 12 it will know automatically where to go.
Add this code to your project below the require line:
--creating a new spritesheet will break the image you put into even blocks that are 100
--by 100, change those parameters to whatever size your images are. Note that this method
--of sprite creation only works for sprites that are the same size. There are other methods
--to handle sprites of different sizes, but that is beyond the scope of this tutorial.
local spriteSheet = sprite.newSpriteSheet("images/monsterSpriteSheet.png", 100, 100)

--from our spritesheet we create a spriteSet, this is how we how we can group different sprites
--together for organizational purposes. Say for example we had 2 different monsters, we could put
--them in the same spritesheet and create 2 different sprite sets each holding the information for
--their respective frames. This sprite set holds all seven frames in our image,defined by 1 and 7.
local monsterSet = sprite.newSpriteSet(spriteSheet, 1, 7)

--next we make animations from our sprite sets. To do this simply tell the
--function which sprite set to us, next name the animation, give the starting
--frame and the number of frames in the animation, the number of milliseconds
--we want 1 animation to take, and finally the number of times we want the
--animation to run for. 0 will make it run until we tell the animtion to stop
sprite.add(monsterSet, "running", 1, 6, 600, 0)
sprite.add(monsterSet, "jumping", 7, 7, 1, 1)

--the last step is to make a sprite out of our sprite set that holds all of the animtions
local hero = sprite.newSprite(monsterSet)
Now that we have our sprite sheet created and have made a sprite object out of that, let's initialize some of the basics we will need for him.
Add this below the last bit of code you entered:
--finds the center of the screen
x = display.contentWidth/2
y = display.contentHeight/2
--a boolean variable that shows which direction we are moving
right = true

hero.x = x
hero.y = y
That code will place our sprite in the center of the screen. Next add this code:
--use prepare to let the sprite know which animation it is going to use
hero:prepare("running")
--calling play will start the loaded animation
hero:play()
Run this code and we should have our little monster running in place in the center of the screen. That's really all there is to creating animated sprites from sprite sheets. We will be using them a bit more in-depth in the following tutorials. For a full reference on sprite sheets, you can check out the Corona SDK reference. This is all we are going to cover on the topic for now, so hopefully it is enough to get you started! For one final effect before you go making our monster run across the screen, add the following code to the bottom of your code:
function update()
	--if we are running right then keep moving right
	if(right) then
		hero.x = hero.x + 3
	--if we are not moving right keep moving left
	else
		hero.x = hero.x - 3
	end

	--if our monster has run off the screen have him turn
	--and run in the opposite direction. hero.xScale = -1
	--will flip our sprite horizontally
	if(hero.x > 380) then
		right = false
		hero.xScale = -1
	end

	if(hero.x < -60) then
		right = true
		hero.xScale = 1
	end
end

--call the update function
timer.performWithDelay(1, update, -1)
Easy stuff. Strip out all the comments I made in the code explaining things and you will see just how easy Corona makes it set up nice animated sprites. If you have and questions or comments let me know!

Comments