Welcome to the sixth part in our Endless Runner tutorial series! Our game is starting to shape up and feel more polished. After completing today's steps, it will be much more interactive and fun to play. We will add two more events that will create some exciting new challenges for the players. First, we'll add the ability for our hero to fire a small bolt to clear obstacles that come toward him. Keep in mind that the little "blueish" image is being fired from our monster. The images we're working with are not especially professional-looking since they are just for practice. After the monster has the ability to fire some bolts, we will also add events which will send obstacles coming back toward him. After that, we'll create two types of obstacles: the first is a spike wall that will sit on the ground and travel at the same speed as the ground, and the second is a ghost that will fly in from the upper right side of the screen toward the player.
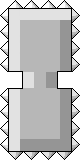
So, let's get started! The first thing that we need to do is to make sure we have all of the assets in the right place. Download the file attached to this tutorial, and in the "new" folder you will find three new assets. You can also just right-click on the images and save them in the correct folder. The images should be named spikeBlock.png, ghost.png, and blast.png.


Open up your main.lua file that can be found in the "old" folder of the tutorial downloads. We will start by giving our players the ability to fire because we don't want to leave them defenseless as they are bombarded with new challenges! We can add this ability in three steps. The first will be instantiating 5 bolts and putting them in a group. Rather than creating and destroying objects every time we want to use them, we can be more efficient by preparing them and storing them off-screen until we need to use them. We are actually going to be doing the same thing for each of the three different images, so go ahead and add this code in between where we declare the variable speed and where we create our blocks.
--create ghosts and set their position to be off-screen
for a = 1, 3, 1 do
	ghost = display.newImage("ghost.png")
	ghost.name = ("ghost" .. a)
	ghost.id = a
	ghost.x = 800
	ghost.y = 600
	ghost.speed = 0
        --variable used to determine if they are in play or not
	ghost.isAlive = false
        --make the ghosts transparent and more... ghostlike!
	ghost.alpha = .5
	ghosts:insert(ghost)
end
--create spikes
for a = 1, 3, 1 do
	spike = display.newImage("spikeBlock.png")
	spike.name = ("spike" .. a)
	spike.id = a
	spike.x = 900
	spike.y = 500
	spike.isAlive = false
	spikes:insert(spike)
end
--create blasts
for a=1, 5, 1 do
	blast = display.newImage("blast.png")
	blast.name = ("blast" .. a)
	blast.id = a
	blast.x = 800
	blast.y = 500
	blast.isAlive = false
	blasts:insert(blast)
end
Notice that they all have some common features. We need to go through and name them in case we ever want to reference them individually. We give them an id, also giving us more future reference options. We give them their offscreen x and y coordinates (we stack similar images on top of each other). Another thing we give them all is the variable 'alive'. This is set to false by default as they will be sitting off the screen. Giving the sprites this variable will allow us to quickly check whether the sprite is in use or not. The only sprite that has anything different is the ghost sprite. For ghost sprites we'll add a speed variable so that we can have ghosts moving at random speeds. We'll also set the alpha of the ghosts to .5 so that they appear more, shall we say, ghostlike!
The next two things that we need to do are to create their respective display groups, then add those groups to the screen display group so that we will be able to see them in the game. Add these right beneath the other display groups' instantiation.
local ghosts = display.newGroup()
local spikes = display.newGroup()
local blasts = display.newGroup()
Next, go down to the section where we add everything to screen. Add those display groups in with the rest. I would make the new order look something like this:
--most of the order here does not matter as long as the backgrounds
--are in back and the ghosts and monster are at the end
screen:insert(backbackground)
screen:insert(backgroundfar)
screen:insert(backgroundnear1)
screen:insert(backgroundnear2)
screen:insert(blocks)
screen:insert(spikes)
screen:insert(blasts)
screen:insert(ghosts)
screen:insert(monster)
screen:insert(collisionRect)
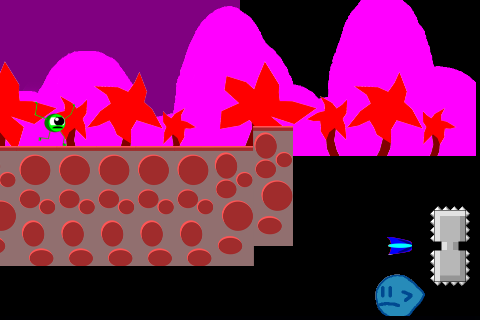
Once you have everything in there, it should look something like this if you were to run it in the iPhone 4 perspective:
After getting that in place, we'll add the function that updates all of the bolts that our monster shoots. Add the following function beneath the checkCollisions() function.
function updateBlasts()
        --for each blast that we instantiated check to see what it is doing
	for a = 1, blasts.numChildren, 1 do
                --if that blast is not in play we don't need to check anything else
		if(blasts[a].isAlive == true) then
			(blasts[a]):translate(5, 0)
                        --if the blast has moved off of the screen, then kill it and return it to its original place
			if(blasts[a].x > 550) then
			        blasts[a].x = 800
				blasts[a].y = 500
				blasts[a].isAlive = false
			end
		end
                --check for collisions between the blasts and the spikes
		for b = 1, spikes.numChildren, 1 do
			if(spikes[b].isAlive == true) then
				if(blasts[a].y - 25 > spikes[b].y - 120 and blasts[a].y + 25 < spikes[b].y + 120 and spikes[b].x - 40 < blasts[a].x + 25 and spikes[b].x + 40 > blasts[a].x - 25) then
				        blasts[a].x = 800
				        blasts[a].y = 500
				        blasts[a].isAlive = false
				        spikes[b].x = 900
				        spikes[b].y = 500
				        spikes[b].isAlive = false
                                end
			end
		end

                --check for collisions between the blasts and the ghosts
                for b = 1, ghosts.numChildren, 1 do
			if(ghosts[b].isAlive == true) then
				if(blasts[a].y - 25 > ghosts[b].y - 120 and blasts[a].y + 25 < ghosts[b].y + 120 and ghosts[b].x - 40 < blasts[a].x + 25 and ghosts[b].x + 40 > blasts[a].x - 25) then
					blasts[a].x = 800
					blasts[a].y = 500
					blasts[a].isAlive = false
					ghosts[b].x = 800
					ghosts[b].y = 600
					ghosts[b].isAlive = false
					ghosts[b].speed = 0
				end
			end
		end
	end
end
The above function is going to have two main responsibilities. The first is to update the position of the blast and check to see if it collided with anything. You can see that when it collides with something, the way we destroy it is to simply move it off-screen and set isAlive to false. This will get the bolt ready to be used again. Something else that you might have noticed is that we only instantiate five bolts. So, what happens if all five bolts are already in play and the user tries to fire another blast? Nothing! With the way it is set up right now, the user is limited to only having five active blasts at one time. This is easy to change by instantiating more at the beginning of the game, but it shows you how to set limits to players. This is also a method we will use to make sure that 50 ghosts don't randomly generate all at once on the screen, instantly killing the player.
Next we need to go down to the touched function to give the player the ability to shoot. Change the touched function to match the following:
--the only difference in the touched function is now if you touch the
--right side of the screen the monster will fire off a little blue bolt
function touched( event )
	if(event.phase == "began") then
		if(event.x < 241) then
			if(onGround) then
				monster.accel = monster.accel + 20
			end
		else
			for a=1, blasts.numChildren, 1 do
				if(blasts[a].isAlive == false) then
					blasts[a].isAlive = true
					blasts[a].x = monster.x + 50
					blasts[a].y = monster.y
					break
				end
			end
		end
	end
end
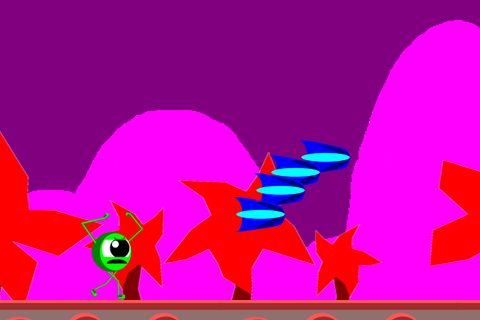
Lastly, be sure to add updateBlasts() to the main update function and you should be ready to go. Give that a try and see the awesome power that our monster has now! After running it you should see something like this:
Now that the players can defend themselves, let's go ahead and give them some challenges. Both of these next events will be overcome by simply shooting them once. After they are in place, however, it will be easy for you to change them to suit your own project. We will start with the spiked wall.
The spiked wall will simply be placed on top of the current ground and move at the same constant speed as the ground around it. First thing to do is add the updateSpikes function. Right below the updateBlasts() function add the following code:
--check to see if the spikes are alive or not, if they are
--then update them appropriately
function updateSpikes()
	for a = 1, spikes.numChildren, 1 do
		if(spikes[a].isAlive == true) then
			(spikes[a]):translate(speed * -1, 0)
			if(spikes[a].x < -80) then
				spikes[a].x = 900
				spikes[a].y = 500
				spikes[a].isAlive = false
			end
		end
        end
end
This will do the same thing as our updateBlast function. It will simply update the position of the spiked wall and check to see if it went off the screen (which it currently can't do because it would hit the player first). Just in case, though, we'll check to make sure. The last thing we need to do is make an event for it. In checkEvent() below the other checks add this:
--the more frequently you want events to happen then
--greater you should make the checks
if(check > 72 and check < 81) then
		inEvent = 12
		eventRun = 1
end
We are going to actually add our wall in the updateBlocks() function. That way we are sure to have the current groundLevel. Right before you call checkEvent() insert the following:
--by setting up the spikes this way we are guaranteed to
--only have 3 spikes out at most at a time.
if(inEvent == 12) then
        for a=1, spikes.numChildren, 1 do
                if(spikes[a].isAlive == true) then
		        --do nothing
                else
		        spikes[a].isAlive = true
		        spikes[a].y = groundLevel - 200
		        spikes[a].x = newX
		        break
	        end
        end
end
The last thing to do in order to get this up and running is add the collision detection to see if our player ran into it or not. Put this right below the section in checkCollisions() where we check the collisions between the blocks and the monster.
--stop the game if the monster runs into a spike wall
for a = 1, spikes.numChildren, 1 do
	if(spikes[a].isAlive == true) then
		if(collisionRect.y - 10> spikes[a].y - 170 and spikes[a].x - 40 < collisionRect.x and spikes[a].x + 40 > collisionRect.x) then
			--stop the monster
			speed = 0
		end
	end
end
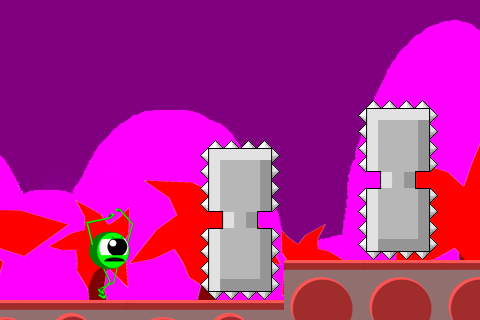
Be sure to add updateSpikes() to the main update function again and give it a run! You should now have these spikes in your monster's path.
Give that a whirl and practice shooting them down. Remember to test to make sure the collisions are working correctly with the blasts. Also make sure that running into the walls actually kills the player. Once you have tested that and are ready for more, start putting the code in place for the ghost.
Putting the ghost in is pretty much identical to putting the wall in. The biggest difference between the two is that for the ghost we are going to randomize where it comes in at as well as how fast it travels. We'll also make the ghosts move up and down so that they are always moving to where the user is. Special details like that will make the obstacles feel entirely different to the user, even though they work in such a similar way.
Let's start again by adding the updateGhosts() function. While you're at it, go ahead and add updateGhosts() to the main update function as well.
--update the ghosts if they are alive
function updateGhosts()
        for a = 1, ghosts.numChildren, 1 do
	        if(ghosts[a].isAlive == true) then
		        (ghosts[a]):translate(speed * -1, 0)
		        if(ghosts[a].y > monster.y) then
			        ghosts[a].y = ghosts[a].y - 1
		        end
		        if(ghosts[a].y < monster.y) then
			        ghosts[a].y = ghosts[a].y + 1
		        end
		        if(ghosts[a].x < -80) then
			        ghosts[a].x = 800
			        ghosts[a].y = 600
			        ghosts[a].speed = 0
			        ghosts[a].isAlive = false;
		        end
                end
	end
end
Next go back into the checkEvent() function and add this below the previous checks:
--ghost event
if(check > 60 and check < 73) then
		inEvent = 13
		eventRun = 1
end
This time instead of getting the ghosts moving from the updateBlocks function, we will do it in the runEvent() function. Add this below the other if statements:
--this will be a little bit different as we want this to really
--make the game feel even more random. change where the ghosts
--spawn and how fast they come at the monster.
if(inEvent == 13) then
        for a=1, ghosts.numChildren, 1 do
		if(ghosts[a].isAlive == false) then
			ghosts[a].isAlive = true
			ghosts[a].x = 500
			ghosts[a].y = math.random(-50, 400)
			ghosts[a].speed = math.random(2,4)
			break
                end
	end
end
Once that is in there we need to check for collisions between the monster and the ghosts. Add this to checkCollions() right after we do the work for the spiked walls:
--make sure the player didn't get hit by a ghost!
for a = 1, ghosts.numChildren, 1 do
	if(ghosts[a].isAlive == true) then
		if(((  ((monster.y-ghosts[a].y))<70) and ((monster.y - ghosts[a].y) > -70)) and (ghosts[a].x - 40 < collisionRect.x and ghosts[a].x + 40 > collisionRect.x)) then
			--stop the monster
			speed = 0
		end
	end
end
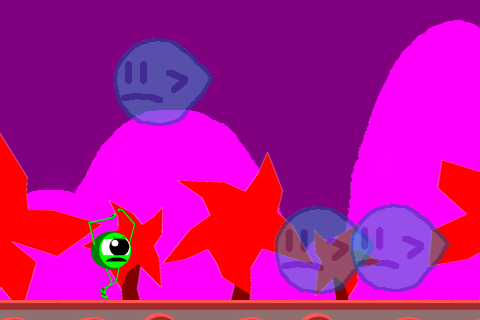
You should now have everything in place, including the ghosts to dodge!
The game should now be a lot more fun and challenging for users. In the next tutorial we will add two more things that will make our game feel more complete: (1) a scoring system, and (2) monster death! We covered a lot in this tutorial, so if you have any questions, please sound off in the comments below. Thanks for reading!

Comments