Welcome to the second tutorial in our series on building a running-game from scratch with the Corona SDK. In this section, we are going to go over how to quickly get a basic background-scrolling level up and running. Open your text editor and let's get started!
Prerequisites
If you haven't already seen the first tutorial in this series, check it out really quickly before moving on to this one. If you have a little bit of experience coding, then you will be fine skipping quickly through the entire first tut, but if you haven't, then it should be worth your time to look at some of the basics of programming working with Lua and the Corona SDK.
Project Setup
So the first thing that we need to cover is the build.settings file. This is a file that needs to go in the same folder as the main.lua file, and is what we use to set some of our application specifications. Now, depending on what platform you are working with (Android or iOS), your build.settings file will be used to set different things. For example, Android developers have to deal with their applications manifest file and their permissions, while iOS developers have their *.plist file to worry about. The build.settings file is where a lot of those application level settings will be handled. One of the nice things about the Corona SDK is that we are able to combine our Android and iOS build.settings information into the same build.settings file. This way, if you are working on both types of devices, you don't have to manage multiple build.settings files. For our purposes right now we are only going to be using the build.settings file for setting our device orientation. So, make a new file called build.settings in the same folder that you are going to have your main.lua file and put this code into it:
--Notice you can use comments in this section as well
settings = {
orientation = {
default = "landscapeRight",
supported = {
"landscapeRight", "landscapeLeft"
},
},
}
This gives us a landscape oriented device on both iOS and Android devices. The code is fairly straight forward and we will go over more settings that you will want to use in future tutorials, but for now this should be all we need to move forward. If you want to dig deeper on your own, you can find all of the build.settings options here. To make sure that the file worked, let's do a quick test in the simulator. Open up your main.lua file and put this code in there:
--This line will remove the status bar at the top of screen,
--some apps you might want to keep it in, but not for games!
display.setStatusBar(display.HiddenStatusBar)

local testRect = display.newRect(0,0,50,50)
testRect:setFillColor(150,0,0);
So, after putting all of that together, if your build.settings is in the correct place you should have something that looks like this:

If the device is upright(portrait mode), and not laying on its side like above (landscape mode), then something has gone wrong. However, hopefully that is not the case as the code above is all there is to it. So, now that that is out of the way we can move on to getting our game up and running. The goal for each of the tutorials is for us to have a new working section. Each will build on the last, but after every iteration you will have something that should be playable.
Adding a background
The first thing we are going to want to do is to get our level moving. We are going to have several layers in our game that are going to be scrolling at different levels of speed. This is going to give us the illusion of what we like to call parallax scrolling. When you are running the program in the simulator go ahead and select iPhone for now (if you haven't already done so). Change this by going to Window > View As > iPhone in the simulator. The assets have been designed for a device running at a resolution of 480x320px. There are, of course, ways to make sure it works for all resolutions, but for our testing purposes now just stick with the iPhone simulator. Go ahead and put this code in your program:
--takes away the display bar at the top of the screen
display.setStatusBar(display.HiddenStatusBar)

--adds an image to our game centered at x and y coordinates
local backbackground = display.newImage("images/background.png")
backbackground.x = 240
backbackground.y = 160

local backgroundfar = display.newImage("images/bgfar1.png")
backgroundfar.x = 480
backgroundfar.y = 160
For this to work go ahead and use the images I provided. In order for the code to work 'as is', you will need to place the images in a folder called images. The images folder should be in the same folder as your main.lua and build.settings file. Once you do that you should get a screen that looks like this:
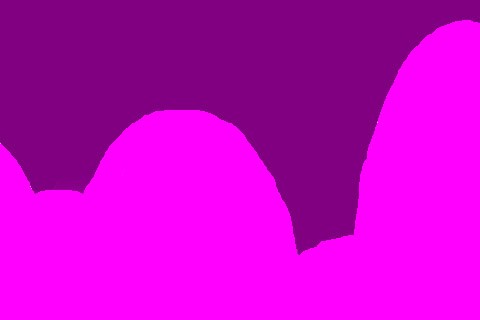
Notice how the backgroundfar image is in front of backbackground? Imagine stacking several plates on top of each other. The more you stack on, the more you have covering that first plate you stacked everything on to begin with. This is also true with images and text that you put in your code. Everytime you want to add something to the screen, unless directed otherwise, that added element will cover everything you have already stacked on. Let's go ahead and stack a few more things on to our screen. Add this to your code below the other lines:
local backgroundnear1 = display.newImage("images/bgnear2.png")
backgroundnear1.x = 240
backgroundnear1.y = 160

local backgroundnear2 = display.newImage("images/bgnear2.png")
backgroundnear2.x = 760
backgroundnear2.y = 160
Now, we should have another layer stacked on top like so:
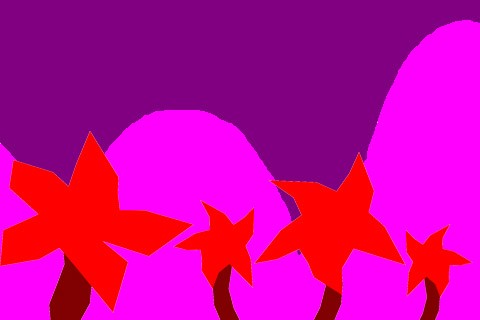
Now, when you look at this you are going to notice that even though we added 2 instances of bgnear2.png, only one of them shows up on the screen. The reason we do things this will become a bit more obvious when we start moving everything around. For now, go ahead and switch your view from iPhone to iPhone 4 the same way we did before. Because we designed our images around the resolution of a non-retina iPhone (e.g. 480x320px), if we switch to a higher resolution such as the iPhone 4 (e.g. 960x640px), everything shrinks down and we can see more of what is going on. Change to the iPhone 4 resolution and you should see this now:
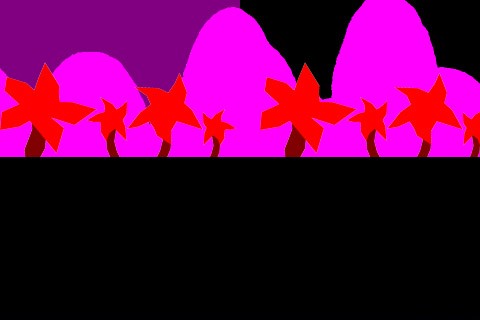
Whenever we want to see what is going on, switching to the larger view will be very helpful. Notice that just because you can't see something, doesn't mean that nothing is happening. Now that we have those background images on there let's make them move. As I go through the tutorials, I will try to document everything that is happening inside of the code itself, so if you ever aren't sure about what something does be sure to read the comments in the code! Now, below the code added previously add this:
--the update function will control most everything that happens in our game
--this will be called every frame(30 frames per second in our case, which is the Corona SDK default)
local function update( event )
--updateBackgrounds will call a function made specifically to handle the background movement
updateBackgrounds()
end

function updateBackgrounds()
--far background movement
backgroundfar.x = backgroundfar.x - (.25)

--near background movement
backgroundnear1.x = backgroundnear1.x - (3)
--if the sprite has moved off the screen move it back to the
--other side so it will move back on
if(backgroundnear1.x < -239) then
backgroundnear1.x = 760
end

backgroundnear2.x = backgroundnear2.x - (3)
if(backgroundnear2.x < -239) then
backgroundnear2.x = 760
end
end

--this is how we call the update function, make sure that this line comes after the
--actual function or it will not be able to find it
--timer.performWithDelay(how often it will run in milliseconds, function to call,
--how many times to call(-1 means forever))
timer.performWithDelay(1, update, -1)
When you run this run it first while still in the iPhone 4 view. This will let you see what is actually happening with all of the different sprites that we are moving around. Once you have looked at it in this view go ahead and switch back to the normal iPhone view so you can see what it really looks like. With all of that in there you should now have everything moving! Now a couple things to look at before we move on. Notice how there is only one instance of backgroundfar, but there are two instances of backgroundnear? This is something that is completely up to you. The reason there is two there is because for the closer background (e.g. trees flying by), we want that to repeat over and over again. For the far background, I wanted it to be something that will pass by very slowly and not repeat itself (e.g. you will usually only do this for backgrounds that are far back, it gives levels a unique feel). This is something you would do when your scrolling level is going to have an end to it. If you really wanted a never ending scroller, you would want to take the same approach that you did for the near background and put two side by side. By placing two side by side, or three, or however many you want, it let's you create seemingly large worlds with very minimal assets. The only thing we have to do is move the sprite back to the other side of the screen.
The next thing we are going to do is add the ground. This is going to take a couple more steps, but we will go slow and make sure everything gets put in the right place. If you didn't do the first tutorial and don't understand how to use groups or understand what they are, now would be a good time to check it out. Here is the code to plop in (put it right underneath the code where we setup backgroundnear2, before the update function):
--create a new group to hold all of our blocks
local blocks = display.newGroup()

--setup some variables that we will use to position the ground
local groundMin = 420
local groundMax = 340
local groundLevel = groundMin

--this for loop will generate all of your ground pieces, we are going to
--make 8 in all.
for a = 1, 8, 1 do
isDone = false

--get a random number between 1 and 2, this is what we will use to decide which
--texture to use for our ground sprites. Doing this will give us random ground
--pieces so it seems like the ground goes on forever. You can have as many different
--textures as you want. The more you have the more random it will be, just remember to
--up the number in math.random(x) to however many textures you have.
numGen = math.random(2)
local newBlock
print (numGen)
if(numGen == 1 and isDone == false) then
newBlock = display.newImage("images/ground1.png")
isDone = true
end

if(numGen == 2 and isDone == false) then
newBlock = display.newImage("images/ground2.png")
isDone = true
end

--now that we have the right image for the block we are going
--to give it some member variables that will help us keep track
--of each block as well as position them where we want them.
newBlock.name = ("block" .. a)
newBlock.id = a

--because a is a variable that is being changed each run we can assign
--values to the block based on a. In this case we want the x position to
--be positioned the width of a block apart.
newBlock.x = (a * 79) - 79
newBlock.y = groundLevel
blocks:insert(newBlock)
end
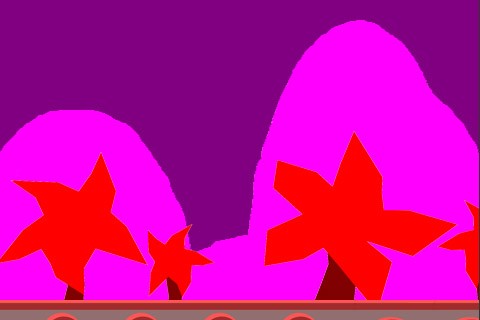
The comments in the code should help you understand what everything does so far. Hopefully, what you are looking at now looks something like this:
Now, the last thing that we need to do is start to get the blocks moving. Let's go ahead and add the code for that. Put this code in after the end of the update function:
function updateBlocks()
for a = 1, blocks.numChildren, 1 do

if(a > 1) then
newX = (blocks[a - 1]).x + 79
else
newX = (blocks[8]).x + 79
end

if((blocks[a]).x < -40) then
(blocks[a]).x, (blocks[a]).y = newX, groundLevel
else
(blocks[a]):translate(-5, 0)
end

end
end
Before anything will actually move, we need to be sure that we actually call the function from the update function. So, inside of the update function below the updateBackgrounds() line, call the function updateBlocks(). With that in there we should have everything moving now. Notice that instead of manually moving the blocks we instead used the translate function. This function is available to any object we create via the newImage call. Either method will work, so use one or the other, or use a mixture. Another thing that you should be noticing is that there is a gap in between some of the blocks. This happens because we are setting the location of the new blocks right next to the old location of the last block. The problem is that when we do it this way, we are trying to place it next to a moving object, so we might not always hit right next to it. This problem will become even bigger once we try to increase the traveling speed of the blocks, the faster they are moving the larger that gap will become. This problem can be overcome by simply adding a speed variable and doing our calculations based on that speed. Go back up to the lines of code where we initialized the variables groundMin and groundMax, and add this:
local speed = 5;
Next, replace the updateBlocks() and updateBackgrounds() functions with these:
function updateBlocks()
for a = 1, blocks.numChildren, 1 do

if(a > 1) then
newX = (blocks[a - 1]).x + 79
else
newX = (blocks[8]).x + 79 - speed
end

if((blocks[a]).x < -40) then
(blocks[a]).x, (blocks[a]).y = newX, (blocks[a]).y
else
(blocks[a]):translate(speed * -1, 0)
end

end
end

function updateBackgrounds()
--far background movement
backgroundfar.x = backgroundfar.x - (speed/55)

--near background movement
backgroundnear1.x = backgroundnear1.x - (speed/5)
if(backgroundnear1.x < -239) then
backgroundnear1.x = 760
end

backgroundnear2.x = backgroundnear2.x - (speed/5)
if(backgroundnear2.x < -239) then
backgroundnear2.x = 760
end
end
With those updated functions, your blocks should be moving nicely with no gaps at all!
One last thing to make this more game-like. Go back in the update function and put in this line of code after the update functions:
speed = speed + .05
Once that is in there you will be able to watch the level speed up before your eyes! The exact value of course is just an example, how fast you update the game will depend on your game and your audience. All that is left at this point is throwing in a hero and some obstacles and we have ourselves a game. That will come later though, as this wraps up the project for now. Getting all of that running was not so bad, and we will continue to add lots of functionality each iteration. Be sure to check back for the next tutorial, and if you have any questions or feedback let me know in the comments below!

Comments