WordPress is normally used as a blog engine or as a content management system (CMS), but those are not the only things it can be used for. With a little imagination, you can do virtually anything you want with it! In this tutorial I will teach you how to build a shortened URL service, write some plugin code using object oriented techniques, and deal with WordPress routers and custom error messages.
Note that this is an advanced tutorial - we'll be using some relatively advanced PHP techniques, but I'll make sure to link you over to any resources articles that you might need to understand along the way. Just remember, the point of this tutorial is to push the limits of WordPress, and that's going to take some real thought!
Overview
You should be familiar with the idea of what a "short URL" service is nowadays. If not, check out Goo.gl, bit.ly, or any of the others out there. Those are all fine and well, but what if you want your own? There a few reasons that you might want this (not just for vanity purposes), and this is an excellent chance to look at some of the more advanced areas of WordPress that you might not be familiar with.
The Goal: We will create a Custom Post Type called "url", its post title will be used as the original url. For each post (actually each url now), we generate a key for it, or the user enters his/her own key, which we will call the "vanity key" from now on. This vanity key will be appended to site's url and we have a short url.
Here's the breakdown of what we'll be doing in layman's terms:
- Assume your site has domain:
http://wp.tutsplus.net. - We have a very long url:
http://net.tutsplus.com/tutorials/wordpress/create-a-multi-layout-portfolio-with-wordpress/. - We will assign it a "vanity key" of "1A", so short url will be:
http://wp.tutsplus.net/1A. - Anyone who hits it gets redirected to:
http://net.tutsplus.com/tutorials/wordpress/create-a-multi-layout-portfolio-with-wordpress/.
If you are not very familiar with plugin development yet, you should take a look at these useful tutorials before going further:
- How to Write a WordPress Plugin
- Create WordPress Plugins with OOP Techniques
- Custom Post Types
- Custom Meta Boxes
Also make sure you have mod_rewrite installed, and enable the Pretty Permalink. We will use a custom field called _vanity_key to store this vanity key for each post.
Enough chatting, let's get started!
Step 1 Setting up the plugin class
We will use OOP here.
Let's call this plugin 'wp-vanity'. We create a folder wp-vanity in wp-content/plugins. Then we create a main file call vanity.php and put it in folder wp-vanity.
File vanity.php
class Vanity {

    static private $_self = null;
    const POST_TYPE = 'url';

    /**
     * Always return the same instance of plugin so we can access its property and its method
     * from anywhere
     * @return Vanity
     */
    static public function singleton() {
        if (!self::$_self) {
            $classname = __CLASS__;
            self::$_self = new $classname;
            self::$_self->_bootstrap();
        }
        return self::$_self;
    }

    /**
     * Construct plugin and set useful property for later reference
     */
    public function __construct() {
    }

    /**
     * Init cache class!
     * Load all styles, script, define JavaScript var with useful URL
     */
    private function _bootstrap() {
        //Add action, filter should be put here
    }

}

$wp_vanity = Vanity::singleton();
We organize code into a class called "Vanity". We also define a class constant POST_TYPE for the name of our post type. Then we use the singleton() pattern, so that in the future you can make the plugin bigger without needing to deal with global variables since we always get the same instance of the "Vanity" class when we use method singleton().
You see the method bootstrap() will be automatically called after creating object in method singleton(). Thus, everything related to add_action, add_filter should be put here.
If you are not familiar with Singleton pattern, then read A beginners guide to design patterns.
Experienced PHP devs may wonder why I didn't put that code in __construct() method. This is for reasons of safety. If you have too much long-execution code in method __construct(), then what might happen if one of those lines calls to method singleton() again. Well, at that time, the executing of __construct() has not finished yet, thus, the object is not yet returned; Therefore Vanity::$_self is not assigned. As the result method singleton() will create an object one more time. In order to be safe, we should not put code which call method singleton() in constructing method.
We manually call bootstrap() in method singleton() after object is created. Of course, if you make sure nothing goes wrong you can just put it in _construct() straight away.
For now, we will put every code related to add_action, add_filter in method bootstrap().
Step 2 Dealing with custom post type
In this step, we will register our custom post type, add a meta box to display our vanity key and short link.
Registering Our Custom Post Type
We register post type whose name is stored in self::POST_TYPE. I didn't use hard-coding so you can easily change post type name to anything. Also, we just need WordPress to show a title field, and an author field for our post type. We just need title field to enter original URL. A custom field is used for the vanity key. You will handle it later. Now let's create method init() to register the post type:
    public function init() {
        $args = array(
            'labels' => array(
                'name' => _x('Short Urls', 'post type general name'),
                'singular_name' => _x('Short Url', 'post type singular name'),
                'add_new' => _x('Add Url', self::POST_TYPE),
                'add_new_item' => __('Add New Url'),
                'edit_item' => __('Edit Url'),
                'new_item' => __('New Url'),
                'all_items' => __('All Urls'),
                'view_item' => __('View Url'),
                'search_items' => __('Search Urls'),
                'not_found' =>  __('No url found'),
                'not_found_in_trash' => __('No urls found in Trash'),
                'parent_item_colon' => '',
                'menu_name' => 'Urls'
            ),
            'public' => true,
            'publicly_queryable' => true,
            'show_ui' => true,
            'show_in_menu' => true,
            'query_var' => true,
            'rewrite' => true,
            'capability_type' => 'post',
            'has_archive' => true,
            'hierarchical' => false,
            'menu_position' => null,
            'supports' => array('title','author')
          );
        register_post_type(self::POST_TYPE, $args);
    }
There's not that I can add to the code above. We register with register_post_type and set a label and text for it. Now we'll let WordPress know we want to hook into it with the init hook! We use modified method _bootstrap():
    private function _bootstrap() {
        add_action('init', array($this, 'init'));
    }
Adding Custom Meta Box
To store the vanity key, we use a custom field called _vanity_key. As editing/adding post, we display a form or in other words, custom meta box, with information about short link (via appending _vanity_key to the site's url), and a text box to let the user enter their own vanity key instead of generating key automatically.
    private function _bootstrap() {
        add_action('init', array($this, 'init'));
        add_action('add_meta_boxes', array($this, 'add_meta_box'));
    }

    public function add_meta_box() {
        add_meta_box("vanity-meta", "Short URL", array($this, 'meta_box_content'), self::POST_TYPE, "normal", "low");
    }

    public function meta_box_content() {
        global $post;
        wp_nonce_field('my_vanity_nonce', 'vanity_nonce');

        $_vanity_key = get_post_meta($post->ID, '_vanity_key', true);

        <p>
            <label><?php echo __('URL Key') ?>:</label>
            <input name="_vanity_key" type="text" value="<?php echo $_vanity_key ?>" />
            You can put your custom url key here if wanted!
        </p>
        <?php
        if (!empty($_vanity_key)) :
            ?>
            <p>
                <label><?php echo __('Your whole shorted url') ?>:</label>
                <input size="50" type="text" value="<?php echo trailingslashit(get_bloginfo('url')), $_vanity_key ?>" />
                <a target="_blank" href="<?php echo trailingslashit(get_bloginfo('url')), $_vanity_key ?>">Try it</a>
            </p>
        <?php endif ?>

        <?php
    }
You can use get_post_meta to get the value of any custom field of a post. If you are still not familiar with meta box and custom field, let read this amazing tutorial again.
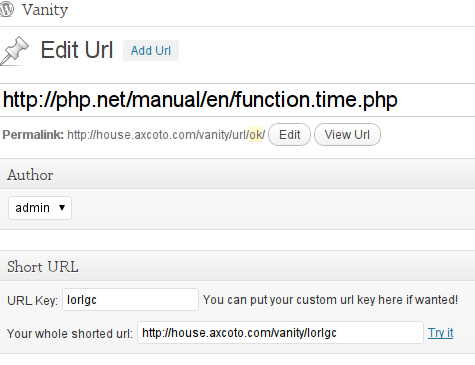
We use action add_meta_boxes to register our new meta box, then we use the method, meta_box_content(), to render its inside content! When displaying meta box, we try to get the value of custom field _vanity_key. If we got a non empty value, we display the whole short url with that vanity key and a "Try it" link so that the user can click on it to try short url in a new window!
At this point, if you try to add a new URL you have form like this:

If you edit an URL, you have form like this:
Saving the custom field
When we save the post, WordPress just saves title of post, we must handle our custom field in meta box ourselves. When any post is saved, action save_post is called, so we'll hook into this action:
    private function _bootstrap() {
        add_action('init', array(&$this, 'init'));
        add_action('add_meta_boxes', array($this, 'add_meta_box'));
        add_action('save_post', array($this, 'save_url'));
    }

    public function save_url($post_id) {
        global $post;
        if (defined('DOING_AUTOSAVE') && DOING_AUTOSAVE)
            return;

        // if our nonce isn't there, or we can't verify it, bail
        if (!isset($_POST['vanity_nonce']) || !wp_verify_nonce($_POST['vanity_nonce'], 'my_vanity_nonce'))
            return;

        // if our current user can't edit this post, bail
        if (!current_user_can('edit_post'))
            return;

        $_vanity_key = empty($_POST['_vanity_key']) ? base_convert($post_id, 10, 36) : preg_replace('/[^a-z0-9_]/i', '_', $_POST['_vanity_key']);
        $old_key = get_post_meta($post_id, '_vanity_key', true);
        if ($_vanity_key == $old_key) {
            //We are updating post, and the key is not changed so it's not necessary to save again
            return;
        }
        update_post_meta($post_id, '_vanity_key', $_vanity_key);
    }
If we are saving the post automatically, there is no point to save our custom field. We also checked to make sure form has a valid nonce field to avoid double submit and to make sure data came from the right place.
If the users entered a value in the vanity field, then value of $_POST['_vanity_key'] in PHP is not empty, let's use it, otherwise we automatically generate a key by converting the id of post into base 36 number. Then we use update_post_meta to save it. Before saving, we get the current value of custom field _vanity_key and compare it with our new key which is entered by the user or generated by our code to see if we really need to save it. If the old value and new value are the same there is no point to save it again.
Error handling
Everything is looking pretty good at this point, but maybe you're wondering what happens if the user enters a vanity key which has been used before? Or what if the user enters an invalid url? We need some sort of error handling to help the users along the way here.
Firstly, let's create a method called _key2url. As its name says about it, it will receive a key, and try to find if we already have an URL corresponding to this key.
    /**
     * Find the original url respond to this key
     * @global wpdb $wpdb
     * @param string $key
     * @return bool or string
     *         false if not found and original url corresponding otherwise
     */
    private function _key2url($key) {
        global $wpdb;
        $sql = "
            SELECT m.post_id, p.post_title as url
                FROM {$wpdb->prefix}postmeta as m
                LEFT JOIN {$wpdb->prefix}posts as p ON m.post_id=p.id
                WHERE  m.meta_key='_vanity_key' AND m.meta_value='%s'
            ";
        $result = $wpdb->get_row($wpdb->prepare($sql, $key));
        if (!$result) {
            return false;
        }
        'http://' != substr($result->url, 0, '7') && $result->url = 'http://' . $result->url;
        return $result->url;
    }
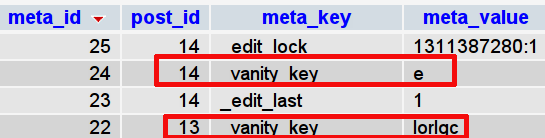
If a vanity key has not already been used, then a false value will be returned. Otherwise, the URL which matches with that key in database will be returned. We also prepend 'http://' to URL if needed. We must do this because of missing leading 'http://' can make WordPress redirect to ourdomain.com/original.com instead http://original.com.
WordPress stores custom fields in the table "wp_postmeta", and posts are stored in the table "wp_posts". Here "wp_" is a prefix which we can access via $wpdb->prefix. We use MySql JOIN clause to match data. Below is a figure on how WordPress store our custom field (our vanity key in this case)
Okay, let's change our method save_url for some error handling. Note that I added two new methods: invalid_key and invalid_url. We will detail this later.
    public function save_url($post_id) {
        global $post;
        if (defined('DOING_AUTOSAVE') && DOING_AUTOSAVE)
            return;

        // if our nonce isn't there, or we can't verify it, bail
        if (!isset($_POST['vanity_nonce']) || !wp_verify_nonce($_POST['vanity_nonce'], 'my_vanity_nonce'))
            return;

        // if our current user can't edit this post, bail
        if (!current_user_can('edit_post'))
            return;

        //Also, if the url is invalid, add custom message
        if (!preg_match('|^http(s)?://[a-z0-9-]+(.[a-z0-9-]+)*(:[0-9]+)?(/.*)?$|i', $post->post_title)) {
            add_filter('redirect_post_location', array($this, 'invalid_url'));
        }

        $_vanity_key = empty($_POST['_vanity_key']) ? base_convert($post_id, 10, 36) : preg_replace('/[^a-z0-9_]/i', '_', $_POST['_vanity_key']);
        $old_key = get_post_meta($post_id, '_vanity_key', true);
        if ($_vanity_key == $old_key) {
            //We are updating post, and the key is not changed so it's not necessary to save again
            return;
        }
        //If our key already exists! Let regenerate till we get a new key
        while ($this->_key2url($_vanity_key)) {
            $_vanity_key = base_convert(time() + rand(1, 10000), 10, 36);
            add_filter('redirect_post_location', array($this, 'invalid_key'));
        }
        update_post_meta($post_id, '_vanity_key', $_vanity_key);
    }

    public function invalid_key($location, $errnum) {
        return $location . '&vanity_message=2';
    }

    public function invalid_url($location, $errnum) {
        return $location . '&vanity_message=1' ;
    }
We use preg_match('|^http(s)?://[a-z0-9-]+(.[a-z0-9-]+)*(:[0-9]+)?(/.*)?$|i', $post->post_title) to check if we have a valid URL. preg_match returns the number of times pattern matches.
In this case, |^http(s)?://[a-z0-9-]+(.[a-z0-9-]+)*(:[0-9]+)?(/.*)?$|i is a regular expression pattern for an URL which start with http or https. URL is $post->post_title (remember we use title of the post as original url).
If URL is not valid, we will call add_filter to warning error. Don't worry about what it means now, I will cover it later. Also, once we got the new vanity key which we assigned to $_vanity_key, we call method _key2url in while loop to make sure no post is used that vanity key before.
If the vanity key is already used, we generate a new key. We get the current time by using function time() which returns an int number then plus with a random number and convert total result to a base 36 number .
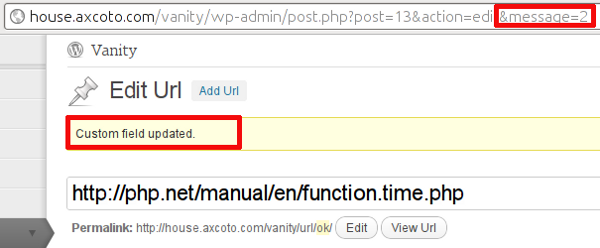
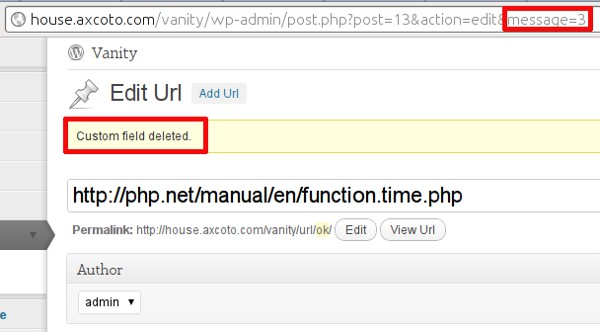
So, how do we notify the user of these on WordPress back-end? The mechanism for solving this inside WordPress looks like this: after saving post, WordPress redirects the user to the post editing page, and appends some parameters to URL as flags to display messages. Try to look at these to figure out and notice the parameter "message" in URL and the actual message in yellow.
If you look at the URL of WordPress after saving a post, you see something like this: http://house.axcoto.com/vanity/wp-admin/post.php?post=13&action=edit&message=1 and a message is shown as in the picture below:

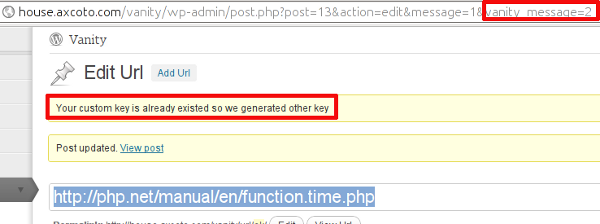
If you try to modify the "message" parameter on URL you have:
Unfortunately, WordPress doesn't have a document for filter
redirect_post_locationnow but you can understand simply that this hook gives us a simple way to modify the URL which WordPress will redirect to after saving a post.
Well, you should understand now how WordPress shows notifications to the user via parameters on URL. So when saving our post type in method save_url, if any error happens, we will alter the URL which WordPress will redirect to and append our custom parameter. WordPress provides filter redirect_post_location to do this. This is an extract from above code for you see it more clearly:
    //..
   add_filter('redirect_post_location', array($this, 'invalid_key'));
   add_filter('redirect_post_location', array($this, 'invalid_url'));
   //..

   public function invalid_key($location, $errnum) {
        return $location . '&vanity_message=2';
    }

    public function invalid_url($location, $errnum) {
        return $location . '&vanity_message=1' ;
    }
In each case, we append a custom parameter vanity_message with a value: 1 means invalid URL, 2 means the key is already use. Next. we must show our custom message with this vanity_message. Let's modify our method meta_box_content:
    public function meta_box_content() {
        global $post;
        wp_nonce_field('my_vanity_nonce', 'vanity_nonce');

        $_vanity_key = get_post_meta($post->ID, '_vanity_key', true);

        if (!empty($_GET['vanity_message'])) :
            switch ((int) $_GET['vanity_message']) :
                case 1:
                    echo '<div class="updated"><p> URL is not valid</p></div>';
                    break;
                case 2:
                    echo '<div class="updated"><p>Your custom key is already existed so we generated other key</p></div>';
                    break;
            endswitch;
        endif
        ?>
        <p>
            <label><?php echo __('URL Key') ?>:</label>
            <input name="_vanity_key" type="text" value="<?php echo $_vanity_key ?>" />
            You can put your custom url key here if wanted!
        </p>
        <?php
        if (!empty($_vanity_key)) :
            ?>
            <p>
                <label><?php echo __('Your whole shorted url') ?>:</label>
                <input size="50" type="text" value="<?php echo trailingslashit(get_bloginfo('url')), $_vanity_key ?>" />
                <a target="_blank" href="<?php echo trailingslashit(get_bloginfo('url')), $_vanity_key ?>">Try it</a>
            </p>
        <?php endif ?>

        <?php
    }
We can output the error message in our meta box. But the good thing is as long as you set the class of any element on the page to "updated" then WordPress automatically grabs it and moves it to right place like this:
You maybe say "wow" after reading this! But as I told you, WordPress is really clever and does many things for you, just they cannot document everything.
Step 3 Detecting url and redirecting
At this moment, you were able to add a new URL and save the URL. It's now time to try shorten the URL now!
What happens if an user hits short url? Well, WordPress loads up, and will process URL into "query" property of class wp_query.
This class has a global instance: $wp_query. We will hook into one of the WordPress hooks before header is printed out to redirect the users to the original url. If the header is printed out, how come we can make redirect, right? To make it easier to understand, let's hook into action 'get_header'.
    private function _bootstrap() {
        add_action('init', array($this, 'init'));
        add_action('add_meta_boxes', array($this, 'add_meta_box'));
        add_action('save_post', array($this, 'save_url'));

        add_action('get_header', array($this, 'check_url'));
    }

    public function check_url() {
        global $wp_query;
        global $wpdb;
        if (!$wp_query->is_404) {
            //This is a valid URL of WordPress!
            return false;
        }
        $key = empty($wp_query->query['pagename']) ? false : $wp_query->query['pagename'];
        if ($key && $url = $this->_key2url($key)) {
            wp_redirect($url);
        }
    }
So, when you go to url domain.com/foo WordPress will store "foo" as "pagename" of $wp_query->query if it cannot detect any permalink (post slug, category name,..) which matched this URL. Once we got the key, we call method _key2url to get URL of that key. If it found one, we redirect to that original URL. Alternatively, we just call _key2url if WordPress output did not find a page! There is no point to call _key2url every time because it needs query database and this can be a performance issue if your site has huge traffic. Finally, you have done it! That's all that you need to do to have a shorten url service with WordPress.
Step 4 Making it even better
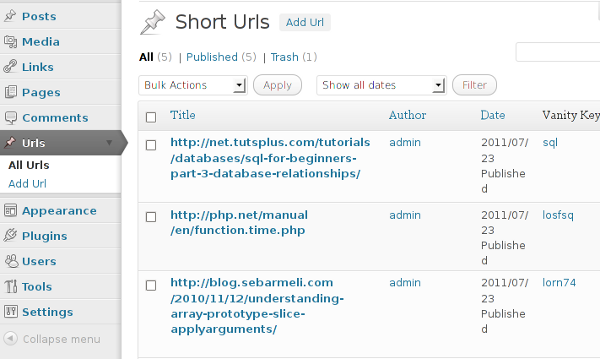
At this point, you can add a url and have a list of url posts in WordPress dashboard! But to see the short url and vanity key, you must edit a post to see it... That's really annoying! So, let's put this vanity key on post listing page. We can achieve this with filter manage_edit-{post_type}_columns and action manage_{post_type}_custom_column
Filter allows us add more columns when listing our custom post type besides normal columns such as: title, author,...etc. Action lets us really build content for that column. As always, you must inject add_action and add_filter to the _bootstrap method:
    private function _bootstrap() {
        add_action('init', array($this, 'init'));
        add_action('add_meta_boxes', array($this, 'add_meta_box'));
        add_action('save_post', array($this, 'save_url'));

        add_action('get_header', array($this, 'check_url'));
        add_filter('manage_edit-' . self::POST_TYPE . '_columns', array($this, 'custom_column'));
        add_action('manage_' . self::POST_TYPE . '_posts_custom_column', array($this, 'column_content'), 10, 2);
    }

	/**
	* WordPress will pass an array of columns to this function.
	* The key of each element is the name of column.
	* @param array of columns
	*/
    public function custom_column($columns) {
        $columns['_vanity_key'] = __('Vanity Key', 'wp-vanity');
        return $columns;
    }

    public function column_content($column_name, $post_id) {
        global $wpdb;
        switch ($column_name) {
            case '_vanity_key':
                $key = get_post_meta($post_id, '_vanity_key', true);
                if ($key) {
                    echo sprintf('<a target="_blank" href="%s" title="Original URL">%s</a>', trailingslashit(get_bloginfo('url')), $key, $key);
                }
                break;
        }
    }
Columns are stored in an array which is passed to our filter method. We add a new column via appending a new element to that array. Method "custom_column" takes care of this. The modified array is returned, WordPress grabs returned value and recognizes the new column. The name of column is _vanity_key. We use it to reference our column later. The title of column is "Vanity Key" - this is the text which appears on table header.
We use method "column_content" to output content of this column. WordPress passes two parameters to functions which hooked action manage_{post: The first one is name of column, the second one is the id of the post which is rendering.
type name}_posts_custom_column
Based on this, we check to make sure value of variable $column_name is _vanity_key, the name of our column. Then we use get_post_meta to read the custom field _vanity_key. Finally, we print out an "a" element with target="_blank" to open it in a new window. If you had other columns, you could continue with other "case" statements for those columns.
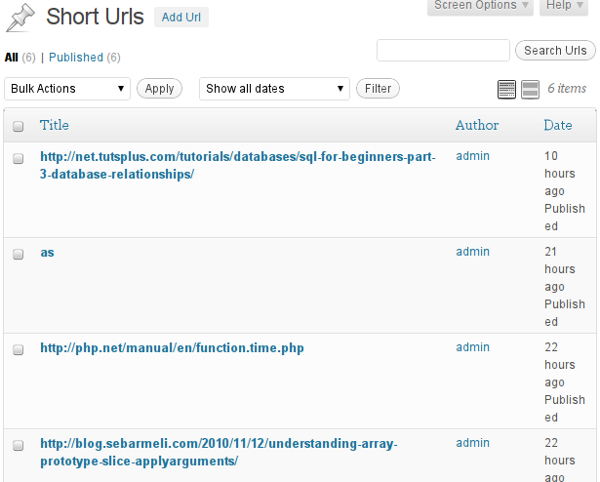
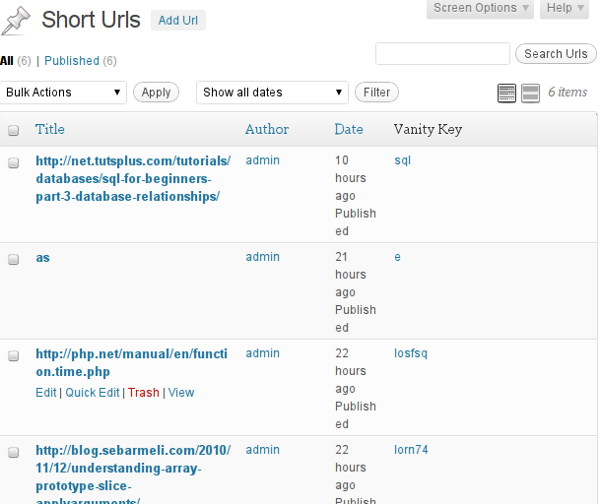
Now you can take a look at two pictures: before and after using above filter, action. The first one doesn't have a vanity column while second one has a vanity column with each post's vanity key.
Conclusion
Finally, you now have your own shorten url service with just around 60-70 minutes of coding and can use your current WordPress site with current domain. Hopefully, you've found this tutorial to be of help. Feel free to reuse this code elsewhere in your projects. If you have something to say or share, or even teach me as well, then please leave me a comment!

Comments