In my previous article, you learned about the basics of JSONModel. You saw how easy it is to work with JSON using JSONModel and how it does a lot for you behind the scenes, such as data validation and conversion.
In this tutorial, you will create a more complex application and you will learn about a number of features that bring even more power to your model classes.
By the end of this article, you'll have created a Flickr browser for iOS. The application will talk to Flickr's JSON API and display a collection of photos I uploaded to Flickr for this tutorial.
You will learn how to:
- process complex API responses
- use JSONModel's data transformations for URLs and dates
- map JSON keys to properties with different names
- create custom data conversions
- preprocess API responses before they are parsed
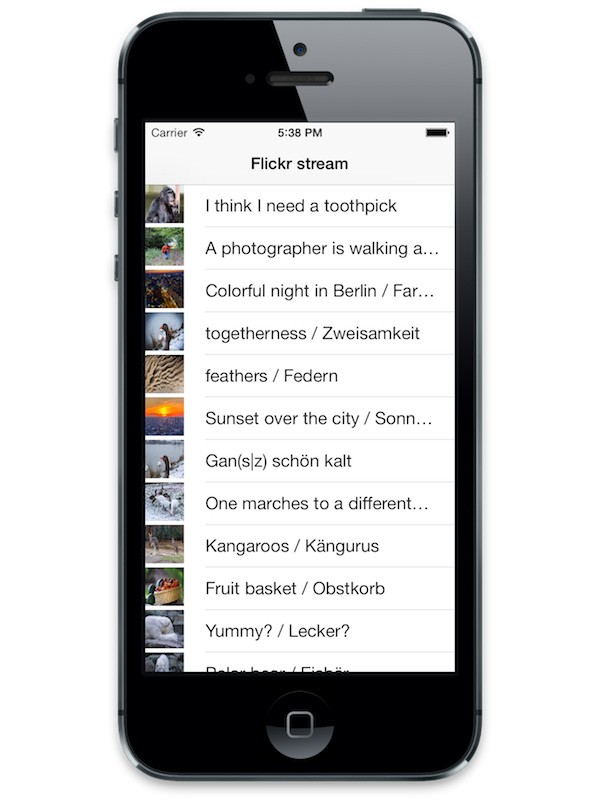
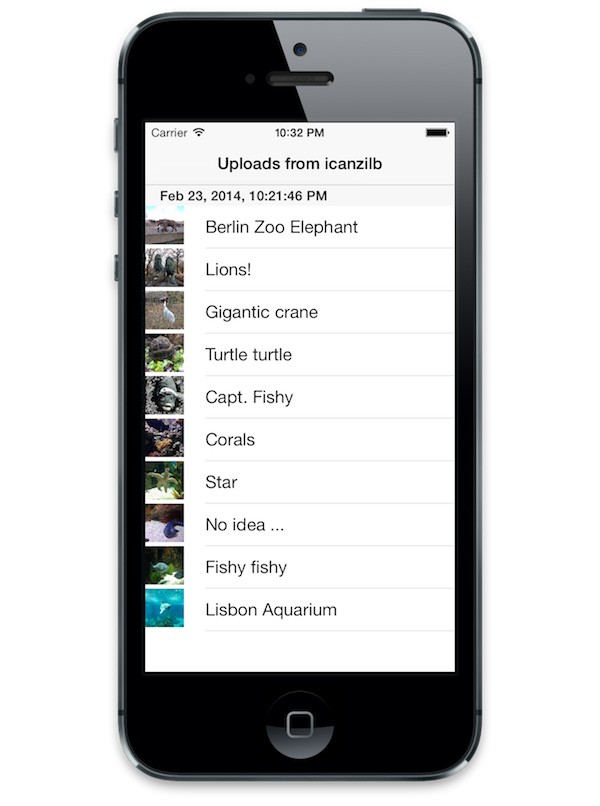
The finished Flickr browser will look like this:
1. Project Setup
Because we will focus on learning about JSONModel's features, I'd like to begin with a head start by starting with a basic project. You can find the project in the source files of this tutorial.
Open the Xcode project and take a moment to inspect its contents. The project has a simple setup, a single table view controller showing an empty table view. I've also included two libraries in the project, JSONModel and SDWebImage.
Build and run the project to make sure that the project compiles without errors.
2. Response Model
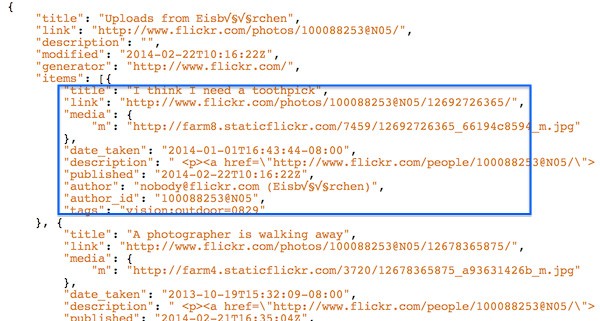
Let's have a look at Flickr's public photos feed. Open the API endpoint in your browser and take a moment to inspect the response. The response only includes a few top-level keys, such as title and modified. There's also a key called items containing a list of photo objects each with a title, link, description, etc.
In the following screenshot, I've highlighted one of those photo objects in the items array to help you figure out its properties.
Let's start by creating a model class for the response of the public photos feed. Create a new class in Xcode, name it PublicPhotosModel, and make it inherit from JSONModel. You are interested in the title and modified keys of the JSON response, so add two properties with the same names to the interface of the PublicPhotoModel class. You will also fetch the array of photos and store them in a property we'll name items. Set the type of the items property to NSArray as shown below.
#import "JSONModel.h"

@interface PublicPhotosModel : JSONModel

@property (copy, nonatomic) NSString *title;
@property (strong, nonatomic) NSDate *modified;

@property (strong, nonatomic) NSArray *items;

@end
In this example, you use one of the built-in data transformers of JSONModel. When you have a date in your JSON response that adheres to the W3C format, you can declare the matching model property of type NSDate and JSONModel will know what to do.
Your basic model class to fetch JSON data from the Flickr API is ready. Let's connect it to the table view in your view controller. You will use the items array in your model object, representing the response of the Flickr API, as the data source of the table view.
Note: You may be wondering how to convert dates if they don't conform to the W3C standard or if the JSON response includes timestamps. Keep reading. Before the end of this tutorial, you will know how to transform any value to an Objective-C object.
3. Fetching JSON from the Flickr API
Start by opening ViewController.m and, under the existing import statement, add an import statement for the model class we just created:
#import "PublicPhotosModel.h"
Next, declare a private property to store the PublicPhotosModel instance we'll be using:
@interface ViewController ()

@property (strong, nonatomic) PublicPhotosModel *photosModel;

@end
You'll fetch the JSON data using a helper method, fetchPhotos, which we'll implement shortly. We invoke fetchPhotos in the view controller's viewDidLoad method:
- (void)viewDidLoad {
    [super viewDidLoad];

    // Fetch Photos
    [self fetchPhotos];
}
In fetchPhotos, we make use of the NSURLSession class to query the Flickr API as you can see below:
- (void)fetchPhotos {
    NSURL *photosURL = [NSURL URLWithString:@"http://api.flickr.com/services/feeds/photos_public.gne?id=46760712@N07&lang=en-us&format=json&nojsoncallback=1"];

    [[[NSURLSession sharedSession] dataTaskWithURL:photosURL completionHandler:^(NSData *data, NSURLResponse *response, NSError *error) {
        // Process Data

    }] resume];
}
The implementation is pretty similar to what you wrote in the previous article on JSONModel. You first declare photosURL, which contains the URL of a particular feed of photos on Flickr, and then create and fire a NSURLSessionDataTask instance to fetch the list of photos of that feed.
Note: If you have a Flickr account and know your Flickr ID, then feel free to include it in the request URL to have the application fetch your own feed of photos.
If you've read the first article on JSONModel, then you already know how to turn the NSData object, returned by the data task, into a JSONModel object. Flickr, however, doesn't always return a valid JSON response. In other words, you'll need to do some preprocessing before creating your model object.
The Flickr API has a special feature that escapes single quotes in the JSON response. The problem is that this renders the JSON response invalid according to the current standards and, as a result, the NSJSONSerialization API cannot process it.
To fix this, you only need to remove the escaped single quotes in the JSON response. You can then safely create your model object. Replace // Process Data with the following snippet:
NSString* rawJSON = [[NSString alloc] initWithData:data encoding:NSUTF8StringEncoding];
rawJSON = [rawJSON stringByReplacingOccurrencesOfString:@"\\'" withString:@"'"];

self.photosModel = [[PublicPhotosModel alloc] initWithString:rawJSON error:nil];

dispatch_async(dispatch_get_main_queue(), ^{
    self.title = self.photosModel.title;
    [self.tableView reloadData];
});
You start by creating an NSString object from the NSData instance the data task returns to you. It's safe to assume the text is UTF8 encoded since Flickr uses only UTF8. You then replace all occurrences of \' with ' to prepare the JSON response for JSONModel.
Because you already have the JSON response as a string object, you can use the custom JSONModel initializer, initWithString:error: to create the model instance. You use GCD to update the user interface on the main thread. The view controller's title is updated with the title property of the PublicPhotosModel instance and the table view is reloaded.
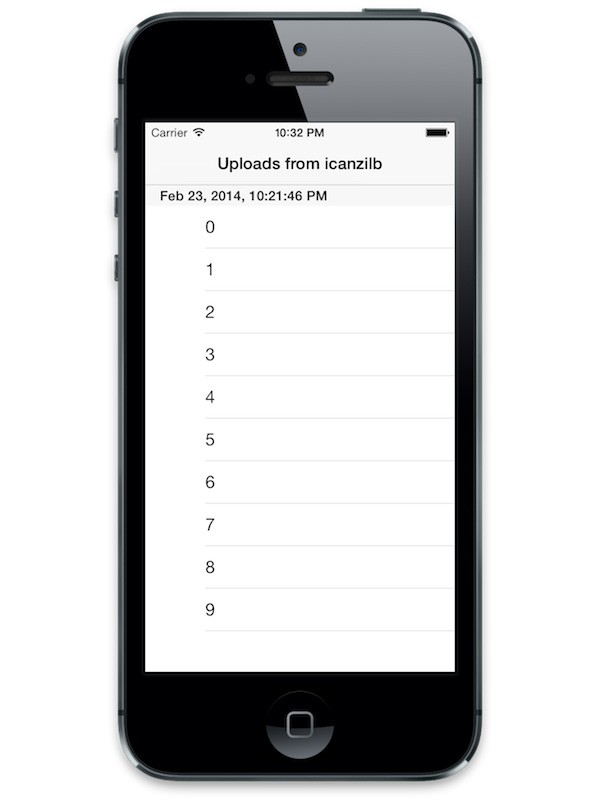
Build and run the project to check that the title is set, which indicates that the model object is properly initialized. Give the application a moment to fetch the JSON data from Flickr's API. You should then see the title of the feed at the top of the screen:
If, for some reason, you don't see the title of the feed as in the above screenshot, then add a log statement in the completion handler of the data task to debug the issue. If you want to check if an error was thrown while creating the model object, then update the initialization of the model object as follows:
NSError *err;
self.photosModel = [[PublicPhotosModel alloc] initWithString:rawJSON error:&err];

if (err) {
    NSLog(@"Unable to initialize PublicPhotosModel, %@", err.localizedDescription);
}
As you can see, JSONModel uses the standard Cocoa error handling paradigm, which means that you can check if initWithString:error: throws an error.
4. Implement the Table View
At the moment, JSONModel treats the array of items as an ordinary array, containing NSDictionary objects. This is fine for now, but we'll create a proper photo model later in this tutorial. It's time to populate the table view with the items in the array.
Let's start by building the user interface. First, you'll set the title of the table view section header, which will display the last modification date of the Flickr feed. You can use a NSDateFormatter instance to convert the NSDate object to a readable string and return it from tableView:titleForHeaderInSection::
- (NSString*)tableView:(UITableView *)tableView titleForHeaderInSection:(NSInteger)section {
    NSDateFormatter *formatter = [[NSDateFormatter alloc] init];
    formatter.dateStyle = NSDateFormatterMediumStyle;
    formatter.timeStyle = NSDateFormatterMediumStyle;
    return [formatter stringFromDate: self.photosModel.modified];
}
Next, add the two required methods of the table view data source protocol to tell the table view how many sections and rows it contains. Use self.publicPhotos.items as the table view's data source:
- (NSInteger)numberOfSectionsInTableView:(UITableView *)tableView {
    return 1;
}

- (NSInteger)tableView:(UITableView *)tableView numberOfRowsInSection:(NSInteger)section {
    return self.photosModel.items.count;
}
Because the image view of the UITableViewCell class doesn't load remote images asynchronously, you'll need a custom UITableViewCell subclass. Create a new Objective-C class, name it ImageCell, and make it a subclass of UITableViewCell. Open ImageCell.h and add a property of type UIImageView, webImageView:
#import <UIKit/UIKit.h>

@interface ImageCell : UITableViewCell

@property (strong, nonatomic) UIImageView *webImageView;

@end
Open ImageCell.m and overwrite the initializer Xcode put in there for you. In initWithStyle:, you need to hide the default image view and create a new custom image view. Believe it or not, but that's what it takes to load images asynchronously in a table view cell.
- (id)initWithStyle:(UITableViewCellStyle)style reuseIdentifier:(NSString *)reuseIdentifier {
    self = [super initWithStyle:style reuseIdentifier:reuseIdentifier];

    if (self) {
        self.webImageView = [[UIImageView alloc] initWithFrame: CGRectMake(0.0, 0.0, 40.0, 40.0)];
        [self addSubview: self.webImageView];

        UIGraphicsBeginImageContextWithOptions(CGSizeMake(20.0, 20.0), NO, kNilOptions);
        self.imageView.image = UIGraphicsGetImageFromCurrentImageContext();
        UIGraphicsEndImageContext();
    }

    return self;
}
Are you confused by the second half of the implementation? You create a blank image of 20px by 20px and set it as the image of the cell's default image view. You do this to position the cell's text label properly. This happens even before your the image for your custom image view is loaded from the web.
Revisit ViewController.m and, under the existing import statements, add an import statement for the custom UITableViewCell class we created.
#import "ImageCell.h"
You're ready for the final piece of the puzzle, the data source method to create the cells for your table:
- (UITableViewCell *)tableView:(UITableView *)tableView cellForRowAtIndexPath:(NSIndexPath *)indexPath {
    static NSString *const cellId = @"ImageCell";

    ImageCell *cell = [self.tableView dequeueReusableCellWithIdentifier: cellId];

    if (!cell) {
        cell = [[ImageCell alloc] initWithStyle:UITableViewCellStyleSubtitle reuseIdentifier: cellId];
    }

    cell.textLabel.text = [@(indexPath.row) stringValue];

    return cell;
}
Build and run the project one more time to see that the table now displays one cell for each of the objects found in items. Speaking of items, it's time to create the photo model.
5. Photo Model
As we saw in the previous tutorial, you need to create a separate model class for a list of objects in the JSON response, the list of photo items in our example. Create a new Objective-C class, name it PhotoModel, make it a subclass of JSONModel.
Have another look at the raw JSON response you receive from the Flickr API and decide what keys each photo object needs to have:
You want to fetch the title, the URL of the photo, when it was published, and the link to the detail page on Flickr. We have a problem though. The URL of the photo is enclosed in yet another object under the media key. Does this mean you need to create another JSONModel subclass only to extract the single key, m, containing the URL of the photo?
Fortunately, the short answer is no. To elegantly solve this problem, you need to learn and understand how key mapping works in JSONModel. Mapping keys is a simple way to instruct your JSONModel subclass how to extract data from a JSON response, which is especially useful if the JSON keys don't exactly match the names of your class's properties.
Start by declaring the properties we need in the PhotoModel class:
#import "JSONModel.h"

@interface PhotoModel : JSONModel

@property (copy, nonatomic) NSString *title;
@property (strong, nonatomic) NSURL *url;
@property (strong, nonatomic) NSURL *link;
@property (strong, nonatomic) NSDate *published;

@end
We use two of the built-in data transformers of JSONModel. The published is of type NSDate and JSONModel will make sure to convert the W3C date to an NSDate object. The url and link properties are of type NSURL and JSONModel will convert the corresponding strings of the JSON response to NSURL objects.
Open PhotoModel.m and add the following code snippet to set up key mapping for the photo model:
+ (JSONKeyMapper*)keyMapper {
    NSDictionary *map = @{ @"published": @"date",
                           @"media.m"  : @"url" };

    return [[JSONKeyMapper alloc] initWithDictionary:map];
}
In keyMapper, you override JSONModel's keyMapper method. It returns a JSONKeyMapper instance, the object that maps JSON keys to property names. The JSONKeyMapper class has a convenient initializer that accepts a dictionary and creates a key mapping between the JSON data and your class.
In the above implementation of keyMapper, you define the following key mapping:
- The
publishedkey in the JSON response maps to the model'sdateproperty. - The
mkey of themediaobject in the JSON response maps tourlin the model.
With keyMapper implemented, JSONModel can parse the JSON response and initialize the photo model as defined by the PhotoModel class.
Before moving on, open PhotoModel.h once more and, at the top, declare a protocol with the same name as the name of the class:
#import "JSONModel.h"

@protocol PhotoModel
@end

@interface PhotoModel : JSONModel

@property (copy, nonatomic) NSString *title;
@property (strong, nonatomic) NSURL *url;
@property (strong, nonatomic) NSURL *link;
@property (strong, nonatomic) NSDate *published;

@end
6. Showing the Photo Feed
Switch to PublicPhotoModel.h and add an import statement at the top:
#import "PhotoModel.h"
To make all this work, make the items property adhere to the PhotoModel protocol we declared a moment ago in the PhotoModel class:
@property (strong, nonatomic) NSArray<PhotoModel> *items;
You now need to make a couple of adjustments in your ViewController class. In order to load and display photos in your table view's cells, you'll use a method declared in the SDWebImage library, which was included in the project you started with. Open ViewController.m and add a new import statement at the top:
#import "UIImageView+WebCache.h"
Next, revisit your implementation of tableView:cellForRowAtIndexPath: in which you currently only display the row number. However, because you can now fetch the corresponding PhotoModel object for each row in the table view, it is better to display the photo's details instead. Update the implementation as shown below:
- (UITableViewCell *)tableView:(UITableView *)tableView cellForRowAtIndexPath:(NSIndexPath *)indexPath {
    static NSString *const cellId = @"ImageCell";

    ImageCell *cell = [self.tableView dequeueReusableCellWithIdentifier: cellId];

    if (!cell) {
        cell = [[ImageCell alloc] initWithStyle:UITableViewCellStyleSubtitle reuseIdentifier: cellId];
    }

    PhotoModel *photo = self.photosModel.items[indexPath.row];

    cell.textLabel.text = photo.title;
    [cell.webImageView setImageWithURL:photo.url placeholderImage:nil];

    return cell;
}
You first fetch the PhotoModel object corresponding to the row in the table view and you then populate the cell's text label with the title of the photo. You use SDWebImage's setImageWithURL:placeholderImage: to asynchronously load and display the photo from the given URL.
Believe it or not, you've already got a working photo stream. Build and run the project to see the result:
7. Custom Data Transformations
In this section, you're going to create a custom feature to the PhotoModel class, which will convert a string from the JSON response to a custom Objective-C class. This will teach you how to convert any JSON data to any Objective-C class.
In the JSON data for a photo, there's a tags key that contains a string of tags. You'll add a new property to the PhotoModel class. The type of this property will be a custom Objective-C class that can handle tags.
Note: You're not limited to convert JSON data to custom Objective-C classes. You can convert JSON data to any Cocoa class. For example, you can convert a hex color, such as #cc0033, to its UIColor equivalent. Keep reading to see how to do that.
Create a new class, name it Tags, and make it a subclass of NSObject. Open Tags.h and add a property to store the list of tags and declare a custom initializer:
#import <Foundation/Foundation.h>

@interface Tags : NSObject

@property (strong, nonatomic) NSArray* tags;

#pragma mark -
#pragma mark Initialization
- (instancetype)initWithString:(NSString*)string;

@end
Switch to Tags.m and implementation the initializer you just declared. As you can see, there's nothing special about it. You use the string to create an array of tags and store the tags in tags:
- (instancetype)initWithString:(NSString*)string {
    self = [super init];

    if (self) {
        self.tags = [string componentsSeparatedByString:@" "];
    }

    return self;
}
You now have a custom Tags class, but how do you use it in your photo model? Open PhotoModel.h, import the new class at the top, and declare a new property in the class's interface:
#import "JSONModel.h"

#import "Tags.h"

@protocol PhotoModel
@end

@interface PhotoModel : JSONModel

@property (copy, nonatomic) NSString *title;
@property (strong, nonatomic) NSURL *url;
@property (strong, nonatomic) NSURL *link;
@property (strong, nonatomic) NSDate *published;
@property (strong, nonatomic) Tags *tags;

@end
Build and run your project as it is to see what will happen.
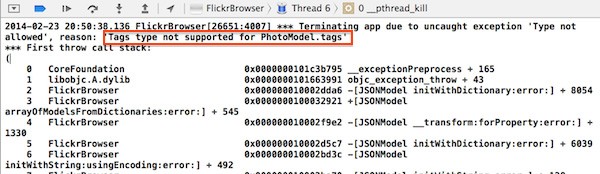
Because the tags property is of type Tags, which JSONModel does not know how to handle, the application will crash and you should see the following error message in XCode's console:
It's time to become familiar with a new class of the JSONModel library, the JSONValueTransformer class. In most cases, the JSONValueTransformer works behind the scenes and converts basic data types for you, NSNumber to a float, NSString to NSNumber, or NSString to NSDate. The class, however, cannot deal with custom classes, because it doesn't know how to work with them.
The nice thing about JSONValueTransformer is that you can extend it to help it learn how to handle custom classes—or any Cocoa class for that matter.
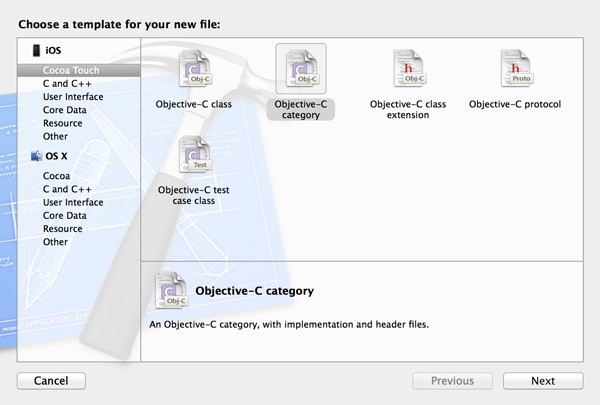
Select New > File... from Xcode's File menu and choose Objective-C category from the list of templates. Click Next to continue.
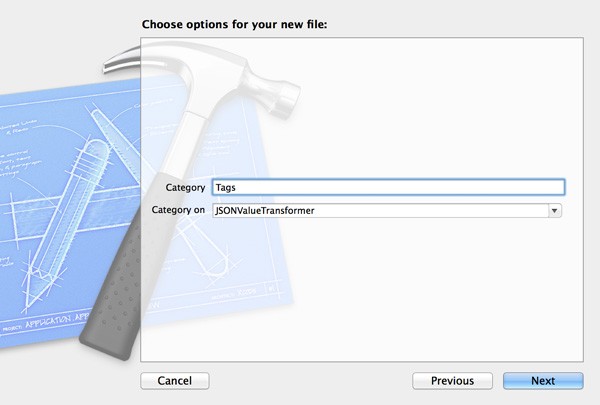
Name the category Tags and set Category On to JSONValueTransformer. Click Next to continue.
In this category on JSONValueTransformer, you can define the necessary methods for handling properties of type Tags. Open JSONValueTransformer+Tags.h and import the header file of the Tags class. Next, add the following two methods to the interface of the category:
#import "JSONValueTransformer.h"

#import "Tags.h"

@interface JSONValueTransformer (Tags)

- (id)TagsFromNSString:(NSString*)string;
- (id)JSONObjectFromTags:(Tags*)tags;

@end
Let's take a closer look at the names of these methods.
-
TagsFromNSString:consists of the name of the class or type you want to convert to,Tags, followed by From and then the type in the JSON data for the respective key,NSString. In short, when JSONModel finds a property of typeTags, it will try to match a JSON key of typeNSString. When a match is found, it will invokeTagsFromNSString:. -
JSONObjectFromTags:handles the reverse conversion. When JSONModel exports your model object back to JSON data, it needs to invoke a method that will take theTagsobject and return a proper string. Thus the name of the method isJSONObjectFromfollowed by the name of the class or type of the property,Tags.
Once you define these two methods, any JSONModel subclass will be able to handle objects of type Tags. Adding a category on JSONValueTransformer is a very easy way to adds functionality to your application's model classes.
Let's now look into the implementation of the two methods in our category. Let's first implement the method that accepts an NSString object and returns a Tags object:
- (id)TagsFromNSString:(NSString*)string {
    return [[Tags alloc] initWithString: string];
}
Thanks to the custom initializer, initWithString:, the implementation is simple. It takes the string of tags from the JSON data and returns a Tags object, which is assigned to your tags property in the PhotoModel class.
Next, implement the second method, which is invoked when the model object is converted to a string. This is the method that will get called when you invoke JSONModel's toDictionary and toJSON.
- (id)JSONObjectFromTags:(Tags*)tags {
    return [tags.tags componentsJoinedByString:@" "];
}
When a PublicPhotosModel instance is initialized, it will automatically create PhotoModel objects and store them in the items property. Each PhotoModel object will also create a Tags object for its tags property. All of this happens automatically thanks to the category we created on JSONValueTransformer.
Let's now make use of the tags property in the PhotoModel class. Open ViewController.m and update the implementation of tableView:cellForRowAtIndexPath: by populating the cell's detail text label with the photo's list of tags.
- (UITableViewCell *)tableView:(UITableView *)tableView cellForRowAtIndexPath:(NSIndexPath *)indexPath {
    static NSString *const cellId = @"ImageCell";

    ImageCell *cell = [self.tableView dequeueReusableCellWithIdentifier: cellId];

    if (!cell) {
        cell = [[ImageCell alloc] initWithStyle:UITableViewCellStyleSubtitle reuseIdentifier: cellId];
    }

    PhotoModel *photo = self.photosModel.items[indexPath.row];

    cell.textLabel.text = photo.title;
    cell.detailTextLabel.text = [photo.tags.tags componentsJoinedByString:@", "];
    [cell.webImageView setImageWithURL:photo.url placeholderImage:nil];

    return cell;
}
Build and run the project. You should see the tags of each photo listed below the photo's title.
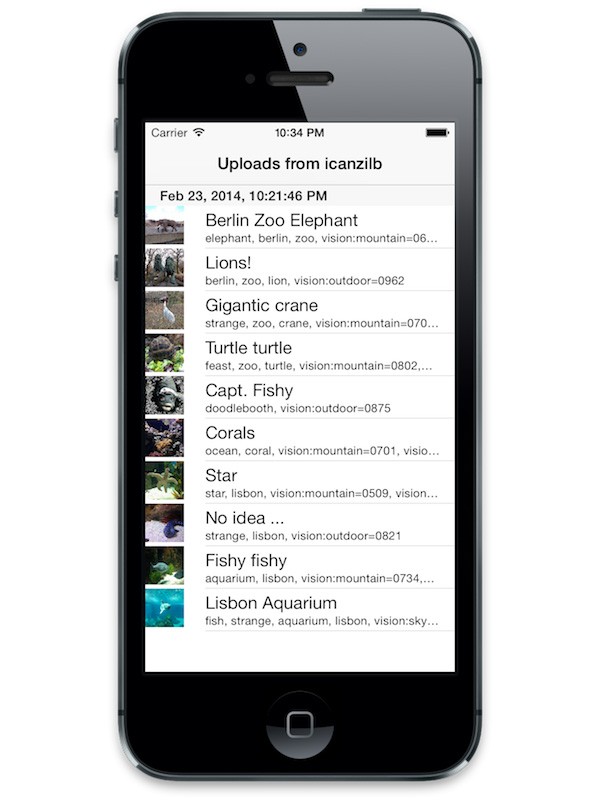
To make our Flickr browser complete, implement tableView:didSelectRowAtIndexPath: of the UITableViewDelegate protocol. In tableView:didSelectRowAtIndexPath:, we fetch the corresponding photo and open the photo's detail page in Safari.
- (void)tableView:(UITableView *)tableView didSelectRowAtIndexPath:(NSIndexPath *)indexPath {
    [self.tableView deselectRowAtIndexPath: indexPath animated:YES];

    PhotoModel *photo = self.photosModel.items[indexPath.row];

    if ([[UIApplication sharedApplication] canOpenURL:photo.link]) {
        [[UIApplication sharedApplication] openURL:photo.link];
    }
}
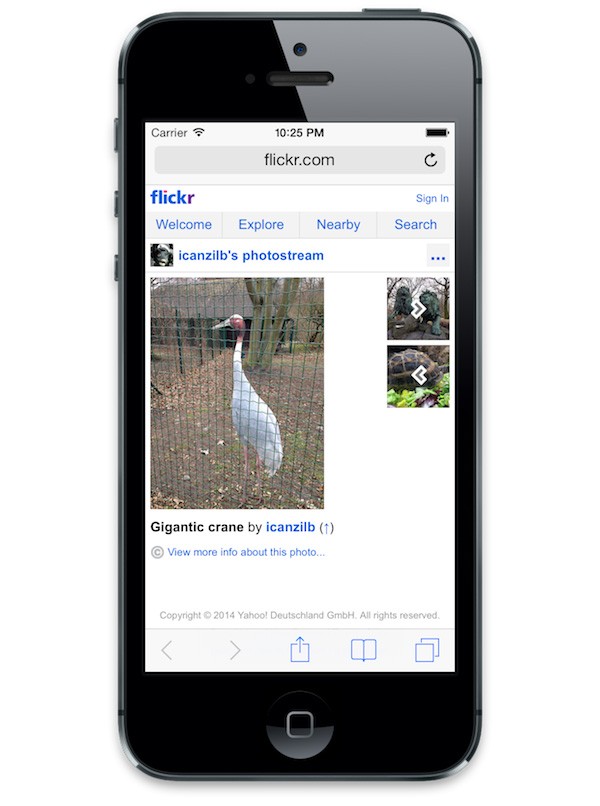
When you tap a row in the table view, you will be taken to the photo's detail page on Flickr:
Conclusion
In this tutorial, you used more complex and powerful features of the JSONModel library. I hope you can see what a time saver JSONModel can be and how it can help you on many levels in your your iOS and OS X projects. If you want to learn more about JSONModel, I encourage you to explore the library's documentation.

Comments