This is the second part of our introductory series on SceneKit. In this tutorial, I assume you are familiar with the concepts explained in the first part, including setting up a scene with lights, shadows, cameras, nodes, and materials.
In this tutorial, I am going to teach you about some of the more complicated—but also more useful—features of SceneKit, such as animation, user interaction, particle systems, and physics. By implementing these features, you can create interactive and dynamic 3D content rather than static objects like you did in the previous tutorial.
1. Setting Up the Scene
Create a new Xcode project based on the iOS > Application > Single View Application template.
Name the project, set Language to Swift, and Devices to Universal.
Open ViewController.swift and import the SceneKit framework.
import UIKit
import SceneKit
Next, declare the following properties in the ViewController class.
var sceneView: SCNView!
var camera: SCNNode!
var ground: SCNNode!
var light: SCNNode!
var button: SCNNode!
var sphere1: SCNNode!
var sphere2: SCNNode!
We set up the scene in the viewDidLoad method as shown below.
override func viewDidLoad() {
    super.viewDidLoad()

    sceneView = SCNView(frame: self.view.frame)
    sceneView.scene = SCNScene()
    self.view.addSubview(sceneView)

    let groundGeometry = SCNFloor()
    groundGeometry.reflectivity = 0
    let groundMaterial = SCNMaterial()
    groundMaterial.diffuse.contents = UIColor.blueColor()
    groundGeometry.materials = [groundMaterial]
    ground = SCNNode(geometry: groundGeometry)

    let camera = SCNCamera()
    camera.zFar = 10000
    self.camera = SCNNode()
    self.camera.camera = camera
    self.camera.position = SCNVector3(x: -20, y: 15, z: 20)
    let constraint = SCNLookAtConstraint(target: ground)
    constraint.gimbalLockEnabled = true
    self.camera.constraints = [constraint]

    let ambientLight = SCNLight()
    ambientLight.color = UIColor.darkGrayColor()
    ambientLight.type = SCNLightTypeAmbient
    self.camera.light = ambientLight

    let spotLight = SCNLight()
    spotLight.type = SCNLightTypeSpot
    spotLight.castsShadow = true
    spotLight.spotInnerAngle = 70.0
    spotLight.spotOuterAngle = 90.0
    spotLight.zFar = 500
    light = SCNNode()
    light.light = spotLight
    light.position = SCNVector3(x: 0, y: 25, z: 25)
    light.constraints = [constraint]

    let sphereGeometry = SCNSphere(radius: 1.5)
    let sphereMaterial = SCNMaterial()
    sphereMaterial.diffuse.contents = UIColor.greenColor()
    sphereGeometry.materials = [sphereMaterial]
    sphere1 = SCNNode(geometry: sphereGeometry)
    sphere1.position = SCNVector3(x: -15, y: 1.5, z: 0)
    sphere2 = SCNNode(geometry: sphereGeometry)
    sphere2.position = SCNVector3(x: 15, y: 1.5, z: 0)

    let buttonGeometry = SCNBox(width: 4, height: 1, length: 4, chamferRadius: 0)
    let buttonMaterial = SCNMaterial()
    buttonMaterial.diffuse.contents = UIColor.redColor()
    buttonGeometry.materials = [buttonMaterial]
    button = SCNNode(geometry: buttonGeometry)
    button.position = SCNVector3(x: 0, y: 0.5, z: 15)

    sceneView.scene?.rootNode.addChildNode(self.camera)
    sceneView.scene?.rootNode.addChildNode(ground)
    sceneView.scene?.rootNode.addChildNode(light)
    sceneView.scene?.rootNode.addChildNode(button)
    sceneView.scene?.rootNode.addChildNode(sphere1)
    sceneView.scene?.rootNode.addChildNode(sphere2)
}
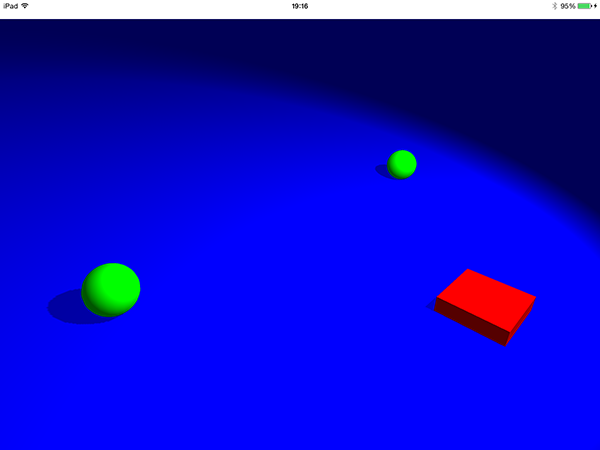
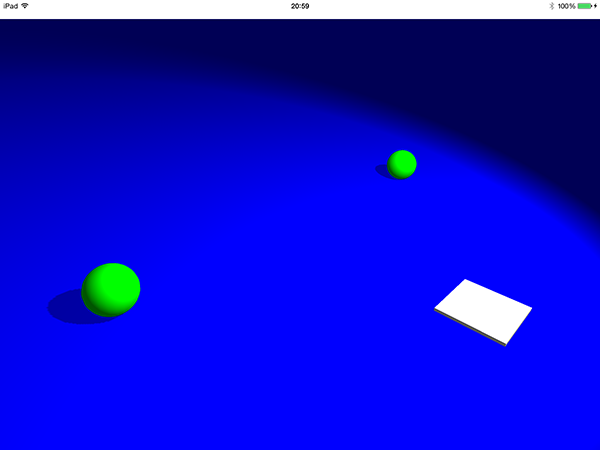
The implementation of viewDidLoad should look familiar if you've read the first part of this series. All we do is setting up the scene that we'll use in this tutorial. The only new things include the SCNFloor class and the zFar property.
As the name implies, the SCNFloor class is used to create a floor or ground for the scene. This is much easier compared to creating and rotating an SCNPlane as we did in the previous tutorial.
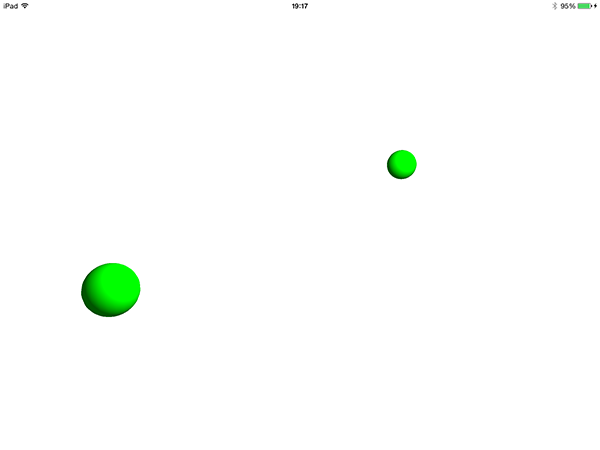
The zFar property determines how far into the distance a camera can see or how far light from a particular source can reach. Build and run your app. Your scene should look something like this:
2. User Interaction
User interaction is handled in SceneKit by a combination of the UIGestureRecognizer class and hit tests. To detect a tap, for example, you first add a UITapGestureRecognizer to a SCNView, determine the tap's position in the view, and see if it is in contact with or hits any of the nodes.
To better understand how this works, we'll use an example. Whenever a node is tapped, we remove it from the scene. Add the following code snippet to the viewDidLoad method of the ViewController class:
override func viewDidLoad() {
    super.viewDidLoad()

    sceneView = SCNView(frame: self.view.frame)
    sceneView.scene = SCNScene()
    self.view.addSubview(sceneView)

    let tapRecognizer = UITapGestureRecognizer()
    tapRecognizer.numberOfTapsRequired = 1
    tapRecognizer.numberOfTouchesRequired = 1
    tapRecognizer.addTarget(self, action: "sceneTapped:")
    sceneView.gestureRecognizers = [tapRecognizer]

    ...
}
Next, add the following method to the ViewController class:
func sceneTapped(recognizer: UITapGestureRecognizer) {
    let location = recognizer.locationInView(sceneView)

    let hitResults = sceneView.hitTest(location, options: nil)
    if hitResults?.count > 0 {
        let result = hitResults![0] as! SCNHitTestResult
        let node = result.node
        node.removeFromParentNode()
    }
}
In this method, you first get the location of the tap as a CGPoint. Next, you use this point to perform a hit test on the sceneView object and store the SCNHitTestResult objects in an array called hitResults. The options parameter of this method can contain a dictionary of keys and values, which you can read about in Apple's documentation. We then check to see if the hit test returned at least one result and, if it did, we remove the first element in the array from its parent node.
If the hit test returned multiple results, the objects are sorted by their z position, that is, the order in which they appear from the current camera's point of view. For example, in the current scene, if you tap on either of the two spheres or the button, the node you tapped will form the first item in the returned array. Because the ground appears directly behind these objects from the camera's point of view, however, the ground node will be another item in the array of results, the second in this case. This happens because a tap in that same location would hit the ground node if the spheres and button weren't there.
Build and run your app, and tap the objects in the scene. They should disappear as you tap each one.
Now that we can determine when a node is tapped, we can start adding animations to the mix.
3. Animation
There are two classes which can be used to perform animations in SceneKit:
SCNActionSCNTransaction
SCNAction objects are very useful for simple and reusable animations, such as movement, rotation and scale. You can combine any number of actions together into a custom action object.
The SCNTransaction class can perform the same animations, but it is more versatile in some ways, such as animating materials. This added versatility, however, comes at the cost of SCNTransaction animations only having the same reusability as a function and the setup being done via class methods.
For your first animation, I am going to show you code using both the SCNAction and SCNTransaction classes. The example will move your button down and turn it white when it's tapped. Update the implementation of the sceneTapped(_:) method as shown below.
func sceneTapped(recognizer: UITapGestureRecognizer) {
    let location = recognizer.locationInView(sceneView)

    let hitResults = sceneView.hitTest(location, options: nil)
    if hitResults?.count > 0 {
        let result = hitResults![0] as! SCNHitTestResult
        let node = result.node

        if node == button {
            SCNTransaction.begin()
            SCNTransaction.setAnimationDuration(0.5)
            let materials = node.geometry?.materials as! [SCNMaterial]
            let material = materials[0]
            material.diffuse.contents = UIColor.whiteColor()
            SCNTransaction.commit()

            let action = SCNAction.moveByX(0, y: -0.8, z: 0, duration: 0.5)
            node.runAction(action)
        }
    }
}
In the sceneTapped(_:) method, we obtain a reference to the node the user has tapped and check whether this is the button in the scene. If it is, we animate its material from red to white, using the SCNTransaction class, and move it along the y axis in a negative direction using an SCNAction instance. The duration of the animation is set to 0.5 seconds.
Build and run your app again, and tap on the button. It should move down and change its color to white as shown in the below screenshot.
4. Physics
Setting up realistic physics simulations is easy with the SceneKit framework. The functionality that SceneKit's physics simulations offer, is extensive, ranging from basic velocities, accelerations and forces, to gravitational and electrical fields, and even collision detection.
What you are going to do in the current scene is, apply a gravitational field to one of the spheres so that the second sphere is pulled towards the first sphere as a result of the gravity. This force of gravity will become active when the button is pressed.
The setup for this simulation is very simple. Use an SCNPhysicsBody object for every node that you want to be affected by the physics simulation and an SCNPhysicsField object for every node that you want to be the source of a field. Update the viewDidLoad method as shown below.
override func viewDidLoad() {
    ...

    buttonGeometry.materials = [buttonMaterial]
    button = SCNNode(geometry: buttonGeometry)
    button.position = SCNVector3(x: 0, y: 0.5, z: 15)

    // Physics
    let groundShape = SCNPhysicsShape(geometry: groundGeometry, options: nil)
    let groundBody = SCNPhysicsBody(type: .Kinematic, shape: groundShape)
    ground.physicsBody = groundBody

    let gravityField = SCNPhysicsField.radialGravityField()
    gravityField.strength = 0
    sphere1.physicsField = gravityField

    let shape = SCNPhysicsShape(geometry: sphereGeometry, options: nil)
    let sphere1Body = SCNPhysicsBody(type: .Kinematic, shape: shape)
    sphere1.physicsBody = sphere1Body
    let sphere2Body = SCNPhysicsBody(type: .Dynamic, shape: shape)
    sphere2.physicsBody = sphere2Body

    sceneView.scene?.rootNode.addChildNode(self.camera)
    sceneView.scene?.rootNode.addChildNode(ground)
    sceneView.scene?.rootNode.addChildNode(light)

    ...
}
We start by creating an SCNPhysicsShape instance that specifies the actual shape of the object that takes part in the physics simulation. For the basic shapes you are using in this scene, the geometry objects are perfectly fine to use. For complicated 3D models, however, it is better to combine multiple primitive shapes together to create an approximate shape of your object for physics simulation.
From this shape, you then create an SCNPhysicsBody instance and add it to the ground of the scene. This is necessary, because every SceneKit scene has by default an existing gravity field that pulls every object downwards. The Kinematic type you give to this SCNPhysicsBody means that the object will take part in collisions, but is unaffected by forces (and won't fall due to gravity).
Next, you create the gravitational field and assign this to the first sphere node. Following the same process as for the ground, you then create a physics body for each of the two spheres. You specify the second sphere as a Dynamic physics body though, because you want it to be affected and moved by the gravitational field you created.
Lastly, you need to set the strength of this field to activate it when the button is tapped. Add the following line to the sceneTapped(_:) method:
func sceneTapped(recognizer: UITapGestureRecognizer) {
    ...
        if node == button {
            ...
            sphere1.physicsField?.strength = 750
        }
    }
}
Build and run your app, tap the button, and watch as the second sphere slowly accelerates towards the first one. Note that it may take a few seconds before the second sphere starts moving.

There's just one thing left to do, however, make the spheres explode when they collide.
5. Collision Detection and Particle Systems
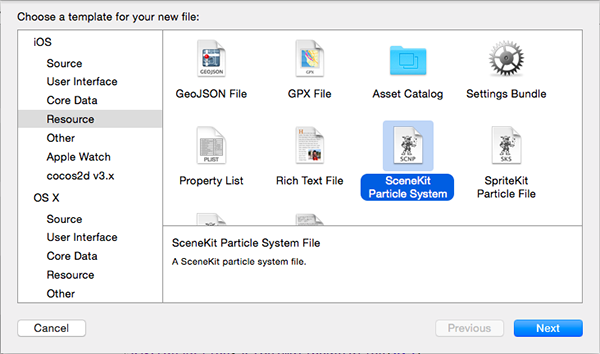
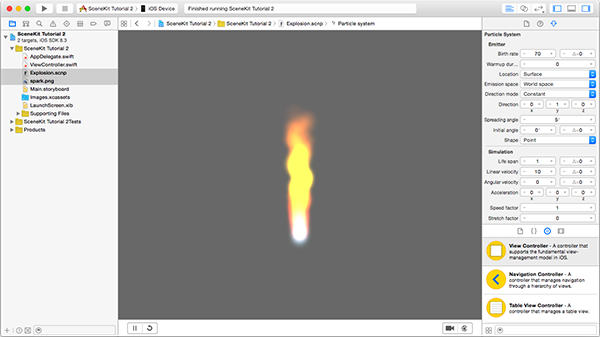
To create the effect of an explosion we're going to leverage the SCNParticleSystem class. A particle system can be created by an external 3D program, source code, or, as I am about to show you, Xcode's particle system editor. Create a new file by pressing Command+N and choose SceneKit Particle System from the iOS > Resource section.
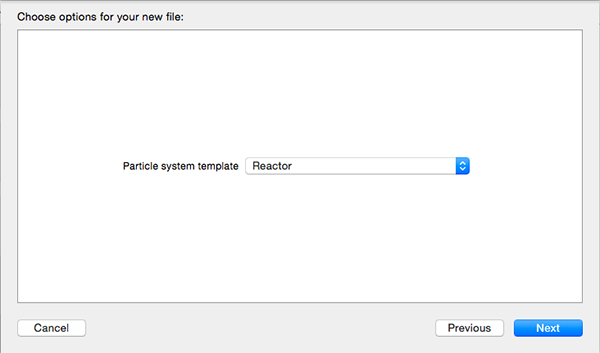
Set the particle system template to Reactor. Click Next, name the file Explosion, and save it in your project folder.
In the Project Navigator, you will now see two new files, Explosion.scnp and spark.png. The spark.png image is a resource used by the particle system, automatically added to your project. If you open Explosion.scnp, you will see it being animated and rendered in real time in Xcode. The particle system editor is a very powerful tool in Xcode and allows you to customize a particle system without having to do it programmatically.
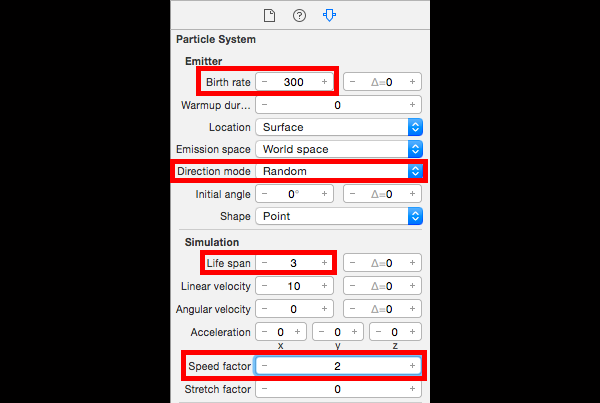
With the particle system open, go to the Attributes Inspector on the right and change the following attributes in the Emitter section:
- Birth rate to 300
-
Direction mode to Random
Change the following attributes in the Simulation section:
-
Life span to 3
- Speed factor to 2
And finally, change the following attributes in the Life cycle section:
- Emission dur. to 1
- Looping to Plays once

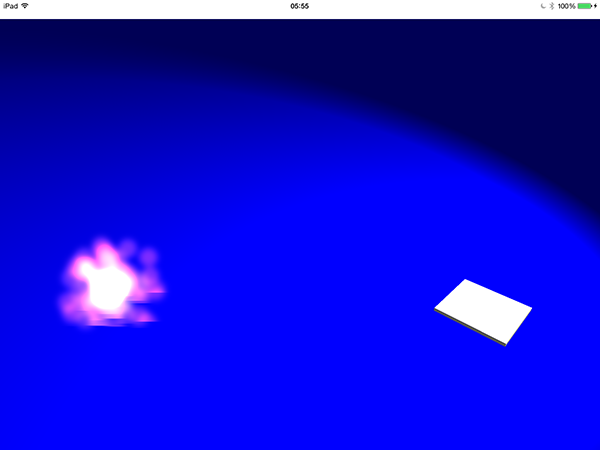
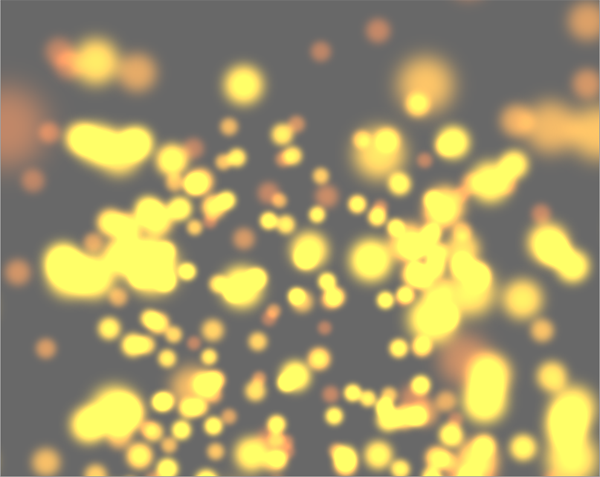
Your particle system should now shoot out in all directions and look similar to the following screenshot:
Open ViewController.swift and make your ViewController class conform to the SCNPhysicsContactDelegate protocol. Adopting this protocol is necessary to detect a collision between two nodes.
class ViewController: UIViewController, SCNPhysicsContactDelegate
Next, assign the current ViewController instance as the contactDelegate of your physicsWorld object in the viewDidLoad method.
override func viewDidLoad() {
    super.viewDidLoad()

    sceneView = SCNView(frame: self.view.frame)
    sceneView.scene = SCNScene()
    sceneView.scene?.physicsWorld.contactDelegate = self
    self.view.addSubview(sceneView)

    ...
}
Finally, implement the physicsWorld(_:didUpdateContact:) method in the ViewController class:
func physicsWorld(world: SCNPhysicsWorld, didUpdateContact contact: SCNPhysicsContact) {
    if (contact.nodeA == sphere1 || contact.nodeA == sphere2) && (contact.nodeB == sphere1 || contact.nodeB == sphere2) {
        let particleSystem = SCNParticleSystem(named: "Explosion", inDirectory: nil)
        let systemNode = SCNNode()
        systemNode.addParticleSystem(particleSystem)
        systemNode.position = contact.nodeA.position
        sceneView.scene?.rootNode.addChildNode(systemNode)

        contact.nodeA.removeFromParentNode()
        contact.nodeB.removeFromParentNode()
    }
}
We first check to see whether the two nodes involved in the collision are the two spheres. If that's the case, then we load the particle system from the file we created a moment ago and add it to a new node. Finally, we remove both spheres involved in the collision from the scene.
Build and run your app again, and tap the button. When the spheres make contact, they should both disappear and your particle system should appear and animate.

Conclusion
In this tutorial, I showed you how to implement user interaction, animation, physics simulation, and particle systems using the SceneKit framework. The techniques you've learned in this series can be applied to any project with any number of animations, physics simulations, etc.
You should now be comfortable creating a simple scene and adding dynamic elements to it, such as animation and particles systems. The concepts you have learned in this series are applicable to the smallest scene with a single object all the way up to a large scale game.

Comments